Introduction
This document describes how to configure Cisco Identity Services Engine (ISE) as an external authentication for Cisco DNA Center GUI administration.
Prerequisites
Requirements
Cisco recommends that you have the knowledge of these topics:
- TACACS+ and RADIUS protocols.
- Cisco ISE Integration with Cisco DNA Center.
- Cisco ISE Policy Evaluation.
Components Used
The information in this document is based on these software and hardware versions:
- Cisco Identity Services Engine (ISE) Version 3.4 Patch1.
- Cisco DNA Center Version-2.3.5.5.
The information in this document was created from the devices in a specific lab environment. All of the devices used in this document started with a cleared (default) configuration. If your network is live, ensure that you understand the potential impact of any command.
Before you begin
- Ensure you have at least one RADIUS authentication server configured on System > Settings > External Services > Authentication and Policy Servers.
- Only a user with SUPER-ADMIN-ROLE permissions on DNAC can perform this procedure.
- Enable external authentication fallback.
Note,
In releases earlier than 2.1.x, when external authentication is enabled, Cisco DNA Center falls back to local users if the AAA server is unreachable or the AAA server rejects an unknown username. In the current release, Cisco DNA Center does not fall back to local users if the AAA server is unreachable or the AAA server rejects an unknown username.
When external authentication fallback is enabled, external users and local admins can log in to Cisco DNA Center.
To enable external authentication fallback, SSH to the Cisco DNA Center instance and enter the this CLI command (magctl rbac external_auth_fallback enable).
Configure
(Option1) Configure DNAC External Authentication Using RADIUS
Step 1. (Optional) Define a Custom Roles.
Configure your custom roles that fulfils your requirement, instead, you can use the default User Roles. This can be done from the tab System > Users & Roles > Role Based Access Control.
Procedure
a. Create a New Role
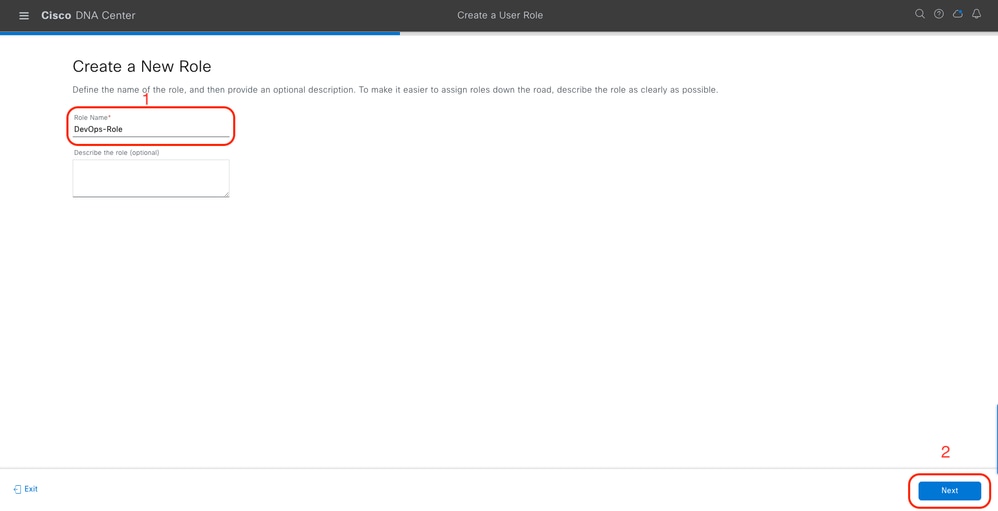 DevOps Role Name
b. Define the Access
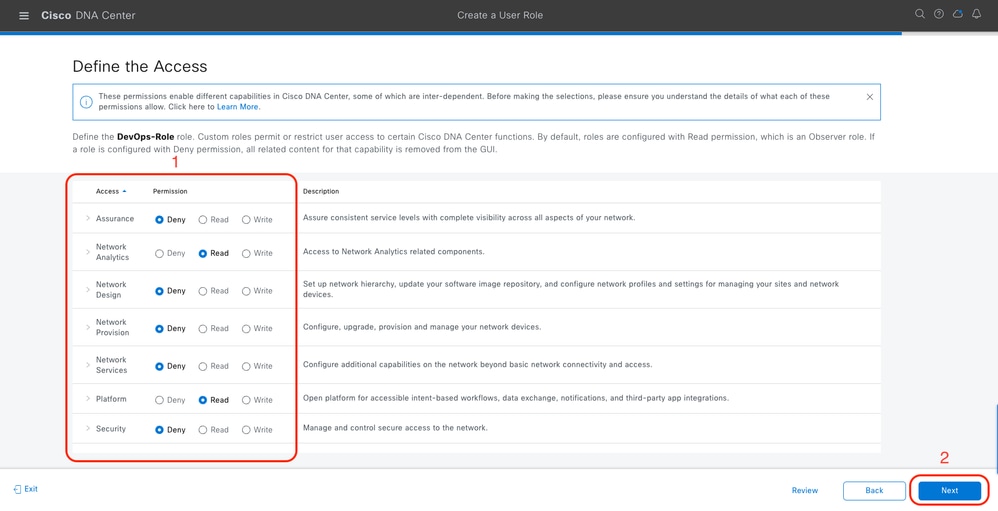 DevOps Role Access
c. Create the New Role
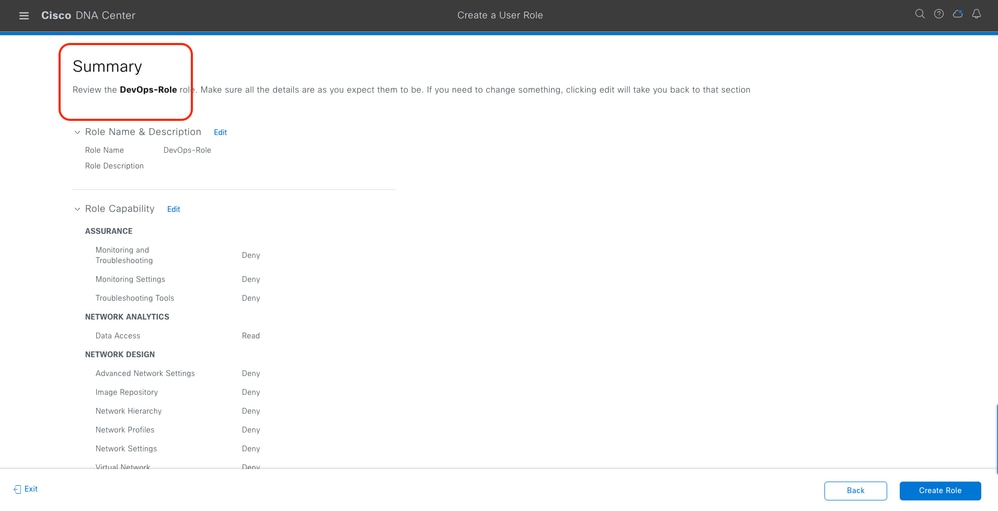 DevOps Role Summary
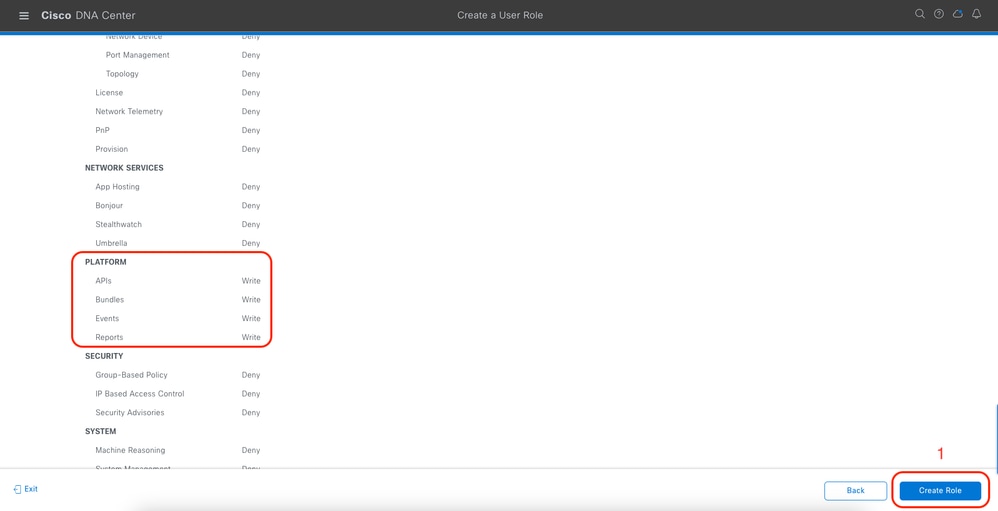 Review and Create DevOps Role
Step 2. Configure External Authentication Using RADIUS
This can be done from the tab System > Users & Roles > External Authentication.
Procedure
a. To enable external authentication in Cisco DNA Center, check the Enable External User check box.
b. Set the AAA attributes.
Enter Cisco-AVPair in the AAA attributes field.
c. (Optional) Configure Primary and Secondary AAA Server.
Ensure RADIUS protocol is enabled on Primary AAA Server at least, or on both Primary and Secondary server.
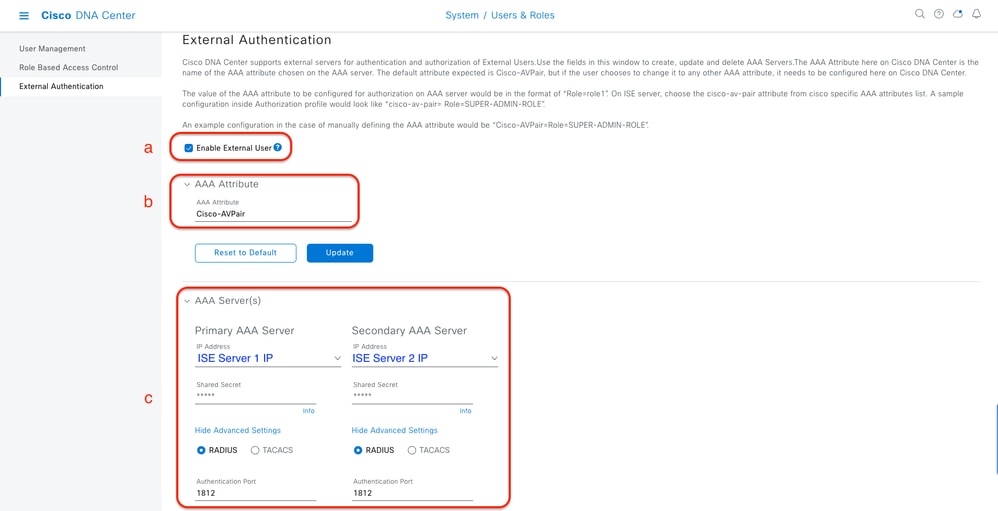 (RADIUS) External Authentication Configuration Steps
(Option1) Configure ISE for RADIUS
Step 1. Add DNAC server as a Network Device on ISE
This can be done from the tab Administration > Network Resources > Network Devices.
Procedure
a. Define (DNAC) Network Device name and IP
b. (Optional) Classify Device Type for Policy Set condition
c. Enable RADIUS Authentication Settings
d. Set RADIUS Shared Secret
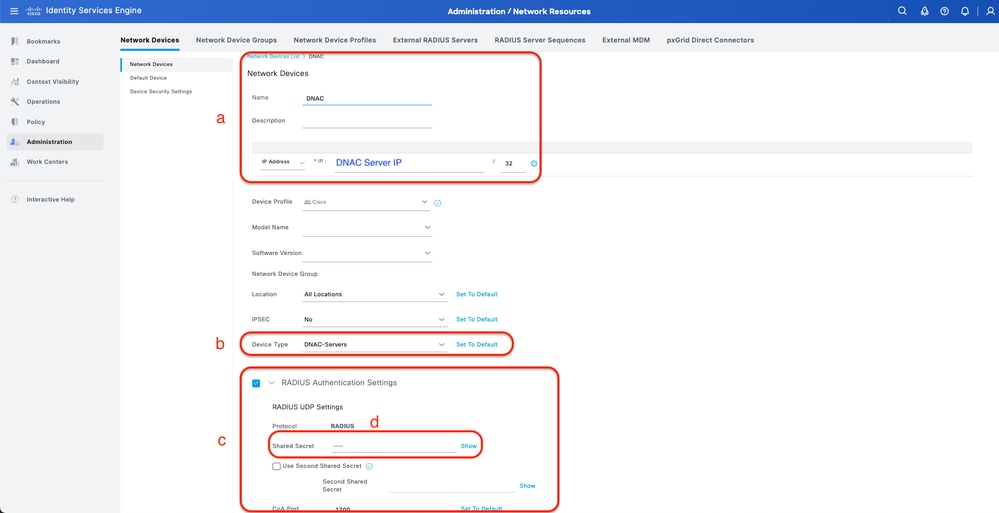 ISE Network Device (DNAC) for RADIUS
Step 2. Create RADIUS Authorization Profiles
This can be done from the tab Policy > Policy Elements > Results > Authorization > Authorization Profiles.
Note, create 3x RADIUS Authorization Profiles, one for each User Role.
Procedure
a. Click Add and define the RADIUS Authorization Profile name
b. Enter the Cisco:cisco-av-pair in the Advanced Attributes Settings and fill the correct User role
- For the (DecOps-Role) user role, enter ROLE=DevOps-Role
- For the (NETWORK-ADMIN-ROLE) user role, enter ROLE=NETWORK-ADMIN-ROLE
- For the(SUPER-ADMIN-ROLE) user role, enter ROLE=SUPER-ADMIN-ROLE
c. Review the Attribute Details
d. Click Save
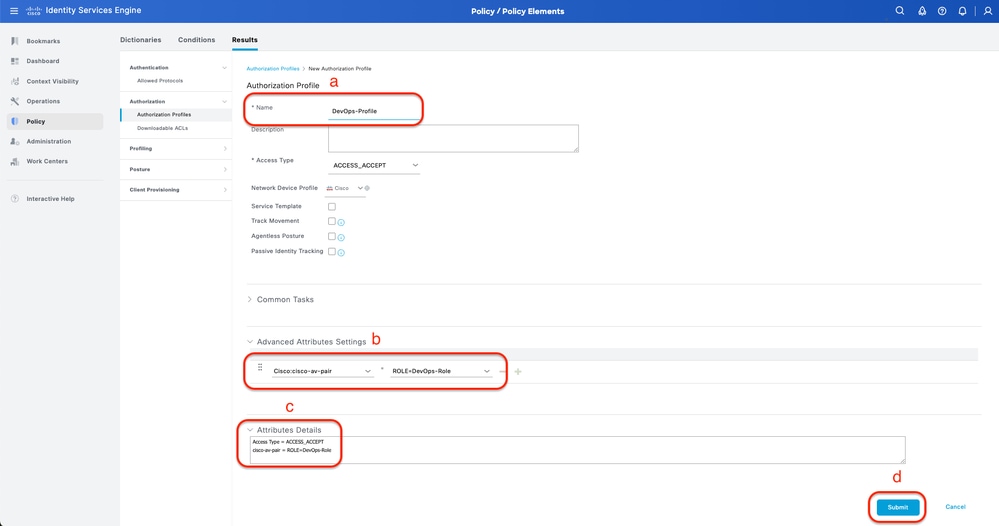 Create Authorization Profile
Step 3. Create User Group
This can be done from the tab Administration > Identity Management > Groups > User Identity Groups.
Procedure
a. Click Add and define the Identity Group name
b. (Optional) Define the Description
c. Click Submit
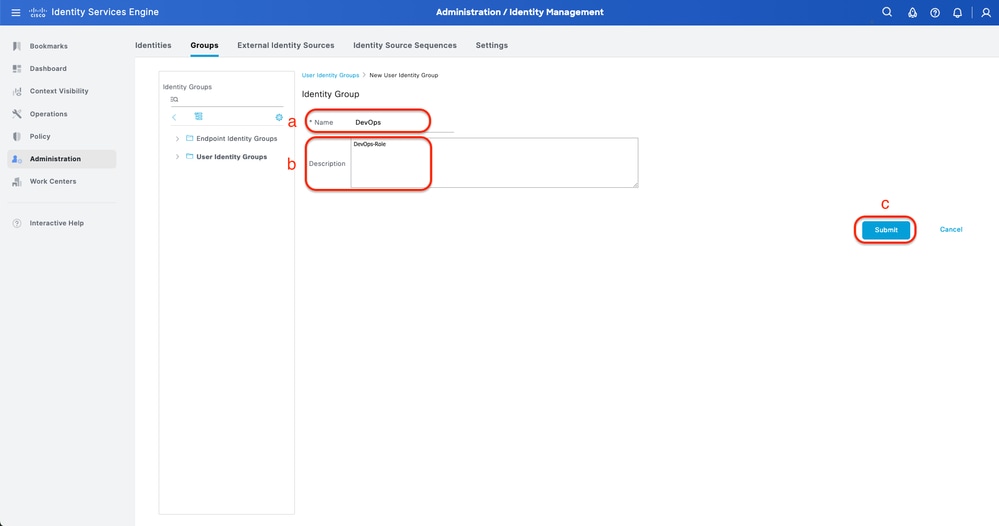 Create User Identity Group
Step 4. Create Local User
This can be done from the tab Administration > Identity Management > Identities > Users.
Procedure
a. Click Add and define the Username
b. Set the Login Password
c. Add the user to the related user group.
d. Click Submit
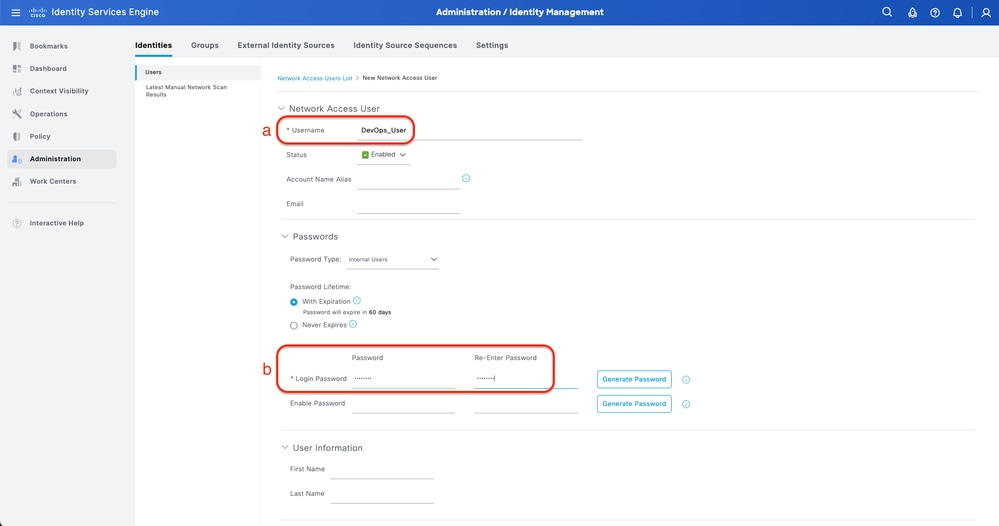 Create Local User 1-2
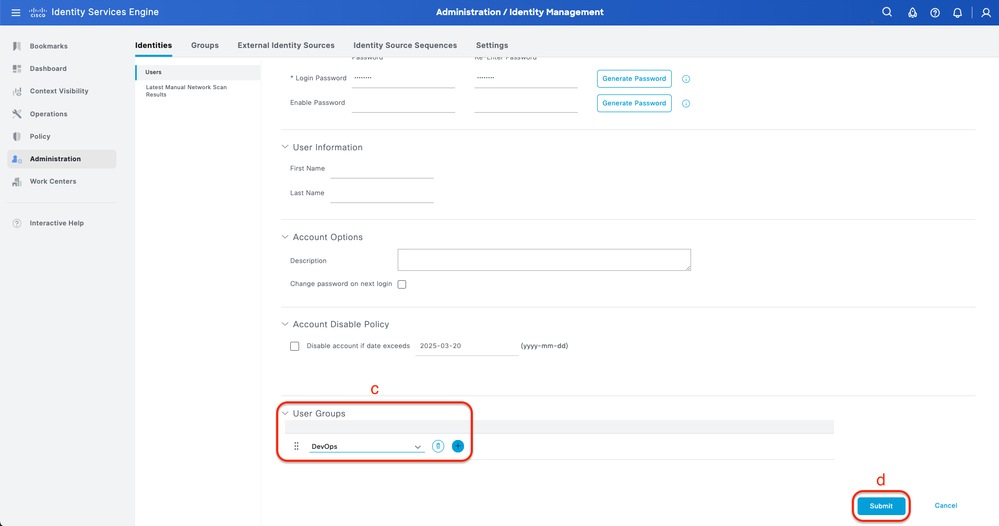 Create Local User 2-2
Step 5. (Optional) Add RADIUS Policy Set
This can be done from the tab Policy > Policy Sets.
Procedure
a. Click Actions and choose (Insert new row above)
b. Define the Policy Set name
c. Set the Policy Set Condition to Select Device Type you created previously on (Step1 > b)
d. Set the Allowed protocols
e. Click Save
f. Click (>) Policy Set View to configure authentication and authorization rules
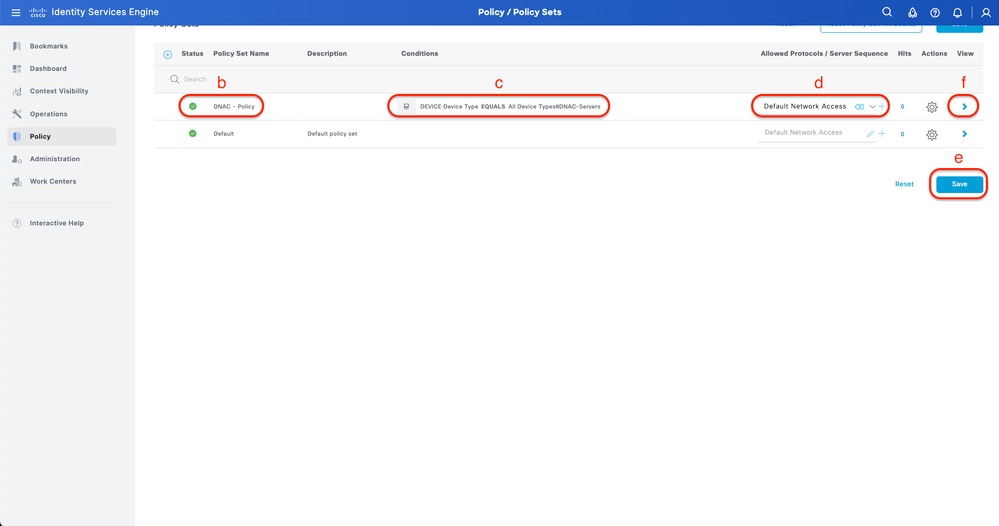 Add RADIUS Policy Set
Step 6. Configure RADIUS Authentication Policy
This can be done from the tab Policy > Policy Sets > Click (>).
Procedure
a. Click Actions and choose (Insert new row above)
b. Define the Authentication Policy name
c. Set the Authentication Policy Condition and Select Device Type you created previously on (Step1 > b)
d. Set the Authentication Policy Use for Identity source
e. Click Save
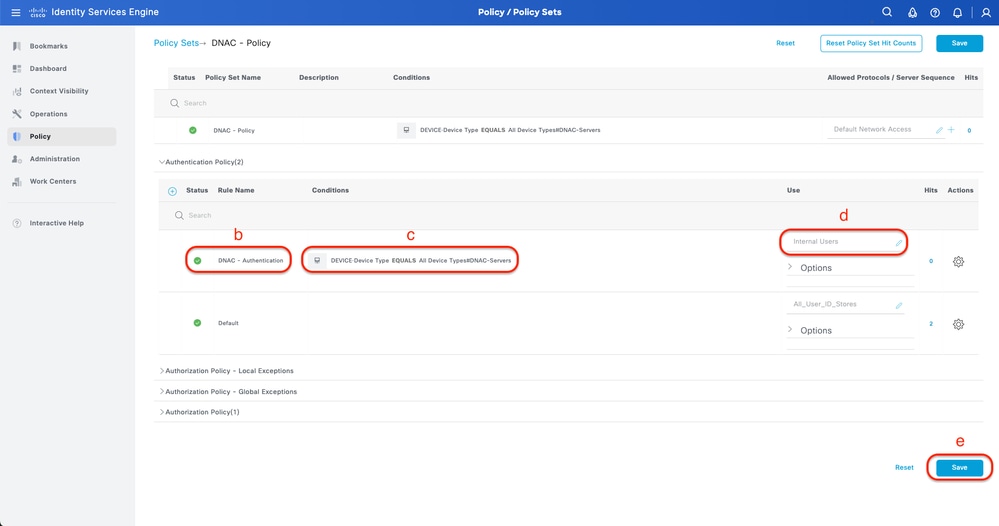 Add RADIUS Authentication Policy
Step 7. Configure RADIUS Authorization Policy
This can be done from the tab Policy > Policy Sets> Click (>).
This step to create Authorization Policy for each User Role.
- SUPER-ADMIN-ROLE
- NETWORK-ADMIN-ROLE
- DevOps-Role
Procedure
a. Click Actions and choose (Insert new row above)
b. Define the Authorization Policy name
c. Set the Authorization Policy Condition and Select User Group that you created in (Step3)
d. Set the Authorization Policy Results/Profiles and Select Authorization Profile that you created in (Step2)
e. Click Save
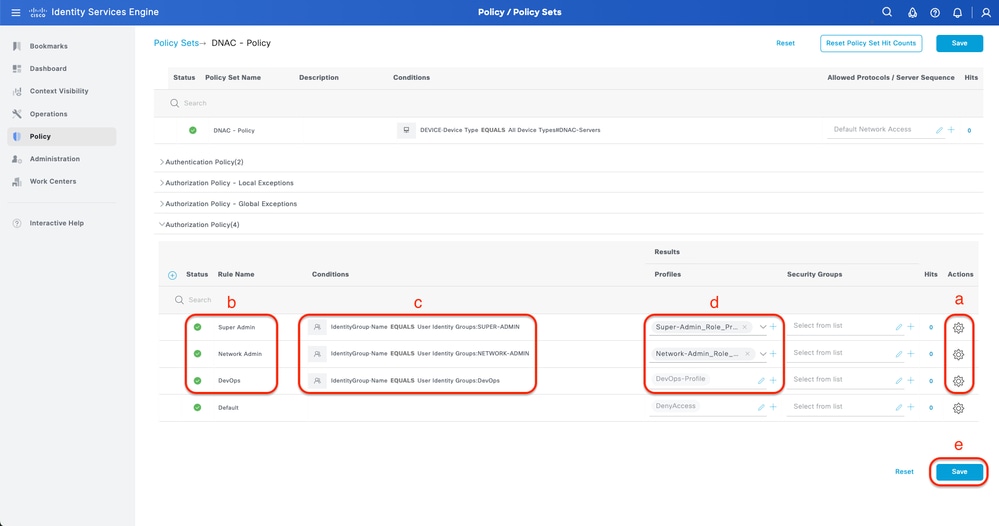 Add Authorization Policy
(Option2) Configure DNAC External Authentication Using TACACS+
Step 1. (Optional) Define a Custom Roles.
Configure your custom roles that fulfils your requirement, instead, you can use the default User Roles. This can be done from the tab System > Users & Roles > Role Based Access Control.
Procedure
a. Create a New Role
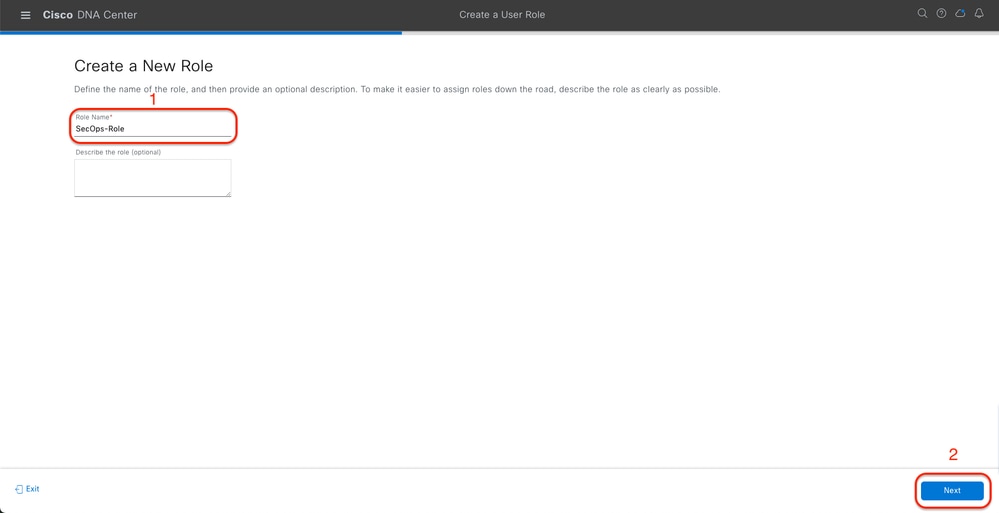 SecOps Role Name
b. Define the Access
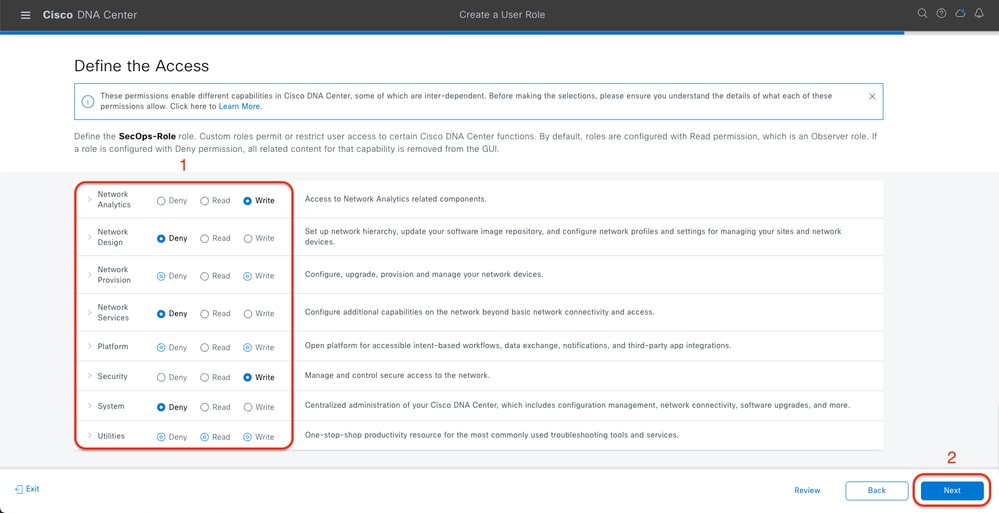 SecOps Role Access
c. Create the New Role
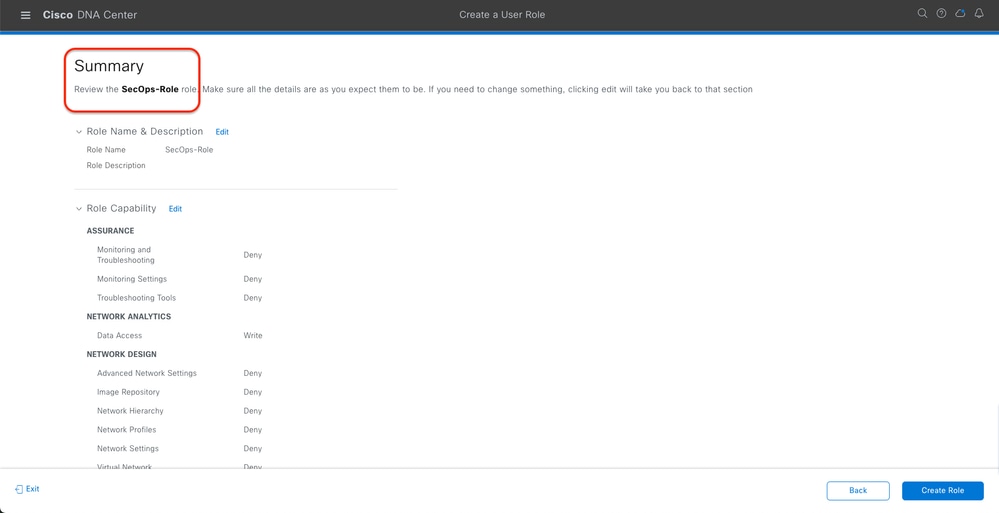 SecOps Role Summary
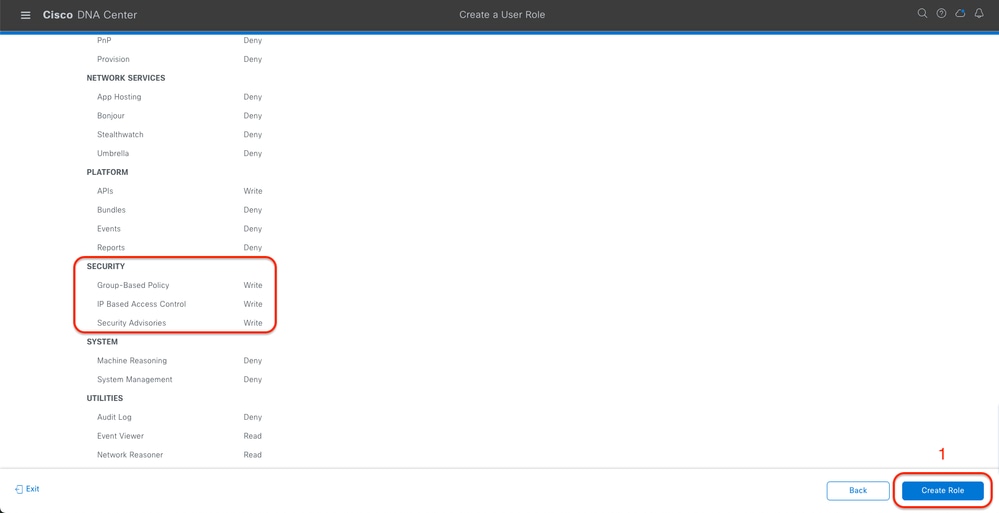 Review and Create SecOps Role
Step 2. Configure External Authentication Using TACACS+
This can be done from the tab System > Users & Roles > External Authentication.
a. To enable external authentication in Cisco DNA Center, check the Enable External User check box.
b. Set the AAA attributes.
Enter Cisco-AVPair in the AAA attributes field.
c. (Optional) Configure Primary and Secondary AAA Server.
Ensure TACACS+ protocol is enabled on Primary AAA Server at least, or on both Primary and Secondary server.
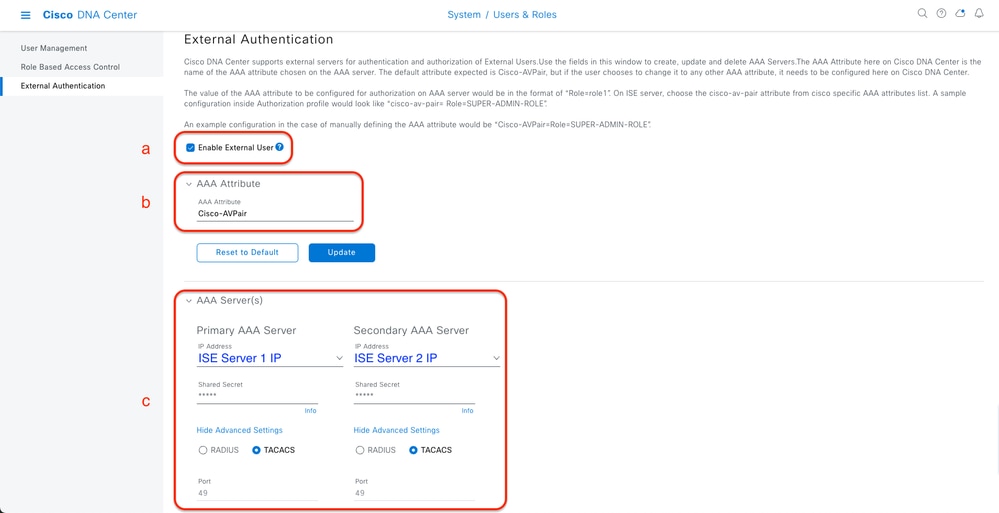 (TACACS+) External Authentication Configuration Steps
(Option2) Configure ISE for TACACS+
Step 1. Enable Device Admin Service
This can be done from the tab Administration > System > Deployment > Edit (ISE PSN Node) > Check Enable Device Admin Service.
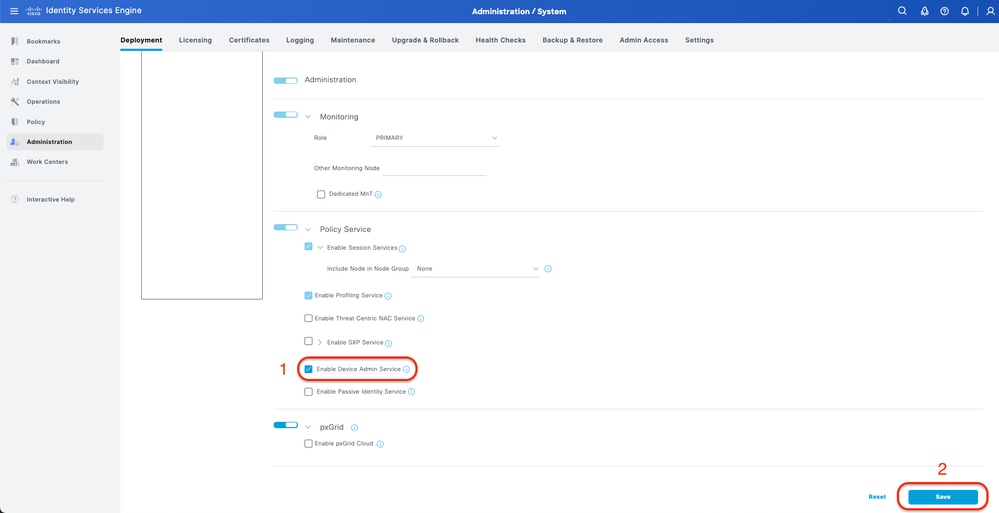 Enable Device Admin Service
Step 2. Add DNAC server as a Network Device on ISE
This can be done from the tab Administration > Network Resources > Network Devices.
Procedure
a. Define (DNAC) Network Device name and IP
b. (Optional) Classify Device Type for Policy Set condition
c. Enable TACACS+ authentication Settings
d. Set TACACS+ Shared Secret
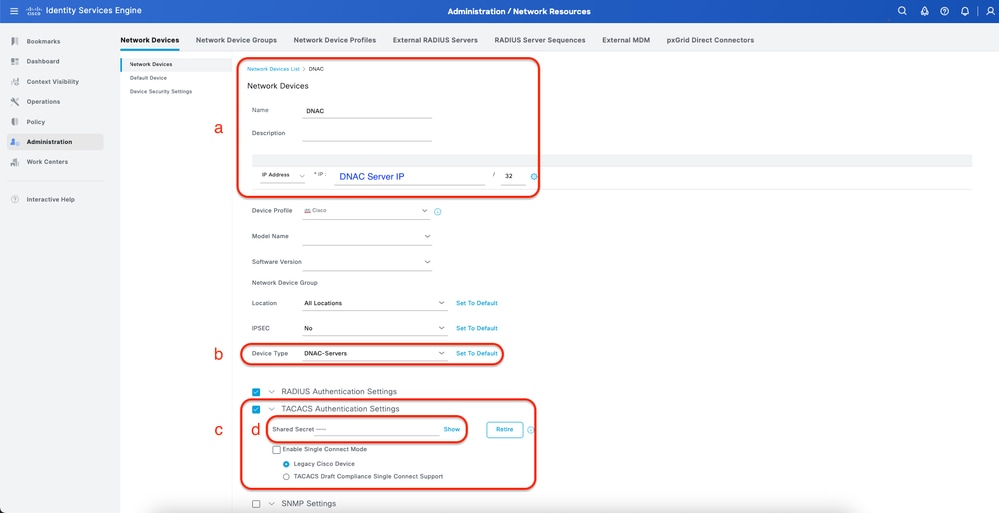 ISE Network Device (DNAC) for TACACS+
Step 3. Create TACACS+ Profiles for each DNAC role
This can be done from the tab Work Centers > Device Administration > Policy Elements > Results > TACACS Profiles.
Note, create 3x TACACS+ Profiles, one for each User Role.
Procedure
a. Click Add and define the TACACS Profile name
b. Click the Raw View tab
c. Enter the Cisco-AVPair=ROLE= and fill the correct User role
- For the (SecOps-Role) user role, enter Cisco-AVPair=ROLE=SecOps-Role
- For the (NETWORK-ADMIN-ROLE) user role, enter Cisco-AVPair=ROLE=NETWORK-ADMIN-ROLE
- For the(SUPER-ADMIN-ROLE) user role, enter Cisco-AVPair=ROLE=SUPER-ADMIN-ROLE
Note, remember AVPair value (Cisco-AVPair=ROLE=<User Role>) is a case-sensitive and ensure it is matching to the DNAC User Role.
d. Click Save
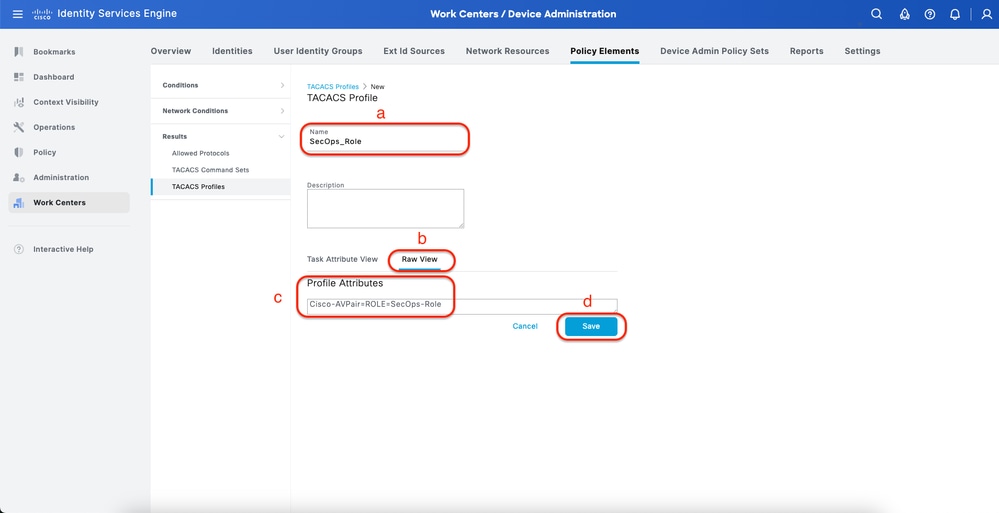 Create TACACS Profile (SecOps_Role)
Step 4. Create User Group
This can be done from the tab Work Centers > Device Administration > User Identity Groups.
Procedure
a. Click Add and define the Identity Group name
b. (Optional) Define the Description
c. Click Submit
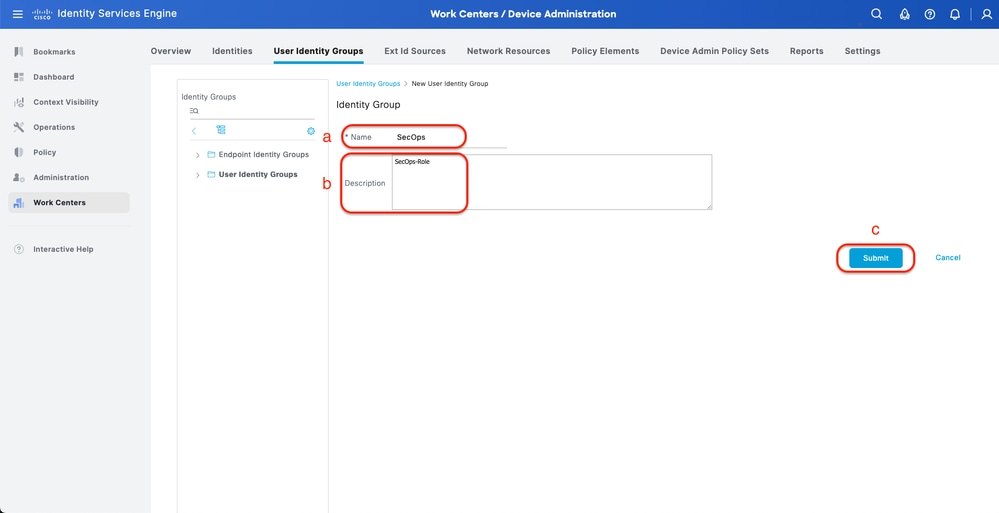 Create User Identity Group
 Step 5. Create Local User
This can be done from the tab Work Centers > Device Administration > Identities > Users.
Procedure
a. Click Add and define the Username
b. Set the Login Password
c. Add the user to the related user group.
d. Click Submit
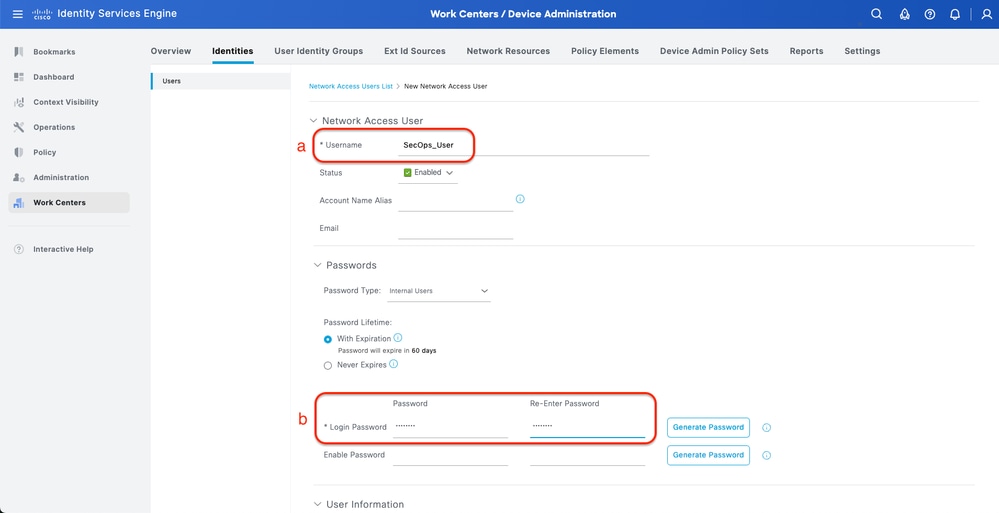 Create Local User 1-2
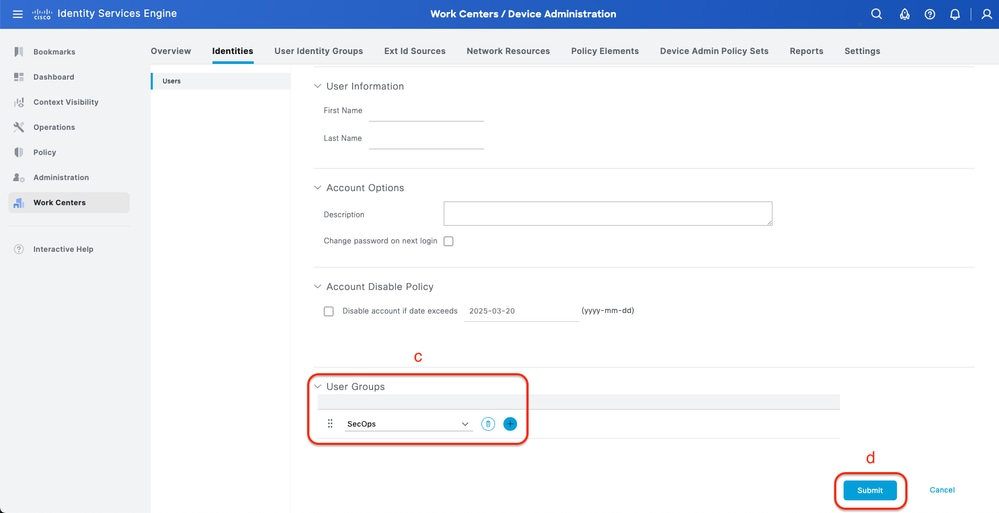 Create Local User 2-2
Step 6. (Optional) Add TACACS+ Policy Set
This can be done from the tab Work Centers > Device Administration > Device Admin Policy Sets.
Procedure
a. Click Actions and choose (Insert new row above)
b. Define the Policy Set name
c. Set the Policy Set Condition to Select Device Type you created previously on (Step2 > b)
d. Set the Allowed protocols
e. Click Save
f. Click (>) Policy Set View to configure authentication and authorization rules
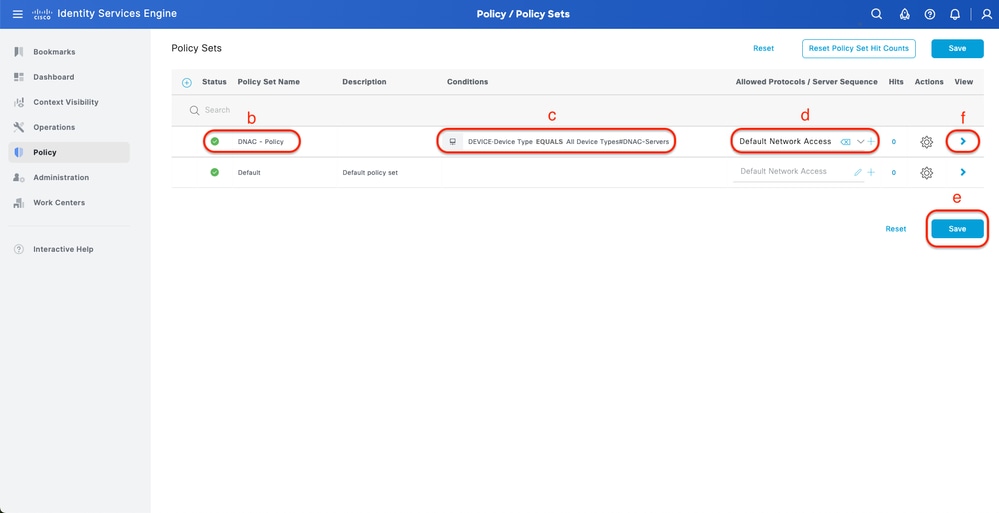 Add TACACS+ Policy Set
Step 7. Configure TACACS+ Authentication Policy
This can be done from the tab Work Centers > Device Administration > Device Admin Policy Sets > Click (>).
Procedure
a. Click Actions and choose (Insert new row above)
b. Define the Authentication Policy name
c. Set the Authentication Policy Condition and Select Device Type you created previously on (Step2 > b)
d. Set the Authentication Policy Use for Identity source
e. Click Save
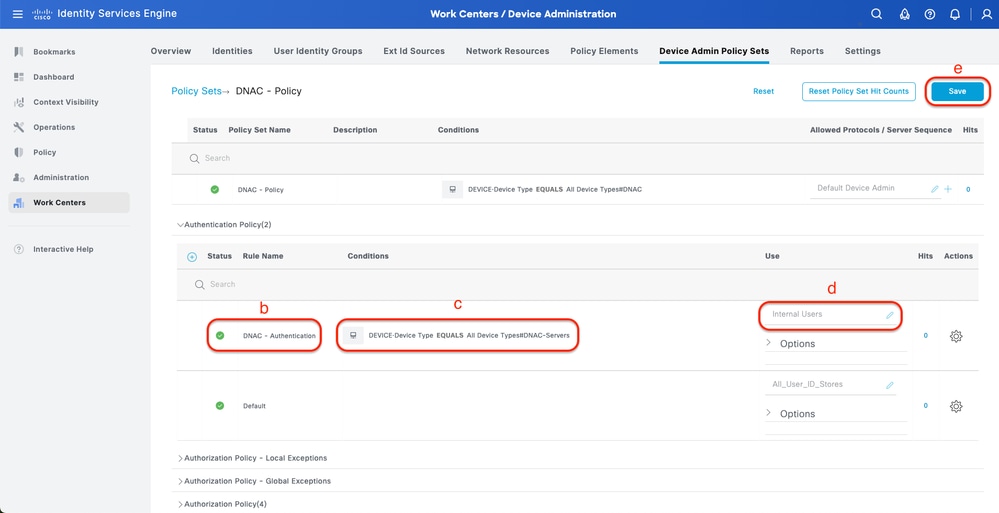 Add TACACS+ Authentication Policy
Step 8. Configure TACACS+ Authorization Policy
This can be done from the tab Work Centers > Device Administration > Device Admin Policy Sets > Click (>).
This step to create Authorization Policy for each User Role.
- SUPER-ADMIN-ROLE
- NETWORK-ADMIN-ROLE
- SecOps-Role
Procedure
a. Click Actions and choose (Insert new row above)
b. Define the Authorization Policy name
c. Set the Authorization Policy Condition and Select User Group that you created in (Step4)
d. Set the Authorization Policy Shell Profiles and Select TACACS Profile that you created in (Step3)
e. Click Save
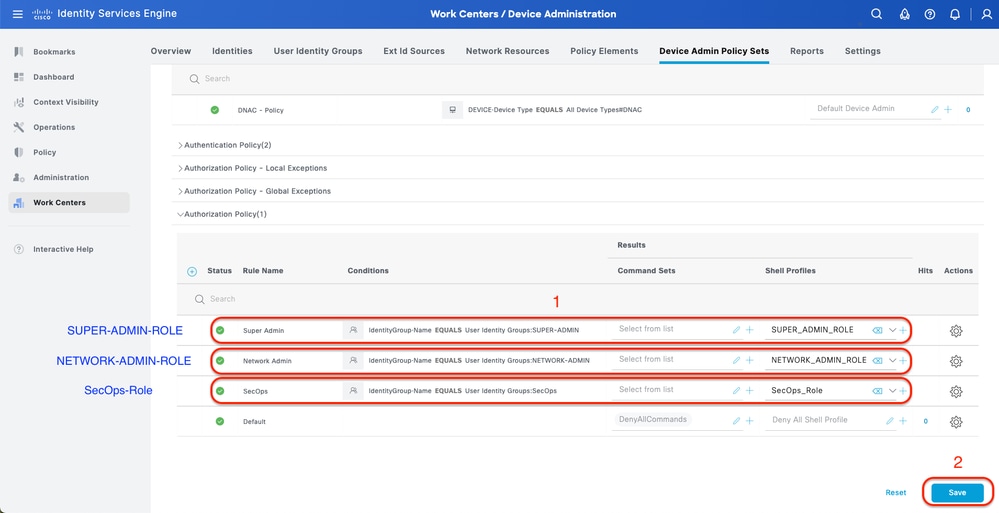 Add Authorization Policy
Verify
Verify RADIUS Configuraiton
1- DNAC - Display External Users System > Users & Roles > External Authentication > External Users.
You can view the list of external users who have logged in through RADIUS for the first time. The information that is displayed includes their usernames and roles.
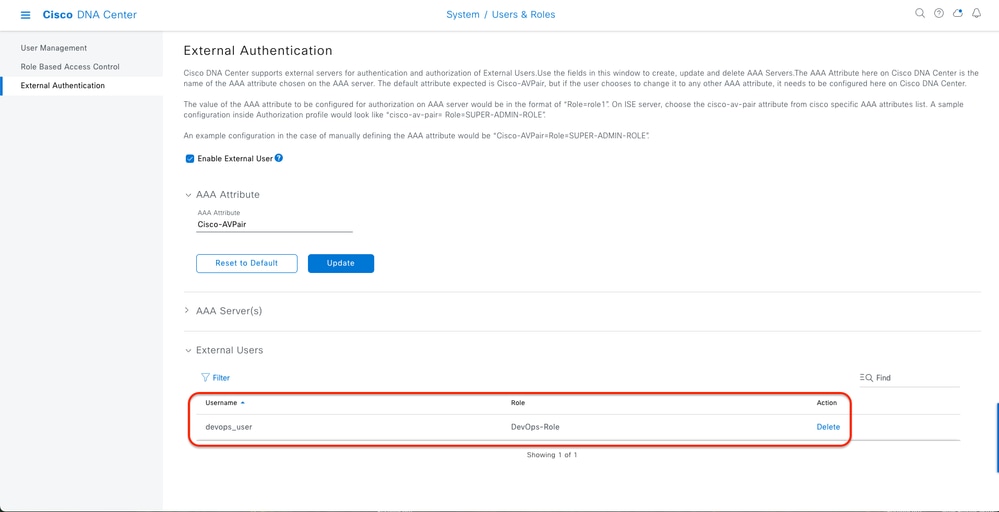 External Users
2. DNAC - Confirm user access
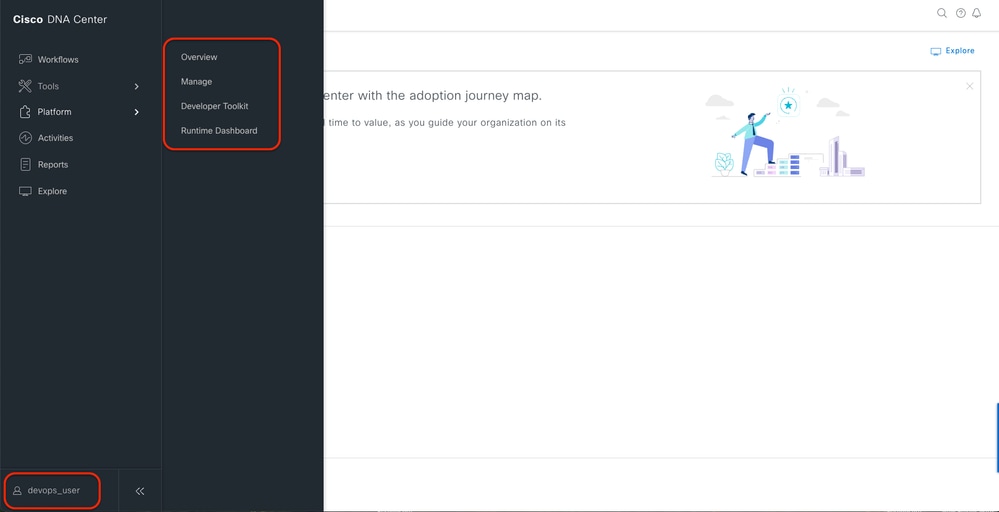 Limited User Access
3.a ISE - RADIUS Live-Logs Operations > RADIUS > Live-Logs.
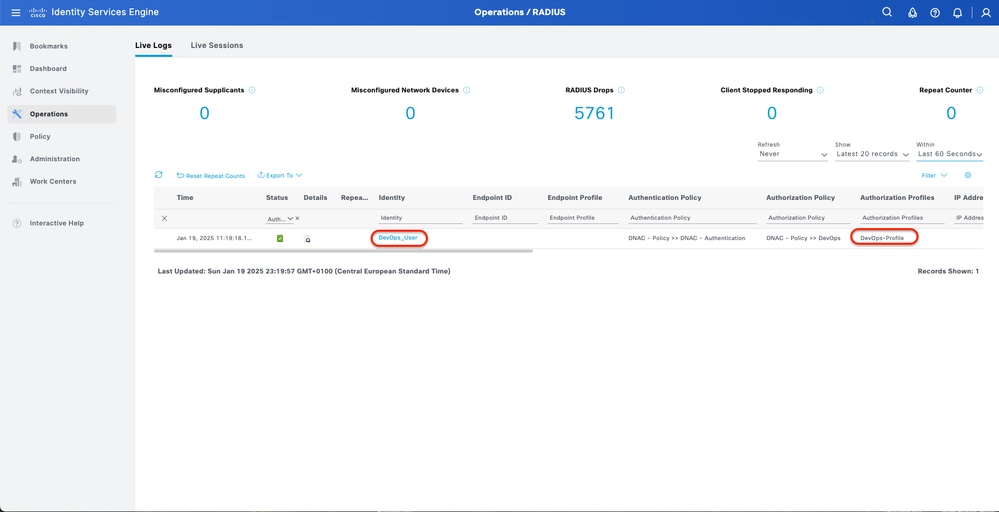 RADIUS Live-Logs
3.b ISE - RADIUS Live-Logs Operations > RADIUS > Live-Logs > Click (Details) for Authorization log.
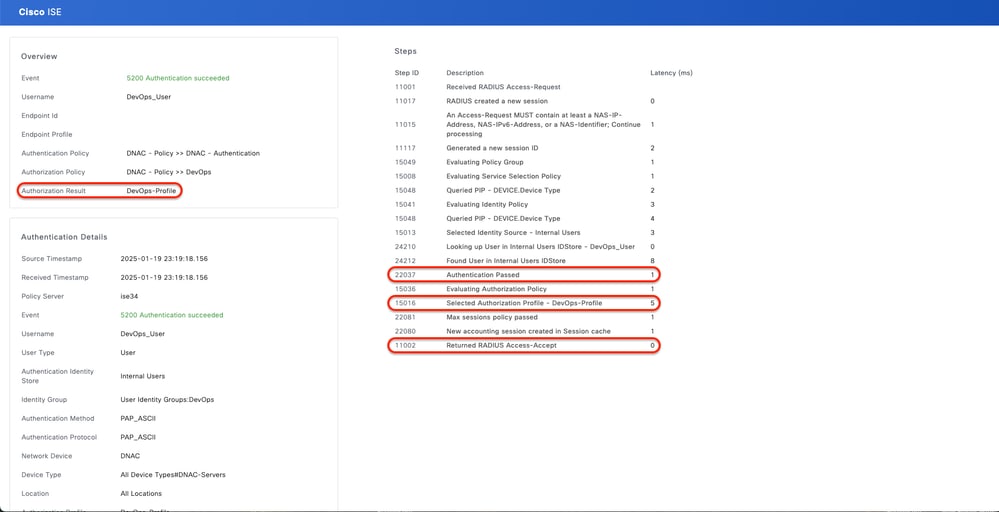 RADIUS Detailed Live-Logs 1-2
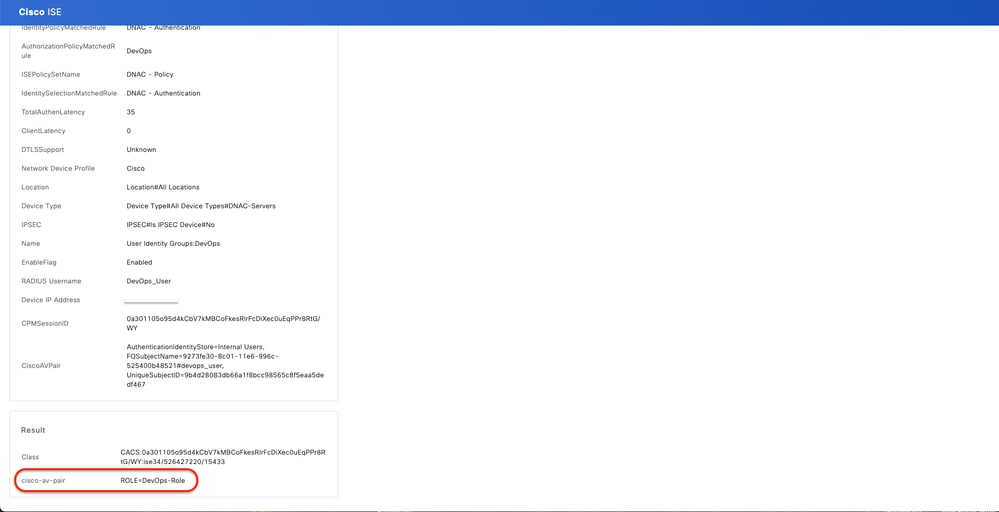 RADIUS Detailed Live-Logs 2-2
Verify TACACS+ Configuration
1- DNAC - Display External Users System > Users & Roles > External Authentication > External Users.
You can view the list of external users who have logged in through TACACS+ for the first time. The information that is displayed includes their usernames and roles.
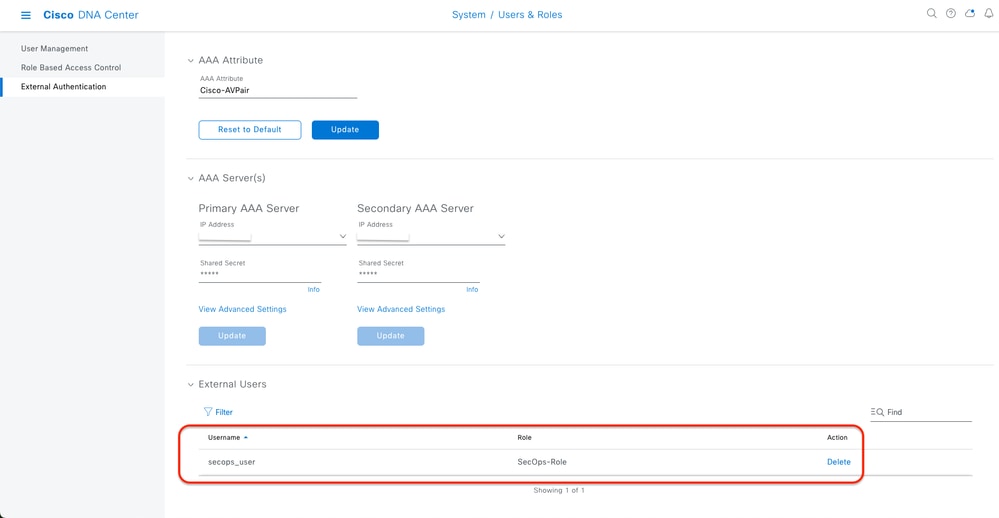 External Users
2. DNAC - Confirm user access
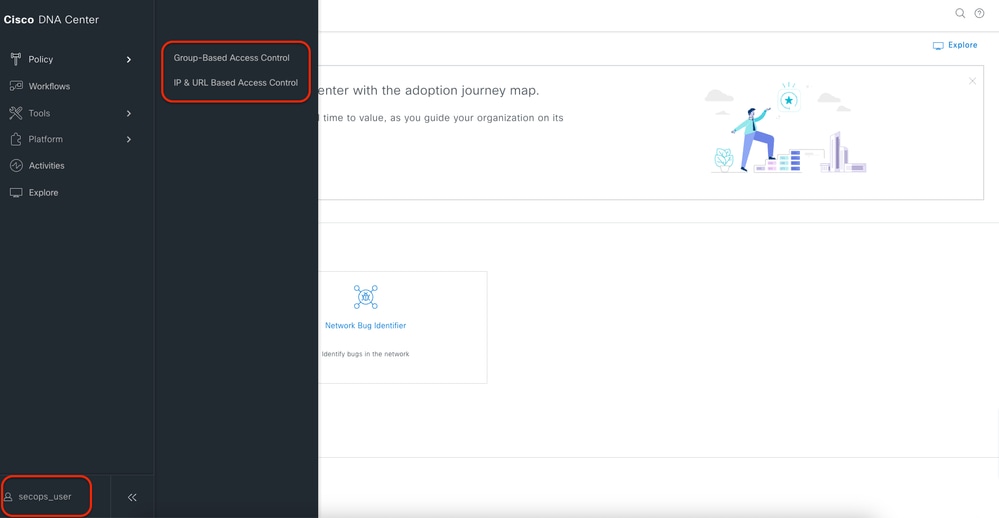 Limited User Access
3.a ISE - TACACS+ Live-Logs Work Centers > Device Administration > Overview > TACACS Livelog.
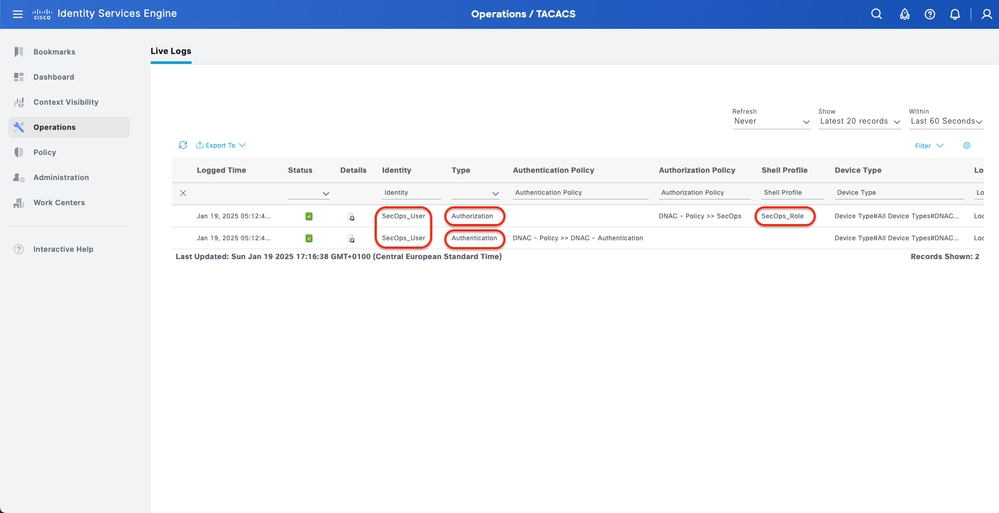 TACACS Live-Logs
3.b ISE - detailed TACACS+ Live-Logs Work Centers > Device Administration > Overview > TACACS Livelog > Click (Details) for Authorization log.
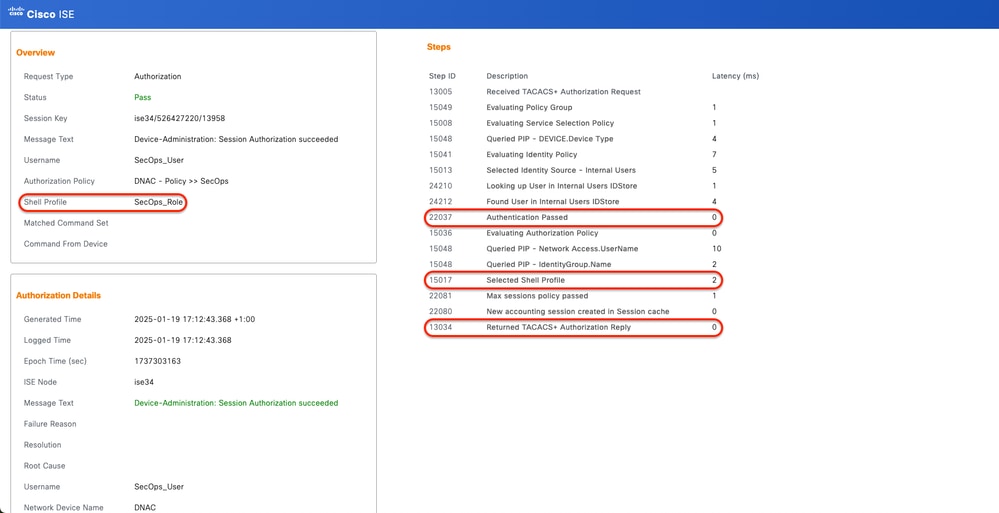 TACACS+ Detailed Live-Logs 1-2
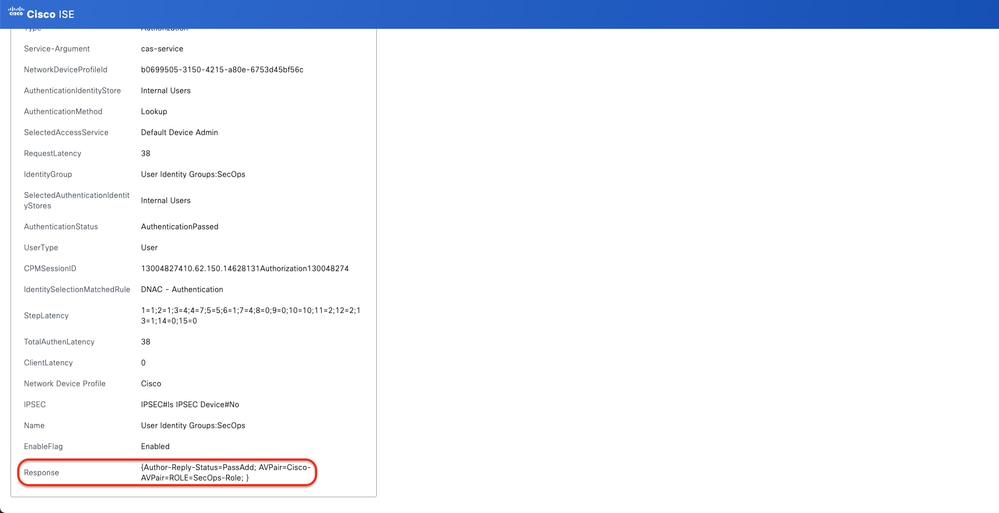 TACACS+ Detailed Live-Logs 2-2
References
Cisco Identity Services Engine Administrator Guide, Release 3.4 > Device Administration
Cisco DNA Center Administrator Guide, Release 2.3.5


 Feedback