CiscoWorks IPS MC in Cisco IOS IPS Configuration Example
Available Languages
Contents
Introduction
The CiscoWorks Management Center for IPS Sensors (IPS MC) is the management console for Cisco IPS devices. IPS MC Version 2.2 supports provisioning of the Intrusion Prevention System (IPS) feature on Cisco IOS® Software routers. This document describes how to use IPS MC 2.2 to configure Cisco IOS IPS.
For more information on how to use IPS MC (which includes how to use it to configure devices that are not based on Cisco IOS Software), refer to the CiscoWorks Management Center for IPS Sensors documentation at this URL:
http://www.cisco.com/en/US/products/sw/cscowork/ps3990/index.html
Prerequisites
Requirements
There are no specific requirements for this document.
Components Used
The information in this document is based on the CiscoWorks Management Center for IPS Sensors (IPS MC) Version 2.2.
The information in this document was created from the devices in a specific lab environment. All of the devices used in this document started with a cleared (default) configuration. If your network is live, make sure that you understand the potential impact of any command.
Conventions
Refer to the Cisco Technical Tips Conventions for more information on document conventions.
Configure
Basic Understanding of Configuration Tasks
IPS MC is used to manage the configuration of a group of Cisco IOS IPS routers. Note that IPS MC does not manage the alerts from routers that run IPS. Cisco recommends Cisco Security Monitoring, Analysis and Response System (Cisco Security MARS) for IPS monitoring. Configuration management consists of a series of tasks described in this document. These tasks can be divided into three phases: import, configuration, and deployment as shown in this image.
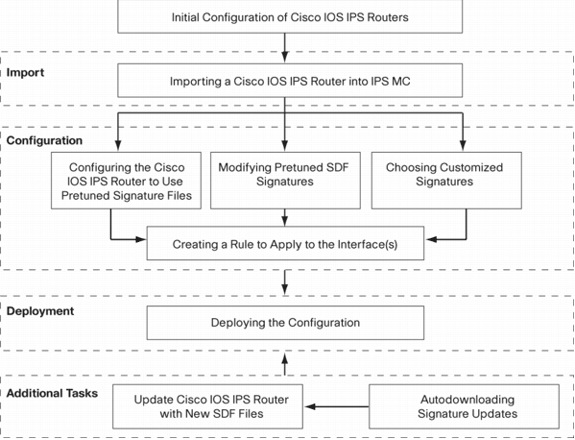
Each phase has its own set of responsibilities and functions:
-
Import—Import a router into IPS MC. You must import a router into IPS MC before you can use IPS MC to configure it. A router cannot be imported unless an initial IPS configuration exists on the router (details are given later in this document).
-
Configuration—Configure the device. For example, you can configure a Cisco IOS IPS router to use one of the Cisco recommended pretuned signature files. Configuration changes are stored in IPS MC, but not sent to the router in this phase.
-
Deployment—Deliver configuration changes to the actual device. During this phase you commit the changes made in configuration tasks to the routers.
-
Additional Tasks—IPS MC provides an autodownload function to automatically download signature updates from Cisco.com.
You must understand this phased approach in order to effectively use IPS MC. It is different from device-based management GUIs, such as Cisco Router and Security Device Manager (SDM). Device-based GUIs act directly on a single router, whereas IPS MC is designed to work on groups of routers (and other IPS devices such as Cisco IPS 4200 Series Sensors) networkwide.
This document provides information about each of the tasks in the diagram to help you use IPS MC to manage Cisco IOS IPS routers.
Initial Configuration of Cisco IOS IPS Routers
In order to successfully import or add a Cisco IOS IPS router to IPS MC, you must perform certain initial configuration steps on the Cisco IOS IPS routers. This section describes those steps.
You must enable Secure Shell (SSH) Protocol in a Cisco IOS IPS router for configuration, import, and deployment through Cisco IPS MC. In addition, the Security Device Event Exchange (SDEE) protocol must be enabled for event reporting purposes (although these alerts are not sent to IPS MC because IPS MC is used only for provisioning, not reporting). Finally, you need to make sure the clock setting on the IPS router is synchronized with the IPS MC.
Complete these steps in order to configure your IOS IPS routers:
-
Create a local user name and password for the router.
Router#config terminal
Router(config)#username <username> password <password>
-
Enable local login on the vty lines interface.
Router#config terminal
Router(config)#line vty 0 15
Router(config-line)#login local
Router(config-line)#exit
If the transport input or transport output command-line interface (CLI) is configured under vty line configuration, make sure SSH is enabled. For example:
Router#conf terminal
Router(config)#line vty 0 15
Router(config-line)#transport input ssh telnet
Router(config-line)#exit
-
Generate a 1024-bit RSA key (if a key does not already exist).
SSH is automatically enabled after cryptography key generation.
Router#conf terminal Enter configuration commands, one per line. End with CNTL/Z. Router(config)#crypto key generate rsa The name for the keys will be: Router.cisco.com Choose the size of the key modulus in the range of 360 to 2048 for your General Purpose Keys. Choosing a key modulus greater than 512 may take a few minutes. How many bits in the modulus [512]: 1024 % Generating 1024 bit RSA keys, keys will be non-exportable...[OK] Router(config)# *Jan 23 00:44:40.952: %SSH-5-ENABLED: SSH 1.99 has been enabled Router config)# -
Enable SDEE on the router.
Router(config)#ip ips notify sdee
-
Enable HTTPS.
HTTP or HTTPS is required for IPS MC to communicate with the router with SDEE to gather event information.
Router(config)#ip http authentication local
Router(config)#ip http secure-server
-
Use the external Network Time Protocol (NTP) server or clock command in order to configure the clock setting on the IPS router.
Router(config)#clock set hh:mm:ss day month year
Now the Cisco IOS IPS router is ready and can be imported to IPS MC for further configuration and management.
Import a Cisco IOS IPS Router into IPS MC
Once you complete the initial configuration on the router, you can add (or import) it into IPS MC.
-
Start your web browser, and point to the CiscoWorks server.
The CiscoWorks Login Manager appears.
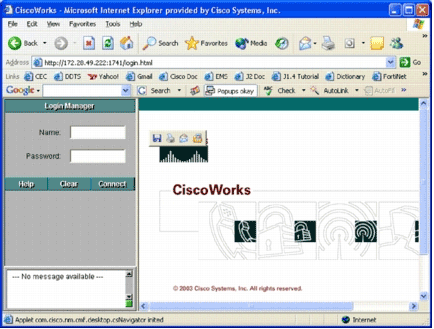
Note: The default port number of the web server is 1741; therefore, you should use a URL similar to http://<server ip address>:1741/.
-
Enter your user name and password in order to log in.
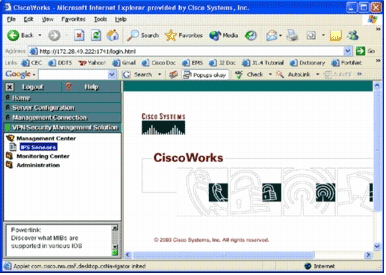
The CiscoWorks main page appears.
-
In the left navigation pane, choose VPN/Security Management Solution, and then choose Management Center.
The Management Center for IPS Sensors page appears.
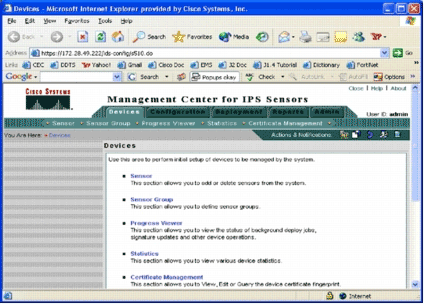
This page displays these five tabs:
-
Devices—In the Devices tab, you can perform the initial setup of and manage all deviceson the system.
-
Configuration—In the Configuration tab, you can perform provisioning functions. You can configure devices at individual device level or at group level. One device group can contain multiple devices. All changes made through configuration tasks must be saved. The configuration function does not immediately make changes to the devices. You must use the deployment function in order to deploy your changes.
-
Deployment—In the Deployment tab, you can deploy your configuration changes to devices. Schedule capability provides flexible control of when the configuration changes should take effect.
-
Reports—In the Reports tab, you can generate various system operation reports.
-
Admin—In the Admin tab, you can perform system administration tasks, such as database management, system configuration, and license management.
-
-
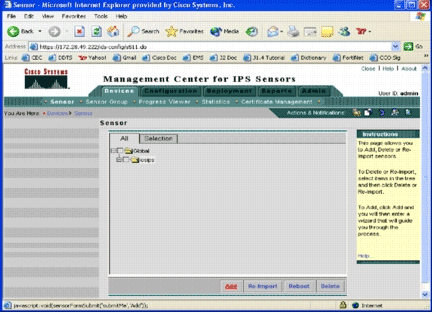
Click the Devices tab in order to add a new device.
The Sensor page appears.
-
Click Add.
The Select Type page appears.
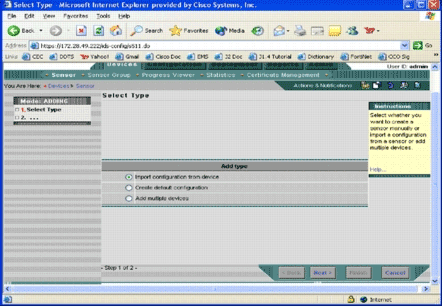
You must inform IPS MC what type of add function you want to perform. This list describes each option:
-
Import configuration from device—Use this option to add to IPS MC devices that currently run on the network.
-
Create default configuration—Use this option to add devices that do not currently run on the network yet.
-
Add multiple devices—Use this option to add multiple devices. You can create a .csv or an .xml file that contains all device information and then import it into IPS MC in order to add the devices at one time.
Tip: The sample .csv format and .xml format files are located in: InstallDirectory\MDC\etc\ids\ and are named MultipleAddDevices-format.csv and MultipleAddDevices-format.xml, respectively.
-
-
Choose the appropriate Add type option, and click Next.
-
Select the group to which you want to add the Cisco IOS IPS router, or use the default global group, and then click Next.
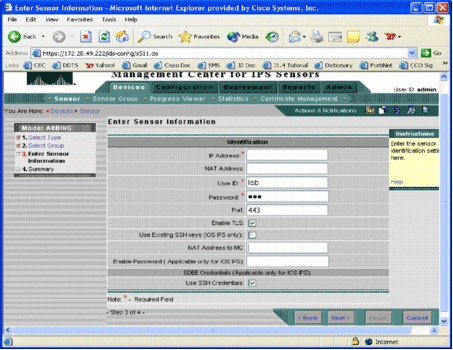
The Enter Sensor Information page appears.
-
In the Identification page, enter the identification information for the device.
Note: If the user does not have privilege level 15 access rights, you must supply the enable password. In the last row of the Identification page, check the Use SSH Credentials check box.
-
Click Next.
The Add Sensor Summary appears.
-
Click Finish.
The device is successfully added into IPS MC.
Note: If you encounter errors during the import process, make sure you check these items:
-
Prerequisite configuration—These configurations are required for IPS MC to communicate with Cisco IOS IPS routers.
-
Connectivity—Make sure IPS MC can reach the Cisco IOS IPS routers.
-
Clock—Check the times on the IPS MC and the Cisco IOS IPS router. The time is a critical component of the https certificate that is used for authentication. The times must be within 12 hours of each other. (Best practice is at most a few hours.)
-
Cisco IOS IPS Certificate—Sometimes the Cisco IOS IPS certificate that is stored is incorrect. In order to delete a certificate from Cisco IOS IPS, you must remove the trustpoint from the Cisco IOS IPS router.
-
Additional Configuration— If ip http timeout-policy is configured with a low number of maximum requests, such as ip http timeout-policy idle 600 life 86400 requests 1, you must increase the maximum request number. For example: ip http timeout-policy idle 600 life 86400 requests 8400
-
Configure the Cisco IOS IPS Router to Use Pretuned Signature Files
After you import the router into IPS MC, you must select the Signature Definition File (SDF) (a text-based file that includes the threat signatures that the IPS router will use) and the action to take when each signature is triggered (for example, drop, TCP reset, alarm).
Cisco Systems® recommends that you use Cisco pretuned SDF files. Currently, there are three such files: attack-drop.sdf, 128MB.sdf, and 256MB.sdf. IPS MC can automatically download these files from Cisco.com. See Autodownload Signature Updates for more information.
This procedure uses a single device as an example and starts with a router with no IPS configuration. You can also use this procedure for multiple devices on a group level.
-
Click the Configuration tab.
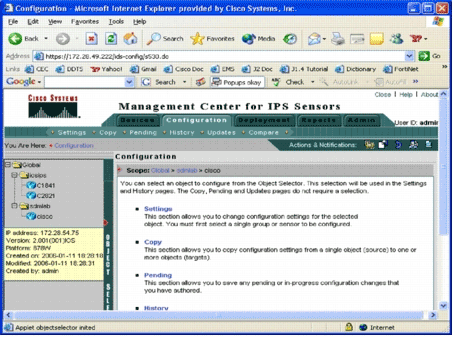
The Configuration page appears.
-
From the Object Selector located on the left side of the page, choose the Cisco IOS IPS router that you want to configure.
Note: Most of the configuration settings in IPS MC 2.2 can be configured at the group level as well as at the individual device level. For example, the global, iosips, and sdmlab groups are all configurable object groups. This example uses an individual device-cisco of sdmlab group.
Once you select the router you want to configure, the path bar located at the top of the Configuration page displays the current scope of configuration. For example, the scope for this example is Global > sdmlab > cisco. cisco is the current configuration object (that is, the router that was selected from the Object Selector.
-
From the Configuration menu bar, click Settings.
The Settings page appears.
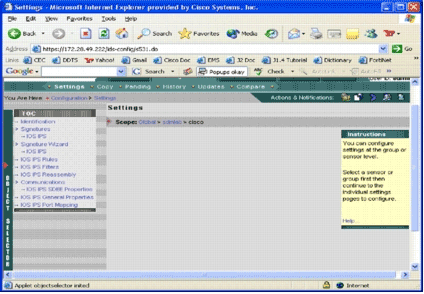
In the Settings page, you can change configuration settings for the selected object. Configuration settings specific to Cisco IOS IPS routers are in the TOC section located on the left side of the page. Here is a list of tasks that are available under the TOC section:
-
Identification—Cisco IOS IPS router basic information; you can specify a pretuned SDF file here
-
Signature—Cisco IOS IPS router signatures
-
Signature Wizard—A signature wizard to add customized signatures
-
Cisco IOS IPS Rules—For configuring Cisco IOS IPS rules that are used to apply to interfaces
-
Cisco IOS IPS Filters—Cisco IOS IPS filters
-
Cisco IOS IPS Reassembly—Interface IP virtual-reassembly configuration
-
Cisco IOS IPS SDEE Properties—For configuring SDEE settings
-
Cisco IOS IPS General Properties—Additional Cisco IOS IPS-related configurations
-
-
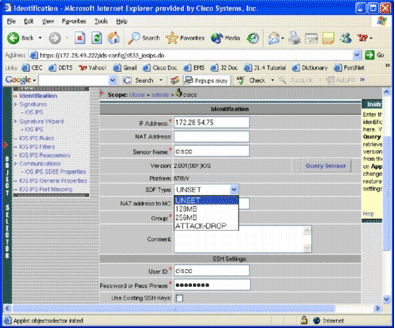
Choose Identification in order to configure pretuned SDF files.
The Identification page appears.
-
From the SDF Type drop-down list, choose the appropriate pretuned SDF, and then click Apply in order to apply changes.
Cisco IOS IPS supports more than 1600 signatures, which is beyond the memory capacity of routers to accept. The SDFs have been developed as a convenient way to select and load the most vital signatures. Currently, you can choose from three SDFs. They vary in size in order to enable you to select an SDF file according to the DRAM capacity of your routers. The available choices are described here:
-
UNSET—The SDF type is not set.
-
ATTACK-DROP—This SDF is for routers with 64 MB of DRAM.
-
256MB—This SDF is for routers with 256 MB of DRAM.
-
128MB—This SDF is for routers with 128 MB of DRAM.
Note: The 128- and 256-MB SDFs require a 2.001 engine or greater. This information is available in the Settings > Identification UI > Version field.
 Warning: IPS MC does not include memory-management functions for Cisco IOS IPS routers. Be careful when you select SDF files for your Cisco IOS IPS router. Ensure that the Cisco IOS IPS router has sufficient memory to run the selected SDF file.
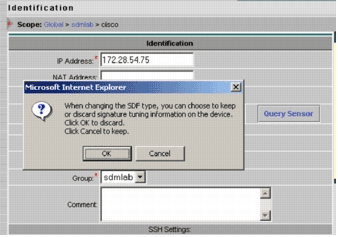
 Note: When you change the SDF type, you might receive this message: When changing the SDF type, you can choose to keep or discard signature tuning information on the device. Click OK to discard. Click Cancel to keep.
-
-
Click Cancel in order to keep your signature tuning information.
Now that you have successfully chosen a pretuned SDF for the router-cisco, you can perform additional signature tuning such as add or edit, or even create your own signatures, or you can skip the signature tuning tasks and go directly to Create a Rule to Apply to the Interface(s).
-
Click Pending from the Configuration menu bar.
The Pending page appears.
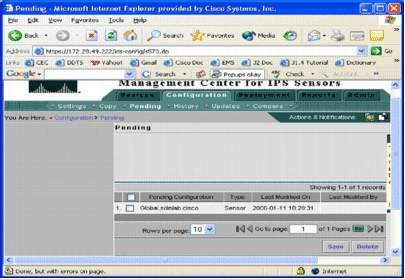
At this point, the configuration task is completed. However, you must complete the deployment task in order to deploy your changes to the target device.
Modify Pretuned SDF Signatures
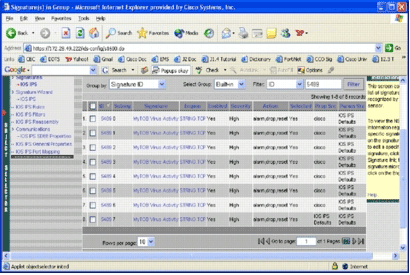
After you select a pretuned SDF file for a router, you can perform additional signature tuning tasks. You can add, edit, delete, and modify signatures to best fit your needs, or you can create your own signatures when necessary. This example uses IPS MC in order to add additional signatures and modify the actions. This image shows the signature configuration interface.
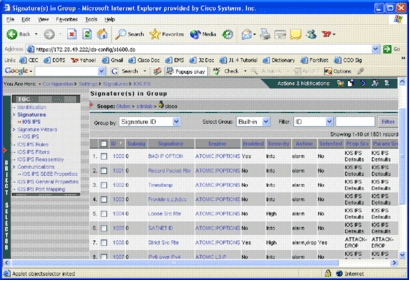
You can use signature configuration in order to enable or disable, select or unselect, add a signature, delete a signature, change signature actions, and edit signature parameters. Use the Signature Wizard to the left to create customized signatures.
In the signature configuration user interface, some information is shown by default. Selected refers to whether the signature is going to be included in the SDF file sent to the router. If a signature is not selected, it will not be added. Enabled applies only if a signature is selected. When a signature is disabled, the IPS engines will not send events for that specific signature. If a signature is unselected, it is also automatically disabled.
The last two columns (Prop Src and Param Src) tell you where the signature and its parameter, respectively, come from. The signature could have been taken from pretuned SDF files or from factory default which you can find in the IOS-Sxxx.zip file updates (it is shown as IOS IPS Defaults). These values apply to the parameter column as well.
While you add signatures to Cisco IOS IPS routers, memory considerations must be accounted for. If you add more signatures than the Cisco IOS IPS router can process, IPS MC will fail to deploy the configuration changes to the devices.
Complete these steps in order to add signatures 5489/x to the Cisco IOS IPS router:
-
Select Configuration, and then use the Object Selector in order to select the Cisco IOS IPS router for which you want to configure IPS signatures.
-
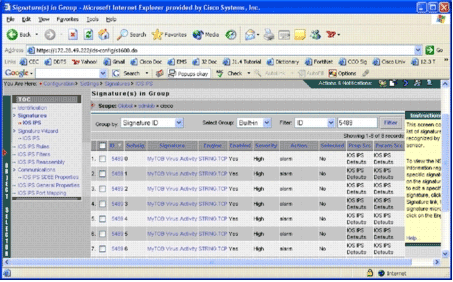
Choose Configuration > Settings > Signatures > IOS IPS.
The Signature(s) in Group page appears.
-
On the signature list that results, select Filter by ID, and type signature ID 5489.
-
Click Filter in order to search for signatures.
The search results appear.
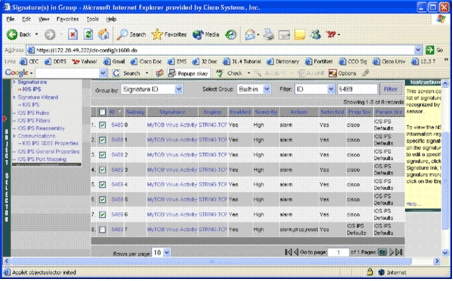
Note: IPS MC does not support new categorization available in Cisco SDM.
-
Check the check box next to signatures that have not been selected, and click Select on the bottom tool bar.
-
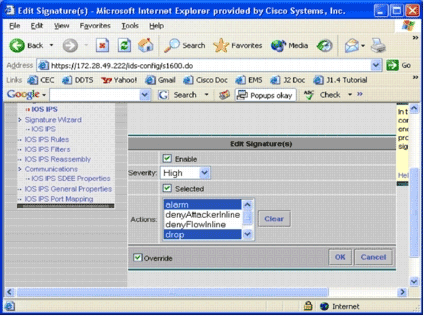
Click Edit in order to change signature actions.
The Edit Signature(s) page appears.
-
Check the Selected check box, and select alarm, drop, and reset from the Actions list.
-
Check the Override check box, and then click OK.
All signatures are changed with desired actions.
-
Go to the Pending task and save all the changes. This completes the configuration task.
Tip: Pay close attention to the Prop Src column. After modification, the source changed to the device named cisco, which means all the tuning information is saved separately from the default pretuned SDF files. This mechanism gives IPS MC the ability to retain customized signature changes.
In the previous section when you changed the SDF file types, the IPS MC asked you whether you wanted to keep signature tuning information. This is the signature tuning information referred to.
Choose Customized Signatures
If you do not want to use the default pretuned SDF files, you can use steps specified in the section Modify Pretuned SDF Signatures in order to select tuning signatures for your devices. In the identification page, you need to make sure the SDF type is UNSET. Refer to step 3 in Configure the Cisco IOS IPS Router to Use Pretuned Signature Files.
Create a Rule to Apply to the Interface(s)
After tuning the signature, you need to enable IPS on the Cisco IOS routers. In order to enable IPS on the router, you must create an IPS rule and apply it to at least one interface.
-
Select Configuration, and then use the Object Selector in order to select the Cisco IOS IPS router that you want to configure. Verify in the path bar that your scope is at the device level, not at a group level.
-
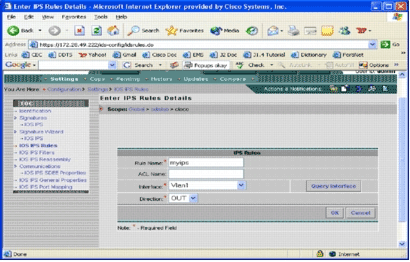
Select Configuration > Settings > IOS IPS Rules, and then click Add.
The Enter IPS Rules Details page appears.
-
Enter information for the rule name and interface to which you want to apply the rule and direction.
-
Click OK.
The IOS IPS Rules page appears.
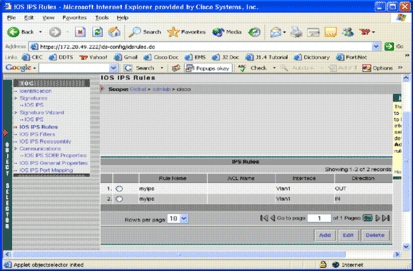
Similarly, you can create rules for both directions for an interface.
-
You must save the configuration changes and go through the deployment process to deliver changes to the affected device or group of devices.
You can perform other IPS-related configurations too, but all other tasks are optional and not required. You can find all the options to the left of the configuration user interface. This document does not cover the optional configuration options.
Deploy the Configuration
After you make all the configuration changes, you must use the deployment task in order to commit the changes to the devices. All the configurations you have made so far are saved locally on the IPS MC server.
In order to deploy configuration changes, go to the Deployment page, and complete these steps:
-
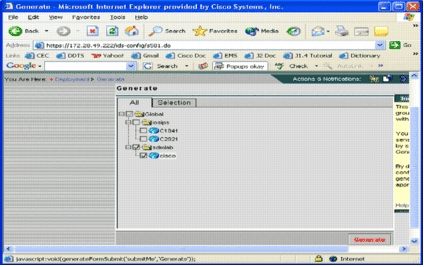
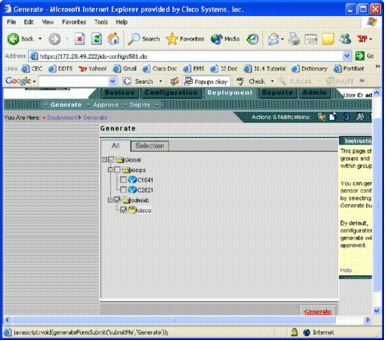
Click the Deployment tab, and choose Generate in order to generate configuration changes.
The Generate page appears.
-
Choose the cisco device that you just configured, and click Generate.
-
Click OK to accept the generated configuration, and then click OK.
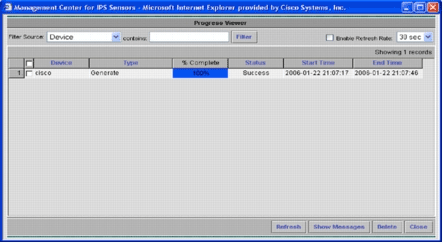
A status page appears.
-
Click Refresh until the generation task completes successfully.
-
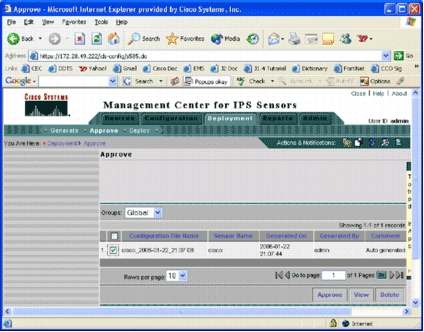
Click Approve located in the Deployment menu bar and the sdmlab group in order to see a list of configurations that need approval.
The Approve page appears.
-
Choose the task(s), and click Approve.
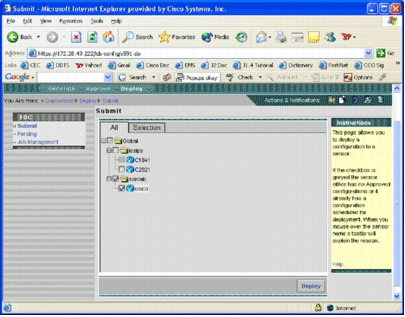
Click Deploy located in the Deployment menu bar, and click Submit.
The Submit page appears.
-
Choose devices for which you want to submit the deployment task.
-
Select the cisco device, and click Deploy.
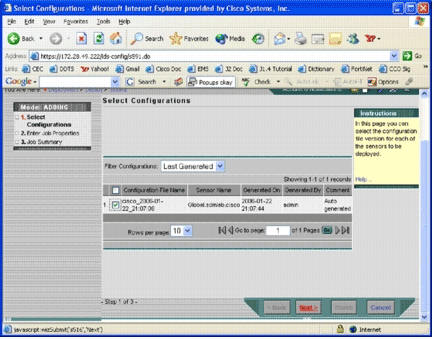
The Select Configurations page appears.
-
Choose the configuration you just made to the cisco device, and click Next.
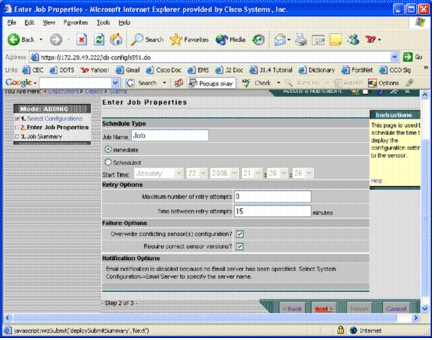
The Enter Job Properties page appears.
-
You can either immediately deploy the changes or schedule a task to do it at a later time. In this example, choose the Immediate option, and then click Next.
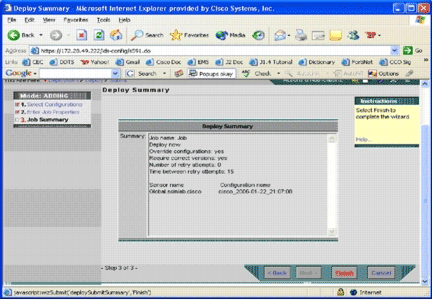
A brief job summary is shown and ready to be deployed.
-
Click Finish.
At the end of the deployment, a dialog box shows the status of the deployment process.
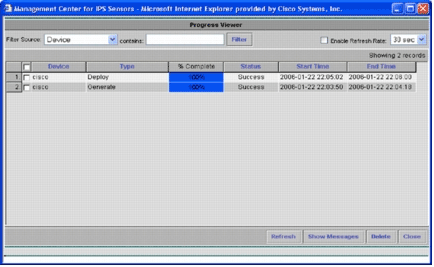
You have successfully deployed Cisco IOS IPS configurations to the device. When you configure multiple devices, you can make configuration changes on the group level and then apply the changes to all Cisco IOS IPS routers that belong to the same group.
Tip: This process is lengthy, but a quick-delivery feature is available. When you use this feature, you do not have to go through the Generate > Approve > Deploy process. Complete these steps in order to use the feature:
-
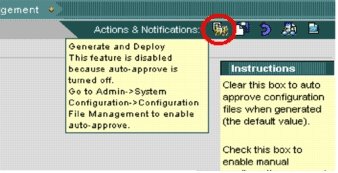
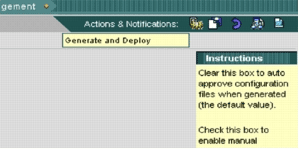
On the top of the user interface is a row of small icons. With your mouse hover over the first icon, and view the tool tip shown in this image:
-
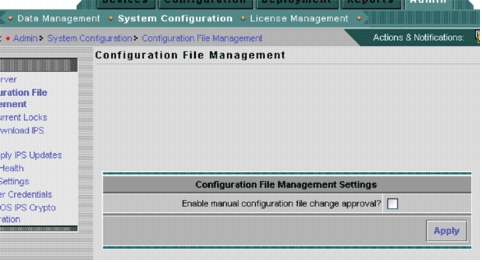
In order to enable the Generate and Deploy task, go to Admin > System Configuration > Configuration File Management, and uncheck the Enable manual configuration file change approval check box.
-
With your mouse hover over the first icon, it shows that the task is enabled.
-
Click this icon.
IPS MC automatically generates configuration changes and deploys them to the devices.
-
Autodownload Signature Updates
IPS MC supports autodownload signature updates from Cisco.com. It can download signature updates for sensor platforms, as well as for Cisco IOS IPS platforms. In order to configure this feature, go to Admin > System Configuration > Auto Download IPS Updates.
The Auto Download IPS Update page appears.
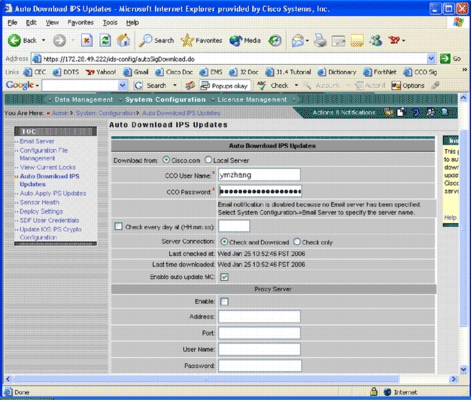
You must have a valid Cisco.com account in order to download this signature update. In order to check the autodownloaded files, go to the IPS MC installation home directory. By default it is \program files\CSCOpx\MDC\etc\ids\updates.
This image shows an image of the downloaded files in this directory.
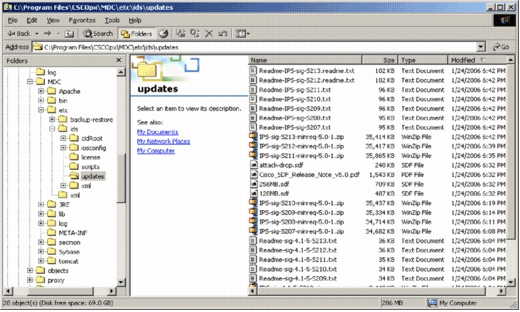
You can see that sensor update files. The Cisco IOS Software update file, and pretuned SDF files are downloaded.
Update Cisco IOS IPS Router with New SDF Files
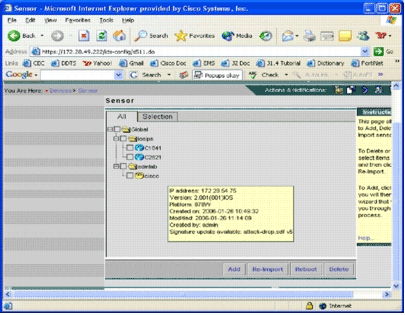
For Cisco IOS IPS routers deployed with pretuned SDF files, as soon as a new version of the SDF files are available through autodownload or copied to the updates directory, Cisco IPS MC recognizes the new version. After a user interface refresh, device icons for applicable devices turn yellow.
-
Click Deployment, and go through the Generate, Approve, and Deploy process.
-
After successful deployment, the Cisco IOS IPS router uses a new version of SDF files.
Related Information
Revision History
| Revision | Publish Date | Comments |
|---|---|---|
1.0 |
08-Oct-2018 |
Initial Release |
Contact Cisco
- Open a Support Case

- (Requires a Cisco Service Contract)


 Warning: IPS MC does not include memory-management functions for Cisco IOS IPS routers. Be careful when you select SDF files for your Cisco IOS IPS router. Ensure that the Cisco IOS IPS router has sufficient memory to run the selected SDF file.


 Feedback