Configuring PIX to Cisco Secure VPN Client Wild-card, Pre-shared, No Mode-Config
Available Languages
Contents
Introduction
This configuration demonstrates how to connect a VPN Client to a PIX firewall with the use of wildcards and the sysopt connection permit-ipsec and sysopt ipsec pl-compatible commands. This document also covers the nat 0 access-list command.
Note: Encryption technology is subject to export controls. It is your responsibility to know the law related to the export of encryption technology. If you have any questions related to export control, send an E-mail to export@cisco.com.
Prerequisites
Requirements
There are no specific requirements for this document.
Components Used
The information in this document is based on these software and hardware versions.
-
Cisco Secure PIX Software release 5.0.3 with Cisco Secure VPN Client 1.0 (shown as 2.0.7 in the Help > About menu) or Cisco Secure PIX Software release 6.2.1 with Cisco Secure VPN Client 1.1 (shown as 2.1.12 in the Help > About menu).
-
Internet machines access the web host on the inside with the IP address 192.68.0.50.
-
The VPN Client accesses all machines on the inside with the use of all ports (10.1.1.0 /24 and 10.2.2.0 /24).
The information presented in this document was created from devices in a specific lab environment. All of the devices used in this document started with a cleared (default) configuration. If you work in a live network, ensure that you understand the potential impact of any command before you use it.
Conventions
For more information on document conventions, refer to the Cisco Technical Tips Conventions.
Background Information
On the PIX, the access-list and nat 0 commands work together. The nat 0 access-list command is intended to be used instead of the sysopt ipsec pl-compatible command. If you use the nat 0 command with the matching access-list command, you have to know the IP address of the client that makes the VPN connection in order to create the matching access control list (ACL) to bypass the NAT.
Note: The sysopt ipsec pl-compatible command scales better than the nat 0 command with the matching access-list command ir order to bypass Network Address Translation (NAT). The reason is because you do not need to know the IP address of the clients that make the connection. The interchangeable commands are bold in the configuration in this document.
A user with a VPN Client connects and receives an IP address from their Internet service provider (ISP). The user has access to everything on the inside of the firewall. This includes networks. Also, users who do not run the client can connect to the web server with the use of the address provided by the static assignment. Users on the inside can connect to the Internet. It is not necessary for their traffic to go through the IPSec tunnel.
Configure
In this section, you are presented with the information to configure the features described in this document.
Network Diagram
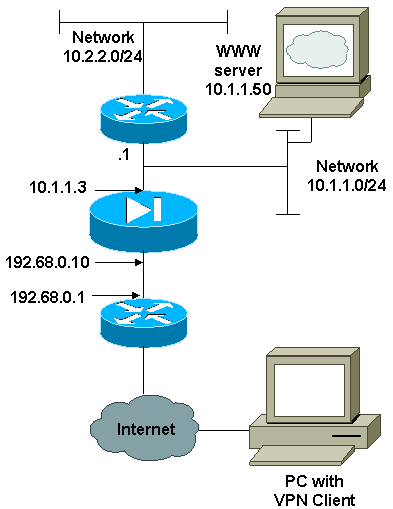
This document uses the network setup shown in this diagram.
Configurations
This document uses the configurations shown here.
| PIX Configuration |
|---|
PIX Version 6.2.1 nameif ethernet0 outside security0 nameif ethernet1 inside security100 enable password 8Ry2YjIyt7RRXU24 encrypted passwd 2KFQnbNIdI.2KYOU encrypted hostname pixfirewall fixup protocol ftp 21 fixup protocol http 80 fixup protocol smtp 25 fixup protocol h323 1720 fixup protocol rsh 514 fixup protocol sqlnet 1521 names !--- The ACL to bypass the NAT. You have to know the !--- IP address of the Client. In this case, it is !--- subnet 65.10.10.0/24. access-list 103 permit ip 10.0.0.0 255.0.0.0 65.10.10.0 255.255.255.0 pager lines 24 no logging timestamp no logging standby logging console debugging no logging monitor no logging buffered no logging trap logging facility 20 logging queue 512 interface ethernet0 10baset interface ethernet1 auto mtu outside 1500 mtu inside 1500 ip address outside 192.68.0.10 255.255.255.0 ip address inside 10.1.1.3 255.255.255.0 no failover failover timeout 0:00:00 failover ip address outside 0.0.0.0 failover ip address inside 0.0.0.0 arp timeout 14400 global (outside) 1 192.68.0.11-192.168.0.15 netmask 255.255.255.0 !--- Binding ACL 103 to the NAT statement in order to !--- avoid NAT on the IPSec packet. nat (inside) 0 access-list 103 nat (inside) 1 0.0.0.0 0.0.0.0 0 0 static (inside,outside) 192.68.0.50 10.1.1.50 netmask 255.255.255.255 0 0 conduit permit icmp any any no rip outside passive no rip outside default no rip inside passive no rip inside default route outside 0.0.0.0 0.0.0.0 192.68.0.1 1 route inside 10.2.2.0 255.255.255.0 10.1.1.1 1 timeout xlate 3:00:00 conn 1:00:00 half-closed 0:10:00 udp 0:02:00 timeout rpc 0:10:00 h323 0:05:00 timeout uauth 0:05:00 absolute aaa-server TACACS+ protocol tacacs+ aaa-server RADIUS protocol radius no snmp-server location no snmp-server contact snmp-server community public no snmp-server enable traps !--- The sysopt ipsec pl-compatible command !--- avoids conduit on the IPSec encrypted traffic. !--- This command needs to be used if you do not use !--- the nat 0 access-list command. sysopt ipsec pl-compatible sysopt connection permit-ipsec crypto ipsec transform-set myset esp-des esp-md5-hmac crypto dynamic-map cisco 1 set transform-set myset crypto map dyn-map 20 ipsec-isakmp dynamic cisco crypto map dyn-map interface outside isakmp enable outside isakmp key cisco123 address 0.0.0.0 netmask 0.0.0.0 isakmp policy 10 authentication pre-share isakmp policy 10 encryption des isakmp policy 10 hash md5 isakmp policy 10 group 1 isakmp policy 10 lifetime 1000 telnet timeout 5 terminal width 80 Cryptochecksum:c687aa0afb1dd03abce04c31566b5c52 : end [OK] |
| VPN Client Configuration |
|---|
Network Security policy:
 1- TACconn
     My Identity
          Connection security: Secure
          Remote Party Identity and addressing
          ID Type: IP subnet
          10.0.0.0
           255.0.0.0
          Port all Protocol all

     Connect using secure tunnel
          ID Type: IP address
          192.68.0.10

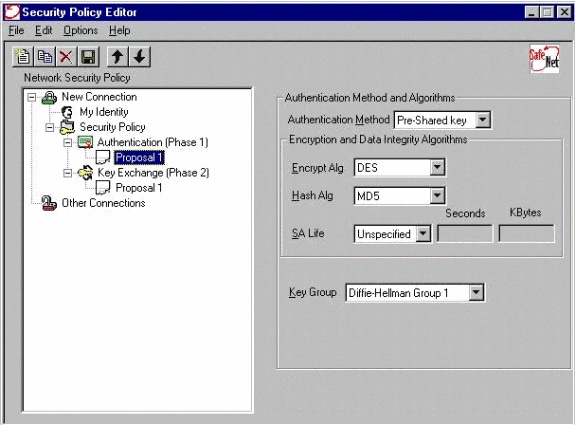
     Authentication (Phase 1)
     Proposal 1
         Authentication method: pre-shared key
         Encryp Alg: DES
         Hash Alg: MD5
         SA life: Unspecified
         Key Group: DH 1


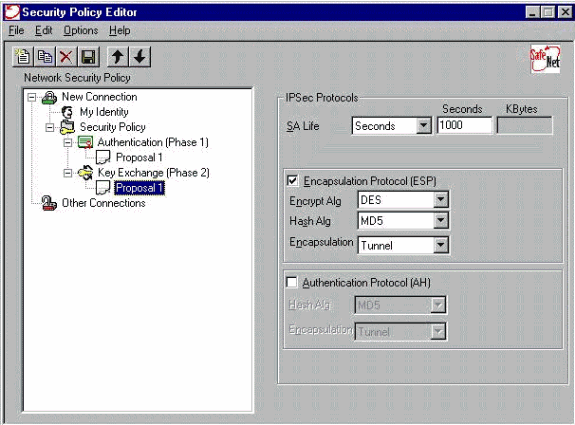
     Key exchange (Phase 2)
     Proposal 1
         Encapsulation ESP
         Encrypt Alg: DES
         Hash Alg: MD5
         Encap: tunnel
         SA life: Unspecified
         no AH


 2- Other Connections
        Connection security: Non-secure
        Local Network Interface
          Name: Any
          IP Addr: Any
Port: All |
Configure the Policy for the VPN Client IPSec Connection
Follow these steps to configure the policy for the VPN Client IPSec connection.
-
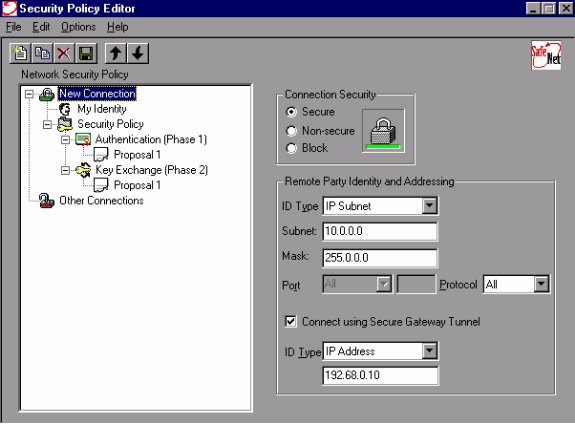
On the Remote Party Identity and Addressing tab, define the private network you want to be able to reach with the use of the VPN Client. Next, select Connect using Secure Gateway Tunnel and define the outside IP address of the PIX.
-
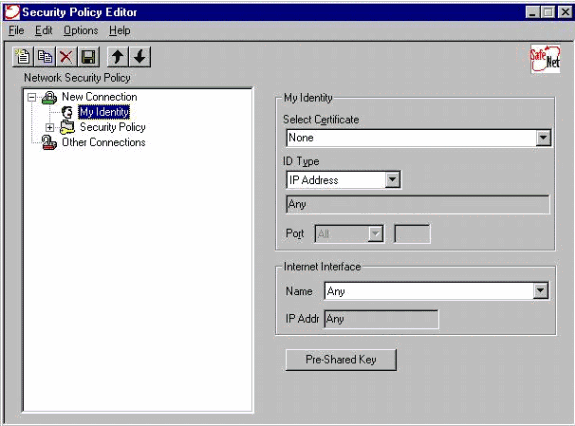
Select My Identity and leave the setting to the default. Next, click the Pre-Shared Key button.
-
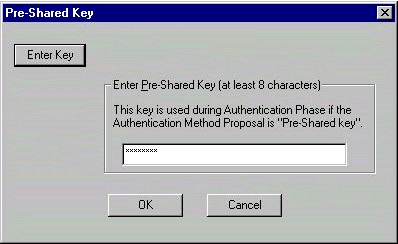
Enter the Pre-shared Key that is configured on the PIX.
-
Configure the Authentication proposal (Phase 1 policy).
-
Configure the IPSec proposal (Phase 2 policy).
Note: Do not forget to save the policy when you are finished. Open up a DOS window and ping a known host on the inside network of the PIX in order to initiate the tunnel from the client. You receive an Internet Control Message Protocol (ICMP) unreachable message from the first ping as it tries to negotiate the tunnel.
Verify
There is currently no verification procedure available for this configuration.
Troubleshoot
This section provides information you can use to troubleshoot your configuration.
debug Commands
Note: Before you issue debug commands, refer to Important Information on Debug Commands.
In order to see the Client-side debugs, enable the Cisco Secure Log Viewer:
-
debug crypto ipsec sa - Displays the IPSec negotiations of phase 2.
-
debug crypto isakmp sa - Displays the ISAKMP negotiations of phase 1.
-
debug crypto engine - Displays the encrypted sessions.
Related Information
- Cisco Secure PIX Firewall Command References
- Security Product Field Notices (including PIX)
- Cisco PIX Firewall Software Product Support
- Requests for Comments (RFCs)

- IP Security (IPSec) Product Support Pages
- Configuring IPSec Network Security
- Configuring Internet Key Exchange Security Protocol
- An Introduction to IP Security (IPSec) Encryption
- Connectivity through the PIX Firewall
- Configuring IPSec
- Technical Support & Documentation - Cisco Systems
Revision History
| Revision | Publish Date | Comments |
|---|---|---|
1.0 |
24-Mar-2008 |
Initial Release |
Contact Cisco
- Open a Support Case

- (Requires a Cisco Service Contract)


 Feedback