RSA SecurID Ready with Wireless LAN Controllers and Cisco Secure ACS Configuration Example
Available Languages
Contents
Introduction
This document explains how to set up and configure Cisco Lightweight Access Point Protocol (LWAPP)-capable APs and Wireless LAN Controllers (WLCs), as well as Cisco Secure Access Control Server (ACS) to be used in a RSA SecurID authenticated WLAN environment. RSA SecurID-specific implementation guides can be found at www.rsasecured.com.
Prerequisites
Requirements
Ensure that you meet these requirements before you attempt this configuration:
-
Knowledge of WLCs and how to configure the WLC basic parameters.
-
Knowledge on how to configure Cisco Wireless Client's profile using Aironet Desktop Utility (ADU).
-
Have functional knowledge of Cisco Secure ACS.
-
Have basic knowledge of LWAPP.
-
Have basic understanding of Microsoft Windows Active Directory (AD) services, as well as domain controller and DNS concepts.
Note: Before you attempt this configuration, ensure that the ACS and the RSA Authentication Manager server are in the same domain and their system clock is exactly synchronized. If you are using Microsoft Windows AD Services, refer to the Microsoft documentation to configure the ACS and RSA Manager server in the same domain. Refer to Configure Active Directory and Windows User Database for relevant information.
Components Used
The information in this document is based on these software and hardware versions:
-
RSA Authentication Manager 6.1
-
RSA Authentication Agent 6.1 for Microsoft Windows
-
Cisco Secure ACS 4.0(1) Build 27
Note: The RADIUS server that is included can be used in place of the Cisco ACS. See the RADIUS documentation that was included with the RSA Authentication Manager on how to configure the server.
-
Cisco WLCs and Lightweight Access Points for Release 4.0 (version 4.0.155.0)
The information in this document was created from the devices in a specific lab environment. All of the devices used in this document started with a cleared (default) configuration. If your network is live, make sure that you understand the potential impact of any command.
Conventions
Refer to the Cisco Technical Tips Conventions for more information on document conventions.
Background Information
The RSA SecurID system is a two-factor user authentication solution. Used in conjunction with RSA Authentication Manager and an RSA Authentication Agent, the RSA SecurID authenticator requires users to identify themselves using a two-factor authentication mechanism.
One is the RSA SecurID code, a random number generated every 60 seconds on the RSA SecureID authenticator device. The other is the Personal Identification Number (PIN).
RSA SecurID authenticators are as simple to use as entering a password. Each end user is assigned an RSA SecurID authenticator that generates a one-time-use code. When logging on, the user simply enters this number and a secret PIN to be successfully authenticated. As an added benefit, RSA SecurID hardware tokens are usually pre-programmed to be fully functional upon receipt.
This flash demonstration explains how to use an RSA secureID authenticator device: RSA demo.
Through the RSA SecurID Ready program, Cisco WLCs and Cisco Secure ACS servers support RSA SecurID authentication right out of the box. RSA Authentication Agent software intercepts access requests, whether local or remote, from users (or groups of users) and directs them to the RSA Authentication Manager program for authentication.
RSA Authentication Manager software is the management component of the RSA SecurID solution. It is used to verify authentication requests and centrally administer authentication policies for enterprise networks. It works in conjunction with RSA SecurID authenticators and RSA Authentication Agent software.
In this document, a Cisco ACS server is used as the RSA Authentication Agent by installing the agent software on it. The WLC is the Network Access Server (NAS) (AAA client) which in turn forwards the client authentications to the ACS. The document demonstrates the concepts and setup using Protected Extensible Authentication Protocol (PEAP) client authentication.
In order to learn about PEAP authentication, refer to Cisco Protected Extensible Authentication Protocol.
Configure
In this section, you are presented with the information to configure the features described in this document.
This document uses these configurations:
Agent Host Configuration
Using Cisco Secure ACS as the RADIUS Server
In order to facilitate communication between the Cisco Secure ACS and the RSA Authentication Manager / RSA SecurID Appliance, an Agent Host record must be added to the RSA Authentication Manager database. The Agent Host record identifies the Cisco Secure ACS within its database and contains information about communication and encryption.
In order to create the Agent Host record, you need this information:
-
Hostname of the Cisco ACS Server
-
IP addresses for all network interfaces of the Cisco ACS Server
Complete these steps:
-
Open the RSA Authentication Manager Host Mode application.
-
Select Agent Host > Add Agent Host.
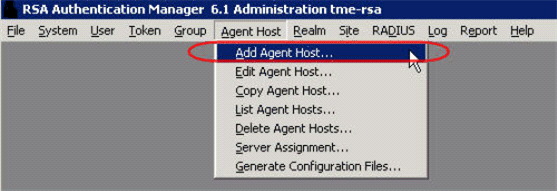
You see this window:
-
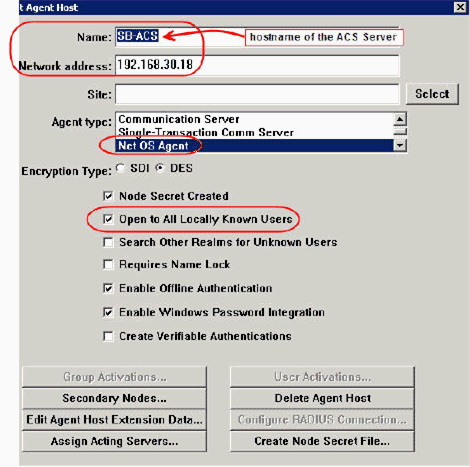
Enter the appropriate information for the Cisco ACS Server Name and Network address. Choose NetOS for the Agent type and check the checkbox for Open to All Locally Known Users.
-
Click OK.
Using RSA Authentication Manager 6.1 RADIUS Server
In order to facilitate communication between the Cisco WLC and the RSA Authentication Manager, an Agent Host record must be added to the RSA Authentication Manager database and RADIUS Server database. The Agent Host record identifies the Cisco WLC within its database and contains information about communication and encryption.
In order to create the Agent Host record, you need this information:
-
WLC’s hostname
-
Management IP addresses of the WLC
-
RADIUS secret, which must match the RADIUS secret on the Cisco WLC
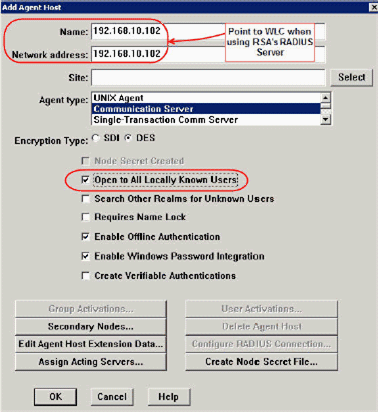
When adding the Agent Host Record, the WLC’s role is configured as a Communication Server. This setting is used by the RSA Authentication Manager to determine how communication with the WLC will occur.
Note: Hostnames within the RSA Authentication Manager / RSA SecurID Appliance must resolve to valid IP addresses on the local network.
Complete these steps:
-
Open the RSA Authentication Manager Host Mode application.
-
Select Agent Host > Add Agent Host.

You see this window:
-
Enter the appropriate information for the WLC hostname (a resolvable FQDN, if necessary) and Network address. Choose Communication Server for Agent type and check the checkbox for Open to All Locally Known Users.
-
Click OK.
-
From the menu, select RADIUS > Manage RADIUS Server.

A new administration window opens.
-
In this window, select RADIUS Clients, then click Add.

-
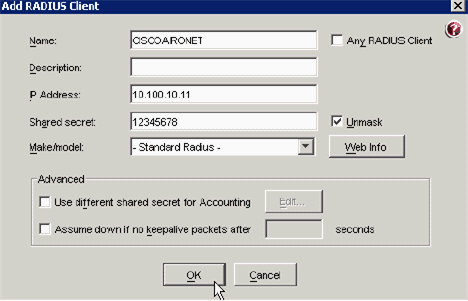
Enter the appropriate information for the Cisco WLC. The Shared secret must match the shared secret defined on the Cisco WLC.
-
Click OK.
Authentication Agent Configuration
This table represents the RSA Authentication Agent functionality of ACS:
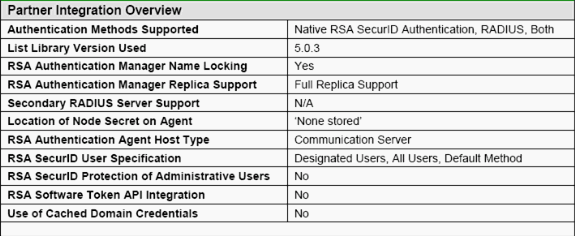
Note: See the RADIUS documentation that was included with the RSA Authentication Manager on how to configure the RADIUS server, if that is the RADIUS server that will be used.
Configure Cisco ACS
Activate RSA SecurID Authentication
Cisco Secure ACS supports RSA SecurID authentication of users. Complete these steps in order to configure Cisco Secure ACS to authenticate users with Authentication Manager 6.1:
-
Install the RSA Authentication Agent 5.6 or later for Windows on the same system as the Cisco Secure ACS server.
-
Verify connectivity by running the Test Authentication function of the Authentication Agent.
-
Copy the aceclnt.dll file from the RSA server c:\Program Files\RSA Security\RSA Authentication Manager\prog directory to the ACS server’s c:\WINNT\system32 directory.
-
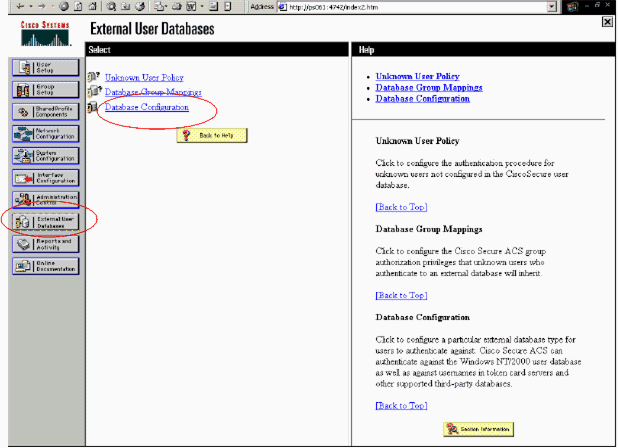
In the navigation bar, click External User Database. Then, click Database Configuration in the External Database page.
-
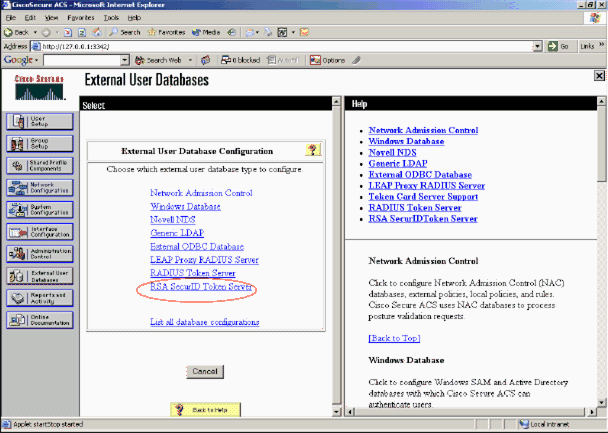
In the External User Database Configuration page, click RSA SecurID Token Server.
-
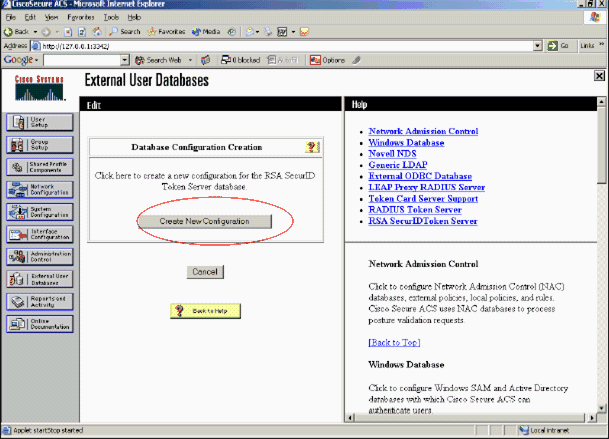
Click Create New Configuration.
-
Enter a name, then click Submit.
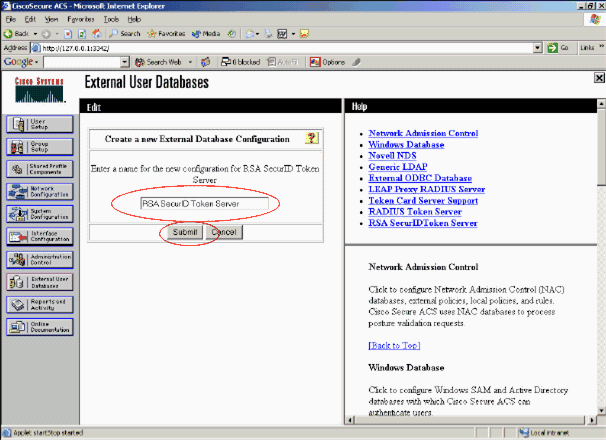
-
Click Configure.
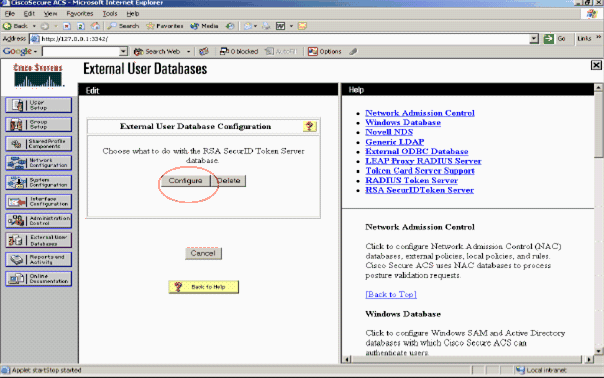
Cisco Secure ACS displays the name of the token server and the path to the authenticator DLL. This information confirms that Cisco Secure ACS can contact the RSA Authentication Agent. You can add the RSA SecurID external user database to your Unknown User Policy or assign specific user accounts to use this database for authentication.
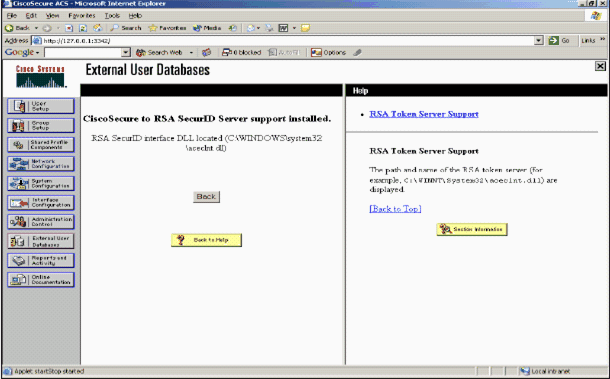
Add/Configure RSA SecurID Authentication to Your Unknown User Policy
Complete these steps:
-
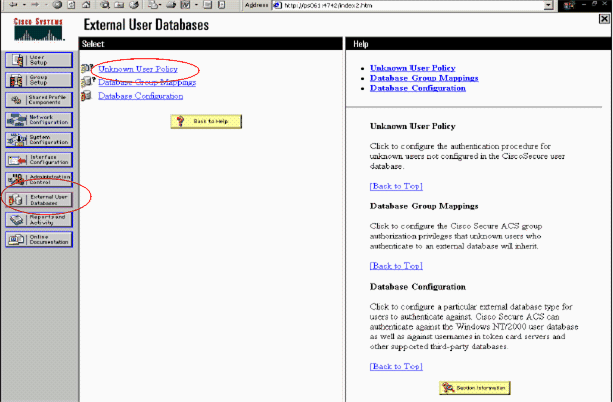
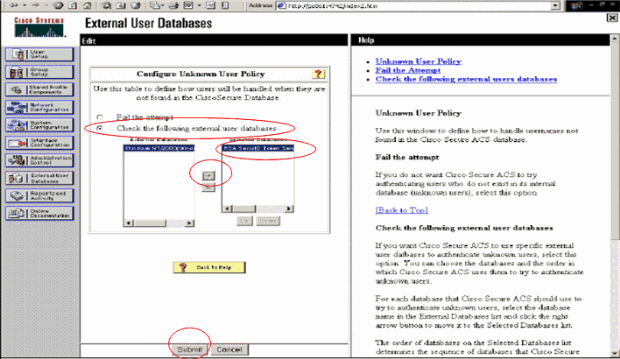
In the ACS navigation bar, click External User Database > Unknown User Policy.
-
In the Unknown User Policy page, select Check the following external user databases, highlight RSA SecurID Token Server and move it to the Selected Databases box. Then, click Submit.
Add/Configure RSA SecurID Authentication for Specific User Accounts
Complete these steps:
-
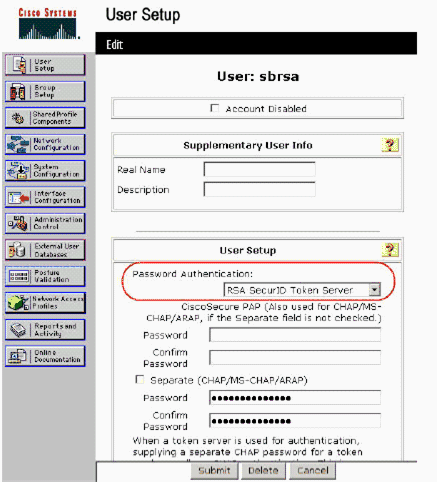
Click User Setup from the main ACS Admin GUI. Enter the username and click Add (or select an existing user you wish to modify).
-
Under User Setup > Password Authentication, choose RSA SecurID Token Server. Then, click Submit.
Add a RADIUS Client in Cisco ACS
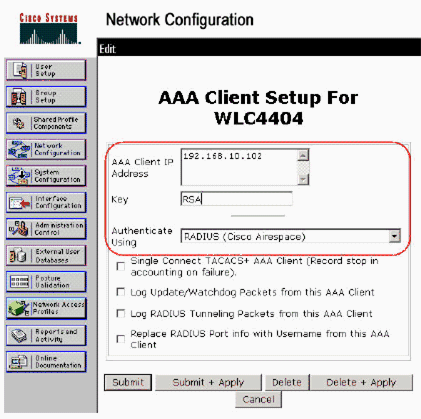
The Cisco ACS server install will need the IP addresses of the WLC to serve as an NAS for forwarding client PEAP authentications to the ACS.
Complete these steps:
-
Under Network Configuration, add/edit the AAA client for the WLC that will be used. Enter the “shared secret” key (common to WLC) that is used between the AAA client and ACS. Select Authenticate Using > RADIUS (Cisco Airespace) for this AAA client. Then, click Submit + Apply.
-
Apply for and install a server certificate from a known, trusted Certificate Authority such as RSA Keon Certificate Authority.
For more information on this process, refer to the documentation that ships with Cisco ACS. If you are using RSA Certificate Manager, you can view the RSA Keon Aironet implementation guide for additional help. You must successfully complete this task before you continue.
Note: Self-signed certificates can also be used. Refer to the Cisco Secure ACS documentation on how to use these.
-
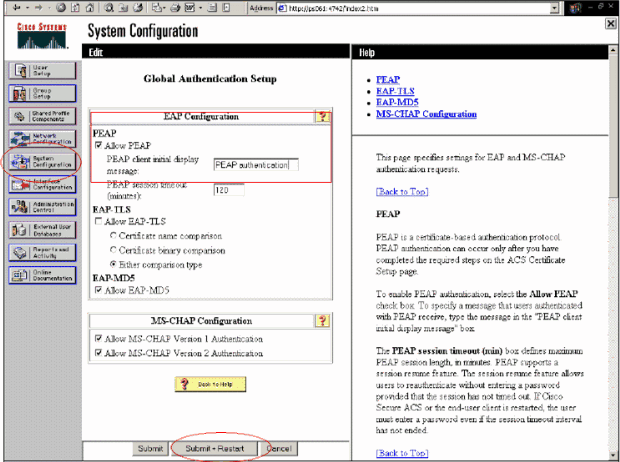
Under System Configuration > Global Authentication Setup, check the checkbox for Allow PEAP authentication.
Configure Cisco Wireless LAN Controller Configuration for 802.1x
Complete these steps:
-
Connect to the WLC’s command line interface to configure the controller so it can be configured to connect to the Cisco Secure ACS Server.
-
Enter the config radius auth ip-address command from the WLC to configure a RADIUS server for authentication.
Note: When you test with the RSA Authentication Manager RADIUS server, enter the IP address of the RSA Authentication Manager’s RADIUS server. When you test with the Cisco ACS server, enter the IP address of the Cisco Secure ACS server.
-
Enter the config radius auth port command from the WLC to specify the UDP port for authentication. Ports 1645 or 1812 are active by default in both the RSA Authentication Manager and Cisco ACS server.
-
Enter the config radius auth secret command from the WLC to configure the shared secret on the WLC. This must match the shared secret created in the RADIUS servers for this RADIUS client.
-
Enter the config radius auth enable command from the WLC to enable authentication. When desired, enter the config radius auth disable command to disable authentication. Note that authentication is disabled by default.
-
Select the appropriate Layer 2 security option for the desired WLAN at the WLC.
-
Use the show radius auth statistics and show radius summary commands to verify that the RADIUS settings are correctly configured.
Note: The default timers for EAP Request-timeout are low and might need to be modified. This can be done using the config advanced eap request-timeout <seconds> command. It might also help to tweak the identity request timeout based on the requirements. This can be done using the config advanced eap identity-request-timeout <seconds> command.
802.11 Wireless Client Configuration
For a detailed explanation of how to configure your wireless hardware and client supplicant, refer to various Cisco documentation.
Known Issues
These are some of the well known issues with RSA SecureID authentication:
-
RSA Software Token. New Pin mode and Next Tokencode modes are not supported when using this form of authentication with XP2. (FIXED as a result of ACS-4.0.1-RSA-SW-CSCsc12614-CSCsd41866.zip)
-
If your ACS implementation is older or you do not have the above patch, the client will not be able to authenticate until the user transitions from “Enabled;New PIN Mode” to “Enabled”. You can accomplish this by having the user complete a non-wireless authentication, or by using the “test authentication” RSA application.
-
Deny 4 digit / Alphanumeric PINs. If a user in New Pin mode goes against the PIN policy, the authentication process fails, and the user is unaware of how or why. Typically, if a user goes against the policy, they will be sent a message that the PIN was rejected and be prompted again while showing the user again what the PIN policy is (For example, if the PIN policy is 5-7 digits, yet the user enters 4 digits).
Related Information
- Dynamic VLAN Assignment with WLCs based on ACS to Active Directory Group Mapping Configuration Example
- Client VPN over Wireless LAN with WLC Configuration Example
- Authentication on Wireless LAN Controllers Configuration Examples
- EAP-FAST Authentication with Wireless LAN Controllers and External RADIUS Server Configuration Example
- Wireless Authentication Types on Fixed ISR Through SDM Configuration Example
- Wireless Authentication Types on a Fixed ISR Configuration Example
- Cisco Protected Extensible Authentication Protocol
- EAP Authentication with RADIUS Server
- Technical Support & Documentation - Cisco Systems
Revision History
| Revision | Publish Date | Comments |
|---|---|---|
1.0 |
01-Dec-2013 |
Initial Release |


 Feedback