ACS Shell Command Authorization Sets on IOS and ASA/PIX/FWSM Configuration Example
Available Languages
Contents
Introduction
This document describes how to configure the shell authorization sets in Cisco Secure Access Control Server (ACS) for AAA clients, such as Cisco IOS® routers or switches and Cisco Security Appliances (ASA/PIX/FWSM) with TACACS+ as the authorization protocol.
Note: ACS Express does not support command authorization.
Prerequisites
Requirements
This document assumes that the basic configurations are set in both AAA Clients and ACS.
In ACS, choose Interface Configuration > Advanced Options, and ensure that the Per-user TACACS+/RADIUS Attributes check box is checked.
Components Used
The information in this document is based on the Cisco Secure Access Control Server (ACS) that runs the software version 3.3 and later.
The information in this document was created from the devices in a specific lab environment. All of the devices used in this document started with a cleared (default) configuration. If your network is live, make sure that you understand the potential impact of any command.
Conventions
Refer to the Cisco Technical Tips Conventions for more information on document conventions.
Command Authorization Sets
Command authorization sets provide a central mechanism to control the authorization of each command that is issued on any given network device. This feature greatly enhances the scalability and manageability required to set authorization restrictions.
In ACS, the default command authorization sets include Shell Command Authorization Sets and PIX Command Authorization Sets. Cisco device management applications, such as CiscoWorks Management Center for Firewalls, can instruct ACS to support additional command authorization set types.
Note: PIX Command Authorization Sets require that the TACACS+ command authorization request identify the service as pixshell. Verify that this service has been implemented in the version of PIX OS that your firewalls use; if not, use Shell Command Authorization Sets to perform command authorization for PIX devices. Refer to Configuring a Shell Command Authorization Set for a User Group for more information.
Note: As of PIX OS version 6.3, the pixshell service has not been implemented.
Note: The Cisco Security Appliances (ASA/PIX) does not currently allow the user to be placed directly into the enable mode during login. The user must manually enter into the enable mode.
In order to offer more control of device-hosted administrative Telnet sessions, a network device that uses TACACS+ can request authorization for each command line before it executes. You can define a set of commands that are permitted or denied for execution by a particular user on a given device. ACS has further enhanced this capability with these features:
-
Reusable Named Command Authorization Sets—Without directly citing any user or user group, you can create a named set of command authorizations. You can define several command authorization sets that delineate different access profiles. For example:
-
A Help desk command authorization set could permit access to high-level browsing commands, such as show run, and deny any configuration commands.
-
An All network engineers command authorization set could contain a limited list of permitted commands for any network engineer in the enterprise.
-
A Local network engineers command authorization set could permit all commands (and include IP address configuration commands).
-
-
Fine Configuration Granularity—You can create associations between named command authorization sets and network device groups (NDGs). Thus, you can define different access profiles for users depending on which network devices they access. You can associate the same named command authorization set with more than one NDG and use it for more than one user group. ACS enforces data integrity. Named command authorization sets are kept in the ACS internal database. You can use the ACS Backup and Restore features to back up and restore them. You can also replicate command authorization sets to secondary ACSs along with other configuration data.
For command authorization set types that support Cisco device management applications, the benefits are similar when you use command authorization sets. You can apply command authorization sets to ACS groups that contain users of the device management application in order to enforce authorization of various privileges in a device management application. The ACS groups can correspond to different roles within the device management application, and you can apply different command authorization sets to each group, as applicable.
ACS has three sequential stages of command authorization filtering. Each command authorization request is evaluated in the order listed:
-
Command Match—ACS determines whether the command that is processed matches a command listed in the command authorization set. If the command is not matched, command authorization is determined by the Unmatched Commands setting: permit or deny. Otherwise, if the command is matched, evaluation continues.
-
Argument Match—ACS determines whether the command arguments presented match the command arguments listed in the command authorization set.
-
If any argument is not matched, command authorization is determined by whether the Permit Unmatched Args option is enabled. If unmatched arguments are permitted, the command is authorized and evaluation ends; otherwise, the command is not authorized and evaluation ends.
-
If all arguments are matched, evaluation continues.
-
-
Argument Policy—Once ACS determines that the arguments in the command match arguments in the command authorization set, ACS determines whether each command argument is explicitly permitted. If all arguments are explicitly permitted, ACS grants command authorization. If any arguments is not permitted, ACS denies command authorization.
Add a Shell Command Authorization Set
This section includes these scenarios that describe how to add a command authorization set:
Note: Refer to the Adding a Command Authorization Set section of the User Guide for Cisco Secure Access Control Server 4.1 for more information about how to create command authorization sets. Refer to Editing a Command Authorization Set and Deleting a Command Authorization Set for more information about how to edit and delete command authorization sets.
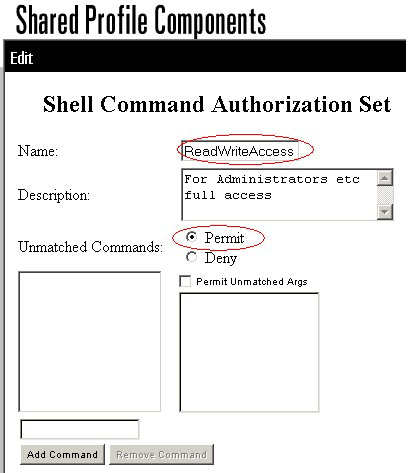
Scenario 1: Privilege for Read-Write Access or Full Access
In this scenarios, users are granted read-write (or full) access.
In the Shell Command Authorization Set area of the Shared Profile Components window, configure these settings:
-
In the Name field, enter ReadWriteAccess as the command authorization set name.
-
In the Description field, enter a description for the command authorization set.
-
Click the Permit radio button, and then click Submit.
Scenario 2: Privilege for Read-Only Access
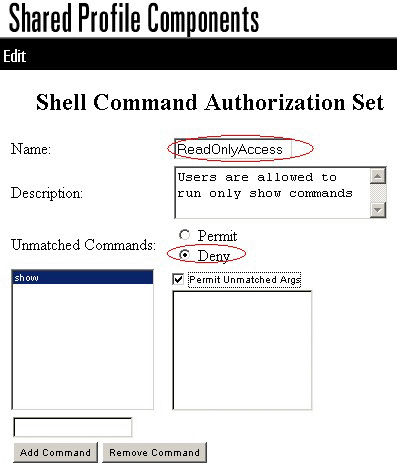
In this scenarios, users are able to use only show commands.
In the Shell Command Authorization Set area of the Shared Profile Components window, configure these settings:
-
In the Name field, enter ReadOnlyAccess as the name of the command authorization set.
-
In the Description field, enter a description for the command authorization set.
-
Click the Deny radio button.
-
Enter the show command in the field above the Add Command button, and then click Add Command.
-
Check the Permit Unmatched Args check box, and click Submit
Scenario 3: Privilege for Restricted Access
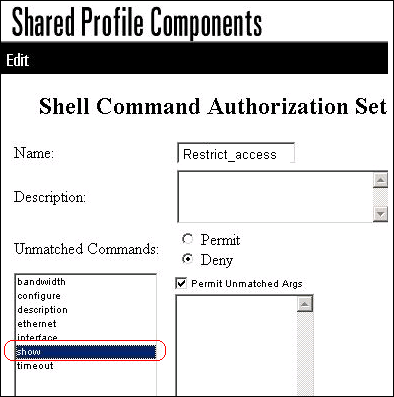
In this scenario, users are able to use selective commands.
In the Shell Command Authorization Set area of the Shared Profile Components window, configure these settings:
-
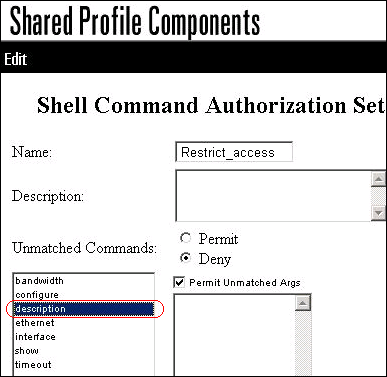
In the name field, enter Restrict_access as the name of the command authorization set.
-
Click the Deny radio button.
-
Enter the commands you want to allow on the AAA clients.
-
In the field located above the Add Command button, enter the show command, and click Add Command.
-
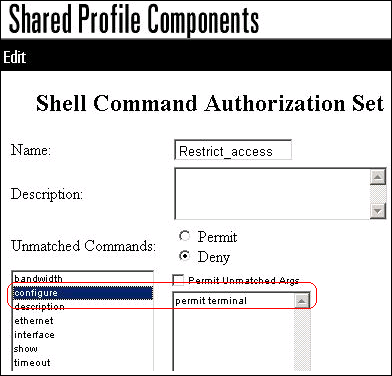
Enter the configure command, and click Add Command.
-
Select the configure command, and enter permit terminal in the field to the right.
-
Enter the interface command, and click Add Command.
-
Select the interface command, and enter permit Ethernet in the field to the right.
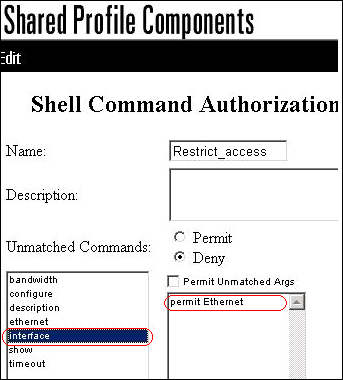
-
Enter the ethernet command, and click Add Command.
-
Select the interface command, and enter permit timeout, permit bandwidth, and permit description in the field to the right.
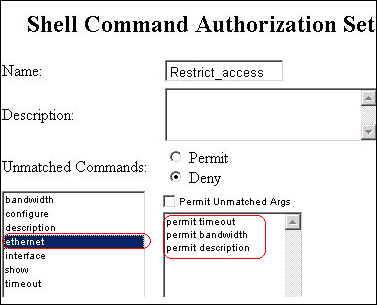
-
Enter the bandwidth command, and click Add Command.
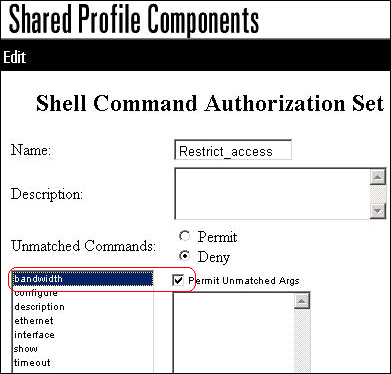
-
Enter the timeout command, and click Add Command.
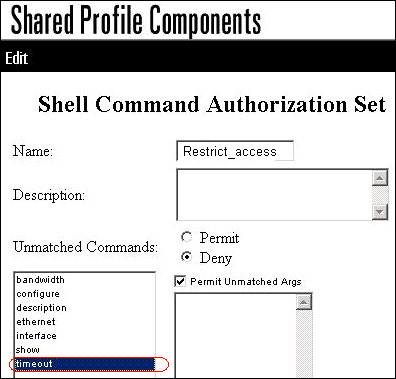
-
Enter the description command, and click Add Command.
-
-
Click Submit.
Associate the Shell Command Authorization Set to User Group
Refer to the Configuring a Shell Command Authorization Set for a User Group section of the User Guide for Cisco Secure Access Control Server 4.1 for more information about how to configure the shell command authorization set configuration for user groups.
Associate the Shell Command Authorization Set (ReadWrite Access) to User Group (Admin Group)
-
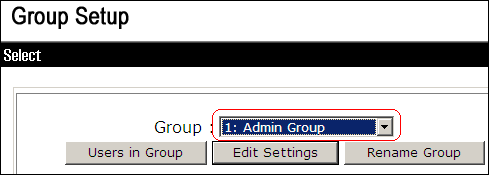
In the ACS window, click Group Setup, and choose Admin Group from the Group drop-down list.
-
Click Edit Settings.
-
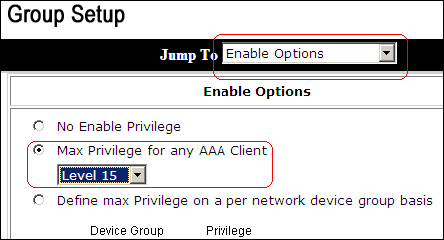
From the Jump To drop-down list, choose Enable Options.
-
In the Enable Options area, click the Max Privilege for any AAA client radio button, and choose Level 15 from the drop-down list.
-
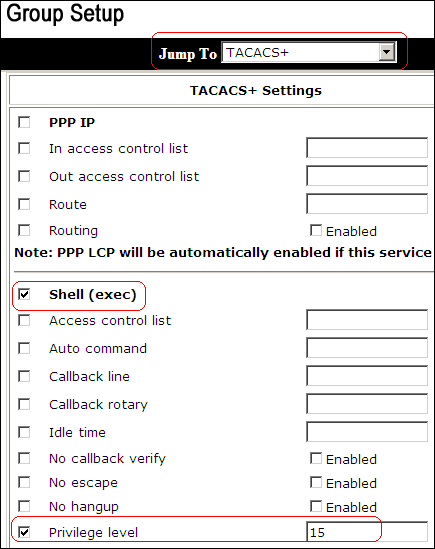
From the Jump To drop-down list, choose TACACS+.
-
In the TACACS+ Settings area, check the Shell (exec) check box, check the Privilege level check box, and enter 15 in the Privilege level field.
-
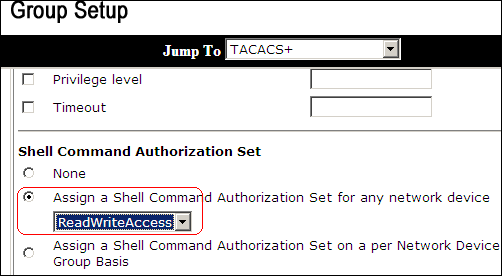
In the Shell Command Authorization Set area, click the Assign a Shell Command Authorization Set for any network device radio button, and choose ReadWriteAccess from the drop-down list.
-
Click Submit
Associate the Shell Command Authorization Set (ReadOnly Access) to User Group (Read-Only Group)
-
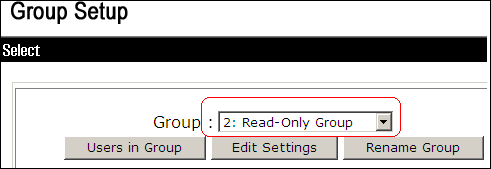
In the ACS Window, click Group Setup, and choose Read-Only Group from the Group drop-down list.
-
Click Edit Settings.
-
From the Jump To drop-down list, choose Enable Options.
-
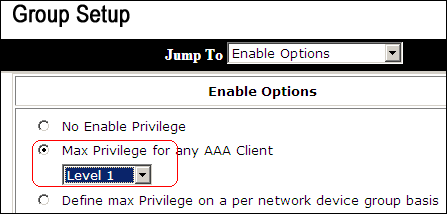
In the Enable Options area, click the Max Privilege for any AAA client radio button, and choose Level 1 from the drop-down list.
-
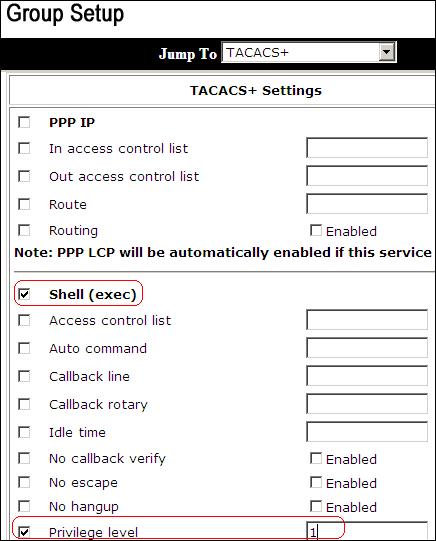
In the TACACS+ Settings area, check the Shell (exec) check box, check the Privilege level check box, and enter 1 in the Privilege level field.
-
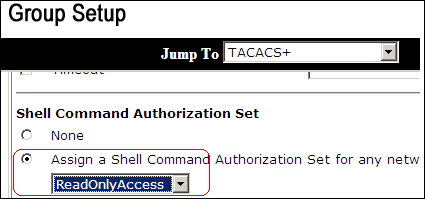
In the Shell Command Authorization Set area, click the Assign a Shell Command Authorization Set for any network device radio button, and choose ReadOnlyAccess from the drop-down list.
-
Click Submit
Associate the Shell Command Authorization Set (Restrict_access) to User
Refer to the Configuring a Shell Command Authorization Set for a User section of the User Guide for Cisco Secure Access Control Server 4.1 for more information about how to configure the shell command authorization set configuration for users.
Note: User-level settings override group-level settings in ACS, which means if the user has shell command authorization set in the user-level settings, then it overrides the group-level settings.
-
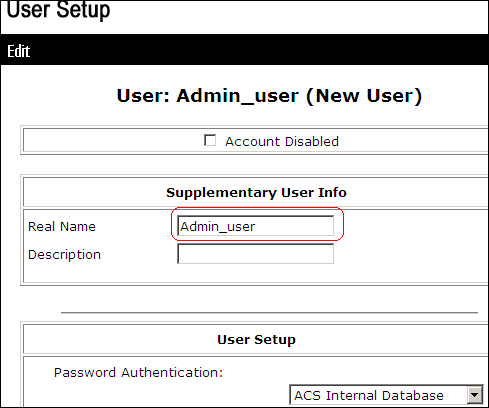
Click User Setup > Add/Edit in order to create a new user named Admin_user to be part of Admin group.
-
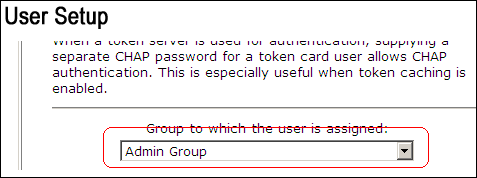
From the group to which the user is assigned drop-down list, choose Admin Group.
-
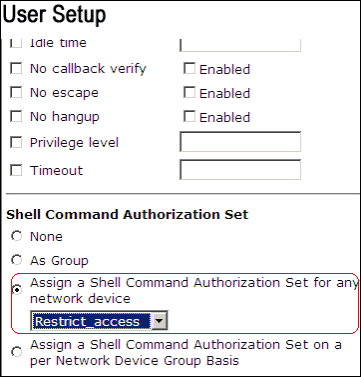
In the Shell Command Authorization Set area, click the Assign a Shell Command Authorization Set for any network device radio button, and choose Restrict_access from the drop-down list.
Note: In this scenario, this user is part of Admin Group. The Restrict_access shell authorization set is applicable; the ReadWrite Access shell authorization set is not applicable.
Note: In the TACACS+ (Cisco) section of the Interface Configuration area, ensure that the Shell (exec) option is selected in the User column.
IOS Router Configuration
In addition to your preset configuration, these commands are required on an IOS router or switch in order to implement command authorization through an ACS server:
aaa new-model
aaa authorization config-commands
aaa authorization commands 0 default  group tacacs+ local
aaa authorization commands 1 default  group tacacs+ local
aaa authorization commands 15 default group tacacs+ local
tacacs-server host 10.1.1.1
tacacs-server key cisco123
ASA/PIX/FWSM Configuration
In addition to your preset configuration, these commands are required on ASA/PIX/FWSM in order to implement command authorization through an ACS server:
aaa-server authserver protocol tacacs+
aaa-server authserver host 10.1.1.1
aaa authorization command authserver
Note: It is not possible to use RADIUS protocol in order to restrict user access to ASDM for read-only purposes. Since the RADIUS packets contain authentication and authorization at the same time, all users that are authenticated in the RADIUS server have a privilege level of 15. You can achieve this through TACACS with the implementation of command authorization sets.
Note: ASA/PIX/FWSM take a long time to execute each command typed even if ACS is unavailable to perform command authorization. If ACS is unavailable and ASA has command authorization configured, ASA will still request command authorization for each command.
Troubleshoot
Error: command authorization failed
Problem
After you log in to the firewall through TACACS logging, commands do not work. When you enter a command, this error is received: command authorization failed.
Solution
Complete these steps in order to resolve this issue:
-
Ensure the correct user name is used and that all required privileges are assigned to the user.
-
If the user name and privileges are correct, verify that the ASA has connectivity with the ACS and that the ACS is active.
Note: This error can also occur if the administrator mistakenly configured command authorization for local, as well as TACACS, users. In this case, perform a password recovery in order to resolve the issue.
Related Information
Revision History
| Revision | Publish Date | Comments |
|---|---|---|
1.0 |
12-Oct-2007 |
Initial Release |
Contact Cisco
- Open a Support Case

- (Requires a Cisco Service Contract)


 Feedback