Configure Secure Access for RA-VPNaaS with Duo SSO and Posture Assessment with ISE
Available Languages
Download Options
Bias-Free Language
The documentation set for this product strives to use bias-free language. For the purposes of this documentation set, bias-free is defined as language that does not imply discrimination based on age, disability, gender, racial identity, ethnic identity, sexual orientation, socioeconomic status, and intersectionality. Exceptions may be present in the documentation due to language that is hardcoded in the user interfaces of the product software, language used based on RFP documentation, or language that is used by a referenced third-party product. Learn more about how Cisco is using Inclusive Language.
Contents
Introduction
This document describes how to configure Posture Assessment for Remote Access VPN users with Identity Service Engine (ISE) and Secure Access with Duo.
Prerequisites
- Configure User Provisioning on Secure Access
- Configure Duo SSO with Authentication Proxy or Third-Party IDP
- Cisco ISE connected to Secure Access through the tunnel
Requirements
Cisco recommends that you have knowledge of these topics:
- Identity Service Engine
- Secure Access
- Cisco Secure Client
- Guide to Two-Factor Authentication - Duo Security
- ISE Posture
- Authentication, Authorization, and Accounting
Components Used
The information in this document is based on:
- Identity Service Engine (ISE) Version 3.3 Patch 1
- Secure Access
- Cisco Secure Client - Anyconnect VPN Version 5.1.2.42
The information in this document was created from the devices in a specific lab environment. All of the devices used in this document started with a cleared (default) configuration. If your network is live, ensure that you understand the potential impact of any command.
Background Information

Integrating Duo SAML with Cisco Identity Services Engine (ISE) enhances the authentication process, adding another layer of security to Cisco Secure Access solutions. Duo SAML provides a Single Sign-On (SSO) capability that simplifies the user login process while ensuring high-security standards.
Once authenticated through Duo SAML, the authorization process is handled by Cisco ISE. This allows for dynamic access control decisions based on user identity and device posture. ISE can enforce detailed policies that dictate what resources a user can access, when, and from which devices.

Note: To configure the RADIUS integration, you need to make sure you have communication between both platforms.
Network Diagram

Configure

Note: Before you begin the configuration process, you must complete the First Steps with Secure Access and ISE Integration.
Duo Configuration
To configure the RA-VPN Application, proceed with the next steps:
Navigate to your Duo Admin Panel
- Navigate to
Applications > Protect an Application - Search for
Generic SAML Service Provider - Click
Protect

You must have the application displayed on the screen; remember the application name for the VPN configuration.
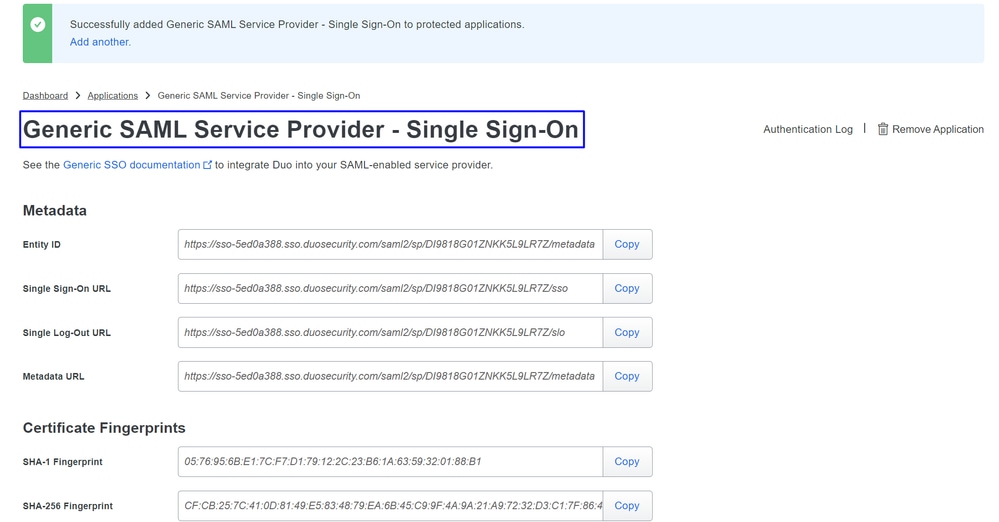
In this case is Generic SAML Service Provider.
Secure Access Configuration
Configure Radius Group on the IP Pools
To configure the VPN Profile using Radius, proceed with the next steps:
Navigate to your Secure Access Dashboard.
- Click on
Connect > Enduser Connectivity > Virtual Private Network - Under your Pool Configuration (
Manage IP Pools), clickManage


- Click the pencil to edit

- Now, under the IP Pool section configuration drop-down under
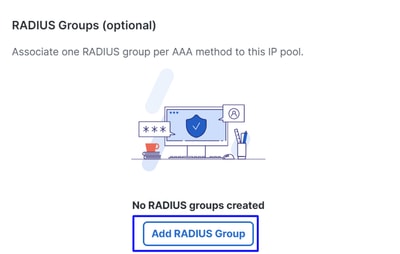
Radius Group (Optional) - Click
Add RADIUS Group
- Under General, configure the next options:

Group Name: Configure a name for your ISE integration in Secure AccessAAA method
Authentication: Mark the checkbox forAuthenticationand select the port, by default, is 1812- In the case that your authentication requires
Microsoft Challenge Handshake Authentication Protocol Version 2 (MCHAPv2)mark the checkbox
- In the case that your authentication requires
Authorization: Mark the checkbox forAuthorizationand select the port, by default, is 1812- Mark the checkbox for
Authorization mode OnlyandChange of Authorization (CoA) modeto permit the posture and changes from ISE
- Mark the checkbox for
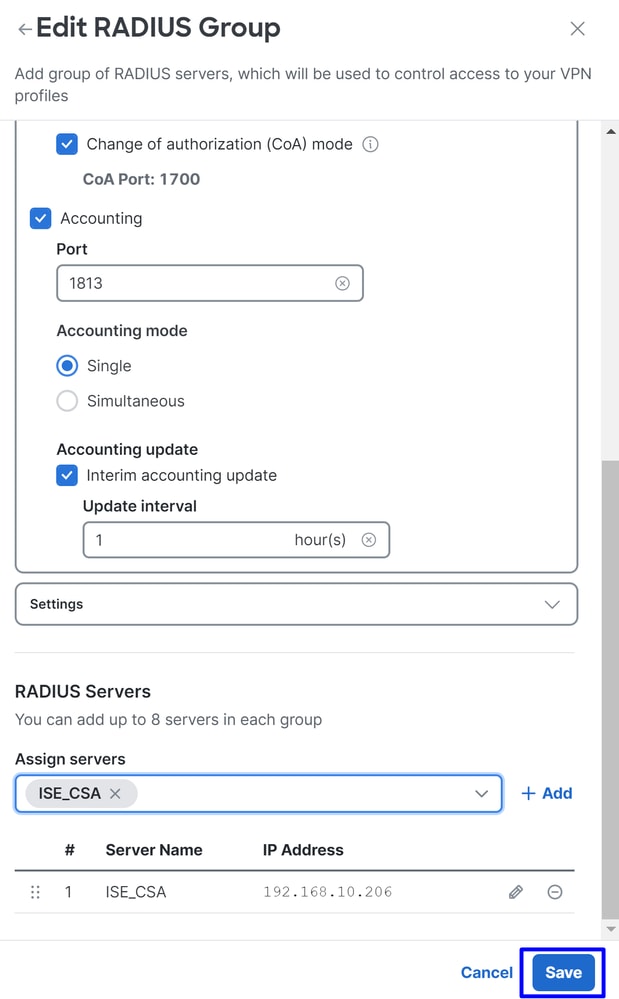
Accounting: Mark the checkbox for Authorization and select the port, by default, is 1813- Choose
Single or Simultaneous(In single mode, accounting data is sent to only one server. In simultaneous mode, accounting data to all servers in the group) - Mark the checkbox for
Accounting updateto enable the periodic generation of RADIUS interim-accounting-update messages.
- Choose

Caution: Both the Authentication and Authorization methods, when selected, must use the same port.
- After that, you need to configure the
RADIUS Servers(ISE) that is used to authenticate via AAA on the sectionRADIUS Servers: - Click on
+ Add

- Then, configure the next options:

Server Name: Configure a name to identify your ISE Server.IP Address: Configure the IP of your Cisco ISE device that is reachable through Secure AccessSecret Key: Configure your RADIUS secret KeyPassword: Configure your Radius password
- Click
Saveand assign your Radius Server under theAssign Serveroption and select your ISE server:

- Click
Saveagain to save all the configuration done
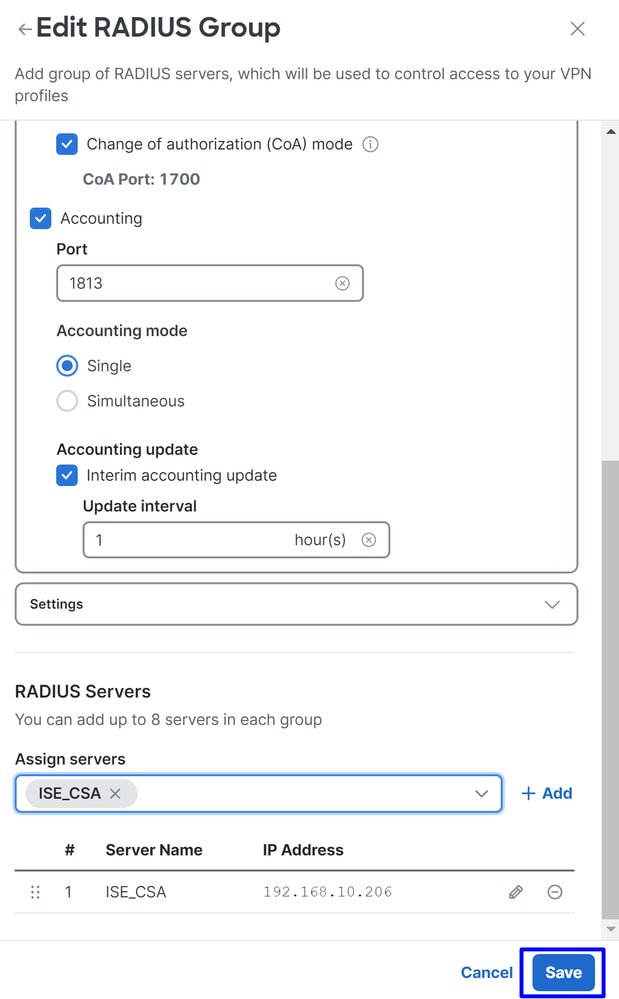
Now that you have configured your ISE server under the IP pool, you need to configure it under your VPN Profiles.

Configure your VPN Profile to use ISE
To configure the VPN Profile, navigate to your Secure Access Dashboard.
- Click on
Connect > Enduser Connectivity > Virtual Private Network - Under
VPN Profilesclick+ Add - Then configure the next options:
General Settings
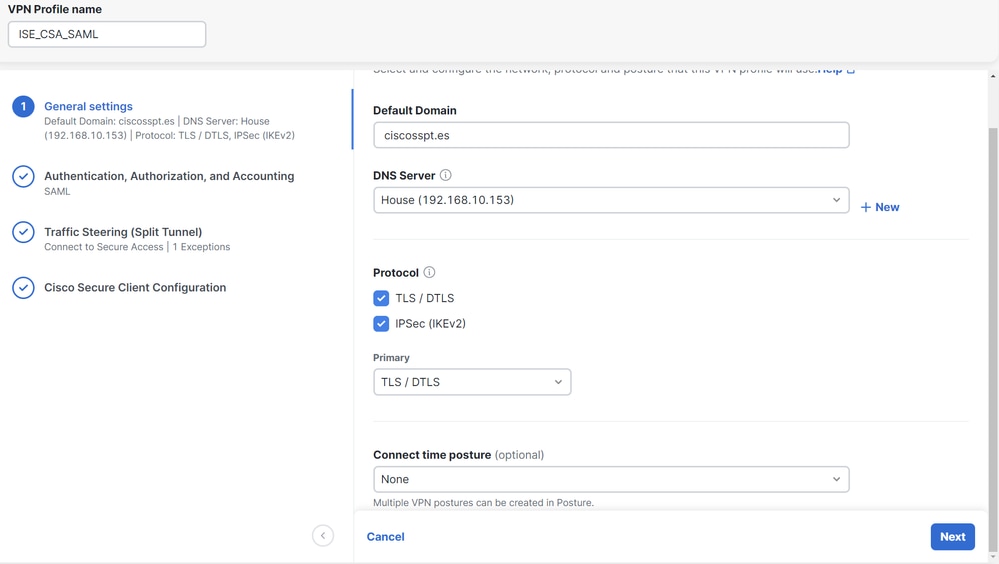
VPN Profile name: Configure a name for your profile nameDefault Domain: Configure your domain.DNS Server: Choose the Domain Name Server (DNS) Server configured by youProtocol: Configure the protocols that you need to permit under the VPNConnect Time posture: Choose a posture or let it as None
- After that, click
Next
Authentication, Authorization, and Accounting
Authentication

Authentication
Protocols: ChooseSAML
- Click
Download Service Provider XML file - Replace the information in the application configured in the step, Duo Configuration
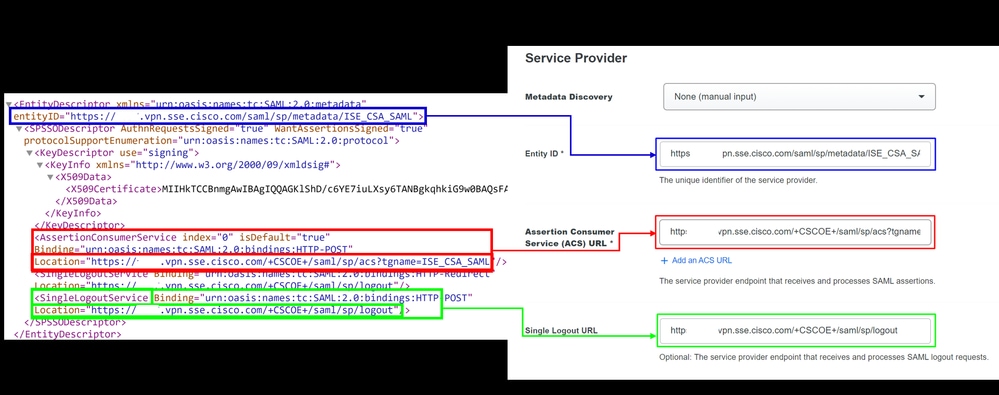
- Once you have configured that information, change the name of the Duo to something related to the integration that you are making

- Click
Saveon your application on Duo. - Once you click Save, you must download the
SAML Metadataby clicking on the buttonDownload XML

- Upload the
SAML Metadataon Secure Acces under the option3. Upload IdP security metadata XML fileand clickNext

Proceed with the Authorization.

Note: Once you configure the authentication with SAML, you will authorize it through ISE, which means the radius packet sent by Secure Access will only contain the username. The password field does not exist here.
Authorization

AuthorizationEnable Radius Authorization: Mark the checkbox to enable the radius Authorization- Select one group for all regions: Mark the checkbox to use one specific radius server for all the Remote Access - Virtual Private Network (RA-VPN) Pools, or define it for every pool separately
- Click
Next
After you configure all the Authorization part, please proceed with the Accounting.

Note: If you do not enable Radio Authorization, posture cannot work.
Accounting
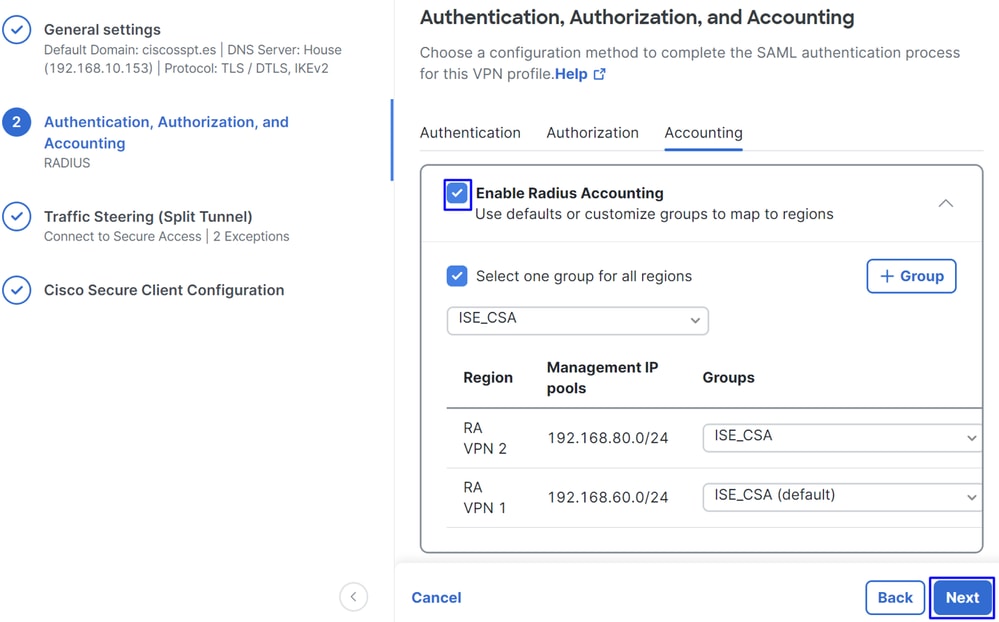
AccountingMap Authorization groups to regions: Choose the regions and choose yourRadius Groups
- Click
Next
After you have done configured the Authentication, Authorization and Accounting please continue withTraffic Steering.
Traffic Steering
Under traffic steering, you need to configure the type of communication through Secure Access.

- If you choose
Connect to Secure Access, all your internet traffic routes throughSecure Access

If you want to add exclusions for internet domains or IPs, please Click on the + Add button, then click Next.
- If you decide to
Bypass Secure Access, all your internet traffic passes through your internet provider, not throughSecure Access(No Internet Protection)


Note: Please add enroll.cisco.com for ISE posture when you choose Bypass Secure Access.
In this step, you select all the private network resources that you want to access through the VPN. To do so, click + Add, then click Next when you have added all the resources.
Cisco Secure Client Configuration

In this step, you can maintain everything as default and click Save, but if you want to customize your configuration more, please check Cisco Secure Client Administrator Guide.

ISE Configurations
Configure Network Devices List
To configure the authentication through Cisco ISE, you need to configure the permitted devices that can make queries to your Cisco ISE:
- Navigate to
Administration > Network Devices - Click on
+ Add
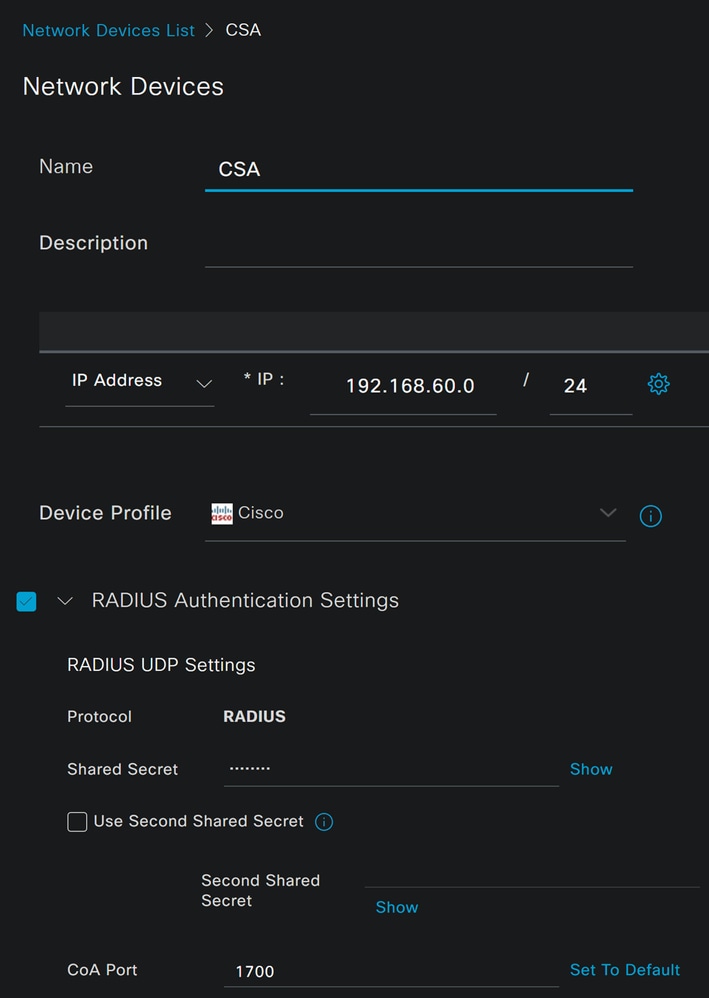
Name: Use a name to Identify Secure AccessIP Address: Configure theManagement Interfaceof the step, IP Pool RegionDevice Profile: Choose CiscoRadius Authentication Settings
Shared Secret: Configure the same shared secret configured on the step, Secret KeyCoA Port: Let it as default; 1700 is also used in Secure Access
After that click Save, to verify if the integration works properly, proceed to create a local user for integration verification.
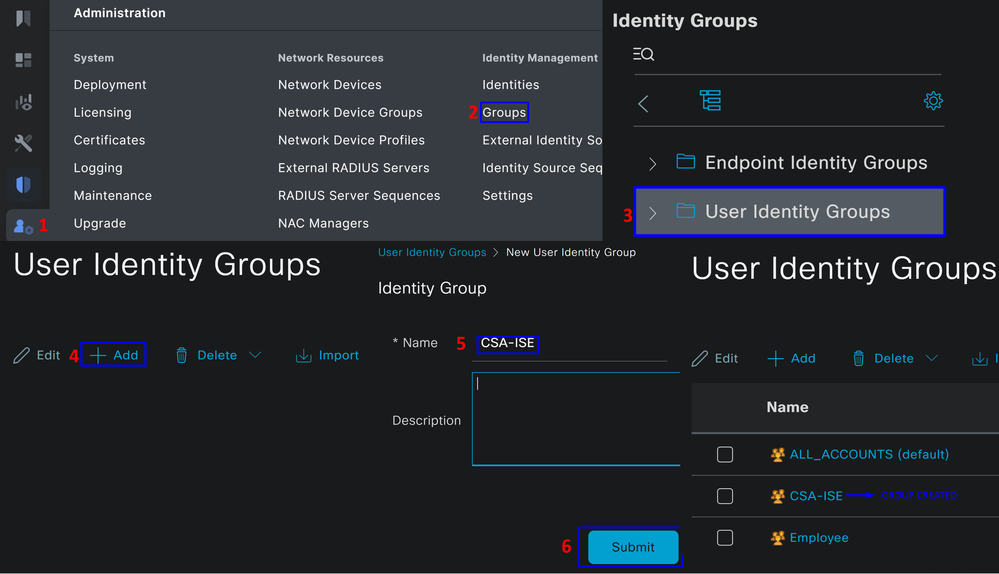
Configure a Group
To configure a group for use with local users, proceed with these steps:
- Click in
Administration > Groups - Click
User Identity Groups - Click
+ Add - Create a
Namefor the Group and clickSubmit
Configure Local User
To configure a local user to verify your integration:
- Navigate to
Administration > Identities - Click on
Add +


Username: Configure the username with a known UPN provisioning in Secure Access; this is based on the step, PrerequisitesStatus: ActivePassword Lifetime: You can configure itWith ExpirationorNever Expires, depending on youLogin Password: Create a password for the userUser Groups: Choose the group created on the step, Configure a Group

Note: The authentication-based on UPN is set to change in upcoming versions of Secure Access.
After that, you can Save the configuration and continue with the step, Configure Policy Set.
Configure Policy Set
Under the policy set, configure the action that ISE takes during authentication and authorization. This scenario demonstrates the use case for configuring a simple policy to provide user access. First, ISE verifies the origin of the RADIUS authentications and checks if the identities exist in the ISE user database to provide access
To configure that policy, navigate to your Cisco ISE Dashboard:
- Click on
Policy > Policy Sets - Click on
+to add a new policy set

In this case, create a new policy set instead of working under the default one. Next, configure the Authentication and Authorization based on that policy set. The configured policy permits access to the network device defined in the step Configure Network Devices List to verify these authentications come from CSA Network Device List then get into the policy as Conditions. And finally, the allowed Protocols, as Default Network Access.
To create the condition that matches the policy set, proceed with the next instructions:
- Click on
+ - Under
Condition Studio, the information available includes:

- To create the Conditions, click on
Click to add an attribute - Click on the
Network Devicebutton - Under the options behind, click on
Network Access-Network Device Nameoption - Under the Equals option, write the name of the
Network Deviceunder the step, Configure Network Devices List - Click
Save
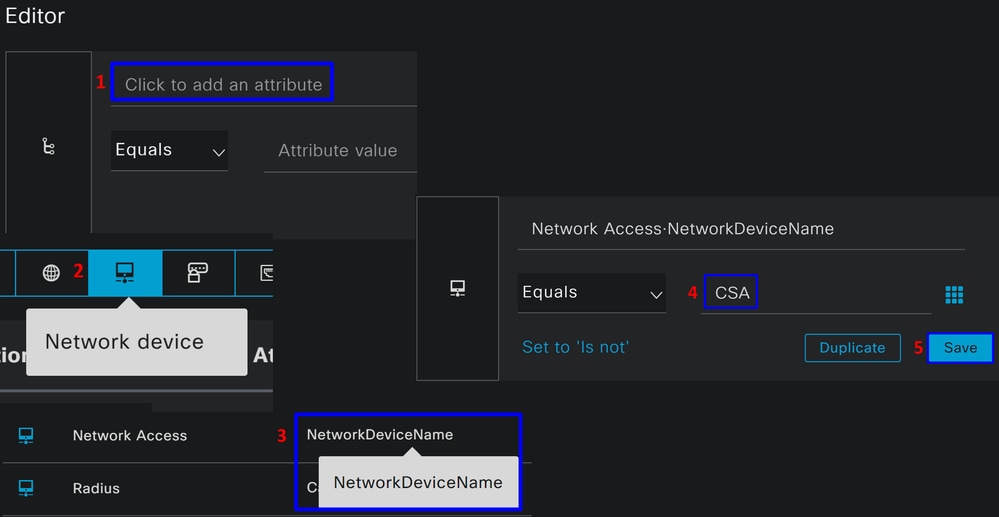
This policy only approves the request from the source CSA to continue the Authentication and Authorization setup under the policy set CSA-ISE, and also verifies the protocols permitted based on the Default Network Access for the allowed protocols.
The result of the Policy defined must be:

- To verify the
Default Network Access Protocolsallowed, proceed with the next instructions:- Click on
Policy > Results - Click on
Allowed Protocols - Click on
Default Network Access
- Click on
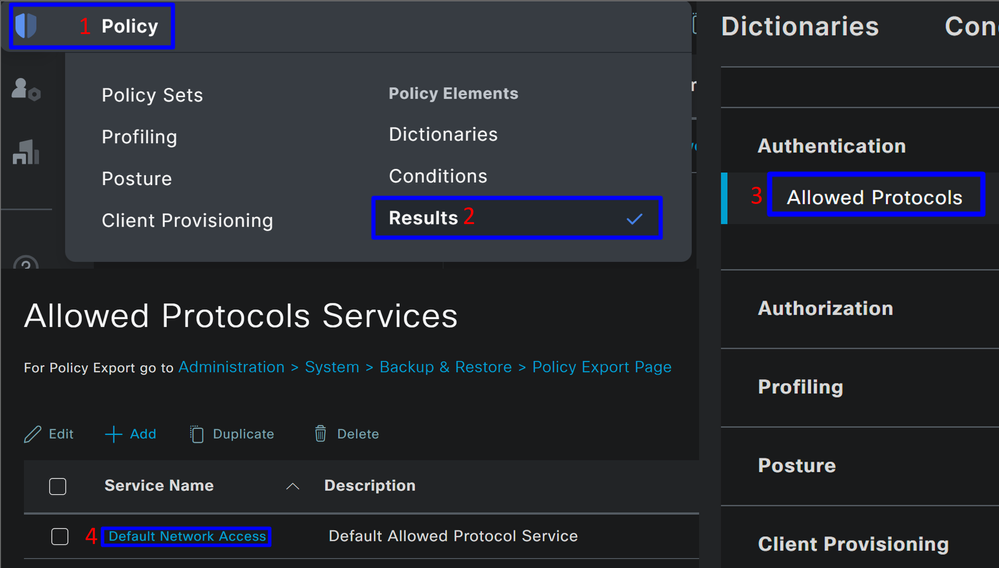
- Then, you see all the protocols permitted on
Default Network Access
Configure Policy Set Authorization
To create the Authorization Policy under the Policy Set, proceed with the next steps:
- Click on
>

- After that, you see the
Authorizationpolicies displayed:

The policy is the same one defined under the step Configure Policy Set.
Authorization Policy
You can configure the authorization policy in many ways. In this case, authorize only the users in the group defined in the step Configure a Group.See the next example to configure your authorization policy:
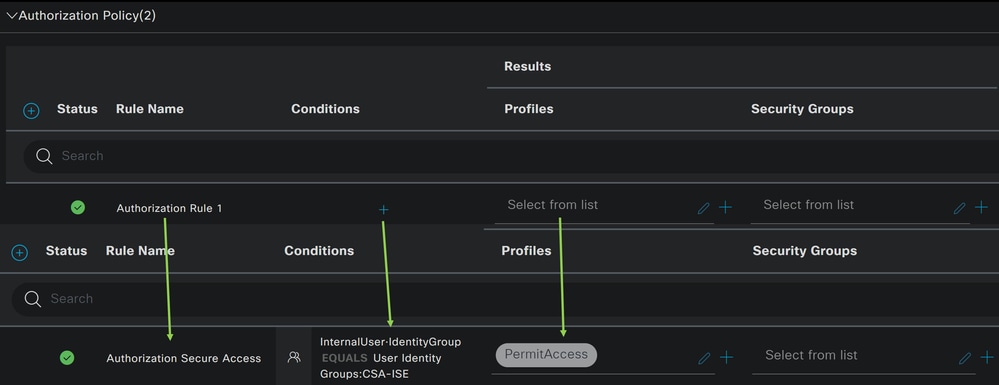
- Click on
Authorization Policy - Click on
+to define the policy for authorization like this:

- For the next step, change the
Rule Name,ConditionsandProfiles - When setting the
Nameconfigure a name to easily identify the authorization policy - To configure the
Condition, click on the+ - Under
Condition Studio, you find the information:

- To create the Conditions, click on
Click to add an attribute - Click on the
Identity Groupbutton - Under the options behind, click on Internal User -
IdentityGroupoption - Under the
Equalsoption, use the dropdown to find theGroupapproved for authentication in the step, Configure a Group - Click
Save - Click
Use
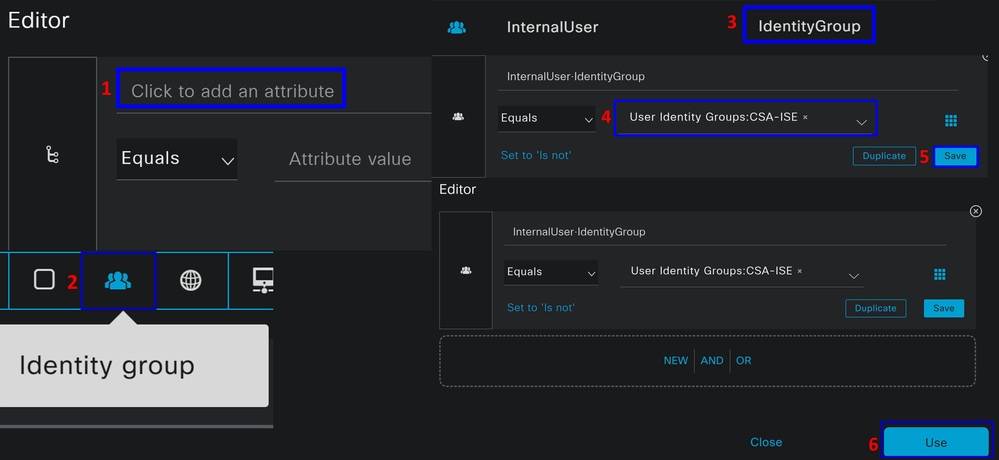
After that, you need to define the Profiles, which help approve user access under the authorization policy once the user authentication matches the group selected on the policy.
- Under the
Authorization Policy, click on the dropdown button onProfiles - Search for permit
- Select
PermitAccess - Click
Save

After that, you have defined your Authorization policy. Authenticate to verify whether the user connects without a problem and whether you can see the logs on Secure Access and ISE.
To connect to the VPN, you can use the profile created on Secure Access and connect through Secure Client with the ISE profile.
- How is the log displayed in Secure Access when the authentication gets approved?
- Navigate to the Secure Access Dashboard
- Click on
Monitor > Remote Access Log

- How is the log displayed in ISE when the authentication gets approved?
- Navigate to the
Cisco ISE Dashboard - Click on
Operations > Live Logs
- Navigate to the

How is the log displayed in Duo when the authentication gets approved?
- Navigate to the Duo Admin Panel
- Click on
Reports > Authentication Log

Configure Radius Local or Active Directory Users
Configure ISE Posture
In this scenario, create the configuration to verify endpoint compliance before granting or denying access to internal resources.
To configure it, proceed to the next steps:
Configure Posture Conditions
- Navigate to your ISE Dashboard
- Click on
Work Center > Policy Elements > Conditions - Click on
Anti-Malware

Note: There, you find many options to verify the posture of your devices and make the correct assessment based on your internal policies.
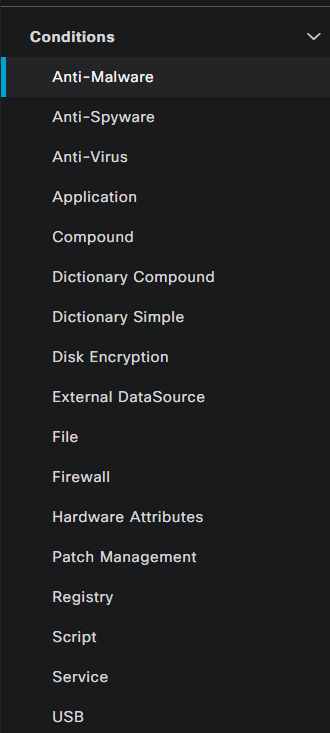
- Under
Anti-Malware Conditions, click+ Add

- You configure the
Anti-Malware Conditionto detect the antivirus installation on the system; you can also choose the operating system version if needed.
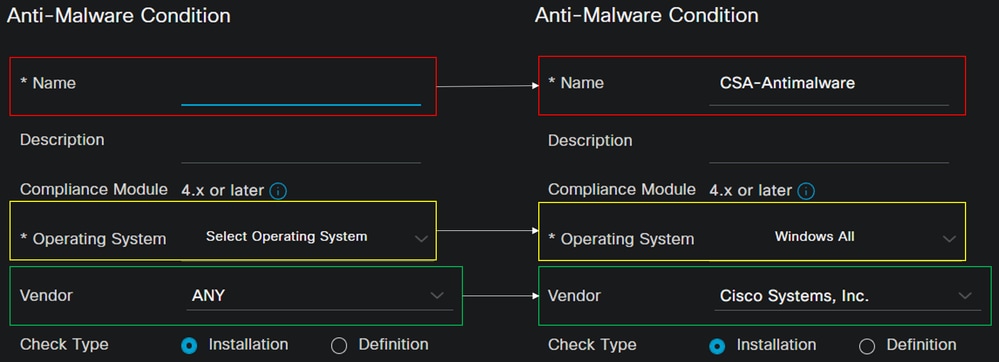
Name: Use a name to recognize the anti-malware conditionOperating System: Choose the operative system that you want to put under the conditionVendor: Choose a vendor or ANYCheck Type: You can verify if the agent is installed or the definition version for that option.
- For
Products for Selected Vendor, you configure what you want to verify about the antimalware on the device.
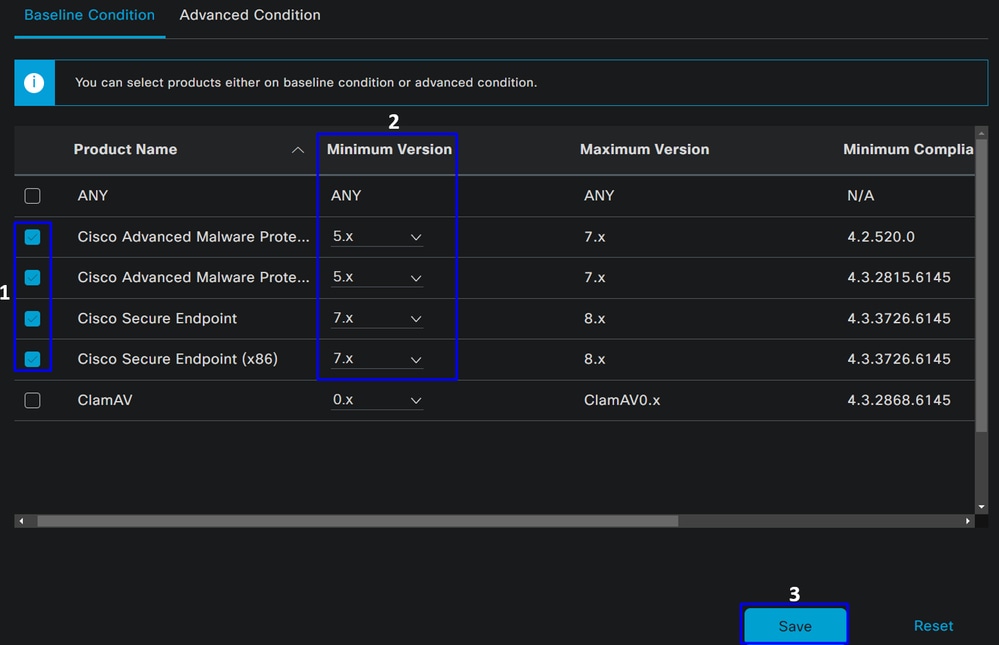
- Mark the checkbox for the conditions that you wanted to evaluate
- Configure the minimum version to verify
- Click Save to continue with the next step
Once you configure it, you can proceed with the step, Configure Posture Requirements.
Configure Posture Requirements
- Navigate to your ISE Dashboard
- Click on
Work Center > Policy Elements > Requeriments - Click on
Editof any one of the requirements and clickInsert new Requirement

- Under the new requirement, configure the next parameters:

Name: Configure a name to recognize the antimalware requirementOperating System: Choose the operating system that you choose under the condition step, Operating SystemCompliance Module: You need to make sure to select the same compliance module that you have under the condition step, Anti-Malware ConditionPosture Type: Choose AgentConditions: Choose the condition or conditions that you created under the step, Configure Posture ConditionsRemediations Actions: ChooseMessage Text Onlyfor this example, or if you have another remediation action, use it- Click
Save
Once you configure it, you can proceed with the step, Configure Posture Policy
Configure Posture Policy
- Navigate to your ISE Dashboard
- Click on
Work Center > Posture Policy - Click on
Editof any one of the policies and clickInsert new Policy

- Under the new policy, configure the next parameters:

Status: Mark the checkbox no enable the policyRule Name: Configure a name to recognize the policy configuredIdentity Groups: Choose the identities that you want to evaluateOperating Systems: Choose the operating system based on the condition and requirement configured beforeCompliance Module: Choose the compliance module based on the condition and requirement configured beforePosture Type: Choose AgentRequeriments: Choose the requirements configured on the step, Configure Posture Requirements- Click
Save
Configure Client Provisioning
To provide the users with the ISE module, configure the client provisioning to equip the machines with the ISE posture module. This enables you to verify the machines posture once the agent is installed. To continue with this process, here are the next steps:
Navigate to your ISE Dashboard.
- Click on
Work Center > Client Provisioning - Choose
Resources
There are three things that you need to configure under client provisioning:
|
Resources to configure |
Description |
|
1. |
Secure Client Web Provisioning Package. |
|
2. |
Cisco ISE Compliance Module |
|
3. |
Control of the provisioning profile. |
|
3. |
Define which modules are provisioned by setting up the provisioning portal, utilizing the Agent Profile and Agent Resources. |
Step 1 Download and Upload Agent Resources
- To add a new agent resource, navigate to the Cisco Download Portal and download the web deploy package; the web deploy file must be .pkg format.

- Click on
+ Add > Agent resources from local diskand upload the packages

Step 2Download the compliance module
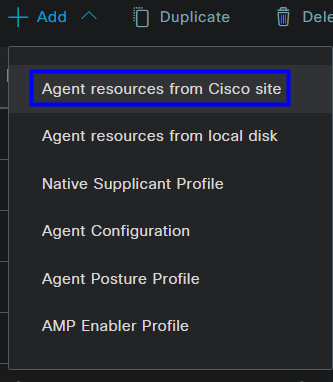
- Click on
+ Add > Agent resources from Cisco Site
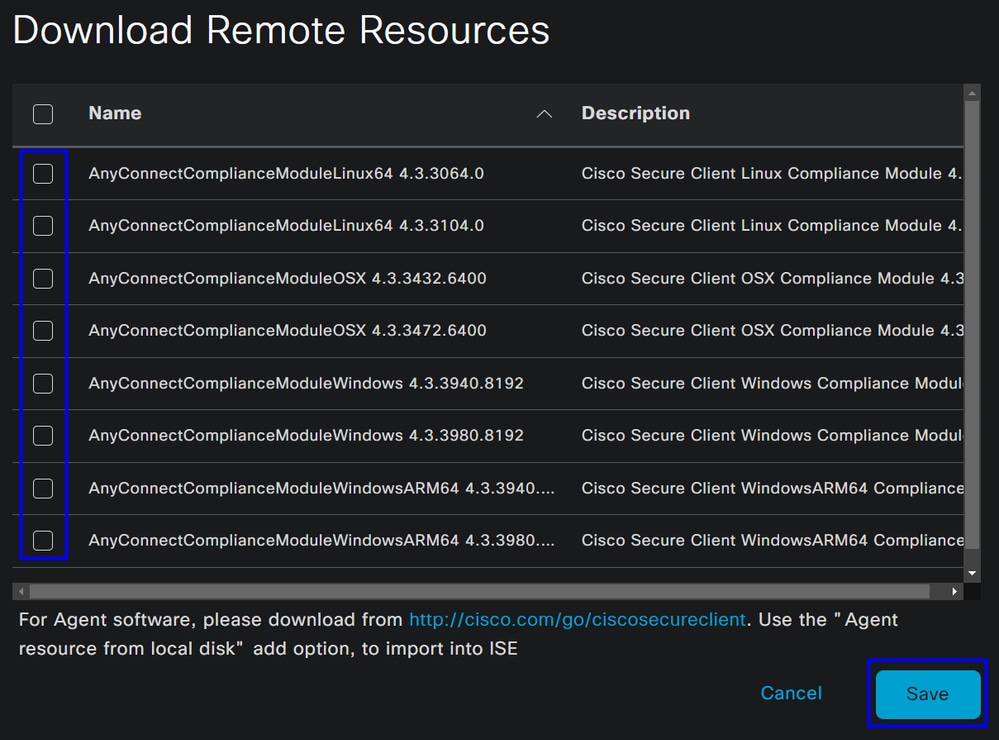
- Mark the checkbox for every compliance module needed and click
Save
Step 3
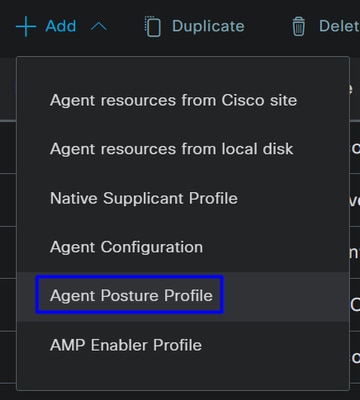
- Click on
+ Add > Agent Posture Profile
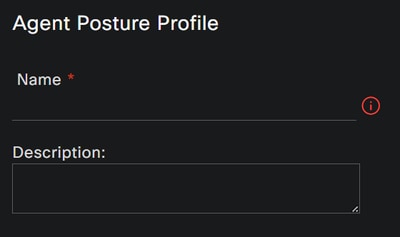
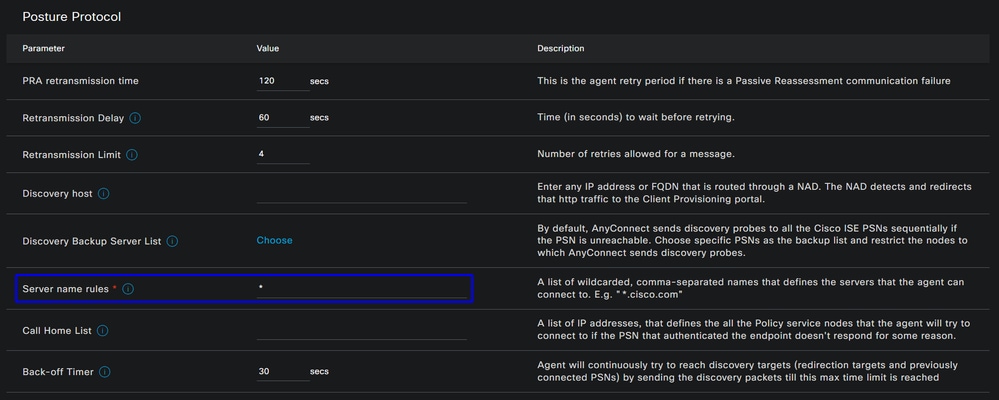
- Create a
Namefor thePosture Profile
- Under Server name rules, put an
*and clickSaveafter that
Step 4 Configure the Agent Configuration
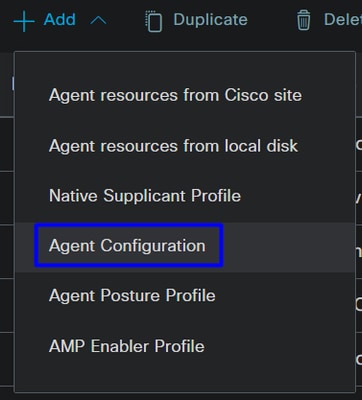
- Click on
+ Add > Agent Configuration
- After that, configure the next parameters:
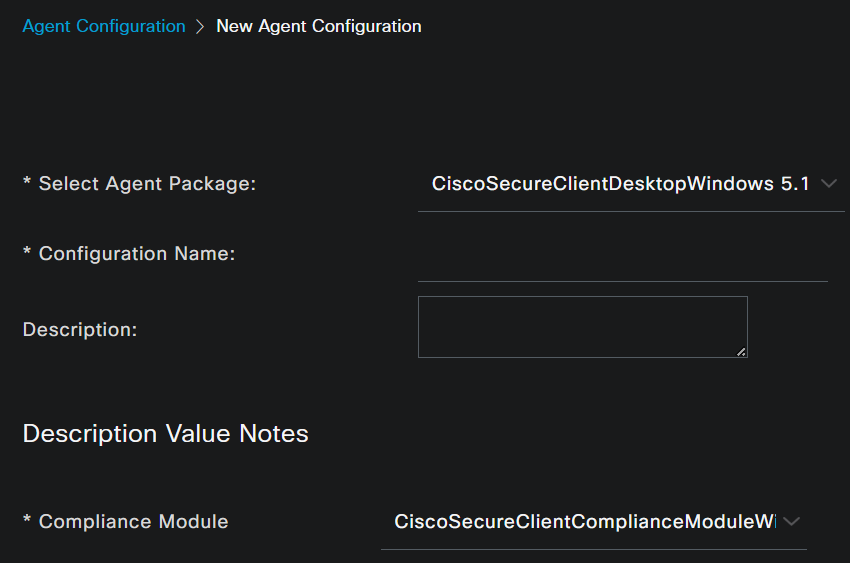

Select Agent Package: Choose the package uploaded on the Step1 Download and Upload Agent ResourcesConfiguration Name: Choose a name to recognize theAgent ConfigurationCompliance Module: Choose the Compliance Module downloaded on the Step2 Download the compliance moduleCisco Secure Client Module Selection
ISE Posture: Mark the Checkbox
Profile Selection
ISE Posture: Choose the ISE profile configured on the Step3 Configure the Agent Profile
- Click
Save

Note: It is recommended that each operating system, Windows, Mac OS, or Linux, has one Client Configuration independent.
Configure Client Provisioning Policy
To enable the provisioning of the ISE posture and modules configured in the last step, you need to configure a policy to make the provisioning.
- Navigate to your ISE Dashboard
- Click on
Work Center > Client Provisioning

Note: It is recommended that each operating system, Windows, Mac OS, or Linux, has one Client Configuration Policy.
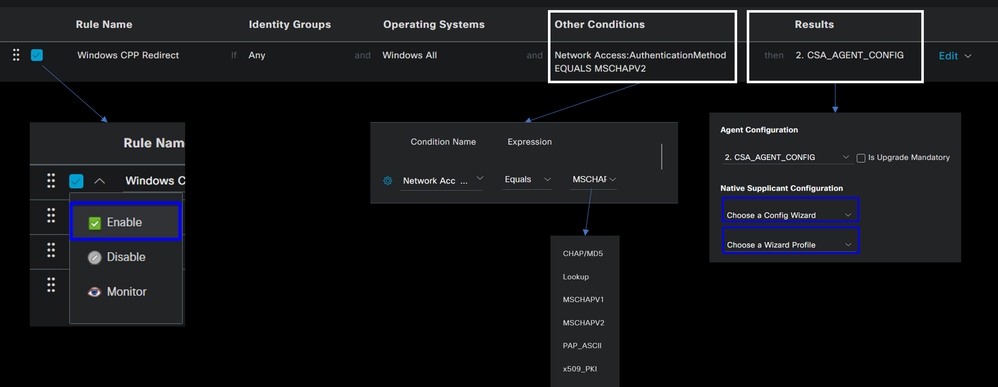
Rule Name: Configure the name of the policy based on the device type and identity group selection to have an easy way to identify each policyIdentity Groups: Choose the identities you want to evaluate on the policyOperating Systems: Choose the operating system based on the agent package selected on the step, Select Agent PackageOther Condition: ChooseNetwork Accessbased on theAuthentication MethodEQUALSto the method configured on the step, Add RADIUS Group or you can leave in blankResult: Choose the Agent Config configured on the Step 4 Configure the Agent ConfigurationNative Supplicant Configuration: ChooseConfig WizardandWizard Profile
- Mark the policy as enabled if it is not listed as enabled on the checkbox.
Create the Authorization Profiles
The authorization profile limits access to the resources depending on the users posture after the authentication pass. The authorization must be verified to determine which resources the user can access based on the posture.
|
Authorization Profile |
Description |
|
User Compliant - Agent Installed - Posture Verified |
|
|
User Uknown Compliant - Redirect to install the agent - Posture Pending to be verified |
|
|
User Non Compliant - Deny Access |
To configure the DACL, navigate to the ISE Dashboard:
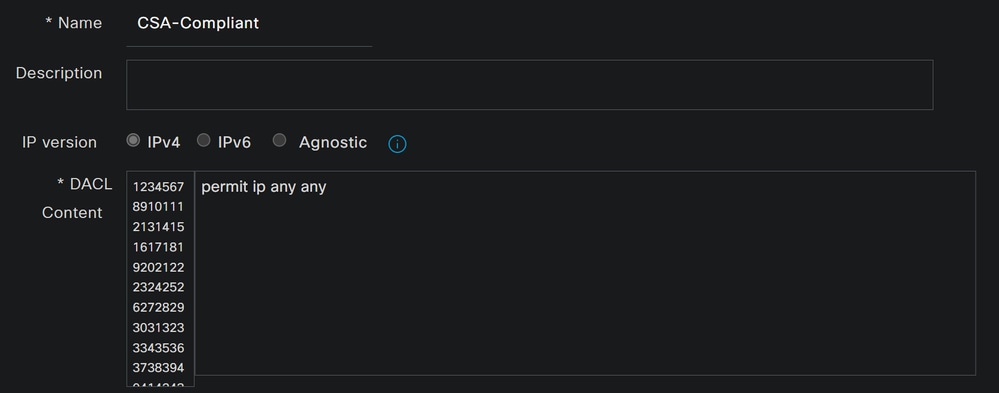
Name: Add a name that makes reference to the DACL-CompliantIP version: ChooseIPv4DACL Content:
permit ip any anyClick Save and create the Unknown Compliance DACL
- Click on
Work Centers > Policy Elements > Downloadable ACLs - Click on
+Add - Create the
Unknown Compliant DACL

Name: Add a name that makes reference to the DACL-Unknown-CompliantIP version: ChooseIPv4DACL Content:Create a DACL that gives limited access to the network, DHCP, DNS, HTTP, and the provisioning portal over port 8443
permit udp any any eq 67
permit udp any any eq 68
permit udp any any eq 53
permit tcp any any eq 80
permit tcp any host 192.168.10.206 eq 8443

Note: In this scenario, the IP address 192.168.10.206 corresponds to the Cisco Identity Services Engine (ISE) server, and port 8443 is designated for the provisioning portal. This means that TCP traffic to the IP address 192.168.10.206 via port 8443 is permitted, facilitating access to the provisioning portal.
At this point, you have the required DACL to create the authorization profiles.
To configure the authorization profiles, navigate to the ISE Dashboard:
- Click on
Work Centers > Policy Elements > Authorization Profiles - Click on
+Add - Create the
Compliant Authorization Profile
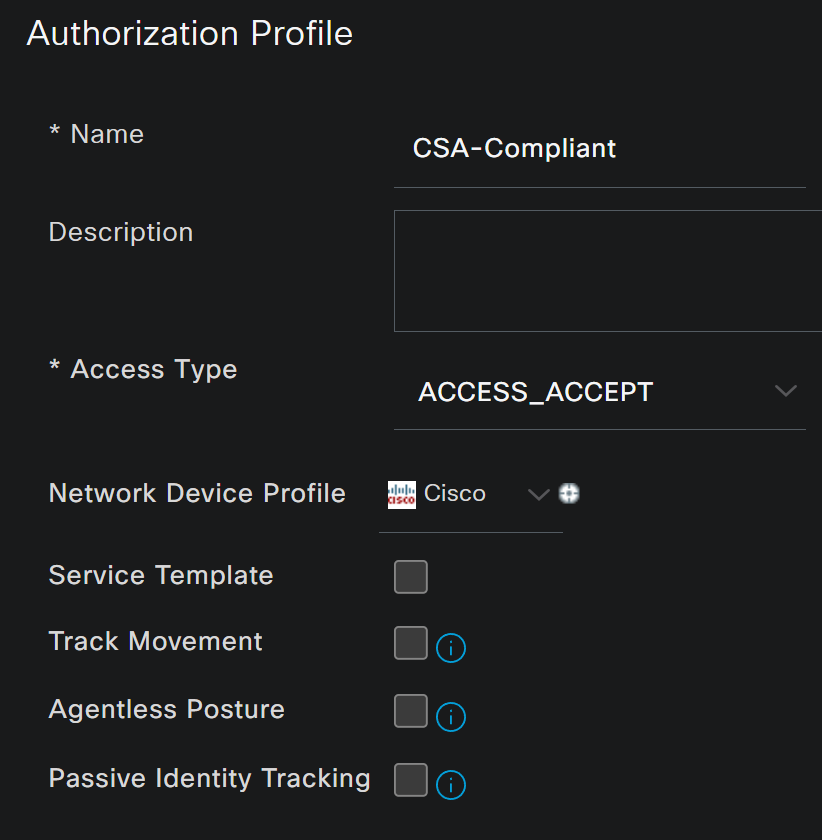

Name: Create a name that makes reference to the compliant authorization profileAccess Type: ChooseACCESS_ACCEPT
Common TasksDACL NAME: Choose the DACL configured on the step Compliant DACL
Click Save and create the Unknown Authorization Profile
- Click on
Work Centers > Policy Elements > Authorization Profiles - Click on
+Add - Create the
Uknown Compliant Authorization Profile
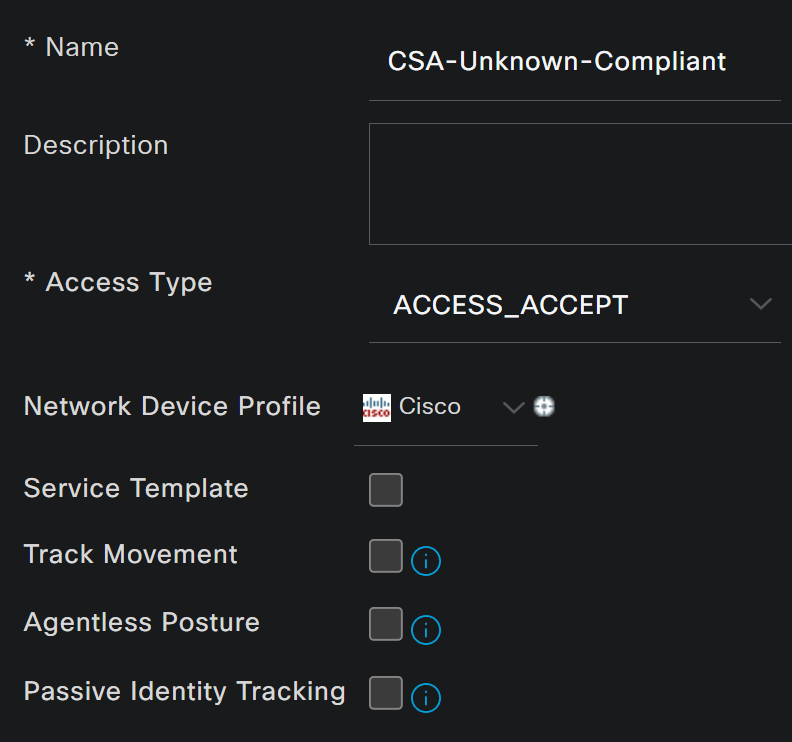


Name: Create a name that makes reference to the unknown compliant authorization profileAccess Type: ChooseACCESS_ACCEPT
Common TasksDACL NAME: Choose the DACL configured on the step Unknown Compliant DACLWeb Redirection (CWA,MDM,NSP,CPP)- Choose
Client Provisioning (Posture) ACL: Must beredirectValue: Choose the default provisioning portal, or if you defined another, choose it
- Choose

Note: The name for the redirection ACL on Secure Access for all the deployments is redirect.
After you define all of these values, you must have something similar under Attributes Details.

Click Save to end the configuration and continue with the next step.
Configure Posture Policy Set
These three policies you create are based on the authorization profiles you configured; for DenyAccess, you do not need to create another one.
|
Policy Set - Authorization |
Authorization Profile |
|
Compliant |
|
|
Unknown Compliant |
|
|
Non Compliant |
Navigate to your ISE Dashboard
- Click on
Work Center > Policy Sets - Click on the
>to access to the policy that you have created

- Click on the
Authorization Policy

- Create the next three policies in the next order:

- Click on
+to define theCSA-Compliancepolicy :

- For the next step, change the
Rule Name,ConditionsandProfiles - When setting the
Nameconfigure a name toCSA-Compliance - To configure the
Condition, click on the+ - Under
Condition Studio, you find the information:

- To create the condition, search for
compliant - You must have displayed
Compliant_Devices - Drag and drop under the
Editor - Click under the
EditorinNew - Click on the
Identity Groupicon - Choose
Internal User Identity Group - Under
Equals, choose theUser Identity Groupthat you want to match - Click
Use
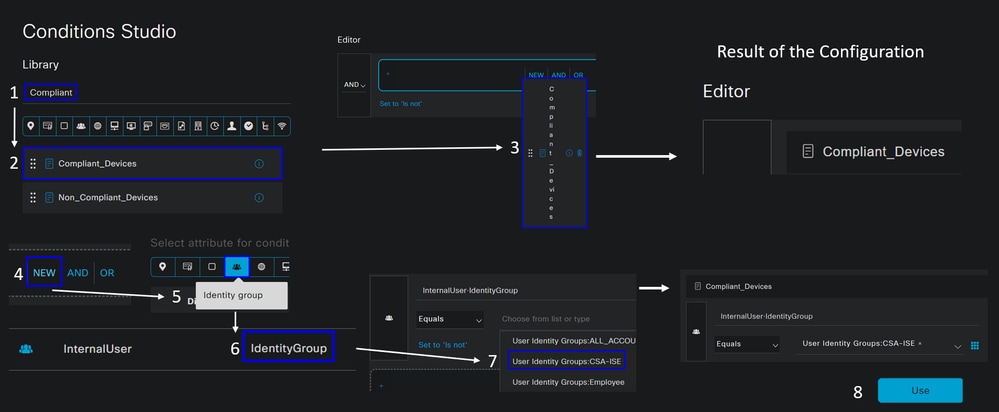
- As a result, you have the next image

- Under
Profileclick under the drop-down button and choose the complaint authorization profile configured on the step, Compliant Authorization Profile

Now you have configured the Compliance Policy Set.

- For the next step, change the
Rule Name,ConditionsandProfiles - When setting the
Nameconfigure a name toCSA-Unknown-Compliance - To configure the
Condition, click on the+ - Under
Condition Studio, you find the information:

- To create the condition, search for
compliance - You must have displayed
Compliant_Unknown_Devices - Drag and drop under the
Editor - Click under the
EditorinNew - Click on the
Identity Groupicon - Choose
Internal User Identity Group - Under
Equals, choose theUser Identity Groupthat you want to match - Click
Use
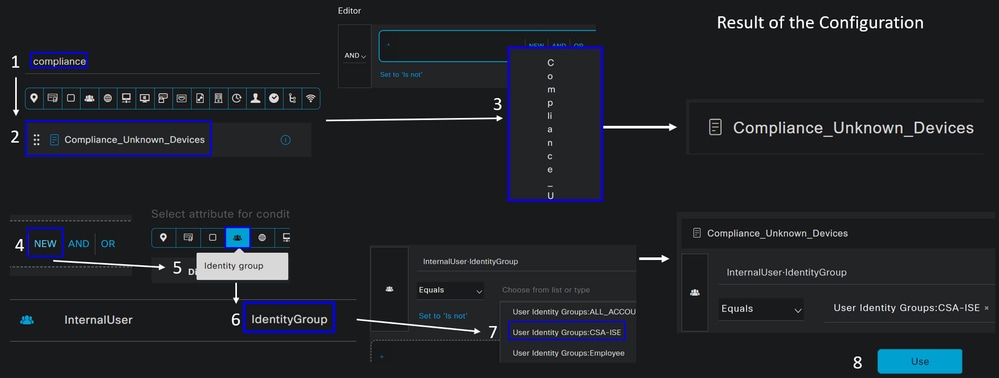
- As a result, you have the next image

- Under
Profileclick under the drop-down button and choose the complaint authorization profile configured on the step, Unknown Compliant Authorization Profile

Now you have configured the Unknown Compliance Policy Set.
- Click on
+to define theCSA- Non-Compliantpolicy:

- For the next step, change the
Rule Name,ConditionsandProfiles - When setting the
Nameconfigure a name toCSA-Non-Compliance - To configure the
Condition, click on the+ - Under
Condition Studio, you find the information:

- To create the condition, search for
non - You must have displayed
Non_Compliant_Devices - Drag and drop under the
Editor - Click under the
EditorinNew - Click on the
Identity Groupicon - Choose
Internal User Identity Group - Under
Equals, choose theUser Identity Groupthat you want to match - Click
Use

- As a result, you have the next image

- Under
Profileclick under the drop-down button and choose the complaint authorization profileDenyAccess

Once you end the configuration of the three profiles, you are ready to test your integration with posture.
Verify
Posture Validation
Connection on the Machine
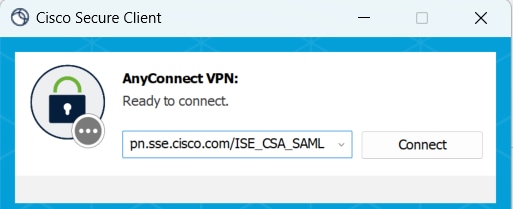
Connect to your FQDN RA-VPN domain provided on Secure Access via Secure Client.
Note: No ISE Module must be installed for this step.
1. Connect using Secure Client.
2. Provide the credentials to authenticate via Duo.
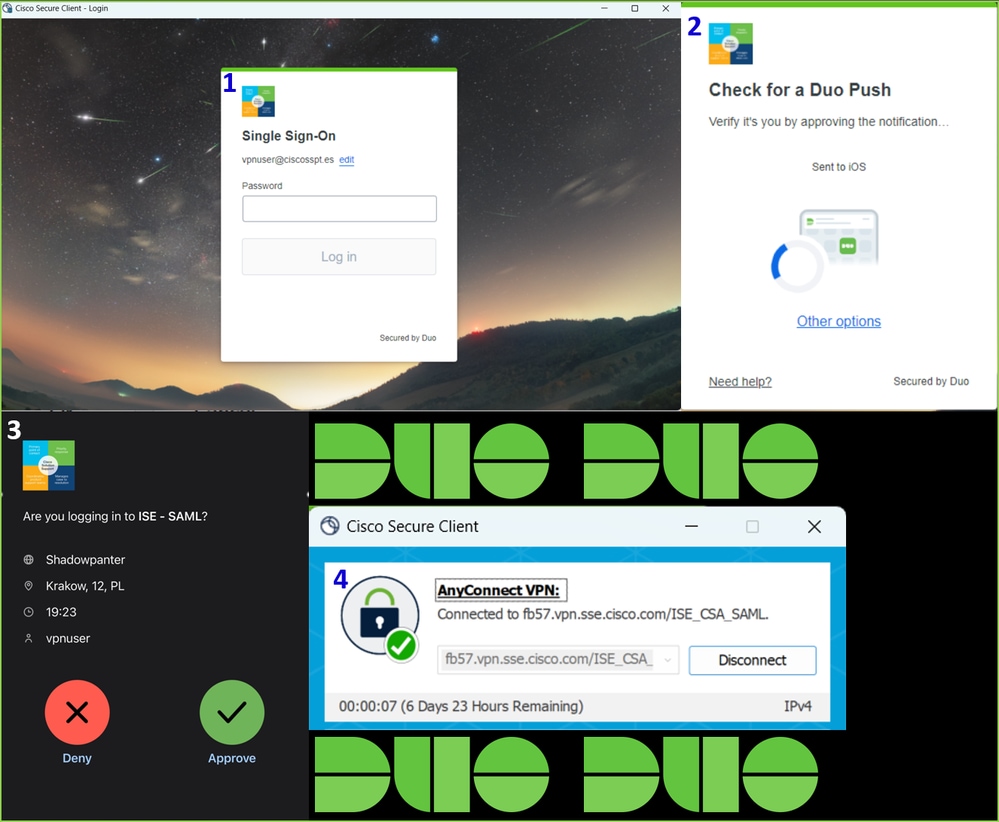
3. At this point, you get connected to the VPN, and mostly probably, you get redirected to ISE; if not, you can try navigating to http:1.1.1.1.


Note: At this point you are falling under the authorization - policy set CSA-Unknown-Compliance because you do not have the ISE Posture Agent installed on the machine, and you get redirected to the ISE Provisioning Portal to install the agent.
4. Click Start to proceed with the agent provisioning.

5. Click on + This is my first time here.

6. Click on Click here to download and install agent
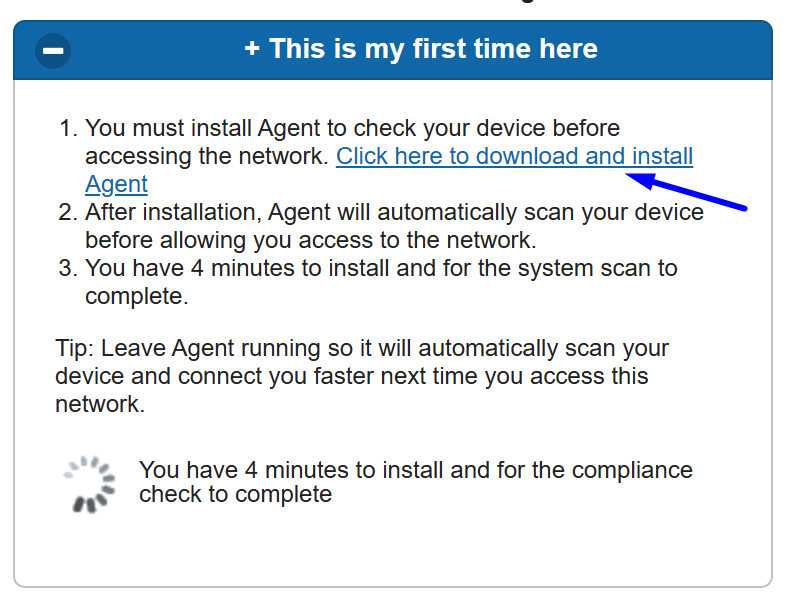
7. Install the agent


8. After you install the agent, the ISE Posture begins verifying the machines current posture. If the policy requirements are not met, a pop-up appears to guide you towards compliance.

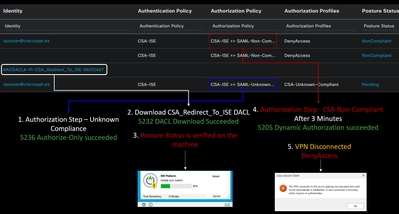
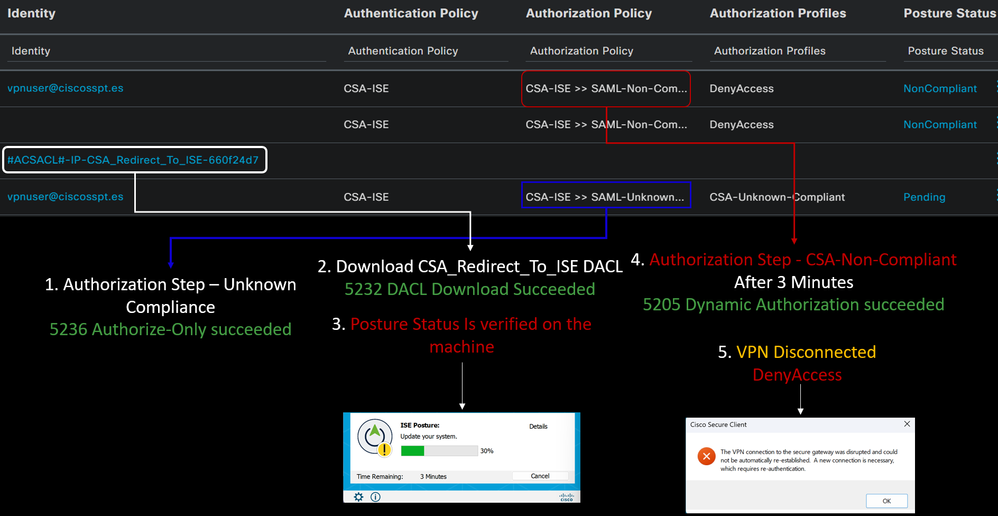
Note: If you Cancel or the remaining time ends, you automatically become non-compliant, fall under the authorization policy set CSA-Non-Compliance, and immediately get disconnected from the VPN.
9. Install the Secure Endpoint Agent and connect again to the VPN.
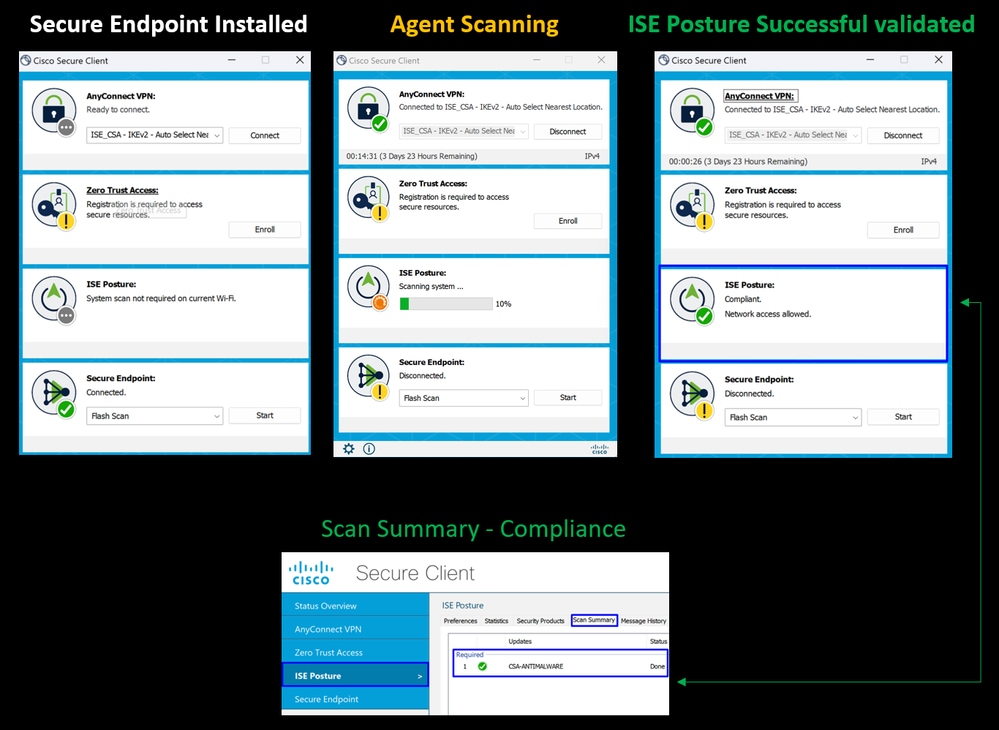
10. After the agent verifies the machine is in compliance, your posture changes to be on complaint and give access to all the resources on the network.
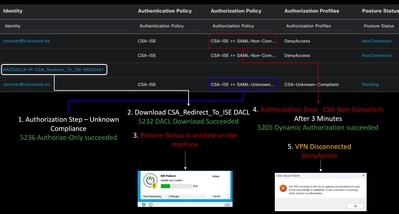
Note: After you become compliant, you fall under the authorization policy set CSA-Compliance, and you immediately have access to all your network resources.
How to Verify Logs in ISE
To verify the authentication outcome for a user, you have two examples of compliance and non-compliance. To review it in ISE, adhere to these instructions:
- Navigate to your ISE Dashboard
- Click on
Operations > Live Logs
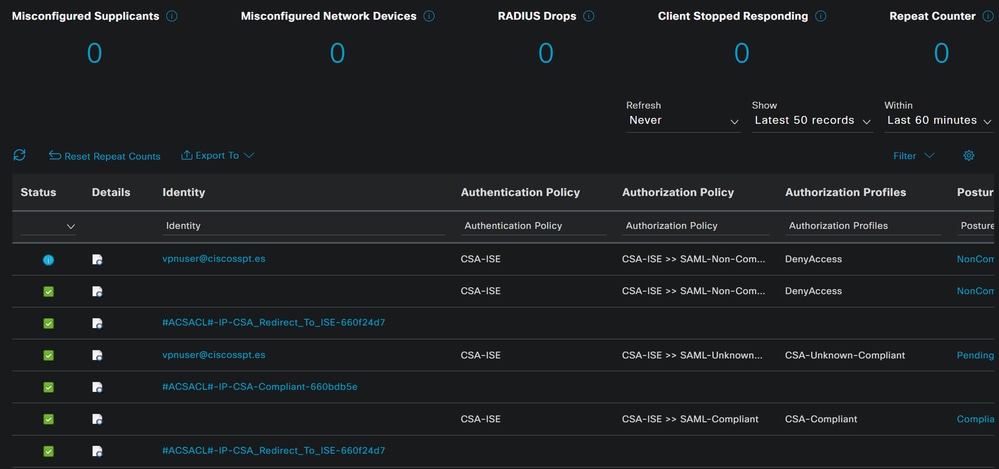
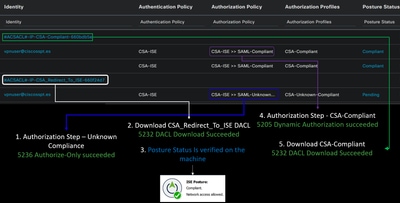
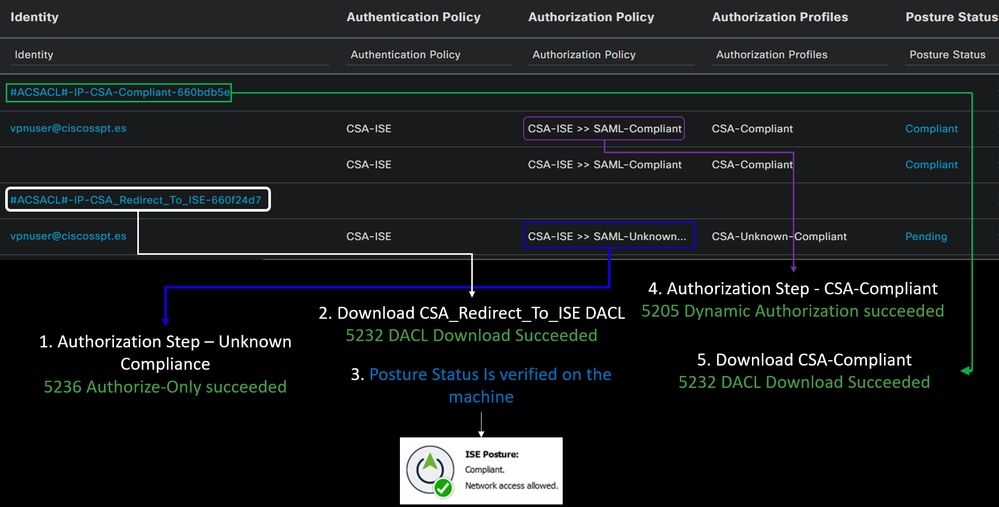
The next tho scenario demonstrates how successful compliance and Non-Compliance events are displayed under Live Logs:
Compliance
Non-Compliance
First Steps with Secure Access and ISE Integration
In the next example, Cisco ISE is under network 192.168.10.0/24, and the configuration of the networks reachable through the tunnel needs to be added under the tunnel configuration.
Step 1: Verify your Tunnel configuration:
To verify this, please navigate to your Secure Access Dashboard.
- Click on
Connect > Network Connections - Click on
Network Tunnel Groups> Your Tunnel

- Under summary, verify the tunnel has configured the address space where your Cisco ISE is:

Step 2: Permit the traffic on your firewall.
To permit Secure Access to use your ISE device for Radius authentication, you need to have configured a rule from Secure Access to your network with the Radius ports required:
|
Rule |
Source |
Destination |
Destination Port |
|
ISE to Secure Access Management Pool |
ISE_Server |
Management IP Pool (RA-VPN) |
COA UDP 1700 (Default Port) |
|
Secure Access Management IP Pool to ISE |
Management IP Pool |
ISE_Server |
Authentication, Authorization UDP 1812 (Default Port) Accounting UDP 1813 (Default Port) |
|
Secure Access Endpoint IP Pool to ISE |
Endpoint IP Pool |
ISE_Server |
Provisioning Portal TCP 8443 (Default Port) |
|
Secure Access Endpoint IP Pool to DNS SERVER |
Endpoint IP Pool |
DNS Server |
DNS UDP and TCP 53 |

Note: If you want to know more ports related to ISE, check the User Guide - Port Reference.

Note: A DNS Rule is needed if you have configured your ISE to be discovered through a name, such as ise.ciscosspt.es
Management Pool and Endpoint IP Pools
To verify your Management and Endpoint IP Pool, navigate to your Secure Access Dashboard:
- Click on
Connect > End User Connectivity - Click on
Virtual Private Network - Under
Manage IP Pools Click onManage

Step3: Verify your ISE is configured under Private Resources
To permit the users connected through the VPN to navigate to ISE Provisioning Portal, you need to be sure you have configured your device as a Private Resource to provide access, which is used to permit the auto-provisioning of the ISE Posture Module through the VPN.
To verify that you have ISE configured correctly, navigate to your Secure Access Dashboard:
- Click on
Resources > Private Resources - Click the ISE Resource
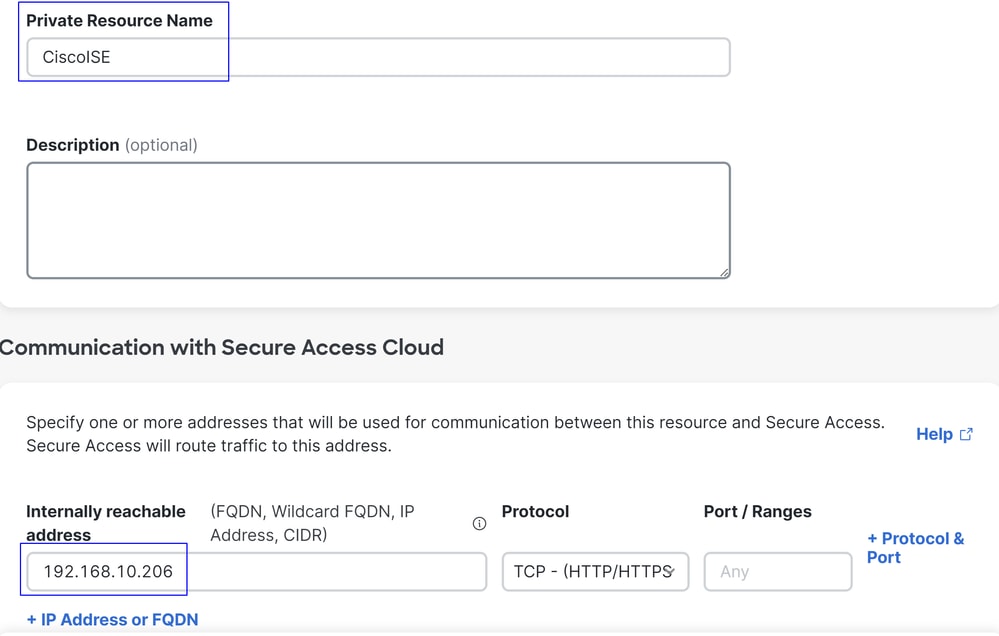

If needed, you can restrict the rule to the provisioning portal port (8443).

Note: Be sure you have marked the checkbox for VPN connections.
Step4: Permit ISE Access Under the Access Policy
To permit the users connected through the VPN to navigate to ISE Provisioning Portal, you need to be sure you have configured an Access Policy to permit the users configured under that rule to access the Private Resource configured in Step3.
To verify that you have ISE configured correctly, navigate to your Secure Access Dashboard:
- Click on
Secure > Access Policy - Click the rule configured to permit access to the VPN users to ISE

Troubleshoot
How to Download ISE Posture Debug Logs
To download ISE Logs to verify an issue related to posture, please proceed with the next steps:
- Navigate to your ISE Dashboard
- Click on
Operations > Troubleshoot > Debug Wizard


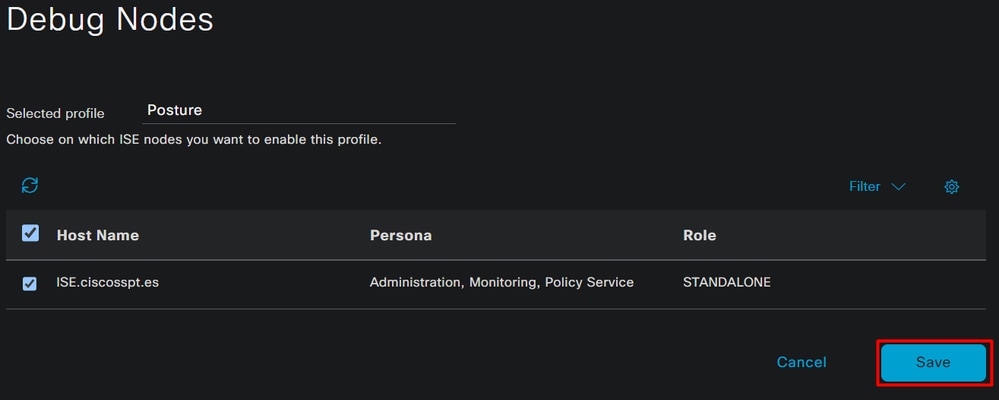
- Mark the checkbox for
Posture > Debug Nodes

- Mark the checkbox for the ISE nodes on which you are to enable debug mode to troubleshoot your problem

- Click
Save

Caution: After this point, you must start reproducing your issue; the debug logs can affect the performance of your device.
After you get the issue reproduced, proceed with the next steps:
- Click on
Operations > Download Logs - Choose the node from where you want to take the logs

- Under
Support Bundle, choose the next options:
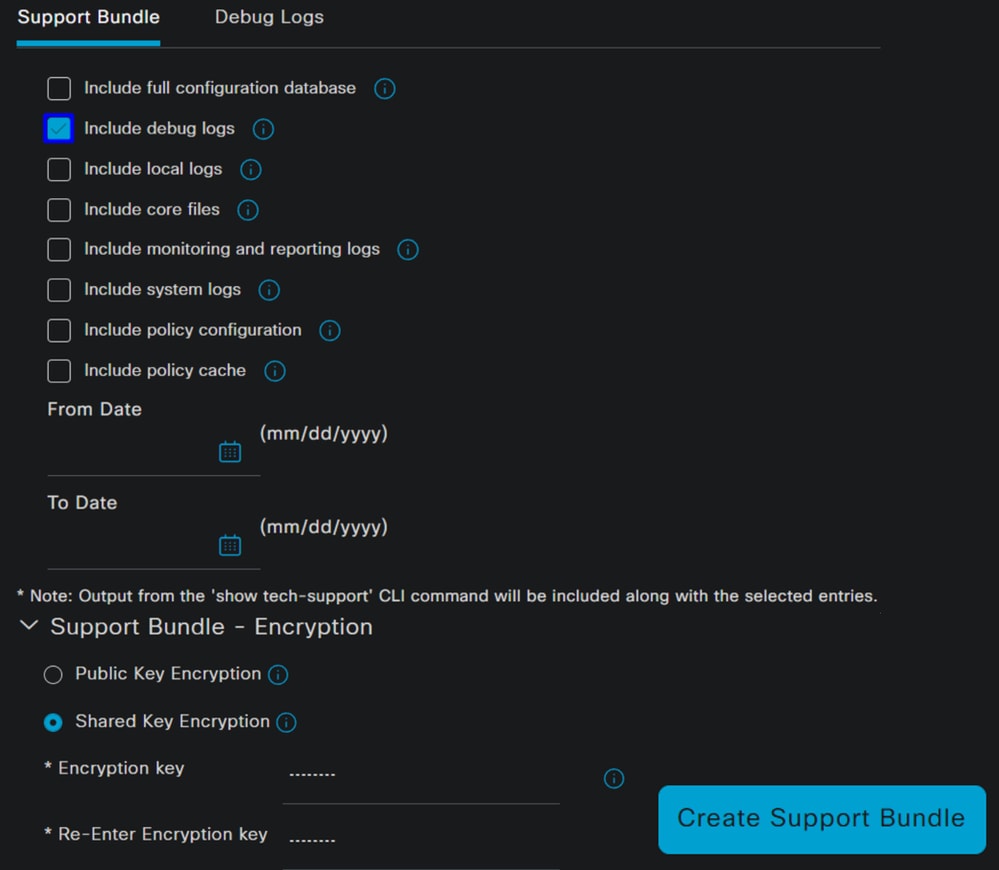
Include debug logs- Under
Support Bundle EncryptionShared Key Encryption- Fill
Encryption keyandRe-Enter Encryption key
- Fill
- Click
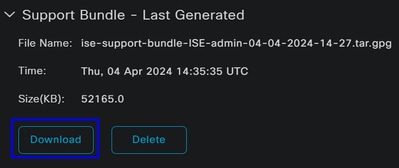
Create Support Bundle - Click
Download

Warning: Disable the debug mode enabled on the step, Debug Profile Configuration
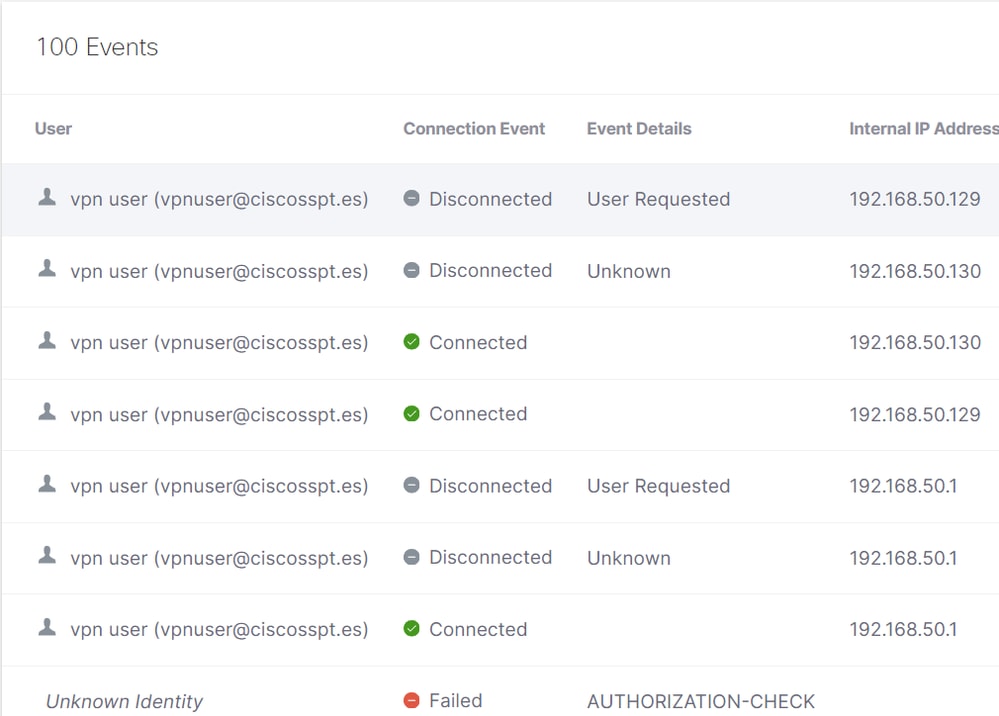
How to Verify Secure Access Remote Access Logs
Navigate to your Secure Access Dashboard:
- Click on
Monitor > Remote Access Logs
Generate DART Bundle on Secure Client
To generate DART Bundle on your machine, verify the next article:
Cisco Secure Client Diagnostic and Reporting Tool (DART)

Note: Once you have collected the logs indicated in the troubleshooting section, please open a case with TAC to proceed with the analysis of the information.
Related Information
Revision History
| Revision | Publish Date | Comments |
|---|---|---|
1.0 |
14-Apr-2024 |
Initial Release |
Contributed by Cisco Engineers
- Jairo MorenoTechnical Consulting Engineer
Contact Cisco
- Open a Support Case

- (Requires a Cisco Service Contract)
 Feedback