Configure Machine Two Factor Authentication for Supplicant Access
Available Languages
Download Options
Bias-Free Language
The documentation set for this product strives to use bias-free language. For the purposes of this documentation set, bias-free is defined as language that does not imply discrimination based on age, disability, gender, racial identity, ethnic identity, sexual orientation, socioeconomic status, and intersectionality. Exceptions may be present in the documentation due to language that is hardcoded in the user interfaces of the product software, language used based on RFP documentation, or language that is used by a referenced third-party product. Learn more about how Cisco is using Inclusive Language.
Contents
Introduction
This document describes the steps required to configure Two-Factor authentication with machine and dot1x authentication.
Prerequisites
Requirements
Cisco recommends that you have knowledge of these topics:
- Configuration of Cisco Identity Services Engine
- Configuration of Cisco Catalyst
- IEEE802.1X
Components Used
- Identity Services Engine Virtual 3.3 Patch 1
- C1000-48FP-4G-L 15.2(7)E9
- Windows Server 2019
The information in this document was created from the devices in a specific lab environment. All of the devices used in this document started with a cleared (default) configuration. If your network is live, ensure that you understand the potential impact of any command.
Network Diagram
This image shows the topology that is used for the example of this document.
The domain name configured on Windows Server 2019 is ad.rem-xxx.com, which is used as an example in this document.
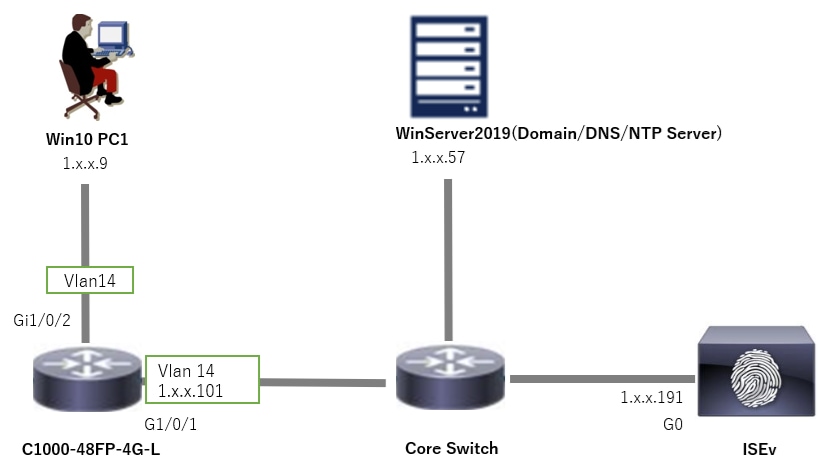 Network Diagram
Background Information
Machine authentication is a security process that verifies the identity of a device seeking access to a network or system. Unlike user authentication, which verifies the identity of a person based on credentials like a username and password, machine authentication focuses on validating the device itself. This is often done using digital certificates or security keys that are unique to the device.
By using machine and user authentication together, an organization can ensure that only authorized devices and users can access its network, thereby providing a more secure environment. This Two-Factor authentication method is particularly useful for protecting sensitive information and complying with strict regulatory standards.
Configurations
Configuration in C1000
This is the minimal configuration in C1000 CLI.
aaa new-model

radius server ISE33
address ipv4 1.x.x.191
key cisco123

aaa group server radius AAASERVER
server name ISE33

aaa authentication dot1x default group AAASERVER
aaa authorization network default group AAASERVER
aaa accounting dot1x default start-stop group AAASERVER
dot1x system-auth-control

interface Vlan14
ip address 1.x.x.101 255.0.0.0

interface GigabitEthernet1/0/1
switchport access vlan 14
switchport mode access

interface GigabitEthernet1/0/2
switchport access vlan 14
switchport mode access
authentication host-mode multi-auth
authentication port-control auto
dot1x pae authenticator
spanning-tree portfast edge
Configuration in Windows PC
Step 1. Add PC to AD Domain
Navigate to Control Panel > System and Security, click System, and then click Advanced system settings. In System Properties window, click Change, select Domain and input the domain name.
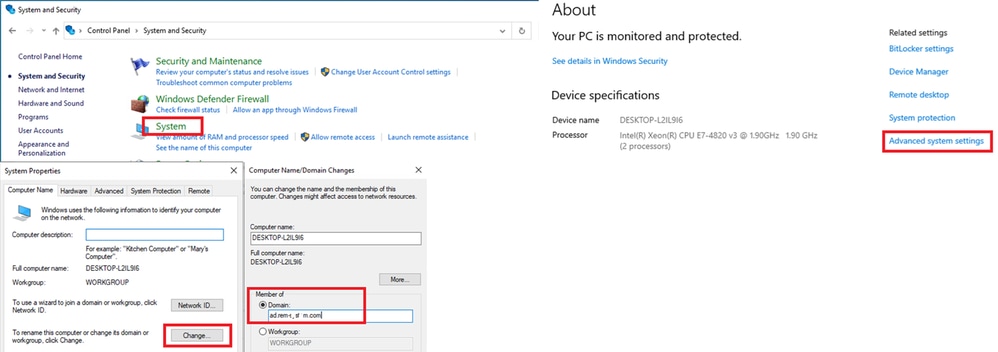 Add PC to AD Domain
In Windows Security window, input username and password of domain server.
 Input Username and Password
Step 2. Configure User Authentication
Navigate to Authentication, check Enable IEEE 802.1X authentication. Click Settings in Protected EAP Properties window, uncheck Verify the server's identity by validating the certificate and then click Configure. In EAP MSCHAPv2 Properties window, check Automatically use my Windows logon name and password (and domain if any) to use the username entered during the windows machine login for user authentication.
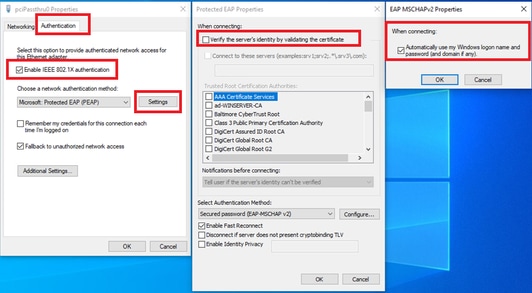 Enable User Authentication
Navigate to Authentication, check Additional Settings. Select User or computer authentication from drop-down list.
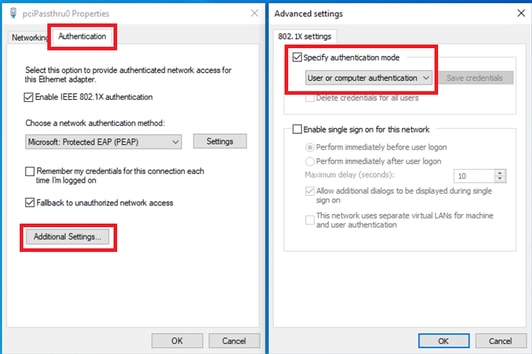 Specify Authentication Mode
Configuration in Windows Server
Step 1. Confirm Domain Computers
Navigate to Active Directory Users and Computers, click Computers. Confirm that Win10 PC1 is listed in the domain.
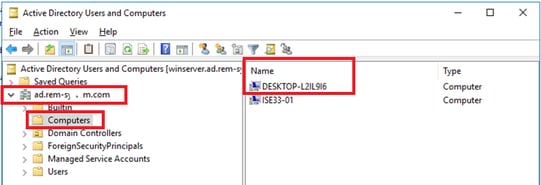 Confirm Domain Computer
Step 2. Add Domain User
Navigate to Active Directory Users and Computers, click Users. Add testuser as domain user.
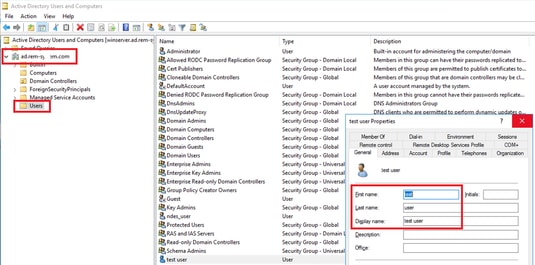 Add Domain User
Add the domain user to member of Domain Admins and Domain Users.
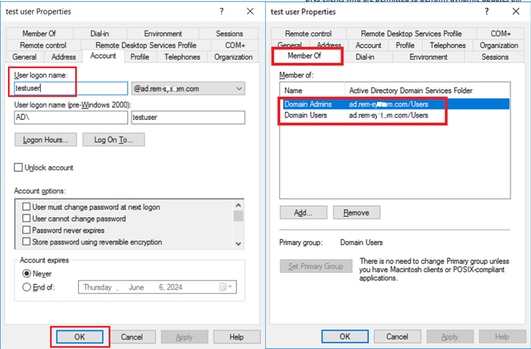 Domain Admins and Domain Users
Configuration in ISE
Step 1. Add Device
Navigate to Administration > Network Devices, click Add button to add C1000 device.
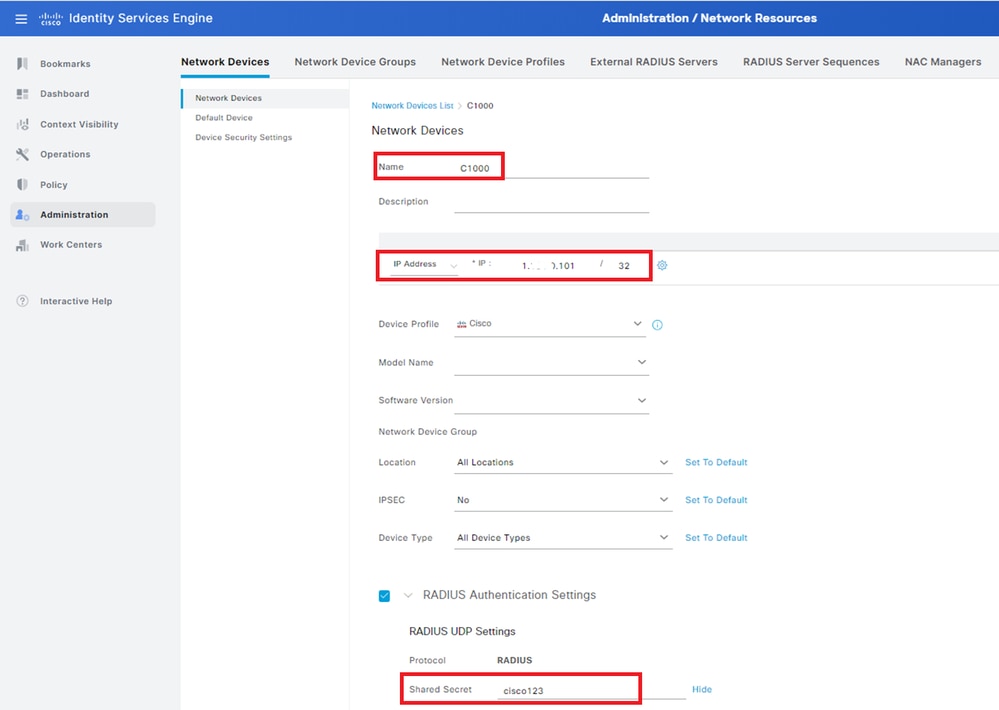 Add Device
Step 2. Add Active Directory
Navigate to Administration > External Identity Sources > Active Directory, click Connection tab, add Active Directory to ISE.
- Join Point Name: AD_Join_Point
- Active Directory Domain: ad.rem-xxx.com
 Add Active Directory
Navigate to Groups tab, select Select Groups From Directory from drop-down list.
 Select Groups from Directory
Click Retrieve Groups from drop-down list. Check ad.rem-xxx.com/Users/Domain Computers and ad.rem-xxx.com/Users/Domain Users and click OK.
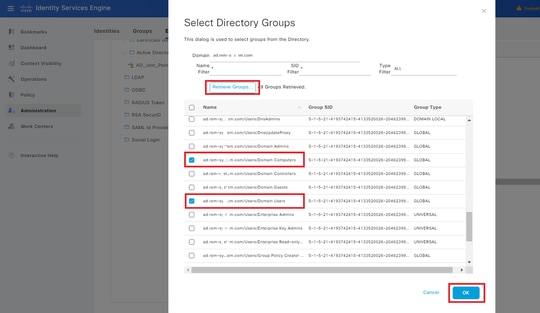 Add Domain Computers and Users
Step 3. Confirm Machine Authentication Setting
Navigate to Advanced Settings tab, confirm the setting of machine authentication.
- Enable Machine Authentication: To enable machine authentication
- Enable Machine Access Restriction: To combine user and machine authentication before authorization

Note: Valid range of aging time is 1 to 8760.
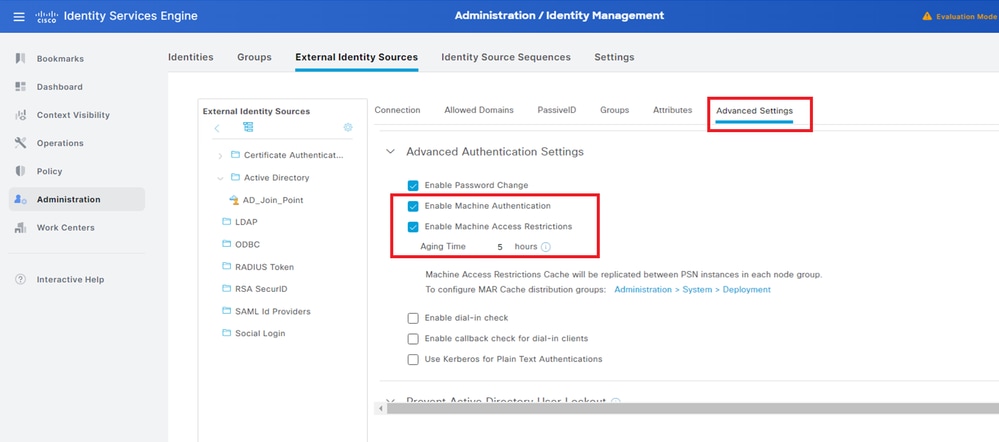 Machine Authentication Setting
Step 4. Add Identity Source Sequences
Navigate to Administration > Identity Source Sequences, add an Identity Source Sequence.
- Name: Identity_AD
- Authentication Search List: AD_Join_Point
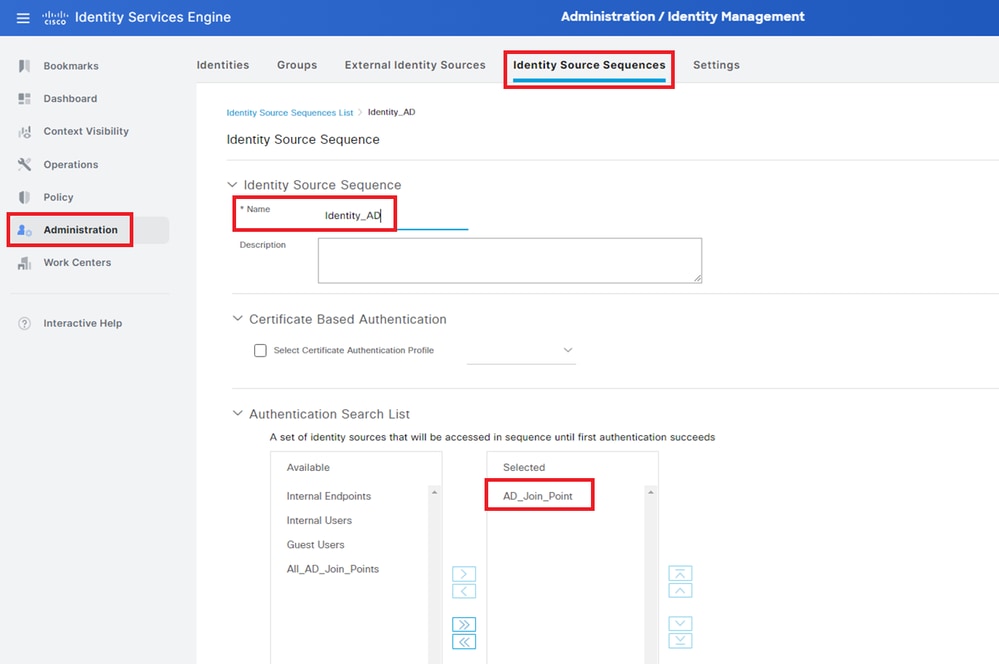 Add Identity Source Sequences
Step 5. Add DACL and Authorization Profile
Navigate to Policy > Results > Authorization > Downloadable ACLs, add a DACL.
- Name: MAR_Passed
- DACL Content: permit ip any host 1.x.x.101 and permit ip any host 1.x.x.105
 Add DACL
Navigate to Policy > Results > Authorization > Authorization Profiles, add a authorization profile.
- Name: MAR_Passed
- DACL Name: MAR_Passed
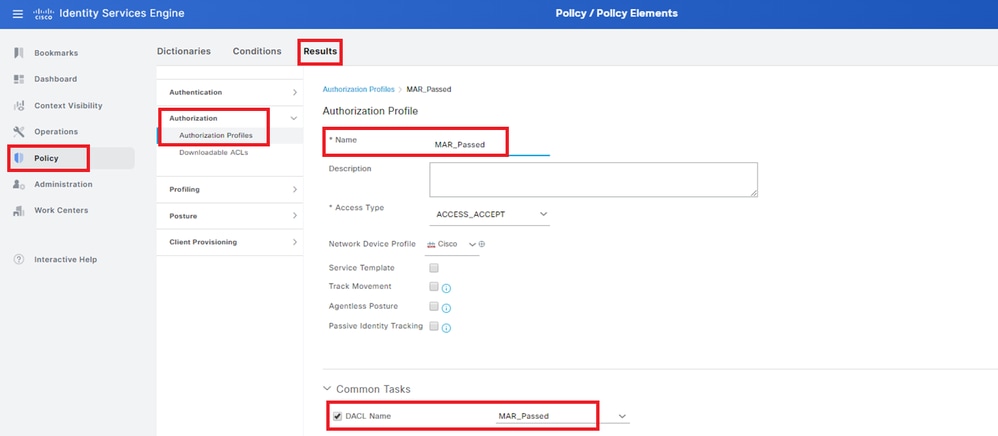 Add Authorization Profile
Step 6. Add Policy Set
Navigate to Policy > Policy Sets, click + to add a policy set.
- Policy Set Name: MAR_Test
- Conditions: Wired_802.1X
- Allowed Protocols / Server Sequence: Default Network Access
 Add Policy Set
Step 7. Add Authentication Policy
Navigate to Policy Sets, click MAR_Test to add an authentication policy.
- Rule Name: MAR_dot1x
- Conditions: Wired_802.1X
- Use: Identity_AD
 Add Authentication Policy
Step 8. Add Authorization Policy
Navigate to Policy Sets, click MAR_Test to add an authorization policy.
- Rule Name: MAR_Passed
- Conditions: AD_Join_Point·ExternalGroups EQUALS ad.rem-xxx.com/Users/Domain Computers AND Network_Access_Authentication_Passed
- Results: MAR_Passed
- Rule Name: User_MAR_Passed
- Conditions: Network Access·WasMachineAuthenticated EQUALS True AND AD_Join_Point·ExternalGroups EQUALS ad.rem-xxx.com/Users/Domain Users
- Results: PermitAccess
 Add Authorization policy
Verify
Pattern 1. Machine Authentication and User Authentication
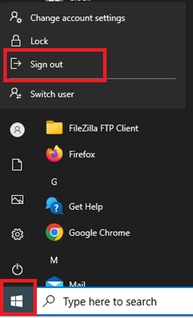
Step 1. Sign Out of Windows PC
Click Sign out button from Win10 PC1 to trigger machine authentication.
 Sign Out of Windows PC
Step 2. Confirm Authentication Session
Run show authentication sessions interface GigabitEthernet1/0/2 details command to confirm machine authentication session in C1000.
Switch#show authentication sessions interface GigabitEthernet1/0/2 details
Interface: GigabitEthernet1/0/2
MAC Address: b496.9115.84cb
IPv6 Address: Unknown
IPv4 Address: 1.x.x.9
User-Name: host/DESKTOP-L2IL9I6.ad.rem-xxx.com
Status: Authorized
Domain: DATA
Oper host mode: multi-auth
Oper control dir: both
Session timeout: N/A
Restart timeout: N/A
Periodic Acct timeout: N/A
Session Uptime: 5s
Common Session ID: 01C2006500000049AA780D80
Acct Session ID: 0x0000003C
Handle: 0x66000016
Current Policy: POLICY_Gi1/0/2

Local Policies:
Service Template: DEFAULT_LINKSEC_POLICY_SHOULD_SECURE (priority 150)

Server Policies:
ACS ACL: xACSACLx-IP-MAR_Passed-6639ba20

Method status list:
Method State

dot1x Authc Success
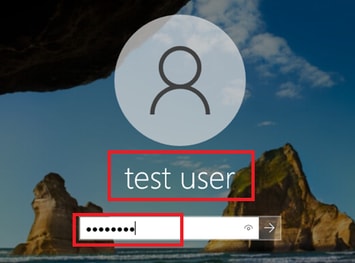
Step 3. Login Windows PC
Login Win10 PC1, input username and password to trigger user authentication.
 Login Windows PC
Step 4. Confirm Authentication Session
Run show authentication sessions interface GigabitEthernet1/0/2 details command to confirm user authentication session in C1000.
Switch#show authentication sessions interface GigabitEthernet1/0/2 details
Interface: GigabitEthernet1/0/2
MAC Address: b496.9115.84cb
IPv6 Address: Unknown
IPv4 Address: 1.x.x.9
User-Name: AD\testuser
Status: Authorized
Domain: DATA
Oper host mode: multi-auth
Oper control dir: both
Session timeout: N/A
Restart timeout: N/A
Periodic Acct timeout: N/A
Session Uptime: 85s
Common Session ID: 01C2006500000049AA780D80
Acct Session ID: 0x0000003D
Handle: 0x66000016
Current Policy: POLICY_Gi1/0/2

Local Policies:
Service Template: DEFAULT_LINKSEC_POLICY_SHOULD_SECURE (priority 150)

Server Policies:


Method status list:
Method State

dot1x Authc Success
Step 5. Confirm Radius Live Log
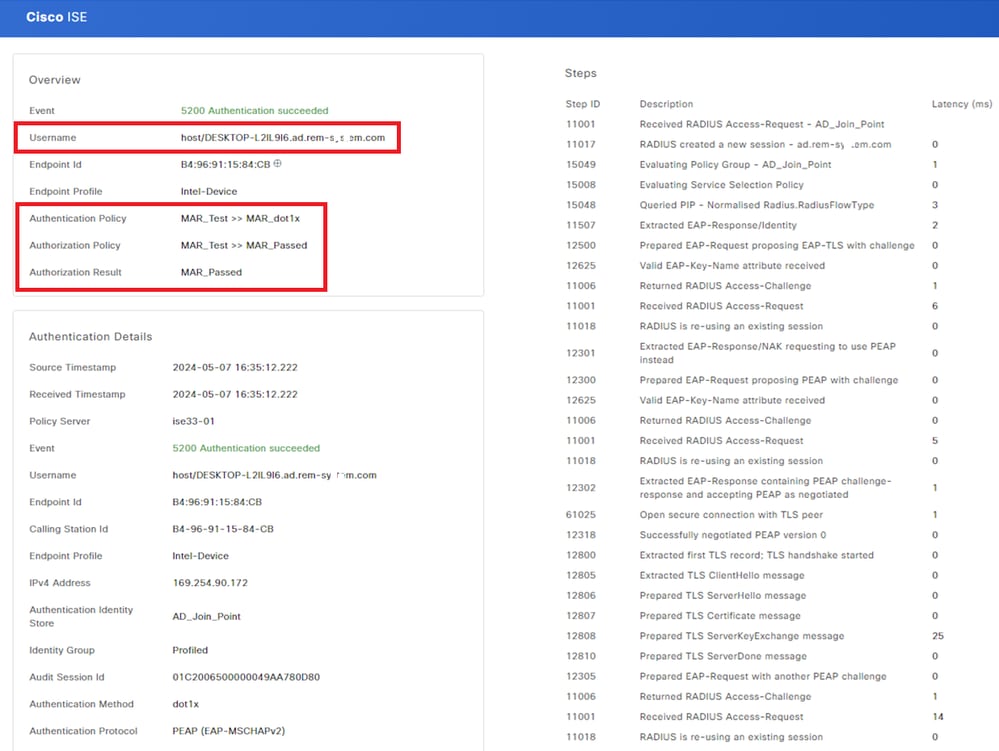
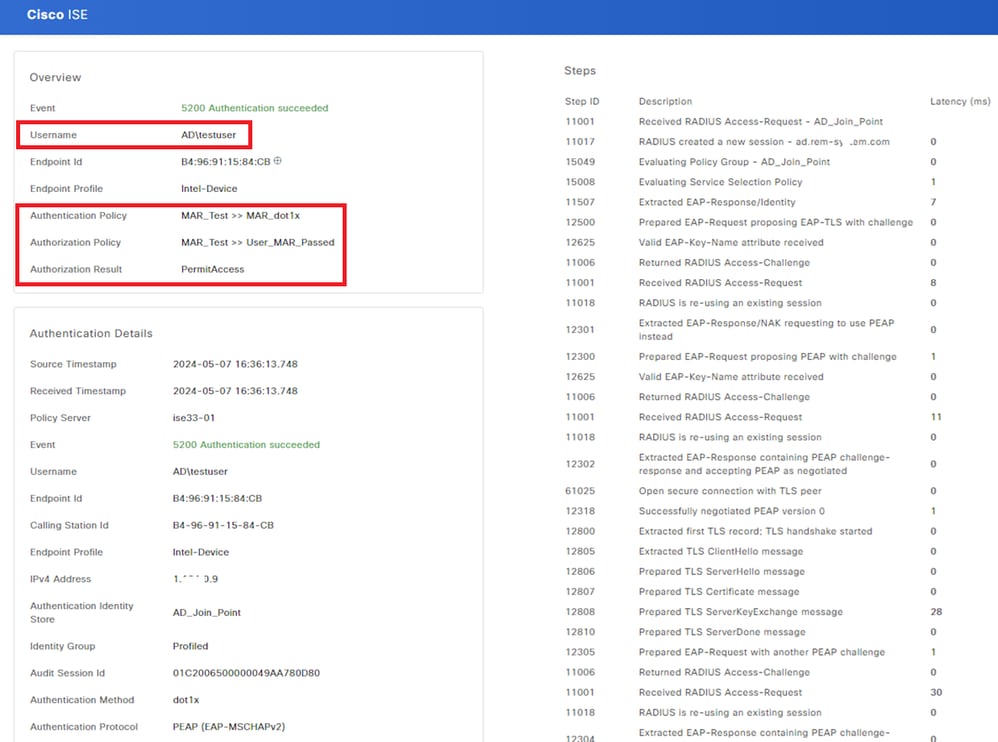
Navigate to Operations > RADIUS > Live Logs in ISE GUI, confirm the live log for machine authentication and user authentication.
 Radius Live Log
Confirm the detailed live log of machine authentication.
 Detail of Machine Authentication
Confirm the detailed live log of user authentication.
 Detail of User Authentication
Pattern 2. User Authentication Only
Step 1. Disable and Enable NIC of Windows PC
In order to trigger user authentication, disable and enable the NIC of Win10 PC1.
Step 2. Confirm Authentication Session
Run show authentication sessions interface GigabitEthernet1/0/2 details command to confirm user authentication session in C1000.
Switch#show authentication sessions interface GigabitEthernet1/0/2 details
Interface: GigabitEthernet1/0/2
MAC Address: b496.9115.84cb
IPv6 Address: Unknown
IPv4 Address: 1.x.x.9
User-Name: AD\testuser
Status: Authorized
Domain: DATA
Oper host mode: multi-auth
Oper control dir: both
Session timeout: N/A
Restart timeout: N/A
Periodic Acct timeout: N/A
Session Uptime: 419s
Common Session ID: 01C2006500000049AA780D80
Acct Session ID: 0x0000003D
Handle: 0x66000016
Current Policy: POLICY_Gi1/0/2

Local Policies:
Service Template: DEFAULT_LINKSEC_POLICY_SHOULD_SECURE (priority 150)

Server Policies:


Method status list:
Method State

dot1x Authc Success
Step 3. Confirm Radius Live Log
Navigate to Operations > RADIUS > Live Logs in ISE GUI, confirm the live log for user authentication.

Note: Because the MAR cache is stored in ISE, only user authentication is needed.
 Radius Live Log
Confirm the detailed live log of user authentication.
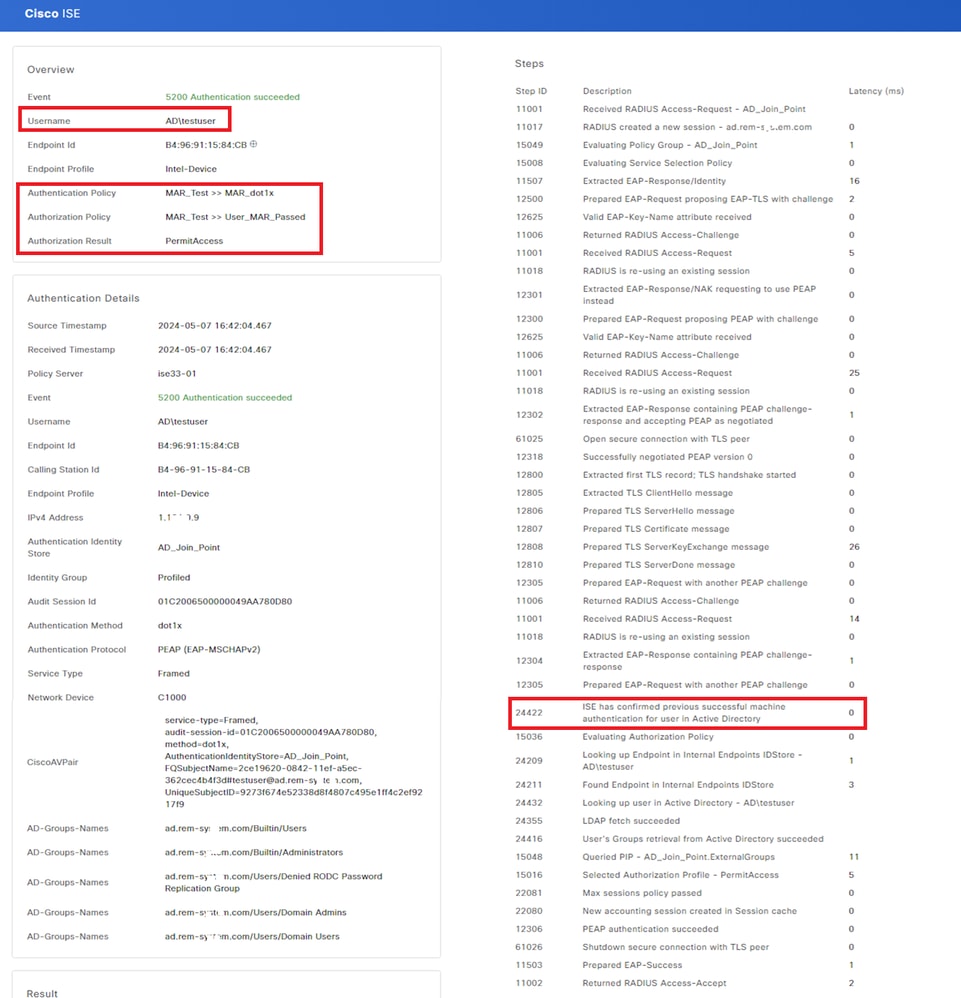 Detail of User Authentication
Troubleshoot
These debug logs (prrt-server.log) help you to confirm the detailed behavior of authentication in ISE.
- runtime-config
- runtime-logging
- runtime-AAA
This is an example of the debug log for Pattern 1. Machine Authentication and User Authentication in this document.
// machine authentication
MAR,2024-05-08 16:54:50,582,DEBUG,0x7fb2fd3db700,cntx=0000034313,sesn=ise33-01/504417979/41,CPMSessionID=01C2006500000049AA780D80,user=host/DESKTOP-L2IL9I6.ad.rem-xxx.com,CallingStationID=B4-96-91-15-84-CB,FramedIPAddress=1.x.x.9,MARCache::checkInsertConditions: subject=machine, calling-station-id=B4-96-91-15-84-CB, HostName=DESKTOP-L2IL9I6$@ad.rem-xxx.com,MARCache.cpp:105

// insert MAR cache
MAR,2024-05-08 16:54:50,582,DEBUG,0x7fb2fd3db700,cntx=0000034313,sesn=ise33-01/504417979/41,CPMSessionID=01C2006500000049AA780D80,user=host/DESKTOP-L2IL9I6.ad.rem-xxx.com,CallingStationID=B4-96-91-15-84-CB,FramedIPAddress=1.x.x.9,Inserting new entry to cache CallingStationId=B4-96-91-15-84-CB, HostName=DESKTOP-L2IL9I6$@ad.rem-xxx.com, IDStore=AD_Join_Point and TTL=18000,CallingStationIdCacheHandler.cpp:55
MAR,2024-05-08 16:54:50,582,DEBUG,0x7fb2fd3db700,cntx=0000034313,sesn=ise33-01/504417979/41,CPMSessionID=01C2006500000049AA780D80,user=host/DESKTOP-L2IL9I6.ad.rem-xxx.com,CallingStationID=B4-96-91-15-84-CB,FramedIPAddress=1.x.x.9,MARCache::onInsertRequest: event not locally,MARCache.cpp:134

// user authentication
MAR,2024-05-08 16:55:11,120,DEBUG,0x7fb2fdde0700,cntx=0000034409,sesn=ise33-01/504417979/45,CPMSessionID=01C2006500000049AA780D80,user=AD\testuser,CallingStationID=B4-96-91-15-84-CB,FramedIPAddress=1.x.x.9,MARCache::onQueryRequest: machine authentication confirmed locally,MARCache.cpp:222
MAR,2024-05-08 16:55:11,130,DEBUG,0x7fb2fe5e4700,cntx=0000034409,sesn=ise33-01/504417979/45,CPMSessionID=01C2006500000049AA780D80,user=AD\testuser,CallingStationID=B4-96-91-15-84-CB,FramedIPAddress=1.x.x.9,MARCache::onMachineQueryResponse: machine DESKTOP-L2IL9I6$@ad.rem-xxx.com valid in AD,MARCache.cpp:316
Related Information
Revision History
| Revision | Publish Date | Comments |
|---|---|---|
1.0 |
25-Jul-2024 |
Initial Release |
Contributed by Cisco Engineers
- Jian ZhangTechnical Consulting Engineer
Contact Cisco
- Open a Support Case

- (Requires a Cisco Service Contract)
 Feedback