Configure Cisco Security Awareness Integration with Cisco Secure Email Gateway
Available Languages
Download Options
Bias-Free Language
The documentation set for this product strives to use bias-free language. For the purposes of this documentation set, bias-free is defined as language that does not imply discrimination based on age, disability, gender, racial identity, ethnic identity, sexual orientation, socioeconomic status, and intersectionality. Exceptions may be present in the documentation due to language that is hardcoded in the user interfaces of the product software, language used based on RFP documentation, or language that is used by a referenced third-party product. Learn more about how Cisco is using Inclusive Language.
Contents
Introduction
This document describes the steps needed to configure Cisco Security Awareness (CSA) integration with the Cisco Secure Email Gateway.
Prerequisites
Requirements
Cisco recommends that you have knowledge of these topics:
- Cisco Secure Email Gateway concepts and configuration
- CSA Cloud Service
Components Used
The information in this document is based on AsyncOS for SEG 14.0 and later.
The information in this document was created from the devices in a specific lab environment. All of the devices used in this document started with a cleared (default) configuration. If your network is live, ensure that you understand the potential impact of any command.
Create and Send Phishing Simulations from CSA Cloud Service
Step 1. Log into CSA Cloud Service
Refer to:
1. https://secat.cisco.com/ for AMERICAS region
2. https://secat-eu.cisco.com/ for EUROPE region
Step 2. Create a Phishing Email Recipient
Navigate to Environment > Users > Add New User and fill in the Email, First Name, Last Name and Language fields and then click Save Changesas shown in the image.
 Screenshot of user interface page to add new user

Note: A password needs to be set only for a CSA admin user who is authorised to create and launch simulations.
The role of the user can be selected once the user is created. You can select the role from the dropdown as indicated in this image:
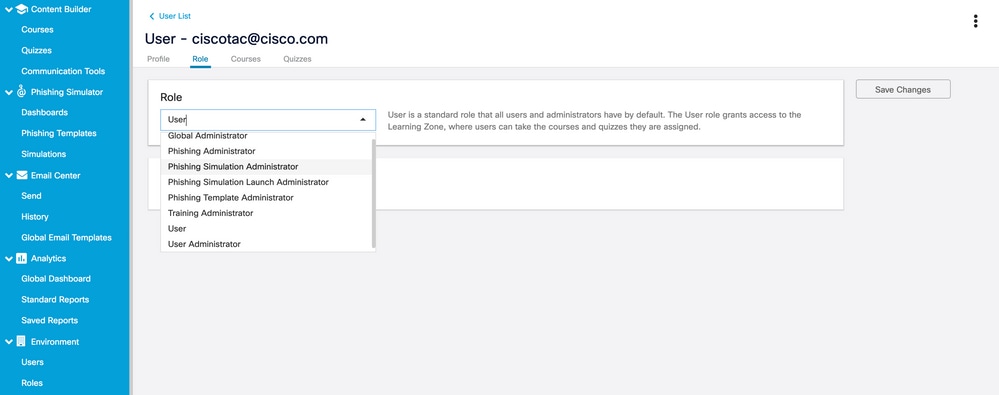 View of the user role drop down options
Select the checkboxUser is Phishing Recipient > Save Changesas shown in the image.
 screenshot showing the "User is Phishing Recipient" checkbox is enabled
Verify that the user is added successfully and is listed when searched based on the email address in the Filter as shown in the image.
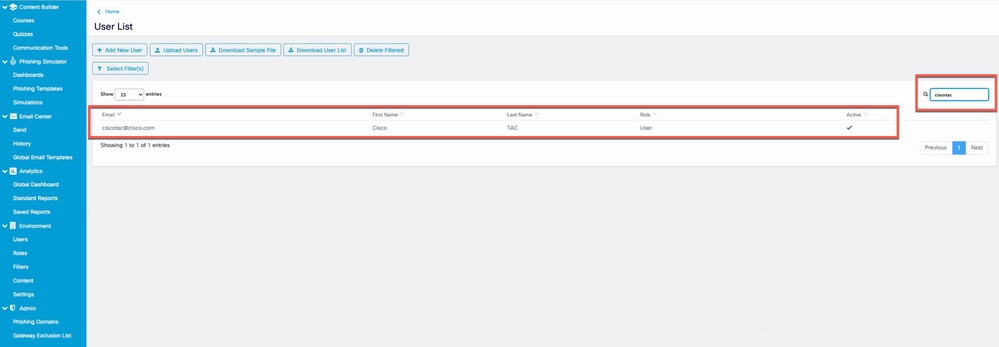 Screenshot of the new user in the user list
Step 3. Enable Report API
Navigate to Environments > Settings > Report API tab and checkEnable Report API > Save Changes .

Note: Make a note of the Bearer Token. You need this to integrate the SEG with CSA.
 Screenshot showing the "Enable Report API" checkbox is enabled.
Step 4. Create Phishing Simulations
a. Navigate to Phishing Simulator > Simulations > Create New Simulation and select a Template from the available list as shown in the image.
 Screenshot highlighting the "Create New Simulation" button
b. Fill in this information:
- Select a name for the template.
- Describe the template.
- Domain name with which the phishing email is sent.
- The display name for the phishing email.
- Email-from address (select from dropdown).
- Reply-to address (select from dropdown).
- Select the language.
- Save changes.
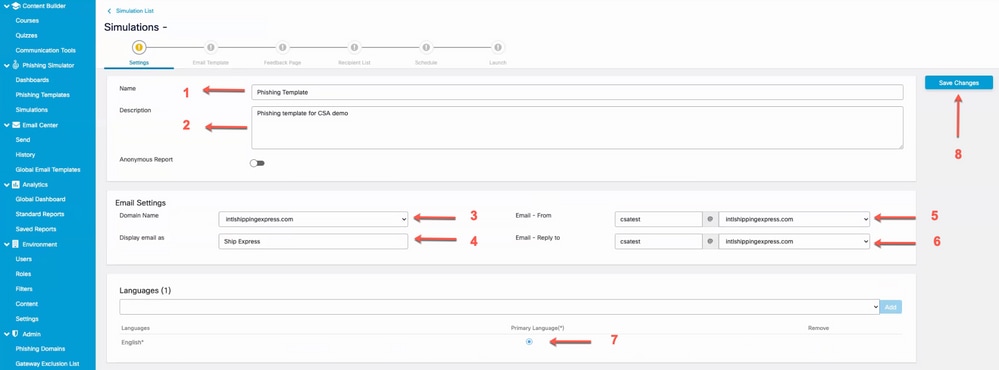 Screenshot highlighting fields that need to be filled into configure new simulation
c. Click on Import from Filters and add the phishing email recipients to the Recipient Listas shown in the image .
 Screenshot highlighting the "Import from Filters" button
You can filter users either by Language or Managers. Click on Add as shown in the image.
 Screenshot of Filter Users dialogue box for filtering by language or manager
Here is an example of the user that was created in Step 2. that is now added to the recipient list as shown in the image.
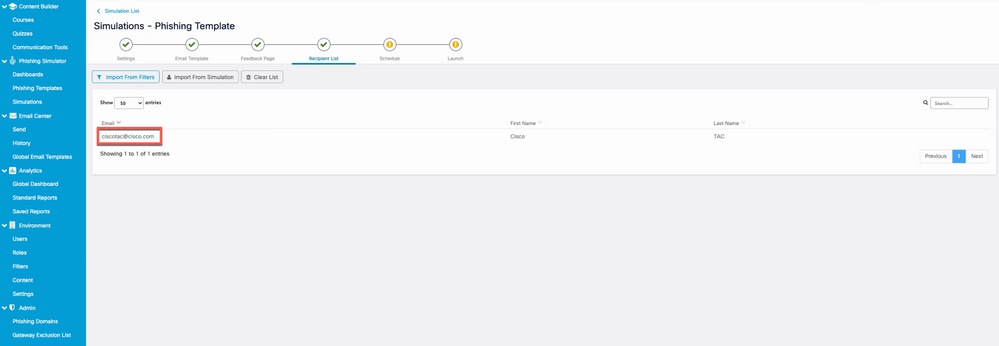 Screenshot of the user created earlier listed as a recipient for the phishing simulation
d. Set theDelivery Startdate and Save changes to schedule the campaign as shown in the image.
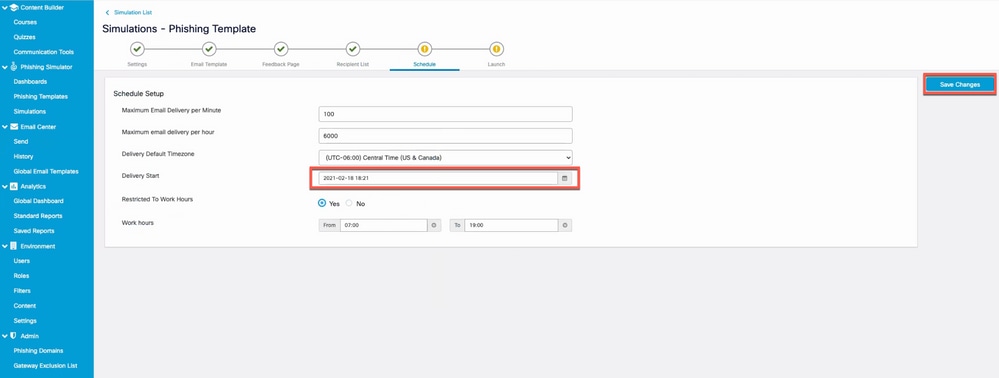 Screenshot highlighting the Delivery start field
Once the start date is chosen, the option to select the end date for the campaign is enabled as shown in the image.
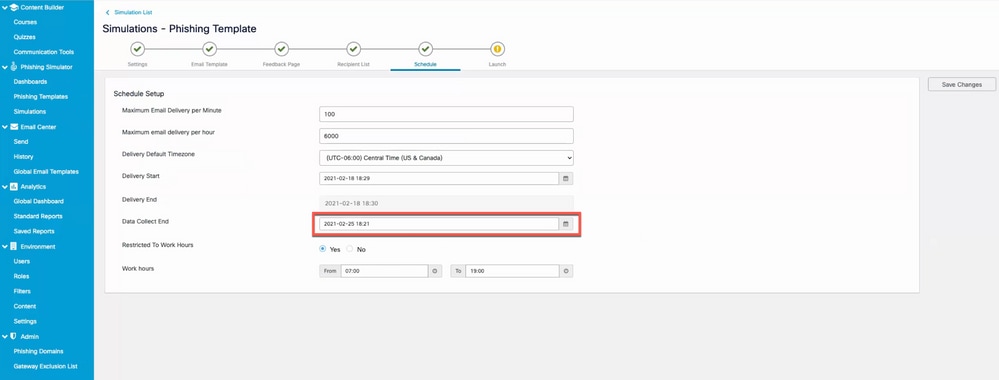 Screenshot of highlighting the Data Collect End field which designates when the simulation should end
e. Click on Launch to launch the campaign as shown in the image.
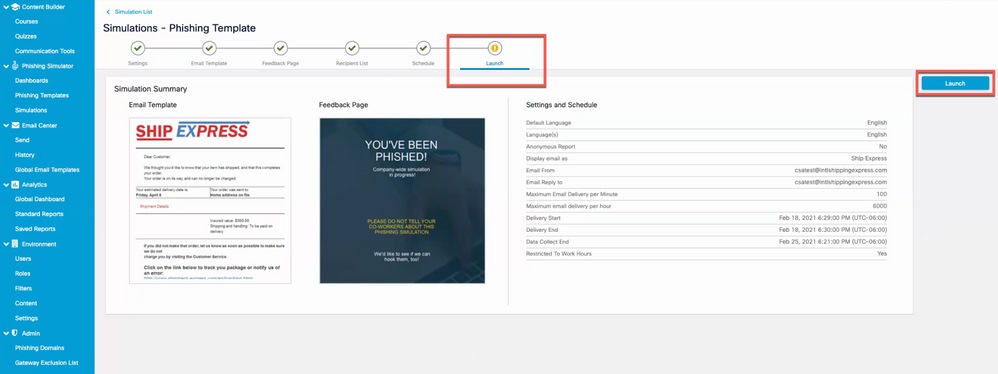 Screenshot of the final tab of the simulation creation wizard where the campaign can be launched
A two-factor authentication code can be requested after the launch button is clicked. Enter the code and click on Launchas shown in the image.
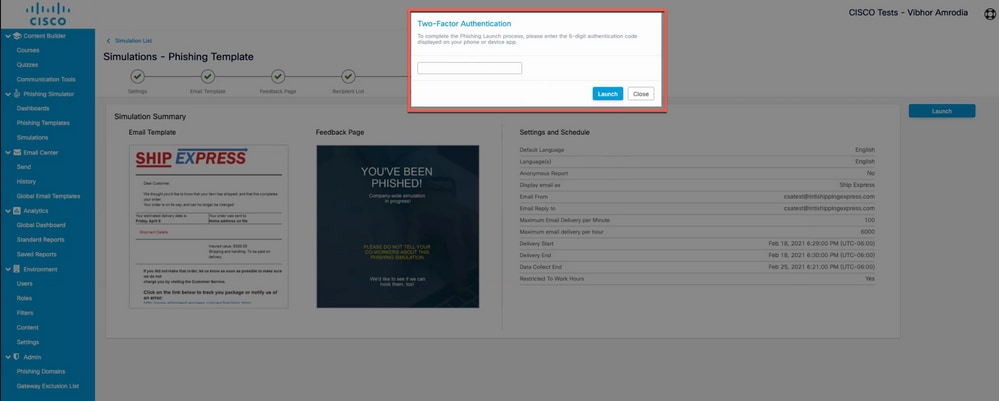 Screenshot of the pop-up asking for the Two Factor Authentication code
Step 5. Verification of Active Simulations
Navigate to Phishing Simulator > Dashboards. The current active simulation list provides the active simulations. You can also click on Export as PDF and get the same report as shown in the image.
 Screenshot of the phishing simulations dashboard
What is seen on the side of the recipient?
Example of a phishing simulation email in the recipient inbox.
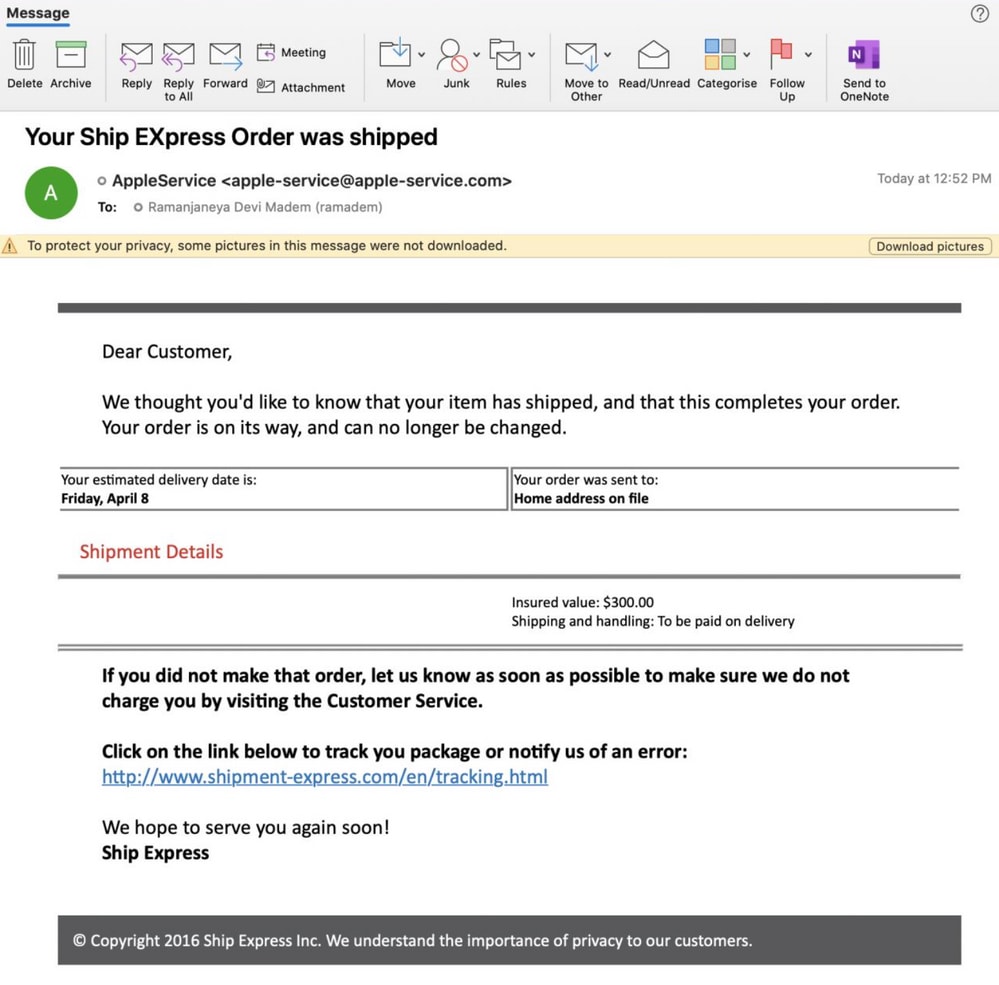 Example of the simulated phish email in a user mailbox
When the recipient clicks the URL, this feedback page is shown to the user and this user appears as part of the Repeat Clickers list (who freely clicked on the phish URL) in CSA.
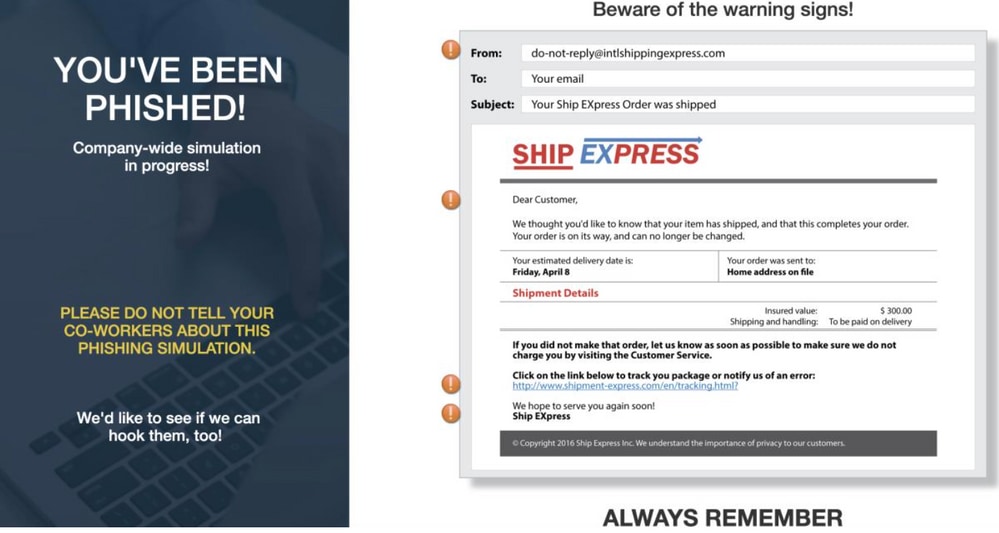 Example of the feedback page the user will seen after clicking the URL in the phish email
Verify on CSA
The Repeat Clickers list is shown underAnalytics > Standard Reports > Phishing Simulations > Repeat Clickersas shown in the image.
 Screenshot of the Repeat Clickers page
Configure the Secure Email Gateway

Note: Under the section Create and Send Phishing Simulations from CSA Cloud Service Step 3. when you enable Report API , you have noted down the bearer token. Keep this handy.
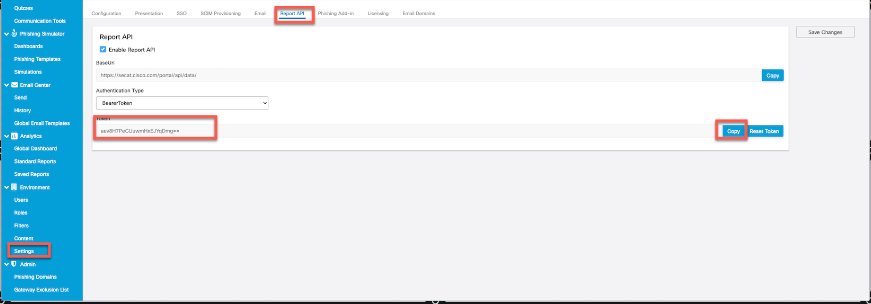 Screenshot of the page under Report API where the admin can find the bearer token
Step 1. Enable the Cisco Security Awareness Feature in the Secure Email Gateway
On Secure Email Gateway GUI, navigate to Security Services > Cisco Security Awareness > Enable . Enter the Region and the CSA Token (Bearer Token obtained from CSA Cloud Service as shown in the previously mentioned Note) and submit and commit the changes.
 Screenshot of the Cisco Security Awareness settings page on the Cisco Secure Email Gateway
CLI Configuration
Type csaconfig to configure CSA via the CLI.
ESA (SERVICE)> csaconfig


Choose the operation you want to perform:
- EDIT - To edit CSA settings
- DISABLE - To disable CSA service
- UPDATE_LIST - To update the Repeat Clickers list
- SHOW_LIST - To view details of the Repeat Clickers list
[]> edit

Currently used CSA Server is: https://secat.cisco.com
Available list of Servers:
1. AMERICAS
2. EUROPE
Select the CSA region to connect
[1]>

Do you want to set the token? [Y]>

Please enter the CSA token for the region selected :
The CSA token should not:
- Be blank
- Have spaces between characters
- Exceed 256 characters.

Please enter the CSA token for the region selected :

Please specify the Poll Interval
[1d]>
Step 2. Allow Simulated Phishing Emails from CSA Cloud Service

Note: The CYBERSEC_AWARENESS_ALLOWED Mailflow policy is created by default with all the scanning engines set to Off as shown here.
 Screenshot of the "CYBERSEC_AWARENESS_ALLOWED" mail flow policy with security features disabled
To allow simulated phishing campaign emails from CSA Cloud Service to bypass all scanning engines on Secure Email Gateway:
a. Create a New Sender Group and assign the CYBERSEC_AWARENESS_ALLOWED Mail flow policy. Navigate to Mail Policies > HAT Overview > Add Sender Group and select the policy CYBERSEC_AWARENESS_ALLOWED and set the order to 1 and then Submit and Add Senders.
b. Add a sender IP/domain or Geo Location from where the phishing campaign emails are initiated.
Navigate to Mail Polices > HAT Overview > Add Sender Group > Submit and Add Senders > Add the sender IP > Submit and Commit changes as shown in the image.
 Screenshot of a CyberSec_Awareness_Allowed sender group with the "CYBERSEC_AWARENESS_ALLOWED mail flow policy selected.
 Screenshot of the Cisco Security Awareness settings page on the Cisco Secure Email Gateway
CLI Configuration:
1. Navigate to listenerconfig > Edit > Inbound (PublicInterface) > HOSTACCESS > NEW > New Sender Group .
2. Create a new sender group with CYBERSEC_AWARENESS_ALLOWED mail policy and, add a sender IP/domain from where the phishing campaign emails are initiated.
3. Set the order of the new Sender Group to 1 and use the Move option under listenerconfig > EDIT > Inbound (PublicInterface) > HOSTACCESS > MOVE .
4. Commit.

Note: The sender IP is the IP address of the CSA and is based on the region you selected. Refer to the table for the correct IP address to be used. Allow these IP addresses/hostnames in the firewall with port number 443 for SEG 14.0.0-xxx to connect to the CSA cloud service.
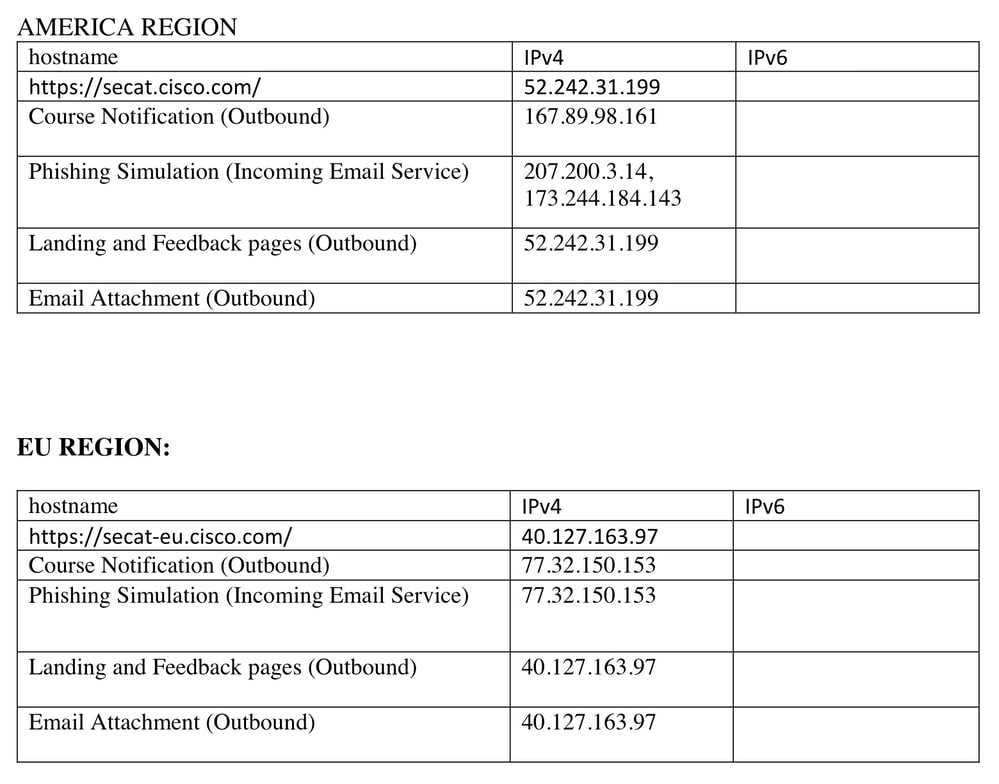 Screenshot of the CSA Americas and EU regions IP addresses and hostnames
Step 3. Take Action on Repeat Clicker from SEG
Once the phishing emails have been sent and the repeat clickers list populated in the SEG, an aggressive incoming mail policy can be created to take action on mail to those specific users.
Create a new aggressive Incoming Custom Mail Policy and enable Include Repeat Clickers List check box in the recipient section.
From GUI, navigate to Mail Policies > Incoming Mail Policies > Add Policy > Add User > Include Repeat Clickers List > Submit and Commit the changes.
 Screenshot of custom Incoming Mail Policy configured to handle mail destined for repeat clickers
Troubleshoot Guide
1. Navigate to csaconfig > SHOW_LISTto see the details of the repeat clickers list.
ESA (SERVICE)> csaconfig


Choose the operation you want to perform:
- EDIT - To edit CSA settings
- DISABLE - To disable CSA service
- UPDATE_LIST - To update the Repeat Clickers list
- SHOW_LIST - To view details of the Repeat Clickers list
[]> show_list

List Name       : Repeat Clickers
Report ID       : 2020
Last Updated    : 2021-02-22 22:19:08
List Status     : Active
Repeat Clickers : 4
2. Navigate to csaconfig > UPDATE_LIST if you would like to force update the repeat clickers list.
ESA (SERVICE)> csaconfig


Choose the operation you want to perform:
- EDIT - To edit CSA settings
- DISABLE - To disable CSA service
- UPDATE_LIST - To update the Repeat Clickers list
- SHOW_LIST - To view details of the Repeat Clickers list
[]> update_list

Machine: ESA An update for the Repeat Clickers list was initiated successfully.
3. Navigate to /data/pub/csa/ to see if the repeat clickers list has been downloaded or if there is an error. Here is the working setup:
Tue Jan  5 13:20:31 2021 Info: CSA: Connecting to the Cisco Security Awareness cloud service [https://secat.cisco.com/portal/api/license/info]
Tue Jan  5 13:20:31 2021 Info: CSA: Polling the Cisco Security Awareness cloud service to download the latest Repeat Clickers list.
Tue Jan  5 13:20:31 2021 Info: CSA: Trying to get the license expiry date: loop count 0
Tue Jan  5 13:20:31 2021 Info: CSA: Connecting to the Cisco Security Awareness cloud service [https://secat.cisco.com/portal/api/data/report/2020]
Tue Jan  5 13:20:31 2021 Info: CSA: Trying to download Repeat clickers list: loop count 0
Tue Jan  5 13:20:31 2021 Info: CSA: The update of the Repeat Clickers list was completed at [Tue Jan  5 13:20:29 2021]. Version: 1
Wed Jan  6 13:20:32 2021 Info: CSA: Polling the Cisco Security Awareness cloud service to download the latest Repeat Clickers list.
Here is an output when you have entered the incorrect token:
Fri Feb 19 12:28:39 2021 Info: CSA: Connecting to the Cisco Security Awareness cloud service [https://secat.cisco.com/portal/api/license/info]
Fri Feb 19 12:28:39 2021 Info: CSA: Trying to get the license expiry date: loop count 0
Fri Feb 19 12:28:39 2021 Info: CSA: Polling the Cisco Security Awareness cloud service to download the latest Repeat Clickers list.
Fri Feb 19 12:28:43 2021 Info: CSA: Connecting to the Cisco Security Awareness cloud service [https://secat.cisco.com/portal/api/data/report/2020]
Fri Feb 19 12:28:43 2021 Info: CSA: Trying to download Repeat clickers list: loop count 0
Fri Feb 19 12:28:44 2021 Warning: CSA: The download of the Repeat Clickers list from the Cisco Security Awareness cloud service failed because of an invalid token.
4. Navigate to /data/log/heimdall/csa to get detailed logs.
Working output:
2021-01-05 13:20:22,292 INFO      csa       Connecting to the Cisco Security Awareness cloud service [https://secat.cisco.com/portal/api/license/info]
Tue Jan  5 13:20:22 2021: DEBUG: csa: THR : ExpiryPoller Trying to get the license expiry date : loop count 0
2021-01-05 13:20:22,293 INFO      csa       Trying to get the license expiry date: loop count 0
2021-01-05 13:20:22,293 INFO      csa       Polling the Cisco Security Awareness cloud service to download the latest Repeat Clickers list.
2021-01-05 13:20:22,300 INFO      requests.packages.urllib3.connectionpool  Starting new HTTPS connection (1): secat.cisco.com
2021-01-05 13:20:27,343 INFO      csa       Connecting to the Cisco Security Awareness cloud service [https://secat.cisco.com/portal/api/data/report/2020]
Tue Jan  5 13:20:27 2021: DEBUG: csa: THR : CSAPoller Trying to download Repeat clickers list: loop count 0
2021-01-05 13:20:27,343 INFO      csa       Trying to download Repeat clickers list: loop count 0
2021-01-05 13:20:27,344 INFO      requests.packages.urllib3.connectionpool  Starting new HTTPS connection (1): secat.cisco.com
Tue Jan  5 13:20:29 2021: INFO: csa: THR : CSAPoller Downloaded Repeat Clicker List.
Tue Jan  5 13:20:29 2021: INFO: csa: THR : CSAPoller Updated the repeat clickers list at [Tue Jan  5 13:20:29 2021] with version [1]
2021-01-05 13:20:29,934 INFO      csa       The update of the Repeat Clickers list was completed at [Tue Jan  5 13:20:29 2021]. Version: 1
Tue Jan  5 13:20:32 2021: DEBUG: csa: THR : CSAPoller Queue is empty: No need of any config update
Tue Jan  5 13:20:32 2021: DEBUG: csa: THR : CSAPoller Waiting for timeout of [86400.0]s or notify signal
5. Navigate to data/csa/reports to get the report id in encrypted format which contains the users.
6. The count of repeat clickers list can also be seen from the GUI. Navigate to Security Services > Cisco Security Awarenessas shown in the image.
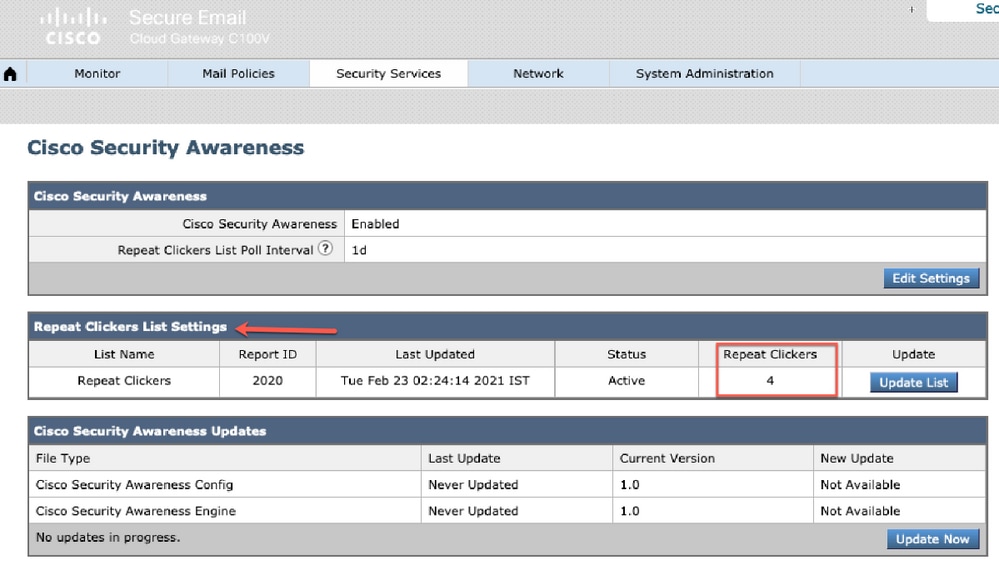 Cisco Security Awareness page highlighting the number of repeat clickers" />Screenshot of Security Services > Cisco Security Awareness page highlighting the number of repeat clickers
Related Information
Revision History
| Revision | Publish Date | Comments |
|---|---|---|
1.0 |
05-Apr-2023
|
Initial Release |
Contributed by Cisco Engineers
- Anvitha PrabhuCisco Customer Delivery Leader
Contact Cisco
- Open a Support Case

- (Requires a Cisco Service Contract)
 Feedback