Introduction
This document describes how to configure Cisco Email Encryption Service Add-in Centralized Deployment via Microsoft Office 365.
Prerequisites
Requirements
Cisco recommends that you have knowledge of these topics:
- Cisco Secure Email Gateway
- Cisco Secure Email Encryption Service (formerly known as Cisco Registered Envelope Service)
- Microsoft O365 Suites (Exchange, Entra ID, Outlook)
Components Used
The information in this document is based on these software and hardware versions:
- Cisco Email Encryption Add-in 10.0.0
- Microsoft Exchange Online
- Microsoft Entra ID (formerly known as Azure AD)
- Outlook for O365 (macOS, Windows)
The information in this document was created from the devices in a specific lab environment. All of the devices used in this document started with a cleared (default) configuration. If your network is live, ensure that you understand the potential impact of any command.
Background Information
The Cisco Secure Email Encryption Service Add-in allows your end users to encrypt their messages directly from Microsoft Outlook with a single click. This Add-in can be deployed on Microsoft Outlook (for Windows and macOS) and Outlook Web App.

Note: This document is ideal for all the end users who plan to use the add-in use Office 365/Microsoft 365 subscription and all the end users who plan to use the Add-in are registered Cisco Secure Email Encryption Service Users.
Best Practices for Deploying the Cisco Secure Email Encryption Service Add-In
- Test Phase - Deploy the Add-in to a small set of end users within a department or function. Evaluate the results and, if successful, move to the next phase.
- Pilot Phase - Deploy the Add-in to more end users from different departments and functions. Evaluate the results and, if successful, move to the next phase.
- Production Phase - Deploy the Add-in to all users.
Configure
Cisco Secure Email Encryption Service Add-in Application Registration
1. Log in to Microsoft 365 Admin Center as at least a Cloud Application Administrator (Microsoft 365 Admin Center).
2. In the left-hand menu, expand Admin Centersand click Identity.
3. Navigate to Identity > Applications > App registrationsand select New registration.

Note: If you have access to multiple Tenants, use the Settings Icon in the top right menu to switch to the Tenant in which you want to register the application from the Directories + Subscriptions menu.
4. Enter a Display Name for the Application, select accounts that can use the Application and click Register.
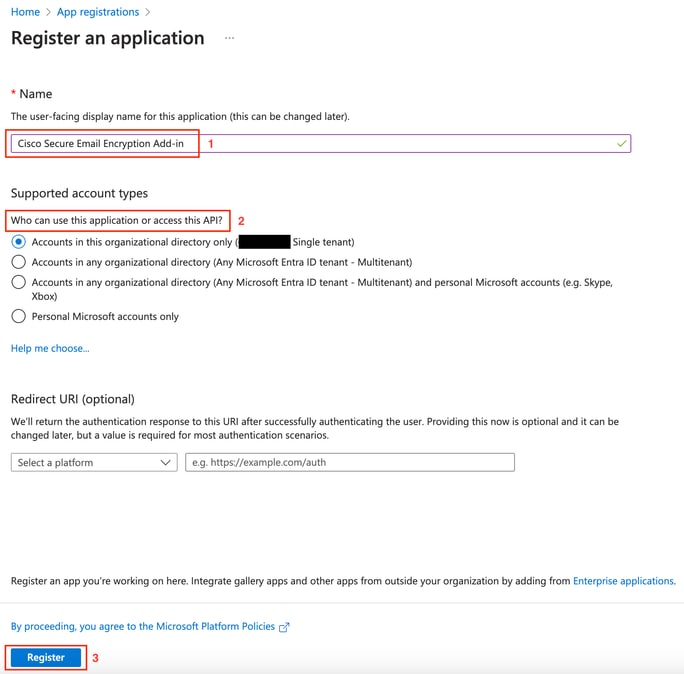 Register Application
5. After successful registration, navigate to the Application to configure Client Secret under Certificates & Secrets. Choose the expiration according to organization regulatory compliance.
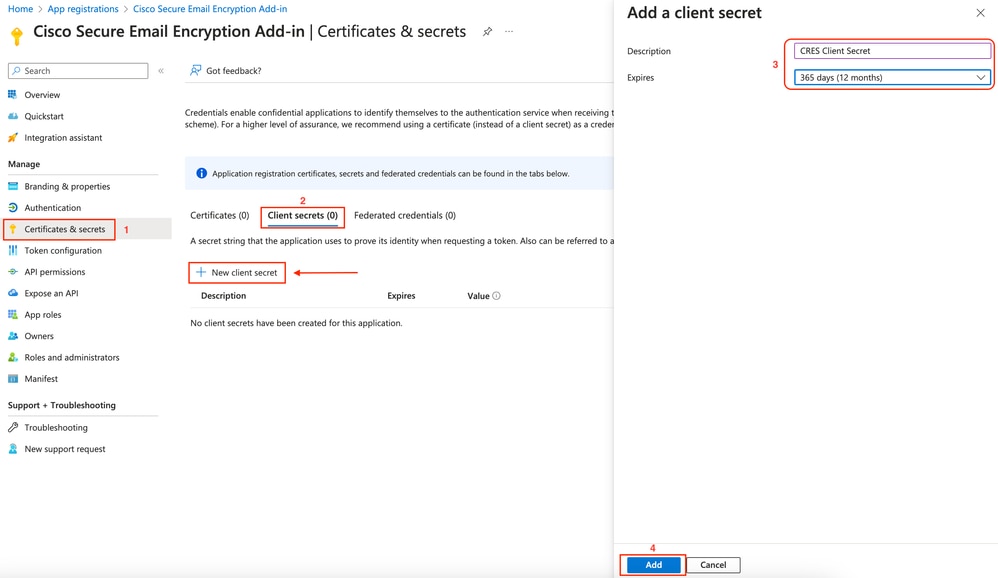 Configure Client Secret
6. From Overview page of the Registered Application, copy the Application (client) ID and Directory (tenant) ID. Copy the Client Secret from Certificates & Secrets generated in the previous step.
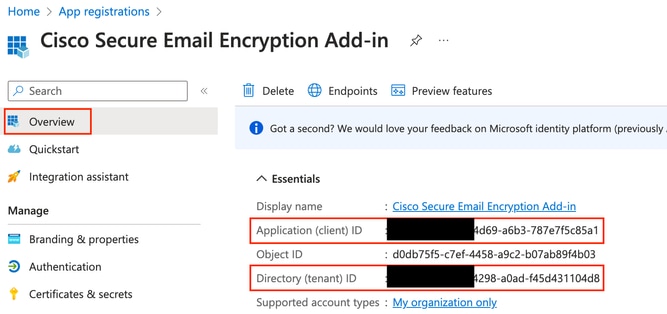 Entra ID Application Overview
 Copy Client Secret
7. Navigate to the Registered Email Encryption Application and then navigate to API permissions. Click Add a permission and select required Microsoft Graph Application Permissions:
- Mail.Read
- Mail.ReadWrite
- Mail.Send
- User.Read.All
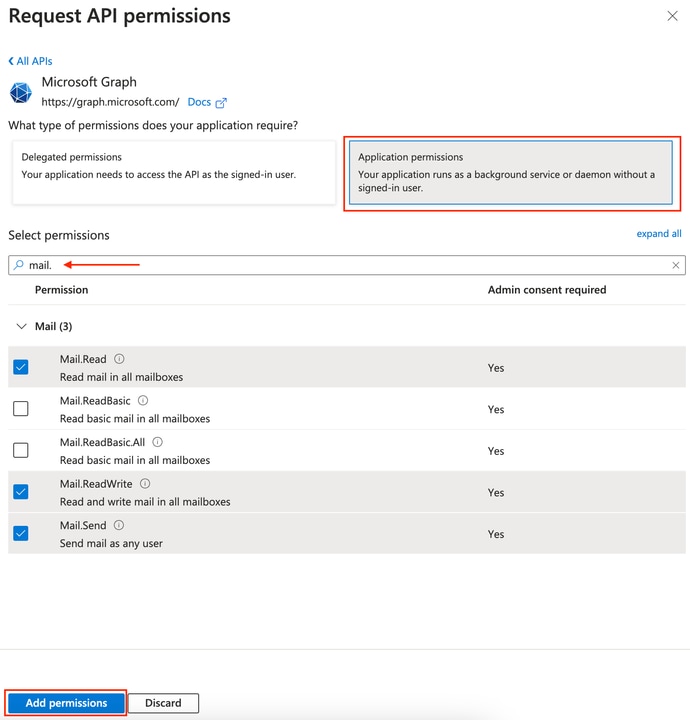 Microsoft Graph Permission Configuration
7. Click Grant Admin Consent for <tenant-name> to give the Application access to Permissions on behalf of the Organization.
 Microsoft Graph API Permissions
Configure Domain and Add-in Settings on Cisco Secure Email Encryption (CRES) Admin Portal
1. Log in to Cisco Secure Email Encryption Service (CRES) Admin Portal as an Account Administrator. (Secure Email Encryption Service)
2. Navigate to Accounts > Manage Accounts. Click the account number assigned to your organization or the account on which you plan to configure Email Encryption Add-in.
3. Navigate to Profiles, select the Name type as Domain and enter your email domain name under Values. Click Add Entries and wait for 5 to 10 seconds. (Do not refresh the browser page or navigate to a different page until it is added successfully).

Tip: Repeat the same steps to add other Email Domains that are going to use Email Encryption Service in your organization.

Note: Contact Cisco Technical Assistance Center to get the Email Domains added on CRES Admin Portal.
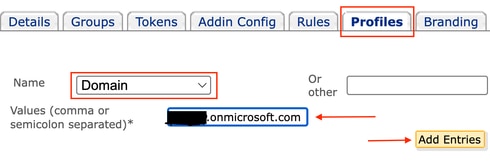 CRES Admin Portal Profiles
4. Navigate to Add-in Config tab.
Step 1: Enter the Tenant, Client ID and Secret obtained from Entra ID under Azure AD Details. Click Save Details.
Step 2: Select the domain, Encryption Type, and click Save Configuration. Use Save Configuration for All Domains to apply the same settings to all added Domains.

Caution: Do not navigate to a different page without completing Step 1. and Step 2. together. If Step 2. is not completed concurrently, Azure AD details are not saved.
Step 3: Click Download Manifest.
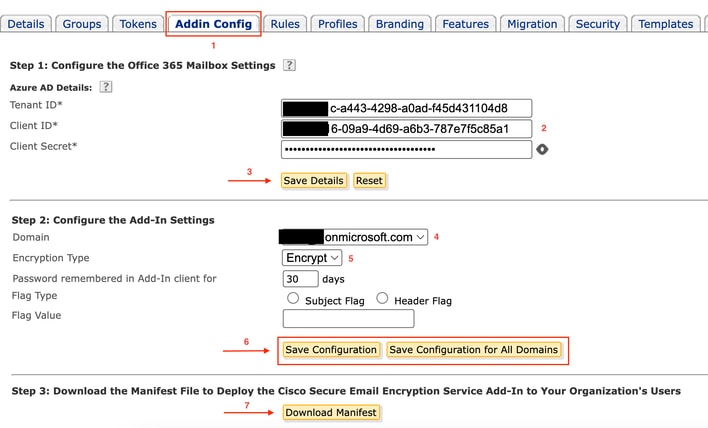 CRES Admin Portal Addin Config
Upload Manifest File to Microsoft 365 to Deploy Email Encryption Service Add-in
1. Log in to Microsoft 365 Admin Center as an Administrator. (Microsoft 365 Admin Center).
2. Navigate to Settings > Integrated apps and click Add-ins.
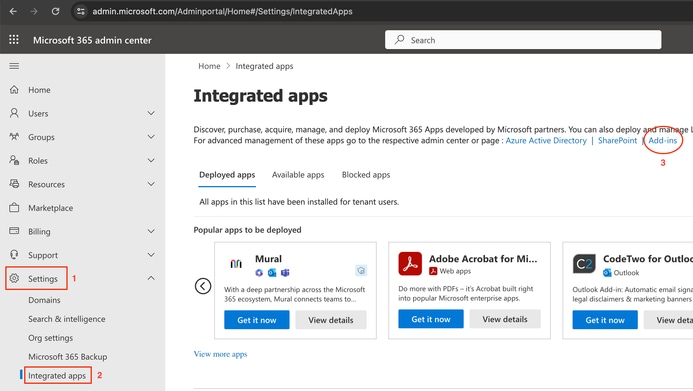 Microsoft O365 Addin Settings
3. Click Deploy Add-inand choose Upload Custom Apps. Select I have the manifest file (.xml) on this deviceand upload the file downloaded from Cisco Email Encryption Service Admin Portal from the previous step. Click Upload.
4. On the next step, assign users who need access to Cisco Secure Email Encryption Service. For a phased manner deployment, choose Specifc Users/groupsand click Deploy.
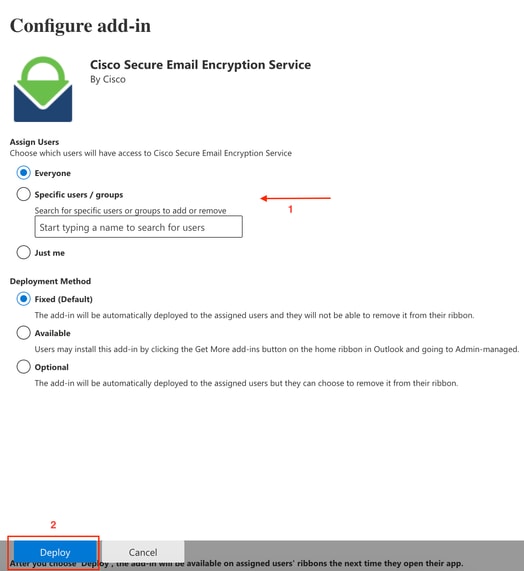 Microsoft O365 Addin Configuration
5. Once the Add-in is successfully deployed, it can take up to 12 hours to be displayed on end users' Ribbons (Outlook Client).
Verify
Use this section in order to confirm that your configuration works properly.
1. Launch Outlook for Office 365/Microsoft 365 or Outlook Web App, compose the message that you want to encrypt, and add at least one valid recipient to it.

Note: If the Encryption Type (set by the administrator) is Encrypt, ensure that you have completed your message and added valid recipients before proceeding to the next step. After Step 3, the message is encrypted and sent immediately.
2. Open/Click the Cisco Secure Email Encryption Service add-in.
- On Outlook Web App, click the ellipsis icon (located near the Send and Discard buttons), and click
Cisco Secure Email Encryption Service.
- On Outlook for Windows or MacOS, click Encrypt from the Ribbon or Toolbar.
- If you are on Outlook for MacOS version 16.42 or later and using the New Outlook interface, click
Cisco Secure Email Encryption Service from the Toolbar.
3. Enter your credentials and click Sign in. (Only if the Encryption Type is Flag, click Send).
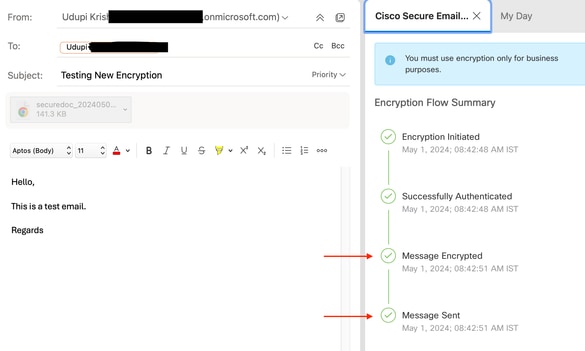 Microsoft Outlook Encryption Status
Troubleshoot
There is currently no specific troubleshooting information available for this configuration.
Related Information


 Feedback