Introduction
This document describes the steps to configure the Domain Mapping feature.
Prerequisites
Requirements
Cisco recommends knowledge of these topics:
- Cisco Secure Email Gateway (SEG / ESA)
- Command Line Interface (CLI) Access.
Components Used
The information in this document is based on these software and hardware versions:
The information in this document was created from the devices in a specific lab environment. All of the devices used in this document started with a cleared (default) configuration. If your network is live, ensure that you understand the potential impact of any command.
Background Information
AsyncOS provides various methods to rewrite Sender and Recipient addresses within the email pipeline.
You can set up a domain map for listeners. For each listener, you can create a domain map table that rewrites the Envelope Recipient for any recipient whose domain matches an entry in the table. This function is comparable to sendmail's Domain Table or Postfix's Virtual Table.

Note: Only the Envelope Recipient is altered; the To: headers remain unchanged.
Configuration
Create Domain Mapping via CLI
Once you log in via CLI to your appliance:
- Type listenerconfig.
- Edit and select the listener you use for this setup.
- From the menu, select domainmap option.
- The Domain Map Table is displayed.
- Select New to create a new entry.
- Add the first address and hit Enter. In here you can enter a domain, partial hostnames, or email addresses.
- Add the second address and hit Enter. This is the address to which the first address is mapped.
- Once both addresses have been added, the Domain Map Table is displayed with the amount of current Domain Maps in it.
- Select the print option to display the current domain maps.
- Hit Enter until you go to the default CLI screen with the appliance hostname.
- Submit and Commit changes.
Example:
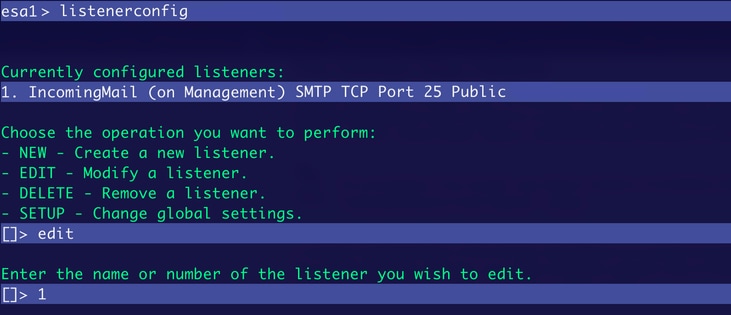 Listener Configuration
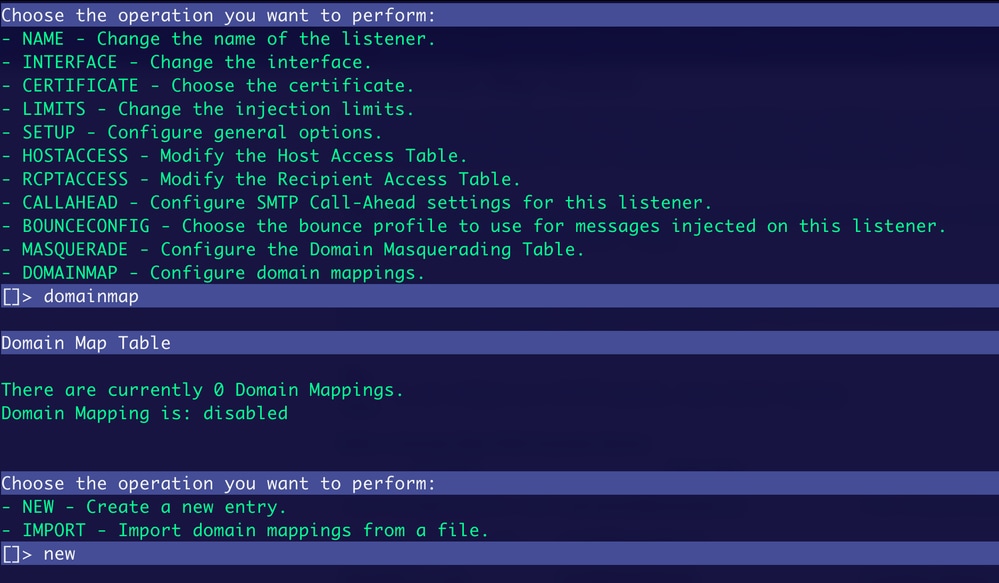 Adding Actions
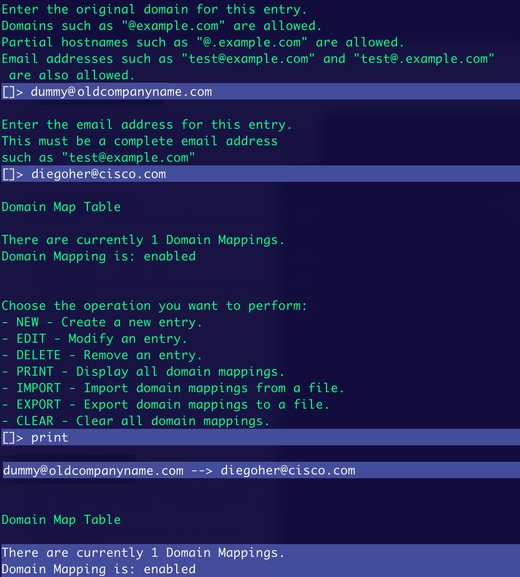 Configuring Domain Map
Test and Check Results in Mail Logs
Once you create the Domain Map configuration, send an email to the first added address to see the results.
The message comes from an external sender to the domain map address.
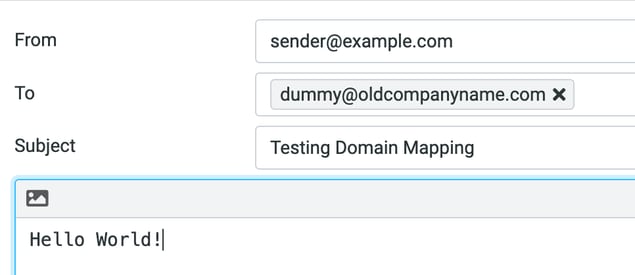 Incoming Email
In Mail Logs, the redirection is displayed in the To header.

In your mailbox, you receive the message in the redirected address.
 Mapped Account Mailbox
Export Current Domain Map Addresses To Add More
You can export the current configuration of your Domain Map and add more entries directly to it.
- Log in via CLI and type listenerconfig > edit. Select the listener to be edited by typing domainmap.
- In the domainmap options, type export.
- After this, you see that a new file has been created in /configuration/<exported-name>.
- Once the configuration is exported, you can retrieve it via FTP or via GUI.
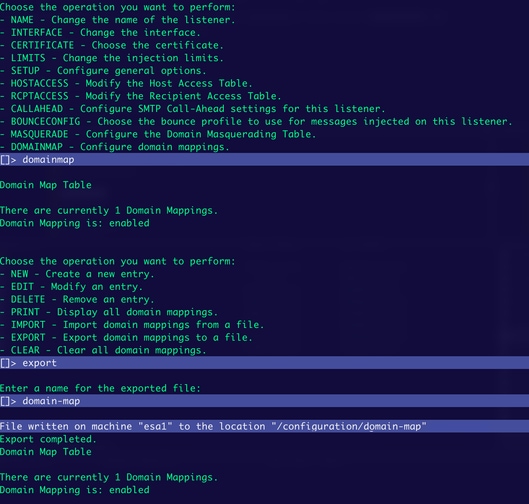 Exporting File
Download Domain Map Configuration via FTP
To download the configuration, use an FTP client to connect to your device and download the current exported file. Once connected to your device, the /configuration folder is displayed and inside you see the name of the file generated in the export step.
Example:
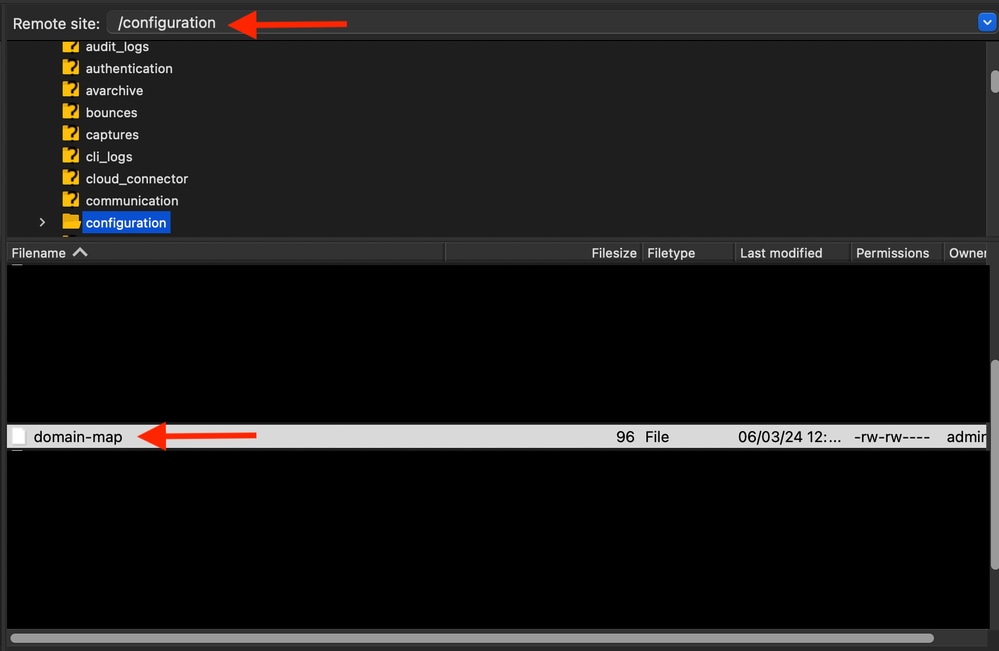 Domain Map Configuration File
Domain Map file contents.

Import Domain Map Configuration with New Entries
With the current configuration file, you can add more entries to it directly, and then upload it back to your device.
Add new entries.

Once the changes are made, you need to import the new file.
- Log in via CLI to your device, type listenerconfig. Select the listener to be edited > domainmap.
- Once in domainmap, type import.
- Type the name you have for the file. In this case is it is domain-map.
- Once you type the name, hit Enter and you see that the entries have been imported.
- To verify the entries, type print to display them.
Example:
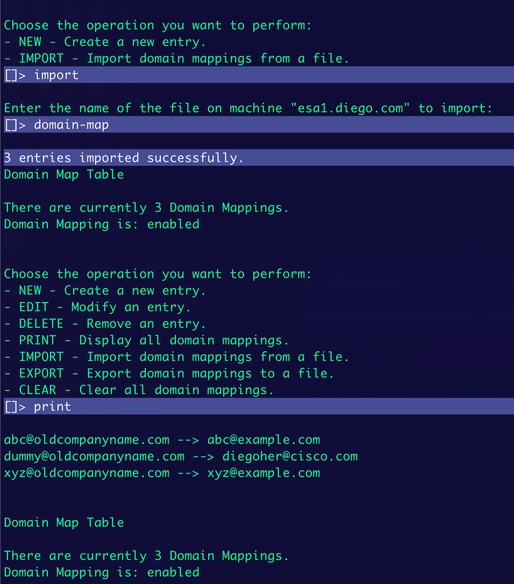 Import New Entries
Download Domain Map Configuration via GUI
To do this, you must have already exported the Domain Map file as described above in the Export Current Domain Map Addresses and Add More section.
- Navigate to System Administration > Configuration File.
- In the Load Configuration section, you see the name of the exported file.
- Click Preview Selected File.
- A new window is opened with the current Domain Map configuration.
- Once the information is displayed, you can copy the information, add it to a text file to edit it, and then upload it via FTP to the device.
Example:
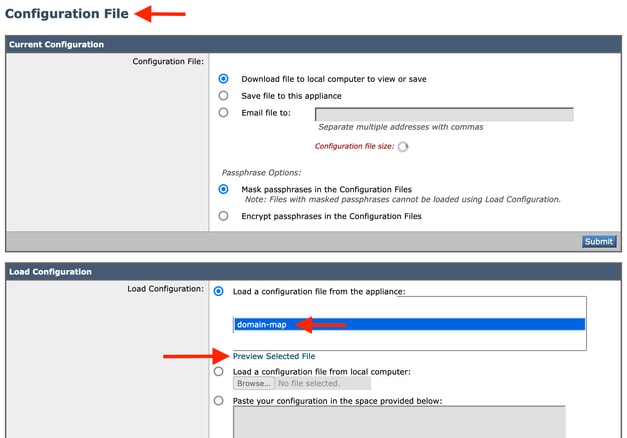 Configuration File GUI
 Preview File

Note: The use of FTP to download and upload files only applies for on-prem and virtual devices. For CES hosted devices, it is necessary to open a ticket with TAC to provide the new Domain Map configuration file.
Related Information


 Feedback