Introduction
This document describes how to troubleshoot Event Streams in Advanced Malware Protection Secure Endpoint Private Cloud.
Prerequisites
Requirements
Cisco recommends that you have knowledge of the topics:
- Secure Endpoint Private Cloud
- API query
Components Used
The information in this document is based on these software and hardware versions:
- Secure Endpoint Private Cloud v3.9.0
- cURL v7.87.0
- cURL v8.0.1
The information in this document was created from the devices in a specific lab environment. All of the devices used in this document started with a cleared (default) configuration. If your network is live, ensure that you understand the potential impact of any command.
Configuration
Create API Key
Step 1. Login to Private Cloud Console.
Step 2. Navigate to Accounts > API Credentials.
Step 3. Click New API Credential.
Step 4. Add the Application name and click Read & Write scope.
 Create API Key
Step 5. Click Create.
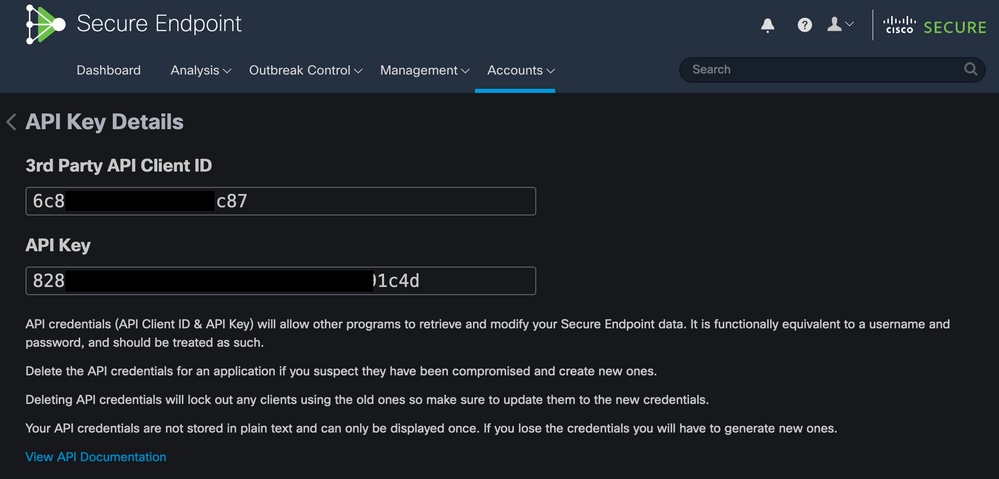
Step 6. Save API credentials.
 API Key
Caution: The API Key cannot be recovered if you leave this page.
Create Event Stream
This creates a new Advanced Message Queuing Protocol (AMQP) message stream for event information.
You can create an Event Stream for specified events types and groups:
--data '{"name":"EVENT_STREAM_NAME","event_type":["EVENT_TYPE_1", "EVENT_TYPE_2"],"group_guid":["GROUP_ID_1", "GROUP_ID_2"]}'You can create an Event Stream for all event types and all groups by:
--data '{"name":"EVENT_STREAM_NAME","event_type":[],"group_guid":[]}'MacOS/Linux
You can create an Event Stream on MacOS/Linux with the use of:
curl -X POST -k -H 'Accept: application/json' -H 'Content-Type: application/json' -u 'CLIENT_ID:API_KEY' -i 'https://CONSOLE_URL/v1/event_streams' --data '{"name":"EVENT_STREAM_NAME","event_type":[],"group_guid":[]}'Windows
You can create an Event Stream on Windows with the use of:
curl -X POST -k -H "Accept: application/json" -H "Content-Type: application/json" -u "CLIENT_ID:API_KEY" -i "https://CONSOLE_URL/v1/event_streams" --data "{\"name\":\"EVENT_STREAM_NAME\",\"event_type\":[],\"group_guid\":[]}"Response
HTTP/1.1 201 Created
(...)
"data": {
  "id": 17,
  "name": "EVENT_STREAM_NAME",
  "amqp_credentials": {
    "user_name": "17-1bfXXXXXXXXXX",
    "queue_name": "event_stream_17",
    "password": "3961XXXXXXXXXXXXXXXXXXXXXX814a77",
    "host": "FMC_SERVICE_URL",
    "port": 443,
    "proto": "https"
  }
}
List of Event Streams
This shows a list of event streams created on Private Cloud.
MacOS/Linux
You can list the Event Streams on MacOS/Linux with the use of:
curl -k -H 'Accept: application/json' -H 'Content-Type: application/json' -u 'CLIENT_ID:API_KEY' -i 'https://CONSOLE_URL/v1/event_streams'
Windows
You can list the Event Streams on Windows with the use of:
curl -k -H "Accept:application/json" -H "Content-Type:application/json" -u "CLIENT_ID:API_KEY" -i "https://CONSOLE_URL/v1/event_streams"
Response
HTTP/1.1 200 OK
(...)
"data": {
  "id": 17,
  "name": "EVENT_STREAM_NAME",
  "amqp_credentials": {
    "user_name": "17-1bfXXXXXXXXXX",
    "queue_name": "event_stream_17",
    "host": "FMC_SERVICE_URL",
    "port": 443,
    "proto": "https"
  }
}
Delete Event Streams
Deletes an active event stream.
MacOS/Linux
You can delete Event Streams on MacOS/Linux with the use of:
curl -X DELETE -k -H 'Accept: application/json' -H 'Content-Type: application/json' -u 'CLIENT_ID:API_KEY' -i 'https://CONSOLE_URL/v1/event_streams/EVENT_STREAM_ID'
Windows
You can delete Event Streams on Windows with the use of:
curl -X DELETE -k -H "Accept:application/json" -H "Content-Type:application/json" -u "CLIENT_ID:API_KEY" -i "https://CONSOLE_URL/v1/event_streams/EVENT_STREAM_ID"
Response
HTTP/1.1 200 OK
(...)
 "data": {}
Verify
Step 1. Copy the Python script to your device and save it as EventStream.py.
import pika
import ssl

user_name = "USERNAME"
queue_name = "QUEUE_NAME"
password = "PASSWORD"
host = "FMC_SERVICE_URL"
port = 443
proto = "https"

def callback(channel, method, properties, body):
 print(body)

amqp_url = f"amqps://{user_name}:{password}@{host}:{port}"

context = ssl.SSLContext(ssl.PROTOCOL_TLSv1_2)
amqp_ssl = pika.SSLOptions(context)

params = pika.URLParameters(amqp_url)
params.ssl_options = amqp_ssl

connection = pika.BlockingConnection(params)
channel = connection.channel()

channel.basic_consume(
   queue_name,
   callback,
   auto_ack = False
)

channel.start_consuming()
Step 2. Execute it in the terminal as python3 EventStream.py.
Step 3. Trigger any event which is added to the Event Stream queue.
Step 4. Check if the events appear in the terminal.
Troubleshooting
In order to execute these commands you must log in via SSH into the Private Cloud.
Check the AMQP Service
Verify if the service is enabled:
[root@fireamp rabbitmq]# amp-ctl service status rabbitmq
running enabled rabbitmq
Verify if the service is running:
[root@fireamp ~]# svstat /service/rabbitmq
/service/rabbitmq: up (pid 25504) 7402137 seconds
Check the Connection to Event Stream Receiver
Execute the command:
tail /data/log/rabbitmq/rabbit@fireamp.log
Connection is established:
=INFO REPORT==== 19-Apr-2023::08:40:12 ===
accepting AMQP connection <0.17588.27> (127.0.0.1:32946 -> 127.0.0.1:5672)
Connection is closed:
=WARNING REPORT==== 19-Apr-2023::08:41:52 ===
closing AMQP connection <0.17588.27> (127.0.0.1:32946 -> 127.0.0.1:5672):
connection_closed_abruptly
Check for the Events in the Queue
Events in the queue are ready to be sent on this event stream to the receiver after the connection is established. In this example, there are 14 events for Event Stream ID 23.
[root@fireamp rabbitmq]# rabbitmqctl list_queues
Listing queues ...
1acb0eb6-39f7-4b11-bd9b-fc4dd0e3bd77_60b15rn8mpftaico6or6l8zxavl1usm 26
1acb0eb6-39f7-4b11-bd9b-fc4dd0e3bd77_61984nlu8p11eeopmgmtcjra1v8gf5p 26
1acb0eb6-39f7-4b11-bd9b-fc4dd0e3bd77_iesRAgVo0h287mO_DetOx9PdDu8MxkS6kL4oSTeBm9s 26
event_decoration 0
event_log_store 0
event_stream_23 14
event_streams_api 0
events_delayed 0
events_retry 0
mongo_event_consumer 0
out_events_q1 0
tevent_listener 0
Collect Network Traffic File
In order to verify the Event Stream traffic from the Private Cloud, you can collect capture with a tcpdump
Step 1. SSH into the Private Cloud.
Step 2. Execute the command:
tcpdump -vvv -i eth1 host <Event_Stream_Receiver_IP> -w file.pcap
Step 3. Stop the capture with Ctrl+C (Windows) or Command-C (Mac).
Step 4. Extract the pcap file from the Private Cloud.
Related Information


 Feedback