Introduction
This document describes the steps to collect Support Snapshot and enable live support session from the Cisco Secure Endpoint Private Cloud appliance.
Background information
When collaborating with TAC, it is sometimes necessary to gather a Support Snapshot or allow TAC to establish a support tunnel to your Secure Endpoint (previously known as Advanced Malware Protection) Private Cloud appliance. This facilitates thorough investigation or remote application of fixes.
This approach saves time and provides the TAC engineer with the comprehensive information needed to address the issue effectively.
Support Snapshots
Generate Support Snapshot from Administration Portal
In order to collect a Support Snapshot from the Administration Portal, perform these steps:
Step 1: Log in to the Administration Portal.
Step 2: Select Support and then select Support Snapshots, as shown in the image.
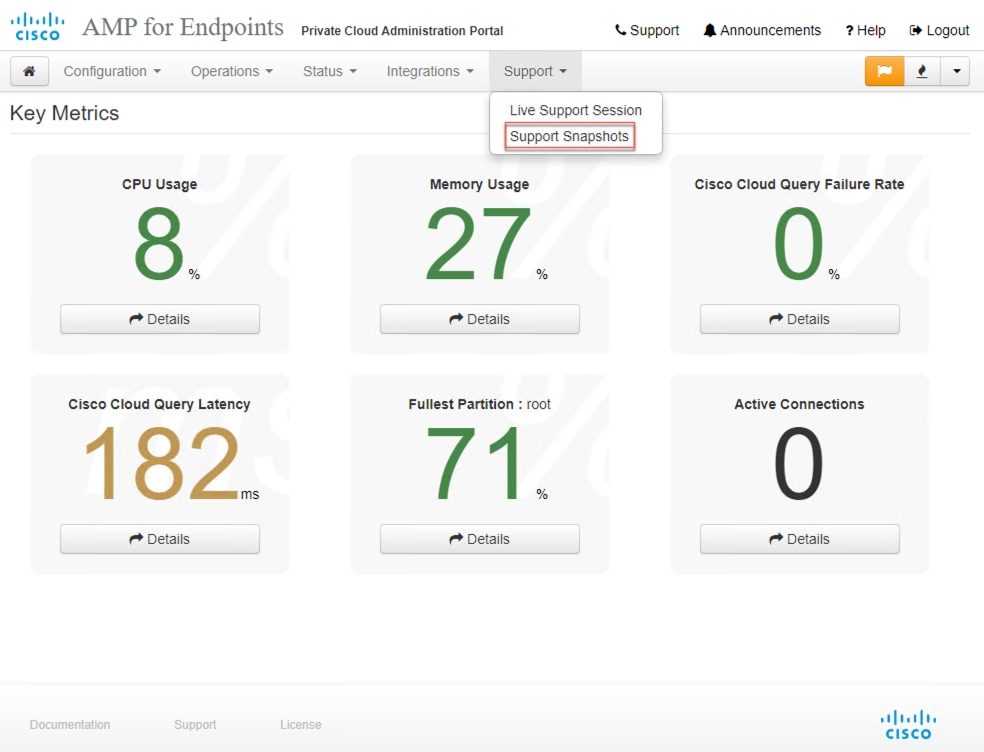
Step 3: Click Create Snapshot.

Step 4: You can select on Include the Core Files and other Memory Dumps as well with the Snapshot which are not selected by default, as shown in the image.
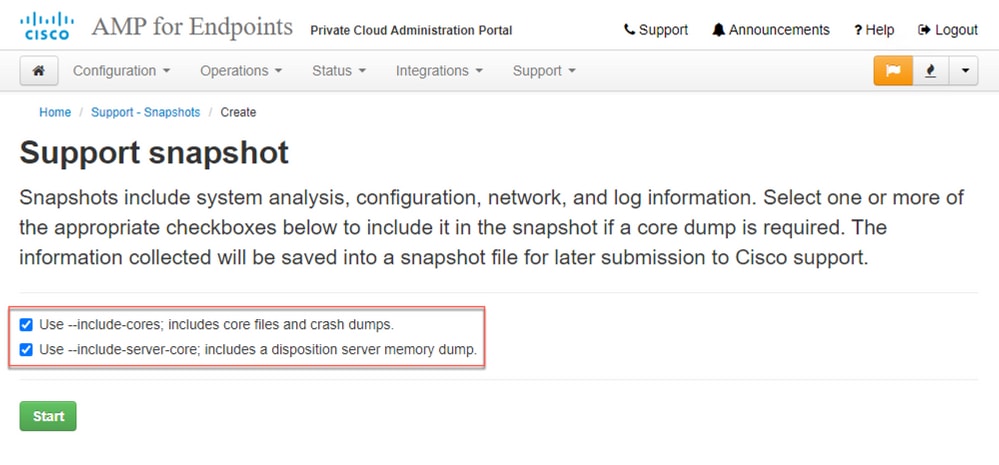
Step 5: You would observe that the Snapshot has started and this can take a while. In order to monitor the progress, cllick on Details, as shown in the image.
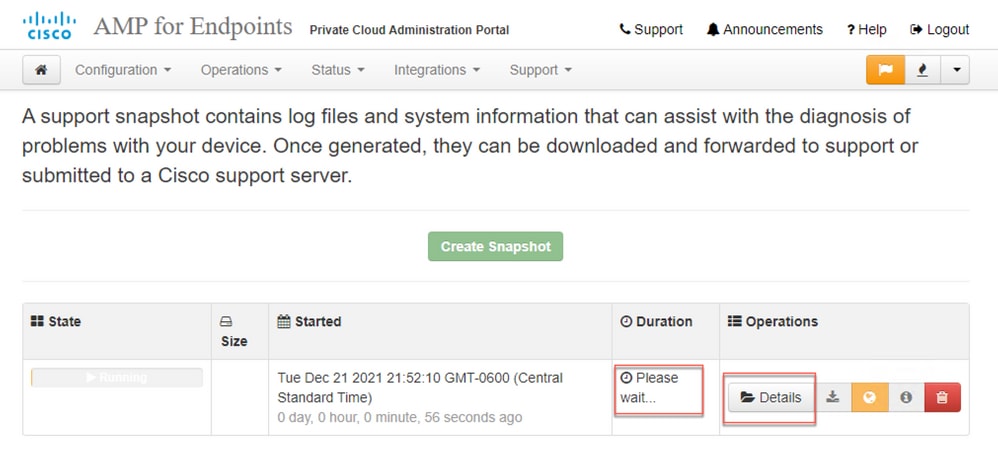
Step 6: Once the Snapshot generation is complete, you must be able to select the  icon to download the snapshot on your local machine from where you are access the Portal.
Generate Support Snapshot from Administration Portal SSH
In order to create a Support Snapshot from the Administration Portal SSH, perform these steps :
Step 1: SSH to the Administration Portal.
Step 2: This is the available CLI to generate the snapshot.
[root@fireamp ~]# amp-support snapshot -A <Path where to store the Snapshot>

usage: /opt/opadmin/embedded/bin/amp-support snapshot [options] <snapshot_file>

Create a snapshot of the current system; this includes log files, system
status, run processes, crash dumps, and other information that can be
used by a support engineer to diagnose problems with your system.
If no explicit options are provided the default ones are assumed.  The
default options are: include-configs, include-logs, include-network,
include-cores, and include-status

    -A, --all                        Include everything.
    -a, --include-analysis           Include system analysis. (SLOW!)
    -C, --include-configs            Include configuration files.
    -c, --include-cores              Include core files.
    -F, --include-firehose-cassandra Include firehose-cassandra status.
    -i, --include-inodes             Include filesystem inode usage.
    -I, --include-integrations       Include appliance integration information.
    -k, --include_kafka              Include Kafka status.
    -L, --include-flink              Include Flink status.
    -l, --include-logs               Include log files.
    -m, --include-mongo              Include MongoDB status.
    -N, --include-cassandra          Include Cassandra status.
    -n, --include-network            Include network analysis.
    -r, --include-redis              Include Redis status.
    -S, --include-server-core        Include a disposition server memory dump.
    -s, --include-status             Include system status.
    -d, --include-docker             Include docker status.
    -z, --include_zookeeper          Include Zookeeper status.
    -f, --fs-check FILE              Include filesystem check results from file.
    -v, --verbose                    Increase output verbosity.
Generate Support Snapshot from Appliance Console
In order to create a Support Snapshot from the Private Cloud Appliance Console, perform these steps:
Step 1: Log in to the Private Cloud Appliance Console.
Step 2: Select SUPPORT_SNAPSHOT.
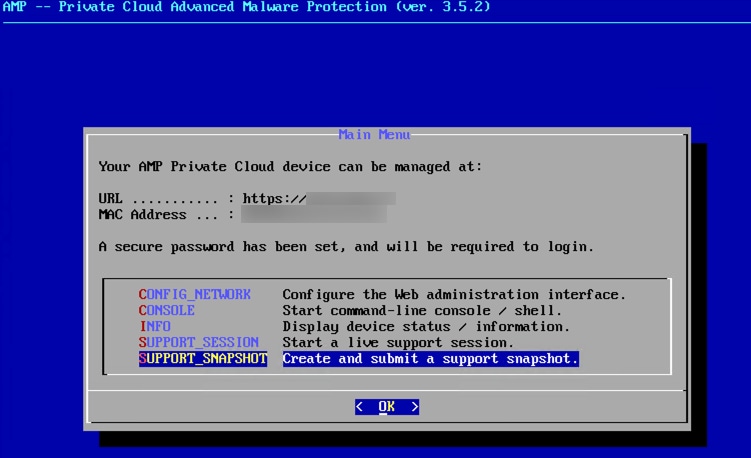
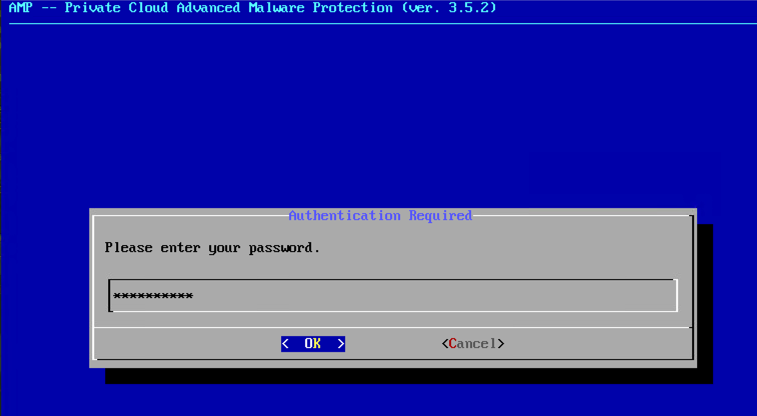
Step 3: Enter the Administration Portal Password, as shown in the image.
Step 4: You can select on Include the Core Files and other Memory Dumps as well with the Snapshot which are not selected by default, as shown in the image.
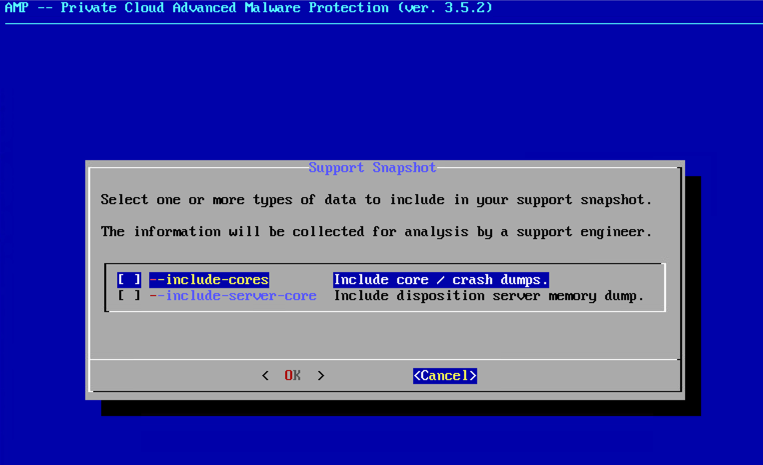
Step 5: After that select OK and the Snapshot would get started.
Live Support Session
Enable Live Support Session from Administration Portal
In order to create enable Live Support Session from Administration Portal, perform these steps:
Step 1: Log in to the Administration Portal.
Step 2: Click or select Support and select Live Support Session.
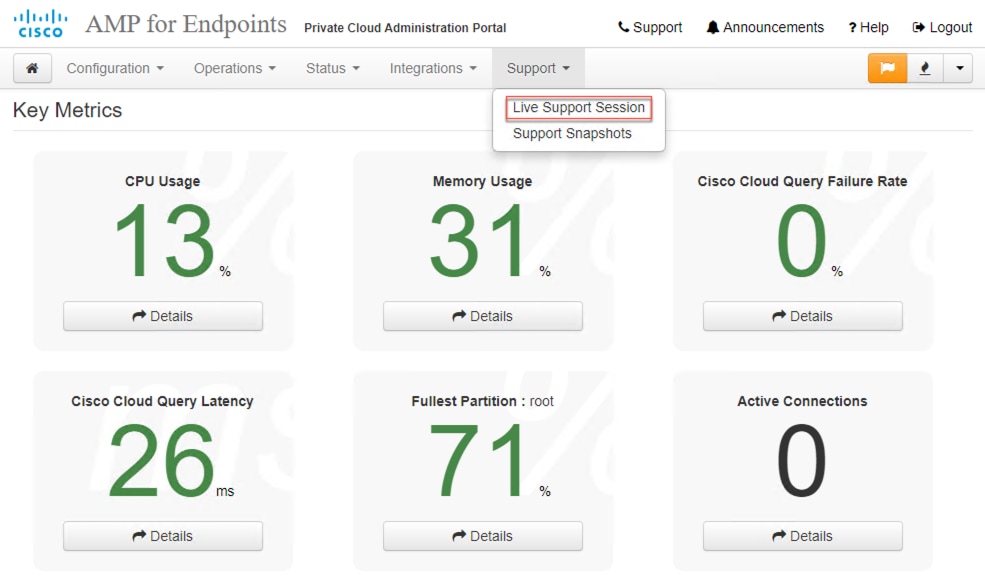
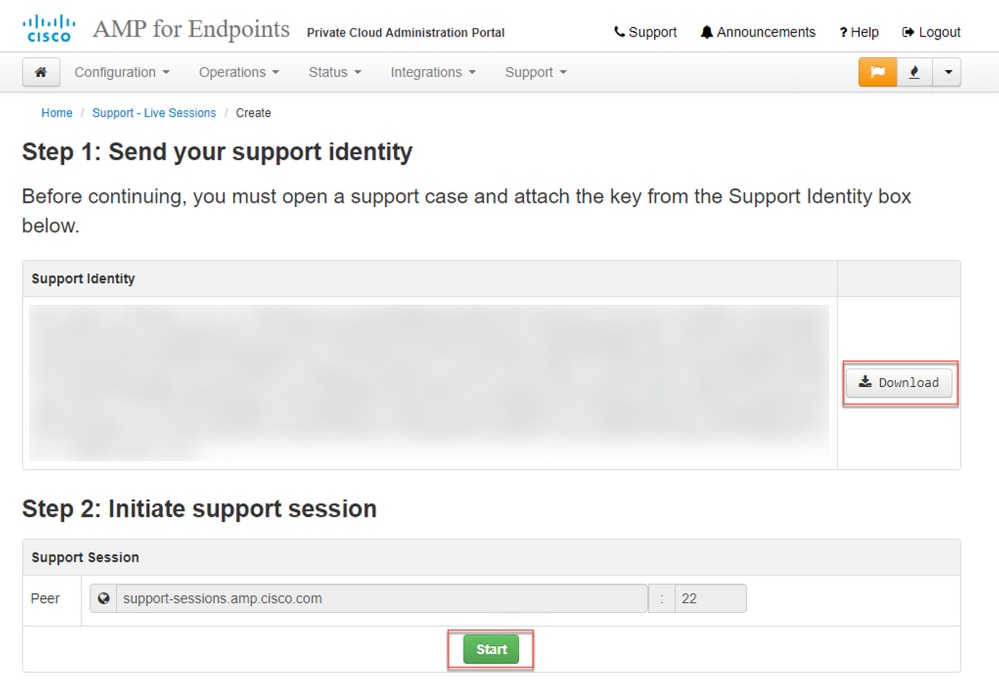
Step 3: Click or select Start Support Session as shown then Download to fetch the SSH Identity required by TAC to connect to the Appliance remotely. Then click or select Start to initiate the Live Support Session, as shown in the image.
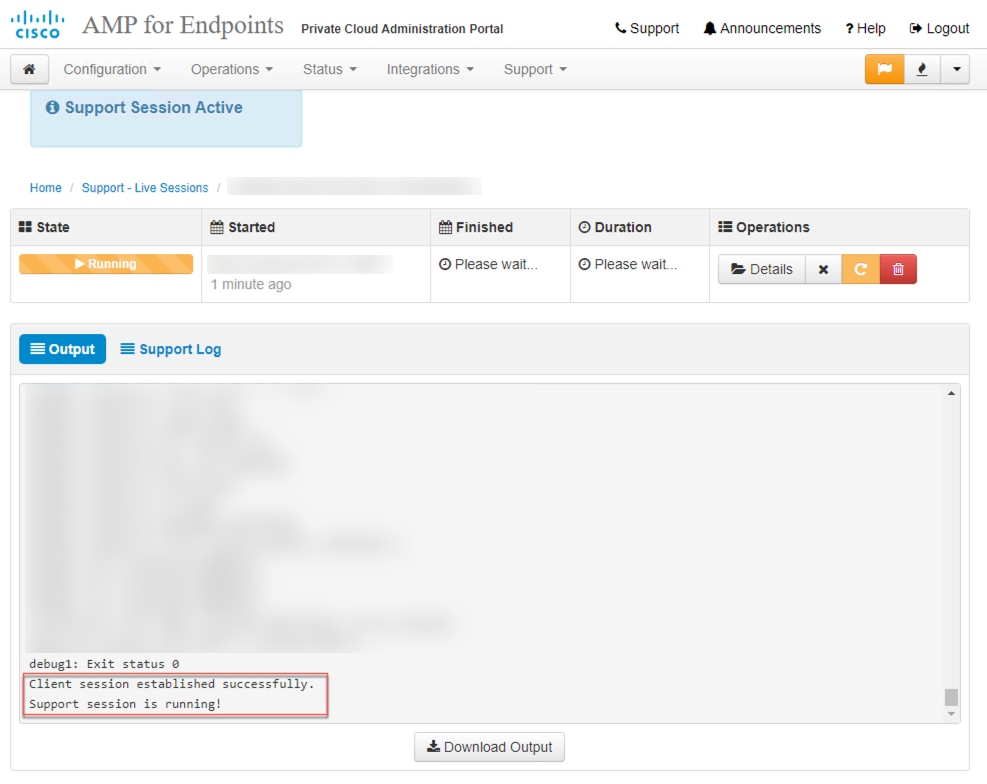
Step 4: You would notice the logs as shown in the as shown in the image after the appliance has connected successfully for the Live Support Session, as shown in the image.
Enable Live Support Session from Administration Portal SSH
In order to create enable Live Support Session from Administration Portal SSH, perform these steps:
Step 1: Log in to the Administration Portal SSH.
Step 2: This is the CLI available to enable Live Support Session from the SSH..
[root@fireamp ~]# amp-support session -l support.log -s support-sessions.amp.cisco.com -p 22 <UUID>
usage: /opt/opadmin/embedded/bin/amp-support session [options] <uuid>

Manage a support session with a remote server; this facilitates a secure method of
provide unrestricted shell access to your machine to an engineer on a remote
system. Note that when restart a session, the same parameters as the previous
session are used unless new parameters are supplied. The UUID is expected to be
version 4.

Note that the `--log` option provides an optional log file for the support
engineer to log their shell activity to. A script is provided to the remote
user to collect this log data, but it is not and cannot be enforced by the
support script.

OPTIONS

    -b, --batch                      Use batch (non-interactive) mode.
    -d, --delete                     Delete a support session and all files.
    -l, --log FILE                   Log remote shell commands to file.
    -p, --port PORT                  Connect to an alternative port.
    -s, --support-server SERVER      Set the server of a session.
    -t, --terminate                  Terminate an active session.
    -v, --verbose                    Increase output verbosity.

NOTE: UUID can be any random string as long as it has the format: xxxxxxxx-xxxx-xxxx-xxxx-xxxxxxxxxxxx. Also, you can keep the Port as default to 22

EXAMPLES

    /opt/opadmin/embedded/bin/amp-support session -l support.log -s support.example.com -p 2222 xxxxxxxx-xxxx-xxxx-xxxx-xxxxxxxxxxxx
    /opt/opadmin/embedded/bin/amp-support session xxxxxxxx-xxxx-xxxx-xxxx-xxxxxxxxxxxx
    /opt/opadmin/embedded/bin/amp-support session -t -d xxxxxxxx-xxxx-xxxx-xxxx-xxxxxxxxxxxx
Enable Live Support Session from Appliance Console
In order to create enable Live Support Session from Private Cloud Appliance Console, perform these steps:
Step 1: Log into the Private Cloud Appliance Console.
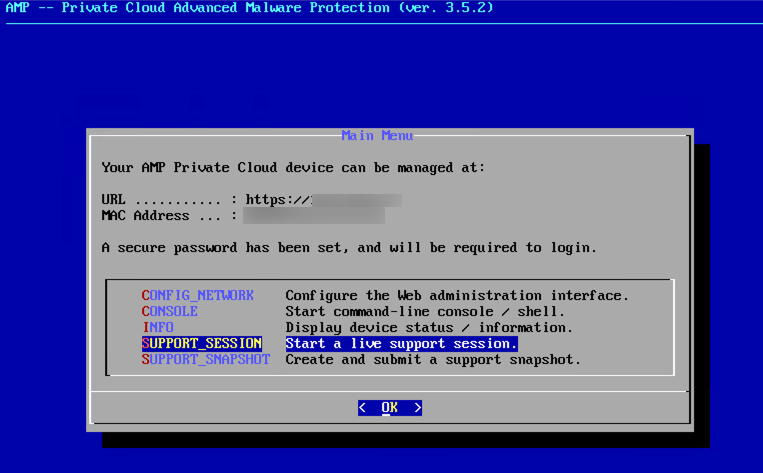
Step 2: Select SUPPORT_SESSION to enable Live Support Session, as shown in the image.
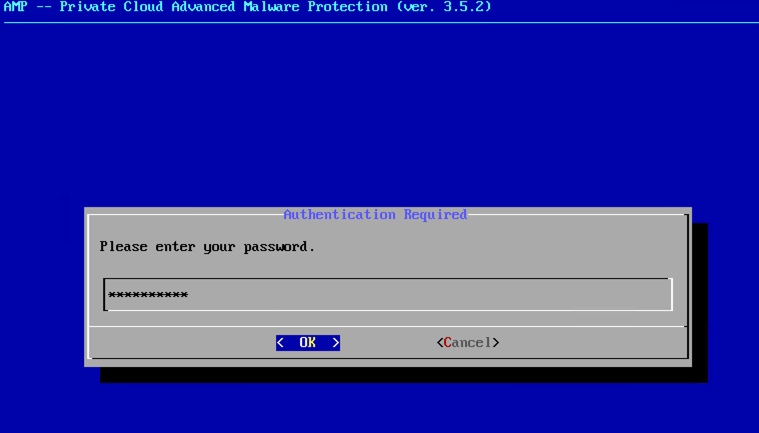
Step 3: Enter the Administration Portal Password, as shown in the image.
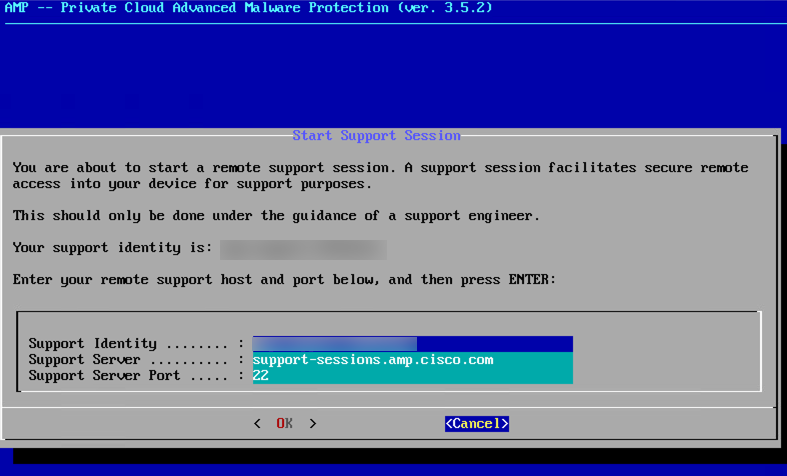
Step 4: You can leave all the default settings unchanged. Select OK to enable the Live Support Session, as shown in the image.


 Feedback