Introduction
This document describes how to upgrade ASA for failover deployments for Secure Firewall 1000, 2100 in Appliance mode, and Secure Firewall 3100/4200.
Prerequisites
Requirements
Cisco recommends that you have knowledge of these topics:
- Cisco Secure Firewall Threat Defense.
- Cisco Adaptive Security Appliance (ASA) configuration.
Components Used
The information in this document is based on the software versions:
- Cisco Adaptive Security Appliance Software Version 9.14(4)
- Cisco Adaptive Security Appliance Software Version 9.16(4)
The information in this document was created from the devices in a specific lab environment. All of the devices used in this document started with a cleared (default) configuration. If your network is live, ensure that you understand the potential impact of any command.
Configure
Verify the Prerequisites
Step 1. Run the command show fxos mode to verify that your device is in appliance mode

Note: For Secure Firewall 21XX In version 9.13 and earlier, only support Platform mode. In version 9.14 and later, the Appliance mode is the default.
ciscoasa# show fxos mode
Mode is currently set to appliance
Step 2. Verify the compatibility.
Consult the Cisco Secure Firewall ASA compatibility document to verify the compatibility between FTD hardware platform and the Secure Firewall ASA software. Refer to
Cisco Secure Firewall ASA Compatibility
Step 3. Download the upgrade package from Cisco Software Central.

Note: For the Secure Firewall 1000/2100 and Secure Firewall 3100/4200, you cannot install ASA or FXOS separately; both images are part of a bundle.
Consult the linked title to know the version of ASA and FXOS that are part of the bundle. See, Secure Firewall 1000/2100 and 3100/4200 ASA and FXOS Bundle Versions .
Upgrade Using the CLI
Step 1. Reset the ASDM image.
Connect to the primary unit in global configuration mode and run the commands:
ciscoasa(config)# asdm image disk0:/asdm.bin
ciscoasa(config)# exit
ciscoasa# copy running-config startup-config

Source filename [running-config]?
Cryptochecksum: 6beb01d1 b7a3c30f 5e8eb557 a8ebb8ca

12067 bytes copied in 3.780 secs (4022 bytes/sec)
Step 2. Upload the software image to the primary unit.

Note: In this document, you are using FTP server, but you can use TFTP, HTTP or other server types.
ciscoasa# copy  ftp://calo:calo@10.88.7.12/cisco-asa-fp2k.9.16.4.SPA disk0:/cisco-asa-fp2k.9.16.4.SPA

Address or name of remote host [10.88.7.12]?

Source username [calo]?

Source password []? ****

Source filename [cisco-asa-fp2k.9.16.4.SPA]?

Destination filename [cisco-asa-fp2k.9.16.4.SPA]?

Accessing  ftp:/calo:<password>@10.88.7.12/cisco-asa-fp2k.9.16.4.SPA...!!!!!!!!!!!!!!!!!!!!!!!!!!!!!!!!!!!!!!!!!!!!!!!!!!!!!!!!!!!!!!!!!!!!!!!!!!!!!!!!!!!!!!!!!!!!!!!!!!!!!!!!!!!!!!!!!!!!!!!!!!!!!!!!!!!!!!!!!!!!!!!!!!!!!!!!!!!!!!!!!!!!!!!!!!!!!!!!!!!!!!!!!!!!!!!!!!!!!!!!!!!!!!!!!!!!!!!!!!!!!!!!!!!!!!!!!!!!!!!!!!!!!!!!!!!!!!!!!!!!!!!!!!!!!!!!!!!!!!!!!!!!!!!!!!!!!!!!!!!!!!!!!!!!!!!!!!!!!!!!!!!!!!!!!!!!!!!!!!!!!!!!!!!!!!!!!!!!!!!!!!!!!!!!!!!!!!!!!!!!!!!!!!!!!!!!!!!!!!!!!!!!!!!!!!!!!!!!!!!!!!!!!!!!!!!!!!!!!!!!!!!!!!!!!!!!!!!!!!!!!!!!!!!!!!!!!!!!!!!!!!!!!!!!!!!!!!!!!!!!!!!!!!!!!!!!!!!!!!!!!!!!!!!!!!!!!!!!!!!!!!!!!!!!!!!!!!!!!!!!!!!!!!!!!!!!!!!!!!!!!!!!!!!!!!!!!!!!!!!!!!!!!!!!!!!!!!!!!!!!!!!!!!!!!!!!!!!!!!!!!!!!!!!!!!!!!!!!!!!!!!!!!!!!!!!!!!!!!!!!!!!!!!!!!!!!!!!!!!!!!!!!!!!!!!!!!!!!!!!!!!!!!!!!!!!!!!!!!!!!!!!!!!!!!!!!!!!!!!!!!!!!!!!!!!!!!!!!!!!!!!!!!!!!!!!!!!!!!!!!!!!!!!!!!!!!!!!!!!!!!!!!!!!!!!!!!!!!!!!!!!!!!!!!!!!!!!!!!!!!!!!!!!!!!!!!!!!!!!!!!!!!!!!!!!!!!!!!!!!!!!!!!!!!!!!!!!!!!!!!!!!!!!!!!!!!!!!!!!!!!!!!!!!!!!!!!!!!!!!!!!!!!!!!!!!!!!!!!!!!!!!!!!!!!!!!!!!!!!!!!!!!!!!!!!!!!!!!!!!!!!!!!!!!!!!!!!!!!!!!!!!!!!!!!!!!!!!!!!!!!!!!!!!!!!!!!!!!!!!!!!!!!!!!!!!!!!!!!!!!!!!!!!!!!!!!!!!!!!!!!!!!!!!!!!!!!!!!!!!!!!!!!!!!!!!!!!!!!!!!!!!!!!!!!!!!!!!!!!!!!!!!!!!!!!!!!!!!!!!!!!!!!!!!!!!!!!!!!!!!!!!!!!!!!!!!!!!!!!!!!!!!!!!!!!!!!!!!!!!!!!!!!!!!!!!!!!!!!!!!!!!!!!!!!!!!!!!!!!!!!!!!!!!!!!!!!!!!!!!!!!!!!!!!!!!!!!!!!!!!!!!!!!!!!!!!!!!!!!!!!!!!!!!!!!!!!!!!!!!!!!!!!!!!!!!!!!!!!!!!!!!!!!!!!!!!!!!!!!!!!!!!!!!!!!!!!!!!!!!!!!!!!!!!!!!!!!!!!!!!!!!!!!!!!!!!!!!!!!!!!!!!!!!!!!!!!!!!!!!!!!!!!!!!!!!!!!!!!!!!!!!!!!!!!!!!!!!!!!!!!!!!!!!!!!!!!!!!!!!!!!!!!!!!!!!!!!!!!!!!!!!!!!!!!!!!!!!!!!!!!!!!!!!!!!!!!!!!!!!!!!!!!!!!!!!!!!!!!!!!!!!!!!!!!!!!!!!!!!!!!!!!!!!!!!!!!!!!!!!!!!!!!!!!!!!!!!!!!!!!!!!!!!!!!!!!!!!!!!!!!!!!!!!!!!!
Verifying file disk0:/cisco-asa-fp2k.9.16.4.SPA...

Writing file disk0:/cisco-asa-fp2k.9.16.4.SPA...

474475840 bytes copied in 843.230 secs (562842 bytes/sec)
Step 3. Upload the software image to the secondary unit.
Run the command on the primary unit.
ciscoasa# failover exec mate copy /noconfirm ftp://calo:calo@10.88.7.12/cisco-asa-fp2k.9.16.4.SPA disk0:/cisco-asa-fp2k.9.16.4.SPA

Accessing ftp://calo :<password>@10.88.7.12/cisco-asa-fp2k.9.16.4.SPA...!!!!!!!!!!!!!!!!!!!!!!!!!!!!!!!!!!!!!!!!!!!!!!!!!!!!!!!!!!!!!!!!!!!!!!!!!!!!!!!!!!!!!!!!!!!!!!!!!!!!!!!!!!!!!!!!!!!!!!!!!!!!!!!!!!!!!!!!!!!!!!!!!!!!!!!!!!!!!!!!!!!!!!!!!!!!!!!!!!!!!!!!!!!!!!!!!!!!!!!!!!!!!!!!!!!!!!!!!!!!!!!!!!!!!!!!!!!!!!!!!!!!!!!!!!!!!!!!!!!!!!!!!!!!!!!!!!!!!!!!!!!!!!!!!!!!!!!!!!!!!!!!!!!!!!!!!!!!!!!!!!!!!!!!!!!!!!!!!!!!!!!!!!!!!!!!!!!!!!!!!!!!!!!!!!!!!!!!!!!!!!!!!!!!!!!!!!!!!!!!!!!!!!!!!!!!!!!!!!!!!!!!!!!!!!!!!!!!!!!!!!!!!!!!!!!!!!!!!!!!!!!!!!!!!!!!!!!!!!!!!!!!!!!!!!!!!!!!!!!!!!!!!!!!!!!!!!!!!!!!!!!!!!!!!!!!!!!!!!!!!!!!!!!!!!!!!!!!!!!!!!!!!!!!!!!!!!!!!!!!!!!!!!!!!!!!!!!!!!!!!!!!!!!!!!!!!!!!!!!!!!!!!!!!!!!!!!!!!!!!!!!!!!!!!!!!!!!!!!!!!!!!!!!!!!!!!!!!!!!!!!!!!!!!!!!!!!!!!!!!!!!!!!!!!!!!!!!!!!!!!!!!!!!!!!!!!!!!!!!!!!!!!!!!!!!!!!!!!!!!!!!!!!!!!!!!!!!!!!!!!!!!!!!!!!!!!!!!!!!!!!!!!!!!!!!!!!!!!!!!!!!!!!!!!!!!!!!!!!!!!!!!!!!!!!!!!!!!!!!!!!!!!!!!!!!!!!!!!!!!!!!!!!!!!!!!!!!!!!!!!!!!!!!!!!!!!!!!!!!!!!!!!!!!!!!!!!!!!!!!!!!!!!!!!!!!!!!!!!!!!!!!!!!!!!!!!!!!!!!!!!!!!!!!!!!!!!!!!!!!!!!!!!!!!!!!!!!!!!!!!!!!!!!!!!!!!!!!!!!!!!!!!!!!!!!!!!!!!!!!!!!!!!!!!!!!!!!!!!!!!!!!!!!!!!!!!!!!!!!!!!!!!!!!!!!!!!!!!!!!!!!!!!!!!!!!!!!!!!!!!!!!!!!!!!!!!!!!!!!!!!!!!!!!!!!!!!!!!!!!!!!!!!!!!!!!!!!!!!!!!!!!!!!!!!!!!!!!!!!!!!!!!!!!!!!!!!!!!!!!!!!!!!!!!!!!!!!!!!!!!!!!!!!!!!!!!!!!!!!!!!!!!!!!!!!!!!!!!!!!!!!!!!!!!!!!!!!!!!!!!!!!!!!!!!!!!!!!!!!!!!!!!!!!!!!!!!!!!!!!!!!!!!!!!!!!!!!!!!!!!!!!!!!!!!!!!!!!!!!!!!!!!!!!!!!!!!!!!!!!!!!!!!!!!!!!!!!!!!!!!!!!!!!!!!!!!!!!!!!!!!!!!!!!!!!!!!!!!!!!!!!!!!!!!!!!!!!!!!!!!!!!!!!!!!!!!!!!!!!!!!!!!!!!!!!!!!!!!!!!!!!!!!!!!!!!!!!!!!!!!!!!!!!!!!!!!!!!!!!!!!!!!!!!!!!!!!!!!!!!!!!!!!!!!!!!!!!!!!!!!!!!!!!!!!!!!!!!!!!!!!!!!!!!!!!!!!!!!!!!!!!!!!!!!!!!!!!!!!!!!!!!!!!!!!!!!!!!!!!!!!!!!!!!!!!!!!!!!!!!!!!!!!!!!!!
Verifying file disk0:/cisco-asa-fp2k.9.16.4.SPA...

Writing file disk0:/cisco-asa-fp2k.9.16.4.SPA...

474475840 bytes copied in 843.230 secs (562842 bytes/sec)
Step 4. Check if you have a current boot image configured with the show running-config boot system command.

Note: You may not have configured a boot system.
ciscoasa(config)# show running-config boot system
boot system disk0:/cisco-asa-fp2k.9.14.4.SPA
Step 5 (optional). Encase you have boot image configured, you must remove it.
no boot system diskn:/asa_image_name
Example:
ciscoasa(config)# no boot system disk0:/cisco-asa-fp2k.9.14.4.SPA
Step 6. Select the image to boot.
ciscoasa(config)# boot system disk0:/cisco-asa-fp2k.9.16.4.SPA

The system is currently installed with security software package 9.14.4, which has:
   - The platform version:  2.8.1.172
   - The CSP (asa) version: 9.14.4
Preparing new image for install...
!!!!!!!!!!!!
Image download complete (Successful unpack the image).
Installation of version 9.16.4 will do the following:
   - upgrade to the new platform version 2.10.1.217
   - upgrade to the CSP ASA version 9.16.4
After installation is complete, ensure to do write memory and reload to save this config and apply the new image.
Finalizing image install process...

Install_status: ready............................
Install_status: validating-images....
Install_status: upgrading-npu
Install_status: upgrading-system.
Install_status: update-software-pack-completed
Step 7. Save the configuration with the copy running-config startup-config command.
Step 8. Reload the secondary unit to install the new version.
ciscoasa(config)# failover reload-standby
Wait until the secondary unit loads.
Step 9. Once the standby unit is reloaded, change the primary unit from the active state to standby state.
ciscoasa# no failover active
Step 10. Reload the new standby unit to install the new version. You must connect to the new active unit.
ciscoasa(config)# failover reload-standby
Once the new standby unit loads, the upgrade is complete.
Upgrade Using ASDM
Step 1. Connect to the secondary unit with ASDM.
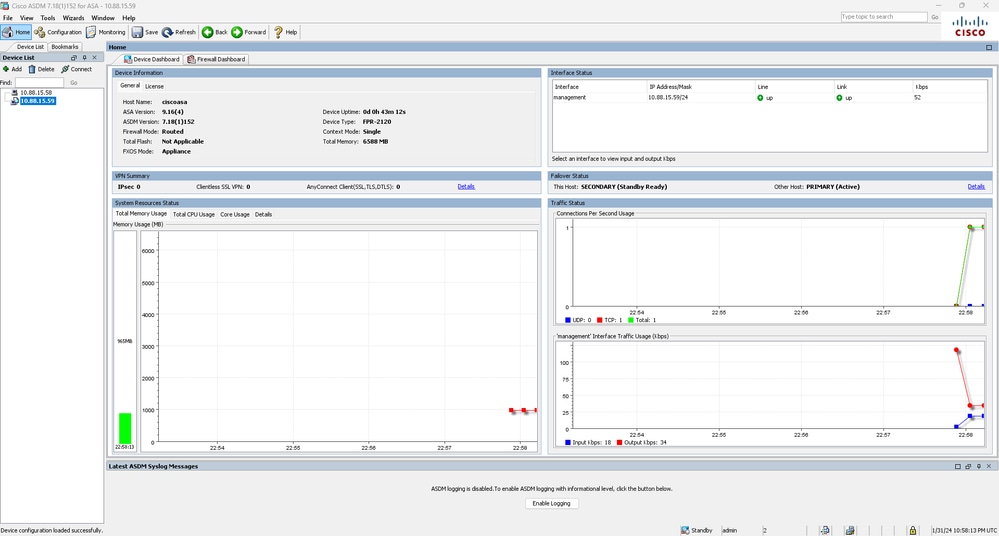
Step 2. Go to .
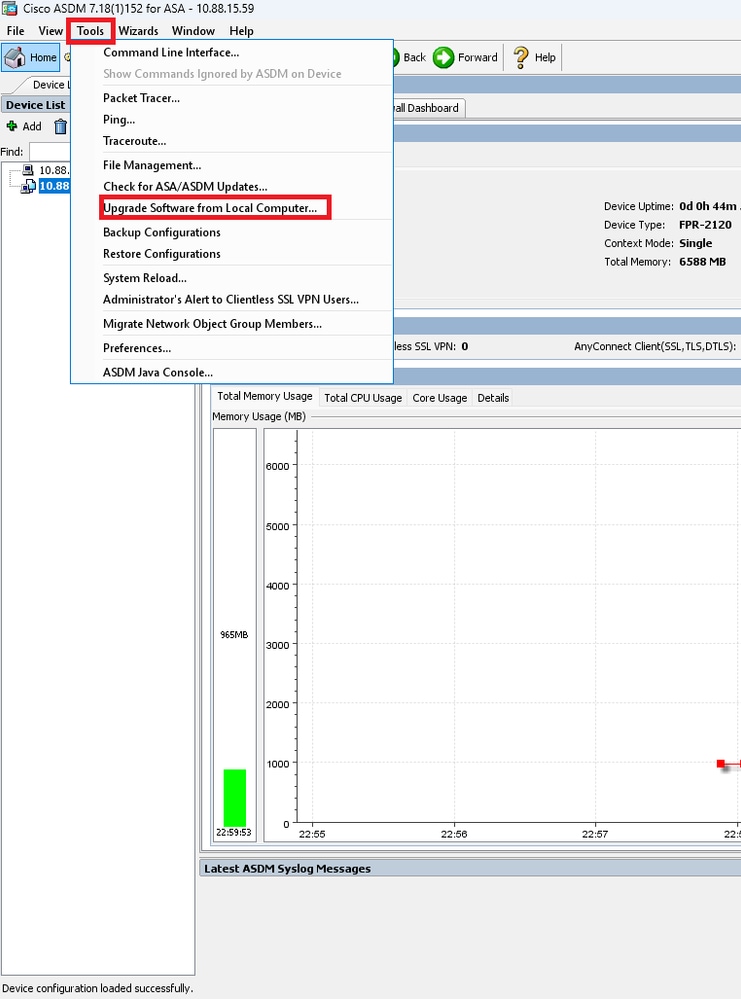
Step 3. Select ASA from the drop-down list.

Step 4. In the Upgrade Software window, click on Browse Local Files to upload the software image to the secondary unit.

Note: By default, the Flash File System Path is disk0; to change it, click on Browse Flash and select the new path.
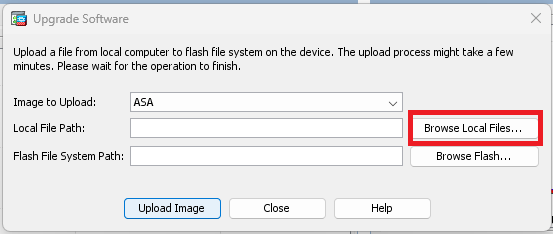
Click on Upload Image.
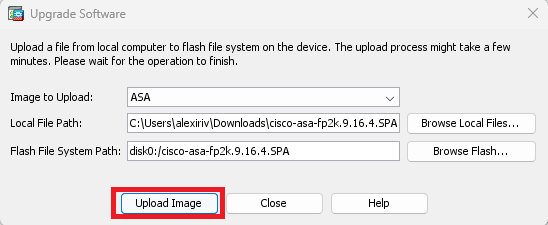
Once the image upload is finished, click on No.

Step 5. Reset the ASDM image.
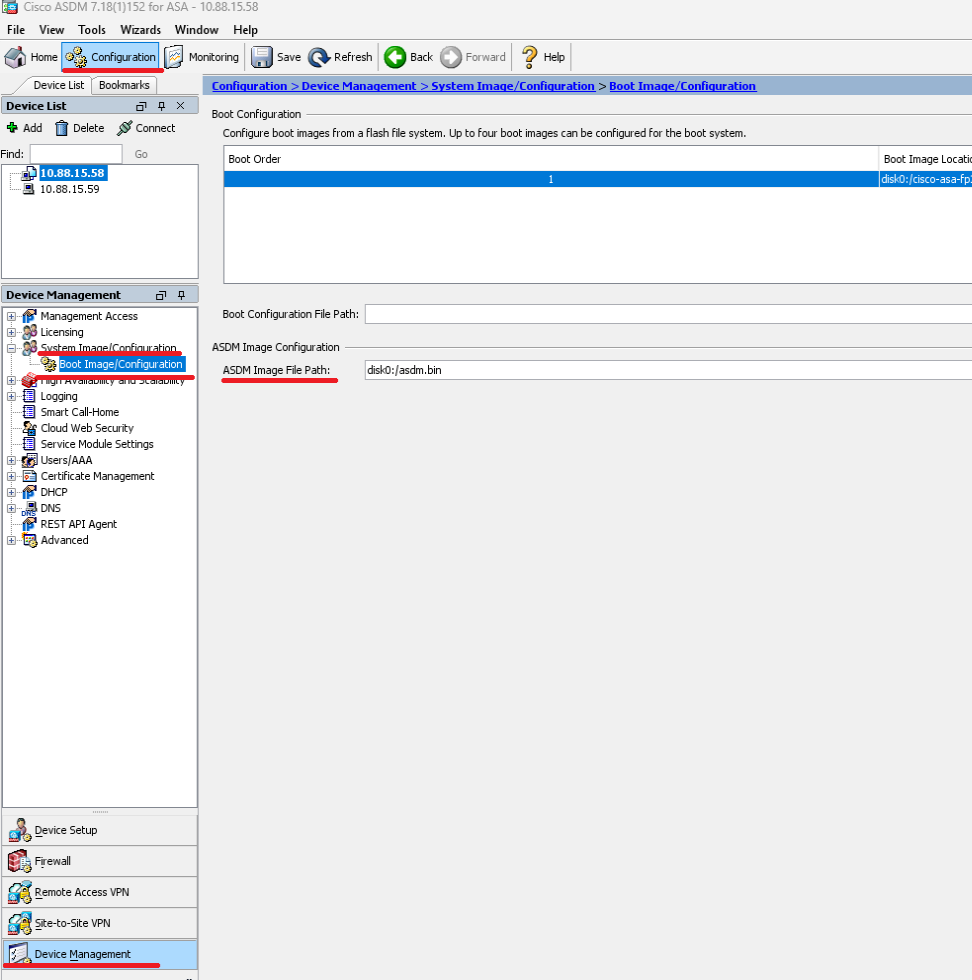
Connect to the primary unit with ASDM and go to .
In ASDM Image File Path, enter the value disk0:/asdm.bin and Apply.
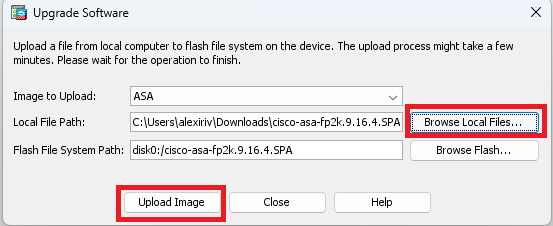
Step 6. Upload the software Image to the primary unit.
Click on Browse Local Files and select the upgrade package on your device.
Click on Upload Image.
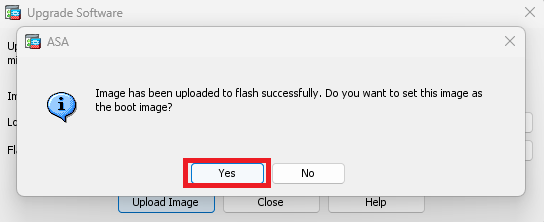
Once the image upload is finished, click on Yes.
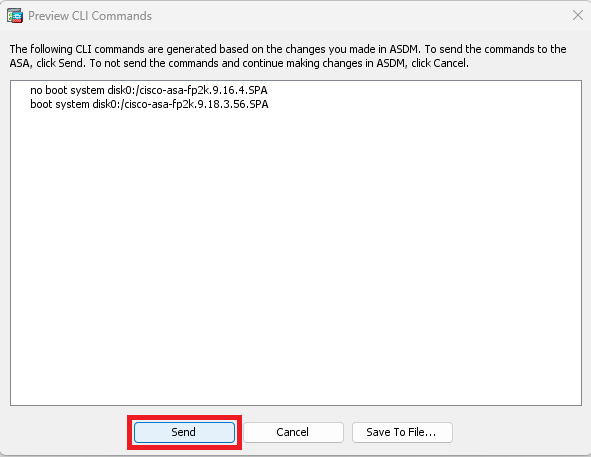
In the preview windows, click on Send button to save configuration.
Step 7. Click on Save to save configuration.

Step 8. Reload the secondary unit to install the new version.
Go to and click on Reload Standby.
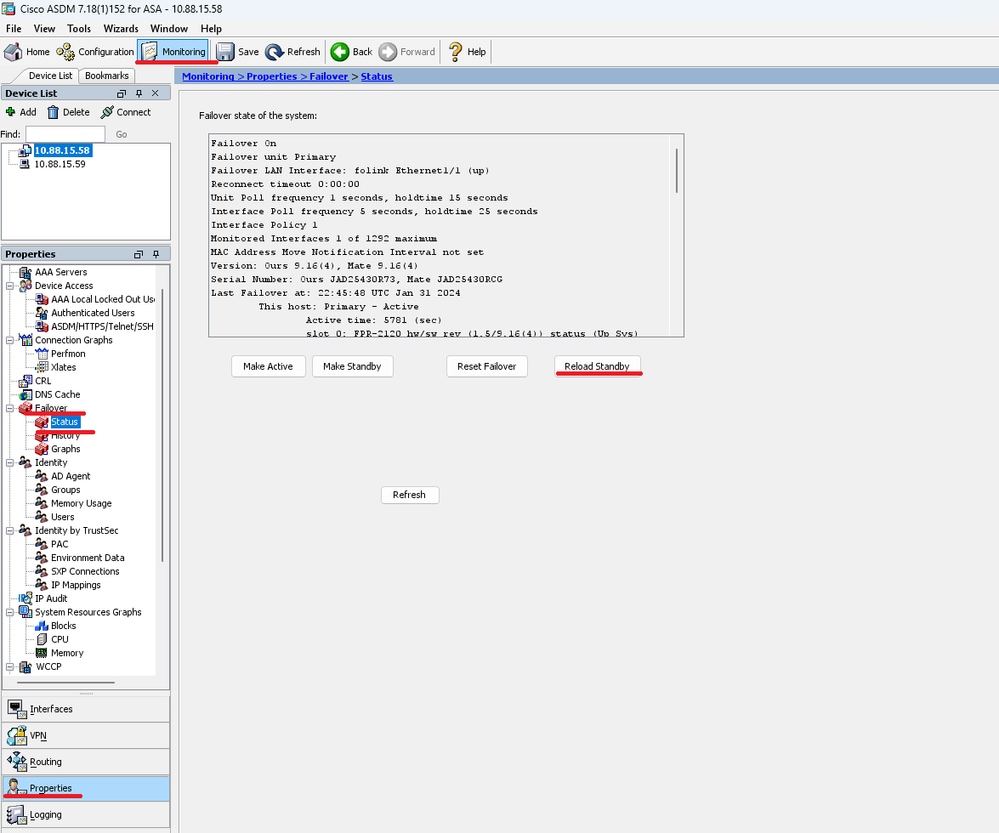
Wait until the standby unit loads.
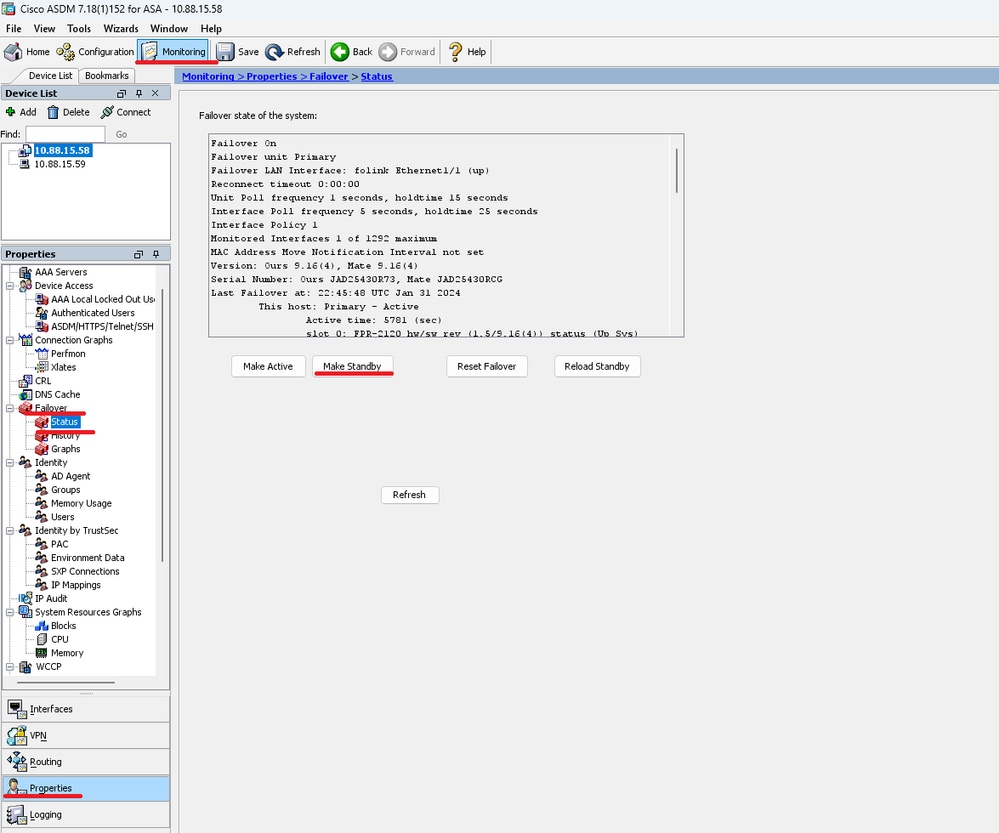
Step 9. Once the standby unit is reloaded, change the primary unit from active state to standby state.
Go to and click on Make Standby.

Note: ASMD automatically connects to the new active unit.
Step 10. Reload the new standby unit to install the new version.
Go to and click on Reload Standby.
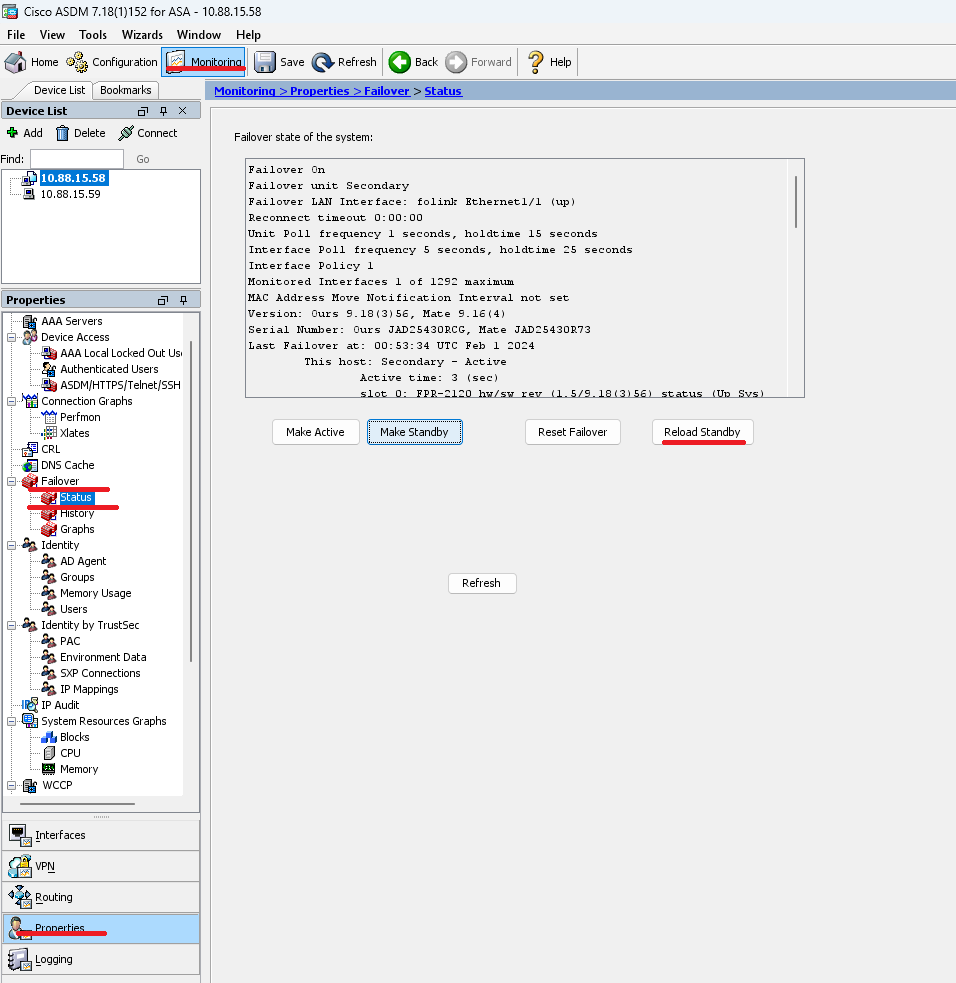
Once the new standby unit loads, the upgrade is complete.
Verify
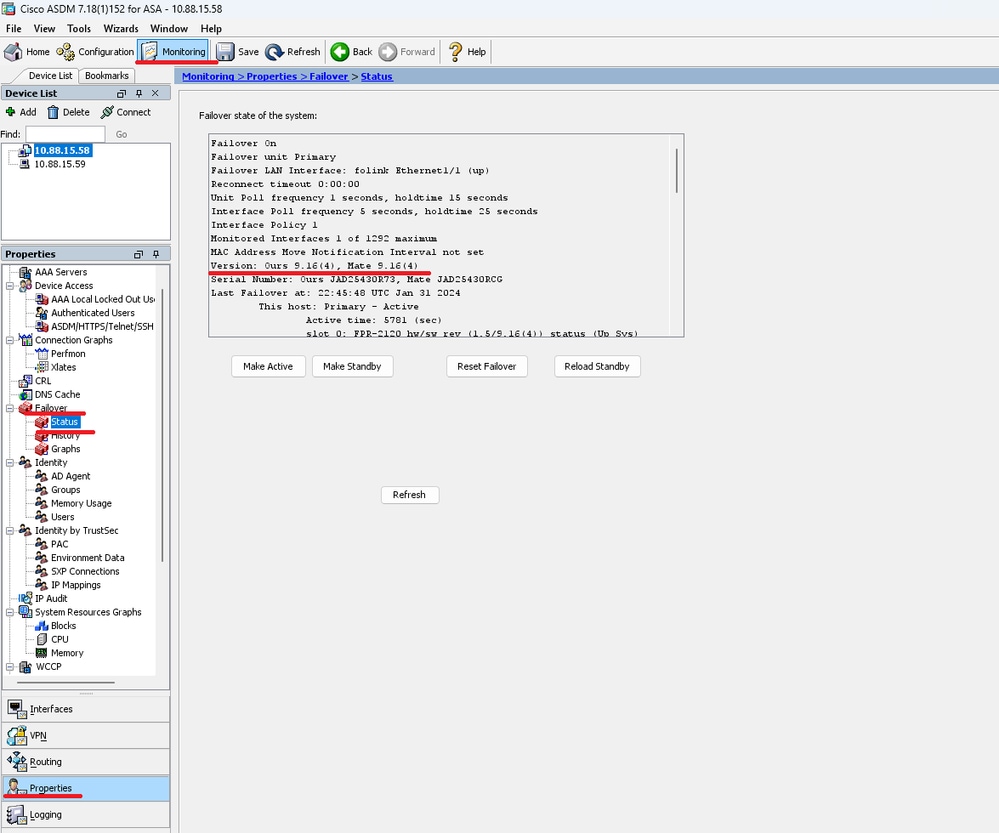
To validate that the upgrade has been completed on both units, check the upgrade via CLI and ASDM.
Via CLI
ciscoasa# show failover
Failover On
Failover unit Primary
Failover LAN Interface: folink Ethernet1/1 (up)
Reconnect timeout 0:00:00
Unit Poll frequency 1 seconds, holdtime 15 seconds
Interface Poll frequency 5 seconds, holdtime 25 seconds
Interface Policy 1
Monitored Interfaces 1 of 1292 maximum
MAC Address Move Notification Interval not set
Version: Ours 9.16(4), Mate 9.16(4)
Serial Number: Ours JAD25430R73, Mate JAD25430RCG
Last Failover at: 22:45:48 UTC Jan 31 2024
This host: Primary - Active
Active time: 45 (sec)
slot 0: FPR-2120 hw/sw rev (1.5/9.16(4)) status (Up Sys)
Interface management (10.88.15.58): Normal (Monitored)
Other host: Secondary - Standby Ready
Active time: 909 (sec)
slot 0: FPR-2120 hw/sw rev (1.5/9.16(4)) status (Up Sys)
Interface management (10.88.15.59): Normal (Monitored)

Stateful Failover Logical Update Statistics
Link : folink Ethernet1/1 (up)
Stateful Obj xmit xerr rcv rerr
General 27 0 29 0
sys cmd 27 0 27 0
up time 0 0 0 0
RPC services 0 0 0 0
TCP conn 0 0 0 0
UDP conn 0 0 0 0
ARP tbl 0 0 1 0
Xlate_Timeout 0 0 0 0
IPv6 ND tbl 0 0 0 0
VPN IKEv1 SA 0 0 0 0
VPN IKEv1 P2 0 0 0 0
VPN IKEv2 SA 0 0 0 0
VPN IKEv2 P2 0 0 0 0
VPN CTCP upd 0 0 0 0
VPN SDI upd 0 0 0 0
VPN DHCP upd 0 0 0 0
SIP Session 0 0 0 0
SIP Tx 0 0 0 0
SIP Pinhole 0 0 0 0
Route Session 0 0 0 0
Router ID 0 0 0 0
User-Identity 0 0 1 0
CTS SGTNAME 0 0 0 0
CTS PAC 0 0 0 0
TrustSec-SXP 0 0 0 0
IPv6 Route 0 0 0 0
STS Table 0 0 0 0
Umbrella Device-ID 0 0 0 0

Logical Update Queue Information
Cur Max Total
Recv Q: 0 10 160
Xmit Q: 0 1 53
Via ASDM
Go to , You can see the ASA Version for both devices.
Related Information


 Feedback