Introduction
This document describes how to configure SAML authentication for Multiple Connection Profiles of Remote Access VPN using Azure as IdP on CSF via FDM.
Prerequisites
Requirements
Cisco recommends that you have basic knowledge of these topics:
- Secure Socket Layer (SSL) Certificates
- OpenSSL
- Remote Access Virtual Private Network (RAVPN)
- Cisco Secure Firewall Device Manager (FDM)
- Security Assertion Markup Language (SAML)
- Microsoft Azure
Components Used
The information in this document is based on these software versions:
- OpenSSL
- Cisco Secure Firewall (CSF) Version 7.4.1
- Cisco Secure Firewall Device Manager Version 7.4.1
The information in this document was created from the devices in a specific lab environment. All of the devices used in this document started with a cleared (default) configuration. If your network is live, ensure that you understand the potential impact of any command.
Background Information
SAML, or Security Assertion Markup Language, is an open standard for exchanging authentication and authorization information between parties, specifically an Identity Provider (IdP) and a Service Provider (SP). The use of SAML authentication for Remote Access VPN (RAVPN) connections and various other applications has become increasingly popular due to its numerous advantages. On the Firepower Management Center (FMC), multiple Connection Profiles can be configured to use different IdP-protected applications because of the Override Identity Provider Certificate option available in the Connection Profile configuration menu. This feature allows administrators to override the primary IdP certificate in the Single Sign-On (SSO) Server object with a specific IdP certificate for each connection profile. However, this functionality is limited on the Firepower Device Manager (FDM) as it does not provide a similar option. If a second SAML object is configured, attempting to connect to the first Connection Profile results in an authentication failure, displaying the error message: "Authentication failed due to a problem retrieving the single sign-on cookie." To work around this limitation, a custom Self-Signed certificate can be created and imported into Azure for use across all applications. By doing so, only one certificate needs to be installed in the FDM, enabling seamless SAML authentication for multiple applications.
Configure
Step 1: Create a Self-Signed Certificate and PKCS#12 File using OpenSSL
This section describes how to create the Self-Signed certificate using OpenSSL
- Log in to an endpoint which has the OpenSSL library installed.

Note: In this document, a Linux machine is used, so some commands are specific to a Linux environment. However, the OpenSSL commands are the same.
b. Create a configuration file using the touch <config_name>.conf command.
root@host# touch config.conf
c. Edit the file with a text editor. In this example, Vim is used and the vim <config_name>.conf command is run. You can use any other text editor.
root@host# vim config.conf
d. Enter the information to be included in the Self-Signed.
Ensure to replace the values between < > with the information of your organization.
[req]
distinguished_name = req_distinguished_name
prompt = no

[req_distinguished_name]
C = <Country Code>
ST = <State or Province>
L = <Locality Name>
O = <Organization Name>
OU = <Organizational Unit Name>
CN = <Common Name>
e. Using this command generates a new 2048-bit RSA private key and a self-signed certificate using the SHA-256 algorithm, valid for 3650 days, based on the configuration specified in the <config_name>.conf file. The private key is saved to <key_name>.pem and the Self-Signed certificate is saved to <self-signed_certificate>.crt.
root@host# openssl req -newkey rsa:2048 -nodes -keyout <key_name>.pem -x509 -sha256 -days 3650 -config <config_name>.conf -out <self-signed_certificate>.crt

f. After creating the private key and the Self-Signed certificate, it exports them into a PKCS#12 file, which is a format that can include both the private key and the certificate.
root@host# openssl pkcs12 -export -inkey <key_name>.pem -in <self-signed_certificate>.crt -name <Alias> -out <pkcs12_name>.pfx

Take note of the password.
Step 2: Upload the PKCS#12 File on Azure and FDM
Ensure to create an application on Azure for each Connection Profile that is using SAML authentication on the FDM.

Once you have the PKCS#12 file from Step 1: Create a Self-Signed Certificate and PKCS#12 file using OpenSSL, it must be uploaded to Azure for multiple applications and configured in the FDM SSO configuration.
Step 2.1. Upload the Certificate to Azure
a. Log in to your Azure portal, navigate to the Enterprise application you want to protect with SAML authentication, and select Single Sign-On.
b. Scroll down to the SAML Certificates section and select the More Options > Edit.
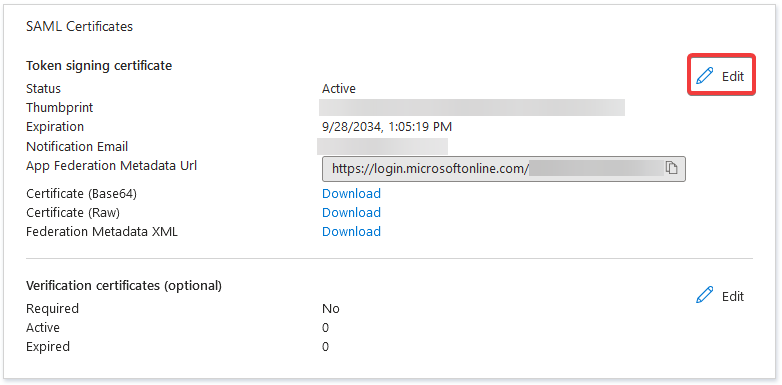
c. Now, select the Import certificate option.

d. Find the PKCS#12 file previously created and use the password you entered when you created the PKCS#12 file.

e. Finally, select the Make Certificate Active option.
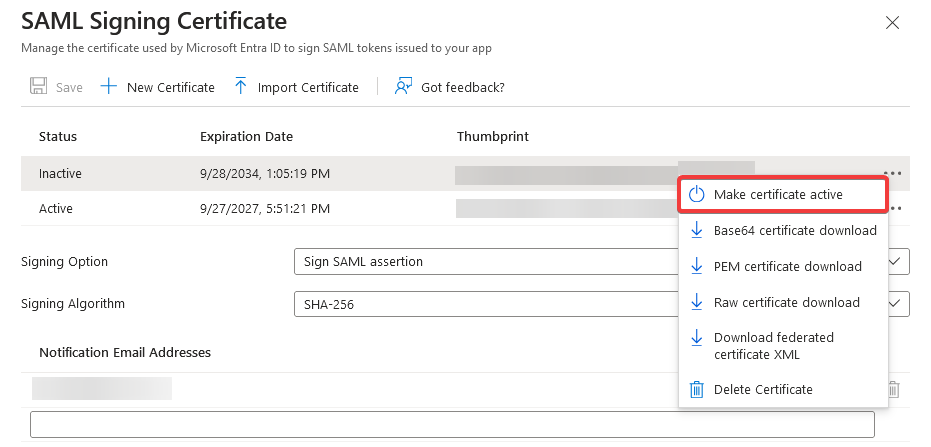

Note: Ensure to perform Step 2.1: Upload the Certificate to Azure for each application.
Step 2.2. Upload the Certificate to the FDM
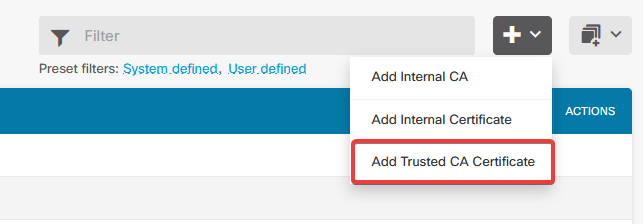
a. Navigate to Objects > Certificates > Click Add Trusted CA certificate.
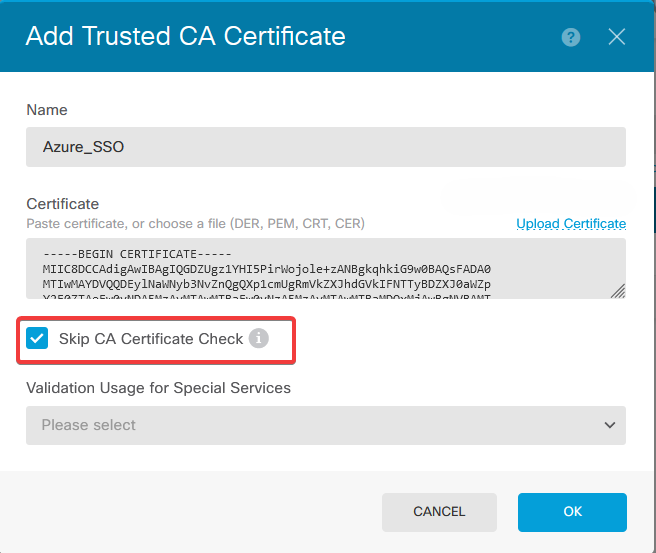
b. Enter the trustpoint name you prefer and upload only the Identity certificate from the IdP (not the PKCS#12 file), and check the Skip CA Certificate Check.
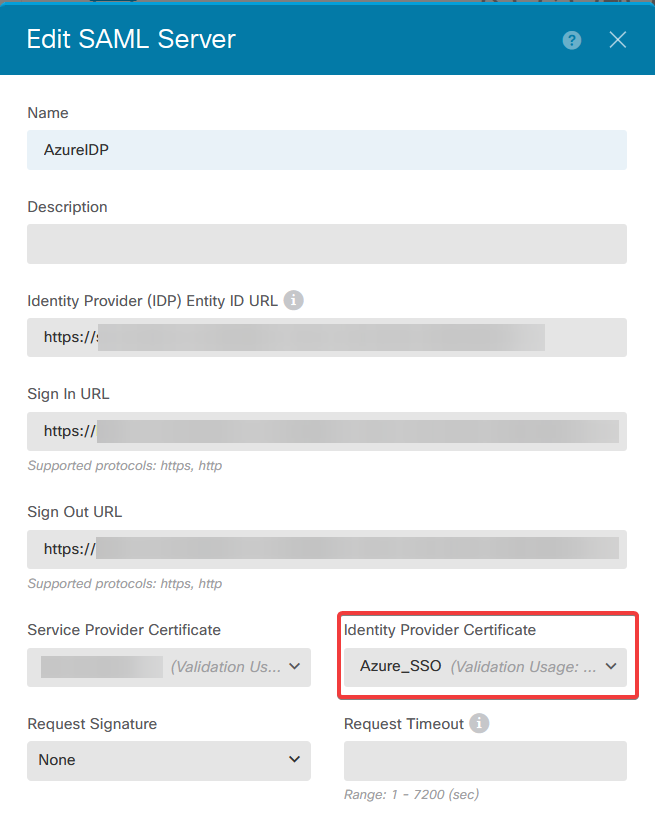
c. Set the new certificate in the SAML object.
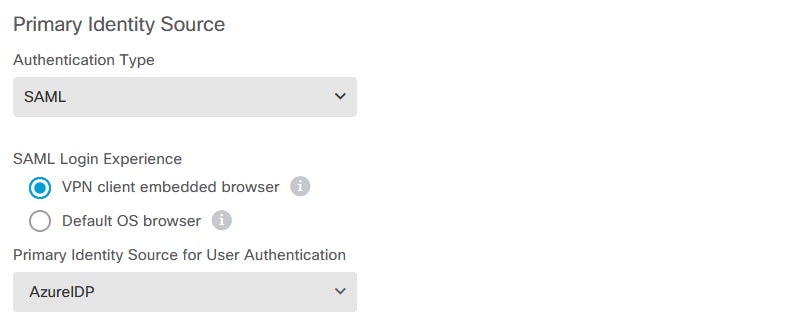
d. Set the SAML object on the different Connection Profiles that are using SAML as the authentication method and for which the application was created in Azure. Deploy the changes

Verify
Run the show running-config webvpn and show running-config tunnel-group commands to review the configuration and verify that the same IDP URL is configured on the different Connection Profiles.
firepower#show running-confuting webvpn
webvpn
 enable outside
 http-headers
  hsts-server
   enable
   max-age 31536000
   include-sub-domains
   no preload
  hsts-client
   enable
   x-content-type-options
   x-xss-protection
   content-security-policy
 anyconnect image disk0:/anyconnpkgs/anyconnect-win-4.10.08029-webdeploy-k9.pkg 2
 anyconnect profiles defaultClientProfile disk0:/anyconncprofs/defaultClientProfile.xml
 anyconnect enable
 saml idp https://saml.lab.local/af42bac0<ommited>/
  url sign-in https://login.saml.lab.local/af42bac0<ommited>/saml2
  url sign-out https://login.saml.lab.local/af42bac0<ommited>/saml2
  base-url https://Server.cisco.com
  trustpoint idp Azure_SSO
  trustpoint sp FWCertificate
  no signature
  force re-authentication
 tunnel-group-list enable
 cache
  disable
 error-recovery disable
firepower#
firepower# show running-config tunnel-group
tunnel-group SAML_TG_Admin type remote-access
tunnel-group SAML_TG_Admin general-attributes
 address-pool Admin_Pool
 default-group-policy SAML_GP_Admin
tunnel-group SAML_TG_Admin webvpn-attributes
 authentication saml
 group-alias SAML_TG_Admin enable
 saml identity-provider https://saml.lab.local/af42bac0<ommited>/

tunnel-group SAML_TG_IT type remote-access
tunnel-group SAML_TG_IT general-attributes
 address-pool IT_Pool
 default-group-policy SAML_GP_IT
tunnel-group SAML_TG_IT webvpn-attributes
 authentication saml
 group-alias SAML_TG_IT enable
 saml identity-provider https://saml.lab.local/af42bac0<ommited>/
firepower#


 Feedback