Introduction
This document describes the necessary steps to successfully configure Hairpin on a Firepower Threat Defense (FTD) with Firepower Management Center (FMC).
Prerequisites
Requirements
Cisco recommends that you have knowledge of these topics:
- Firepower Management Center (FMC)
- Firepówer Threat Defense (FTD)
Components Used
The information in this document is based on these software and hardware versions:
- Firepower Management Center Virtual 7.2.4.
- Firepower Threat Defense Virtual 7.2.4.
The information in this document was created from the devices in a specific lab environment. All of the devices used in this document started with a cleared (default) configuration. If your network is live, ensure that you understand the potential impact of any command.
Configure
The term hairpin is used because the traffic from the client makes it to the router (or firewall implementing NAT) and is then turned back like a hairpin to the internal network after translation to access the private IP address of the server.
This function is useful for network services like web hosting within a local network, where the users on the local network need to access the internal server using the same URL or IP address that external users would use. It ensures uniform access to resources regardless of whether the request originates from inside or outside the local network.
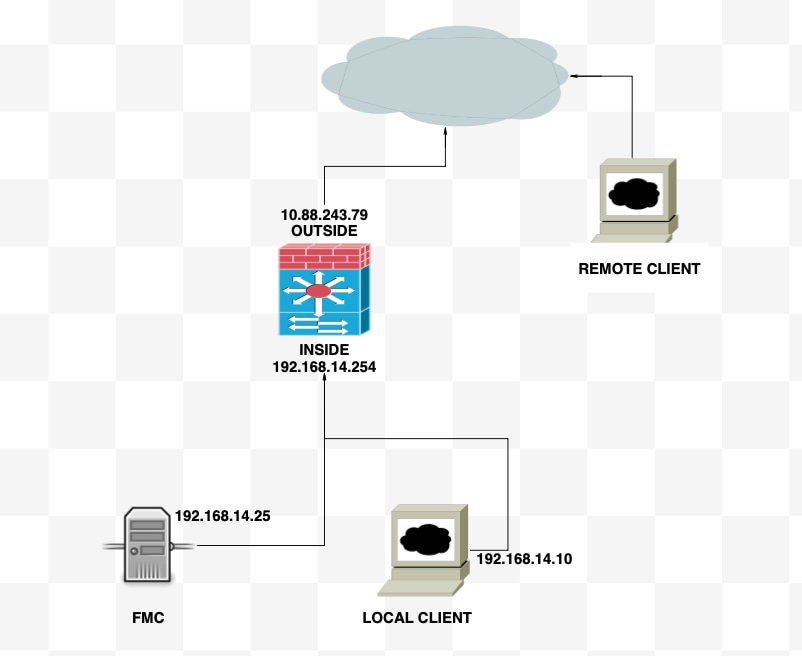
In this example, an FMC must be accessed through the IP of the external interface of the FTD
Diagram

Step 1. Configure Outside-Inside Nat
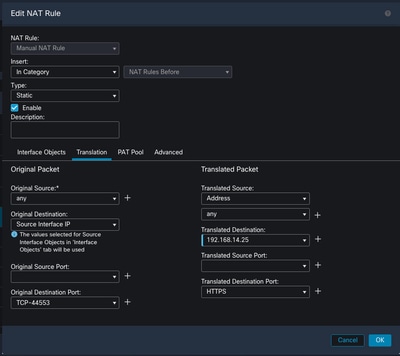
As the first step, a static NAT must be configured; in this example, the destination IP and destination port are translated using the IP of the Outside interface and the port destination is 44553.
From the FMC navigate to Device > NAT to create or edit the existing policy, then click the Add Rule box.
- NAT Rule: Manual Nat Rule
- Original Source: Any
- Original Destination: Source Interface IP
- Original Destination Port: 44553
- Translated Destination: 192.168.14.25
- Translated Destination Port: 443

Configure the policy. Navigate to Policies > Access Control to create or edit the existing policy, then click the Add Rule box.
Source Zone: Outside
Destination Zone: Inside
Source Network: Any
Destination Network: 10.88.243.79

Step 2. Configure Inside-Inside Nat (Hairpin)
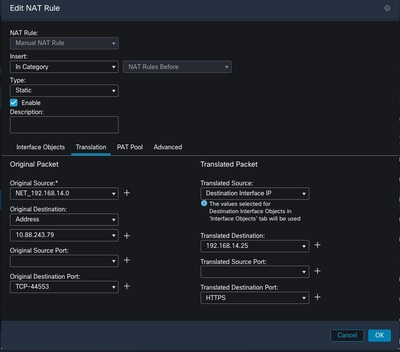
As the second step, a static NAT must be configured from Inside to Inside; in this example, the destination IP and destination port are translated using an object with the IP of the outside interface and the destination port is 44553.
From the FMC navigate to Device > NAT to edit the existing policy, then click the Add Rule box.
- NAT Rule: Manual Nat Rule
- Original Source: 192.168.14.0/24
- Original Destination: Address 10.88.243.79
- Original Destination Port: 44553
- Translated Source: Destination Interface IP
- Translated Destination: 192.168.14.25
- Translated Destination Port: 443

Configure the policy. Navigate to Policies > Access Control to edit the existing policy, then click the Add Rule box.
Source Zone: Any
Destination Zone: Any
Source Network: 192.168.14.0/24
Destination Network: 10.88.243.79

Verify
From the local client, do a telnet with destination IP and destination port:
If this error message "telnet unable to connect to remote host: Connection timed out" prompt, something went wrong at some point during the configuration.

But if it says Connected, the configuration was successful.

Troubleshoot
If you are experiencing issues with Network Address Translation (NAT), use this step-by-step guide to troubleshoot and resolve common issues.
Step 1: NAT Rules Configuration Check
- Review NAT Rules: Ensure all NAT rules are correctly configured in FMC. Check that the source and destination IP addresses, as well as ports, are accurate.
- Interface Assignment: Confirm that both the source and destination interfaces are correctly assigned in the NAT rule. Incorrect mapping can cause traffic not to be translated or routed properly.
- NAT Rule Priority: Verify that the NAT rule is placed at the top of any other rule that can match the same traffic. Rules in FMC are processed in sequential order, so a rule placed higher up has precedence.
Step 2: Access Control Rules (ACL) Verification
- Review ACLs: Check the Access Control Lists to make sure they are appropriate for permitting NAT traffic. ACLs must be configured to recognize the translated IP addresses.
- Rules Order: Make sure the access control list is in the correct order. Like NAT rules, ACLs are processed from top to bottom, and the first rule that matches the traffic is the one that is applied.
- Traffic Permissions: Verify that an appropriate access control list exists to allow traffic from the internal network to the translated destination. If a rule is missing or incorrectly configured, the desired traffic could be blocked.
Step 3: Additional Diagnostics
- Use Diagnostic Tools: Utilize the diagnostic tools available in FMC to monitor and debug the traffic passing through the device. This includes viewing real-time logs and connection events.
- Restart Connections: In some cases, existing connections cannot recognize changes made to NAT rules or ACLs until they are restarted. Consider clearing existing connections to force new rules to be applied.
From LINA:
firepower# clear xlate
- Verify Translation: Use commands like show xlate and show nat on the command line if you are working with FTD devices to verify that NAT translations are being performed as expected.
From LINA:
firepower# show nat
firepower# show xlate


 Feedback