Configure Control Plane Access Control Policies for Secure Firewall Threat Defense and ASA
Available Languages
Download Options
Bias-Free Language
The documentation set for this product strives to use bias-free language. For the purposes of this documentation set, bias-free is defined as language that does not imply discrimination based on age, disability, gender, racial identity, ethnic identity, sexual orientation, socioeconomic status, and intersectionality. Exceptions may be present in the documentation due to language that is hardcoded in the user interfaces of the product software, language used based on RFP documentation, or language that is used by a referenced third-party product. Learn more about how Cisco is using Inclusive Language.
Contents
Introduction
This document describes the process to configure control plane access rules for Secure Firewall Threat Defense and Adaptive Security Appliance (ASA).
Prerequisites
Requirements
Cisco recommends that you have knowledge of these topics:
- Secure Firewall Threat Defense (FTD)
- Secure Firewall Device Manager (FDM)
- Secure Firewall Management Center (FMC)
- Secure Firewall ASA
- Access Control List (ACL)
- FlexConfig
Components Used
The information in this document is based on these software and hardware versions:
- Secure Firewall Threat Defense version 7.2.5
- Secure Firewall Manager Center version 7.2.5
- Secure Firewall Device Manager version 7.2.5
- Secure Firewall ASA version 9.18.3
The information in this document was created from the devices in a specific lab environment. All of the devices used in this document started with a cleared (default) configuration. If your network is live, ensure that you understand the potential impact of any command.
Background Information
The traffic usually traverses a firewall and is routed between data interfaces; in some circumstances, it is beneficial to deny traffic destined 'to' the secure firewall. The Cisco secure firewall can use a control-plane access control list (ACL) to restrict 'to-the-box' traffic. An example of when a control-plane ACL can be useful would be to control which peers can establish a VPN (Site-to-Site or Remote Access VPN) tunnel to the secure firewall.
Secure Firewall 'through-the-box' traffic
Traffic normally traverses firewalls from one interface (inbound) to another interface (outbound), this is known as 'through-the-box' traffic and is managed by both, the Access Control Policies (ACP) and the Pre-filter rules.
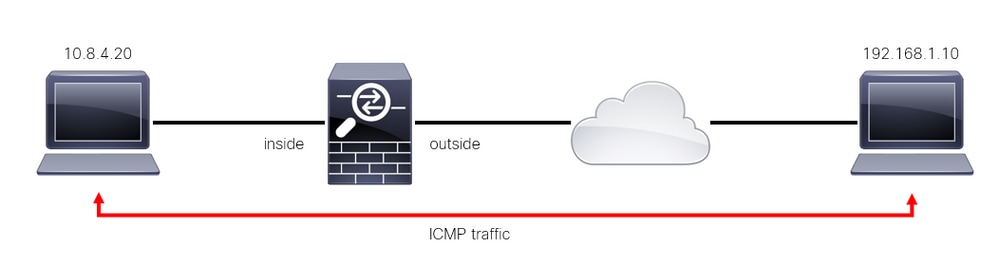 Image 1. Through-the-box traffic example
Secure Firewall 'to-the-box' traffic
There are other cases in which traffic is directly destined to an FTD interface (Site-to-Site or Remote Access VPN), this is known as 'to-the-box' traffic and is managed by the control-plane of that specific interface.
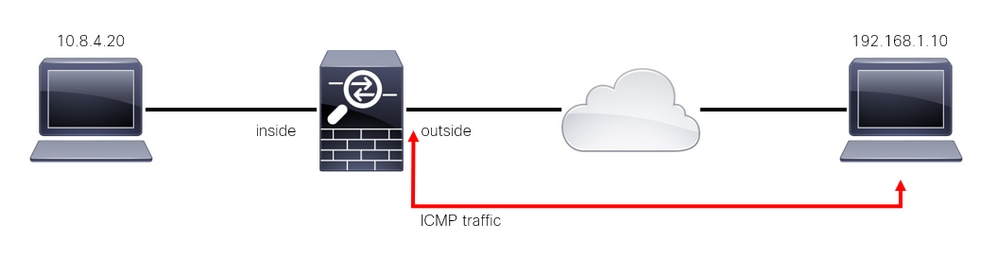 Image 2. To-the-box traffic example
Important Considerations Regarding Contol Plane ACLs
- As of FMC/FTD version 7.0, a control plane ACL must be configured using FlexConfig, using the same command syntax used on the ASA.
- The keyword control-plane is appended to the access-group configuration, which enforces traffic 'to' the secure firewall interface. Without the control-plane word appended to the command, the ACL would restrict traffic 'through' the secure firewall.
- A control-plane ACL does not restrict SSH, ICMP or TELNET inbound to a secure firewall interface. These are processed (permitted/denied) according to the Platform Settings Policies and have a higher precedence.
- A control-plane ACL restricts traffic 'to' the secure firewall itself, whereas the Access Control Policy for the FTD or the normal ACLs for the ASA, controls traffic 'through' the secure firewall.
- Unlike a normal ACL, there is not an implicit 'deny' at the end of the ACL.
- The object-group search (OGS) feature does not work over control-plane ACLs, CSCwi58818.
- At the time of this document being created, the FTD Geolocation feature cannot be used to restrict access 'to' the FTD.
Configure
In the next example, a set of IP addresses from a certain country tries to VPN brute force into the network by attempting to log in to the FTD RAVPN. The best option to protect the FTD against these VPN brute force attacks is to configure a control plane ACL to block these connections to the outside FTD interface.
Configurations
Configure a control-plane ACL for FTD managed by FMC
This is the procedure you need to follow in an FMC to configure a control plane ACL to block incoming VPN brute force attacks to the outside FTD interface:
Step 1. Open the FMC Graphic User Interface (GUI) via HTTPS and Log in with your credentials.
 Image 3. FMC Log In page
Step 2. You need to create an extended ACL. For this, navigate to Objects > Object Management.
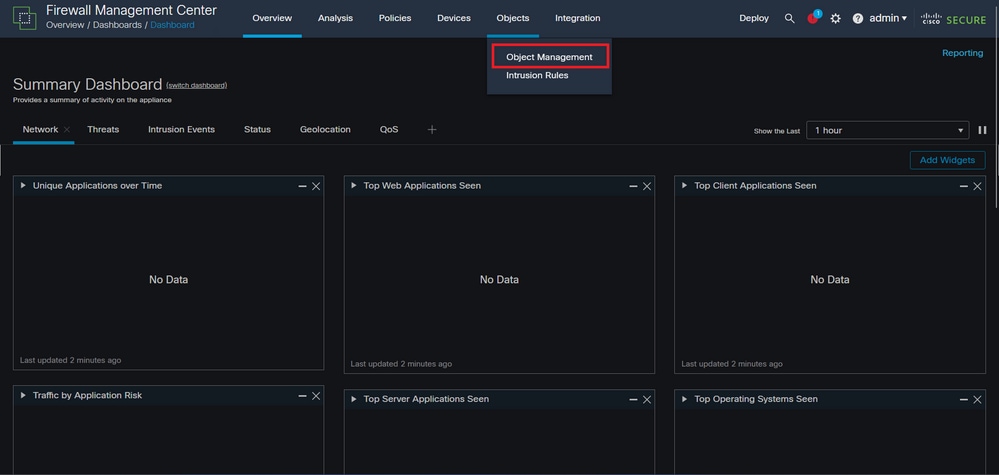 Image 4. Object Management
Step 2.1. From the left panel, navigate to Access List > Extended to create an extended ACL.
 Image 5. Extended ACL menu
Step 2.2. Then, select Add Extended Access List.
 Image 6. Add Extended ACL
Step 2.3. Type a name for the extended ACL, and then, click on the Add button to create an access control entry (ACE):
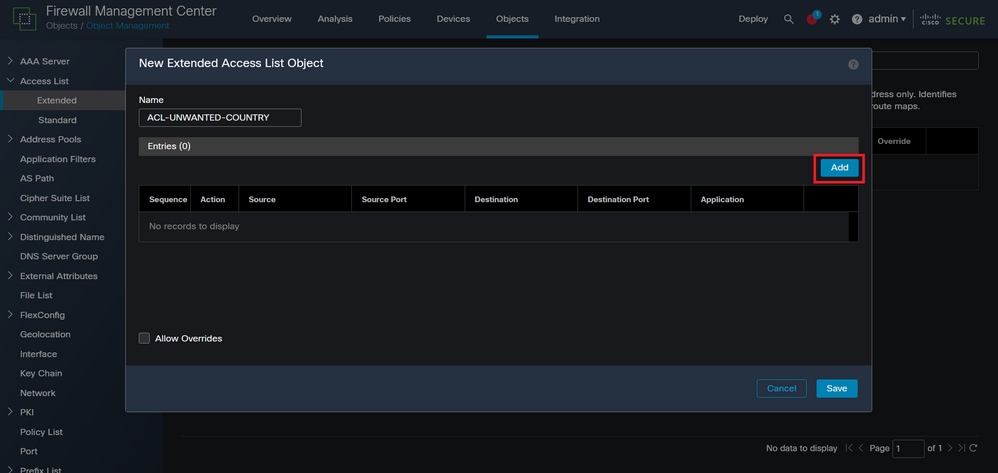 Image 7. Extended ACL entries
Step 2.4. Change the ACE action to Block, then add the source network to match the traffic that needs to be denied to the FTD, keep the destination network as Any, and click on the Add button to complete the ACE entry:
- In this example, the ACE entry configured blocks VPN brute force attacks coming from the 192.168.1.0/24 subnet.
 Image 8. Denied Networks
Step 2.5. In case you need to add more ACE entries, then click on the Add button again and repeat step 2.4. After this, click on the Save button to complete the ACL configuration.
 Image 9. Completed Extended ACL entries
Step 3. Then, you need to configure a Flex-Config Object to apply the control-plane ACL to the outside FTD interface. For this, navigate to the left panel, and select the option FlexConfig > FlexConfig Object.
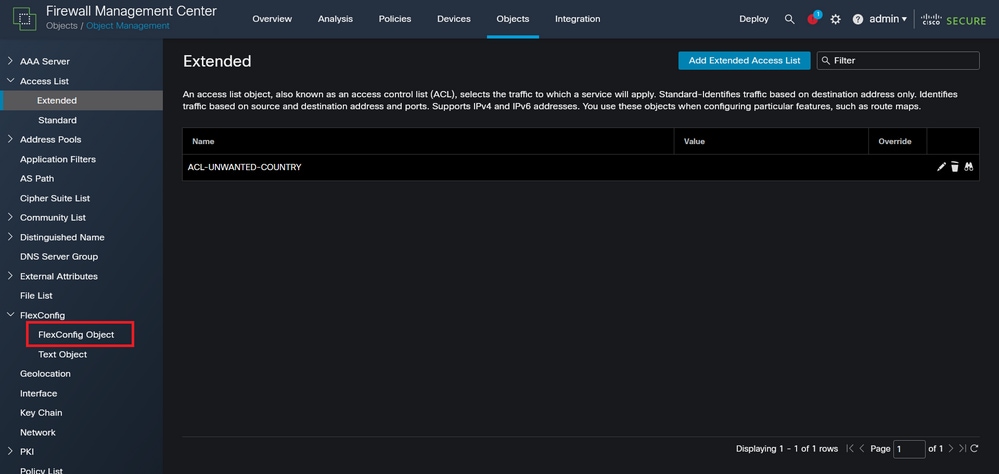 Image 10. FlexConfig Object menu
Step 3.1. Click Add FlexConfig Object.
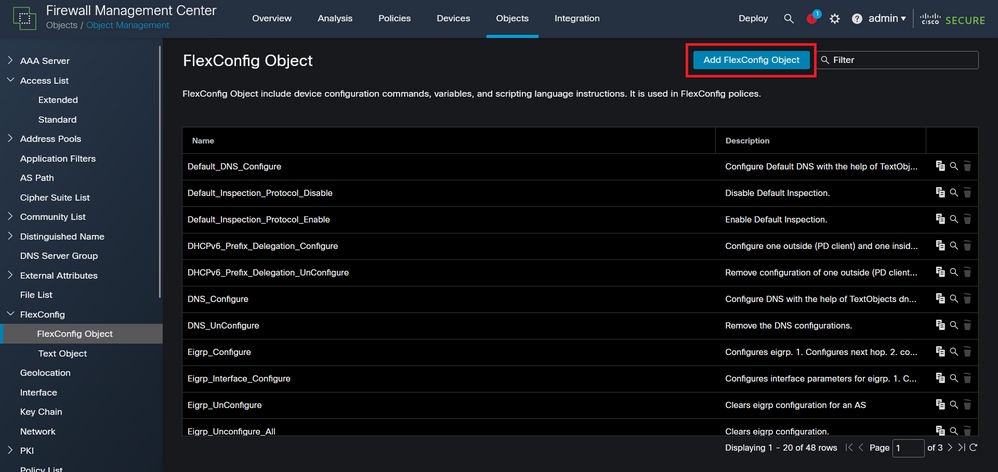 Image 11. Add Flexconfig Object
Step 3.2. Add a name for the FlexConfig object and then, insert an ACL policy object. For this, select Insert > Insert Policy Object > Extended ACL Object.
 Image 12. FlexConfig Object variable
Step 3.3. Add a name for the ACL object variable and then, select the extended ACL that was created in the Step 2.3, after this, click on the Save button.
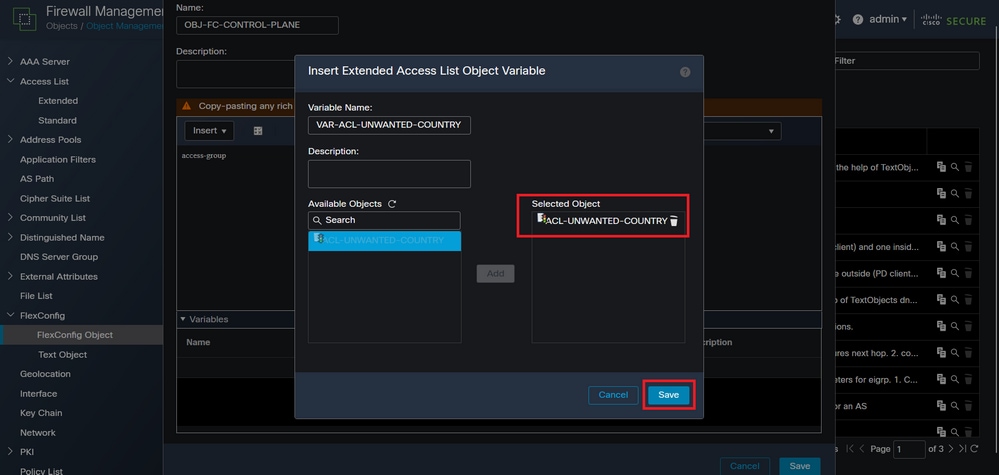 Image 13. FlexConfig Object variable ACL assigment
Step 3.4. Then, configure the control-plane ACL as inbound for the outside interface.
Command line syntax:
access-group "variable name starting with $ symbol" in interface "interface-name" control-plane
This translates into the next command example, which uses the ACL variable created in the Step 2.3 'VAR-ACL-UNWANTED-COUNTRY':
access-group $VAR-ACL-UNWANTED-COUNTRY in interface outside control-plane
This is how it must be configured into the FlexConfig object window, after this, select the Save button to complete the FlexConfig Object.
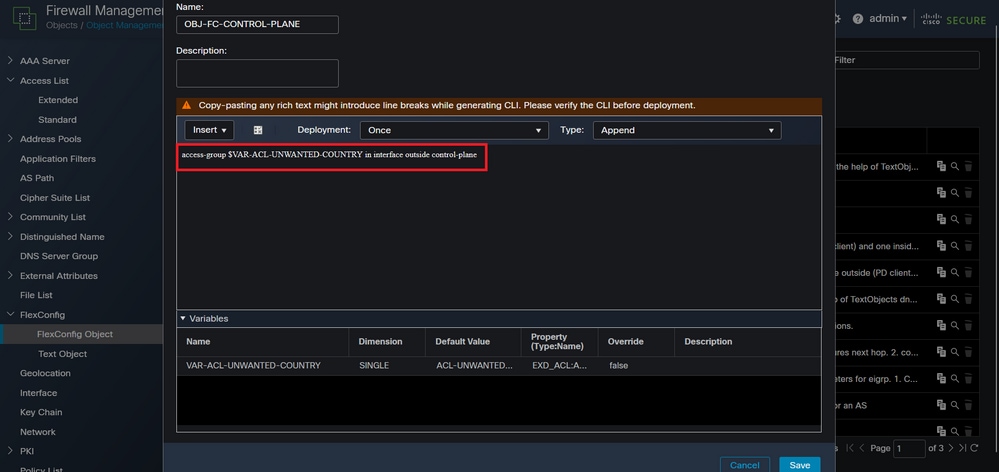 Image 14. Flexconfig Object complete command line
Note: It is highly recommended to configure the control-plane ACL just for the interfaces receiving incoming remote access VPN sessions in the secure firewall, like the Outside interface.
Step 4. You need to apply the FlexConfig Object configuration to the FTD, for this, navigate to Devices > FlexConfig.
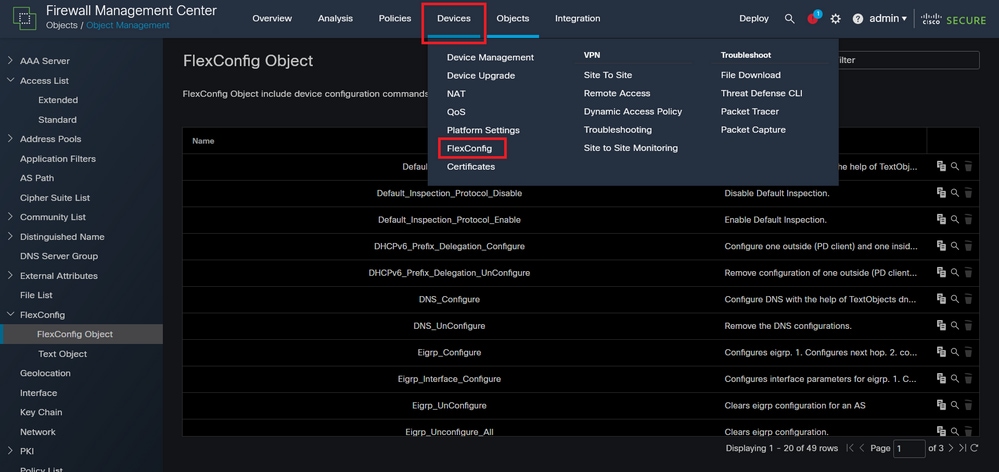 Image 15. FlexConfig Policy menu
Step 4.1. Then, click on New Policy if there is not an already FlexConfig created for your FTD, or edit the existing FlexConfig policy.
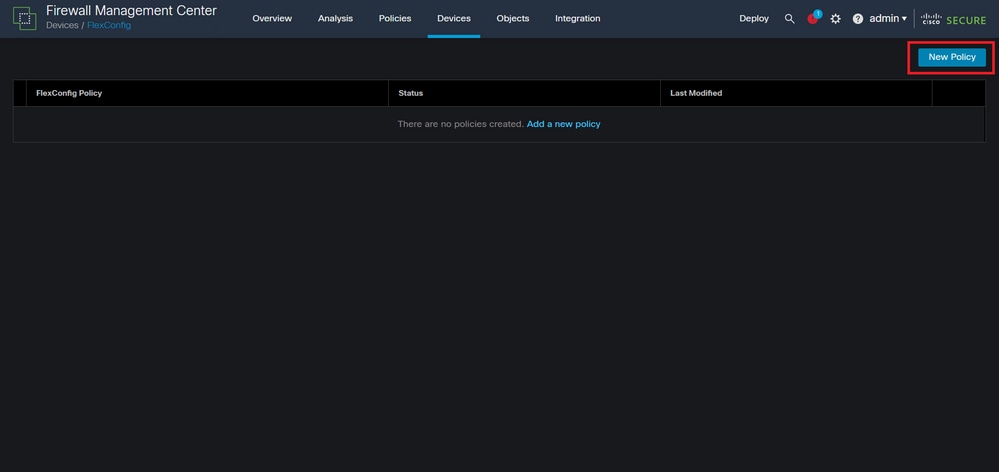 Image 16. FlexConfig Policy creation
Step 4.2. Add a name for the new FlexConfig policy and select the FTD you would like to apply the control-plane ACL created.
 Image 17. FlexConfig Policy device assigment
Step 4.3. From the left panel, search for the FlexConfig object created in the step 3.2, then, add it to the FlexConfig policy by clicking on the right arrow located in the middle of the window, after this, click on the Save button.
 Image 18. FlexConfig Policy object assigment
Step 5. Proceed to deploy the configuration change to the FTD, for this, navigate to Deploy > Advanced Deploy.
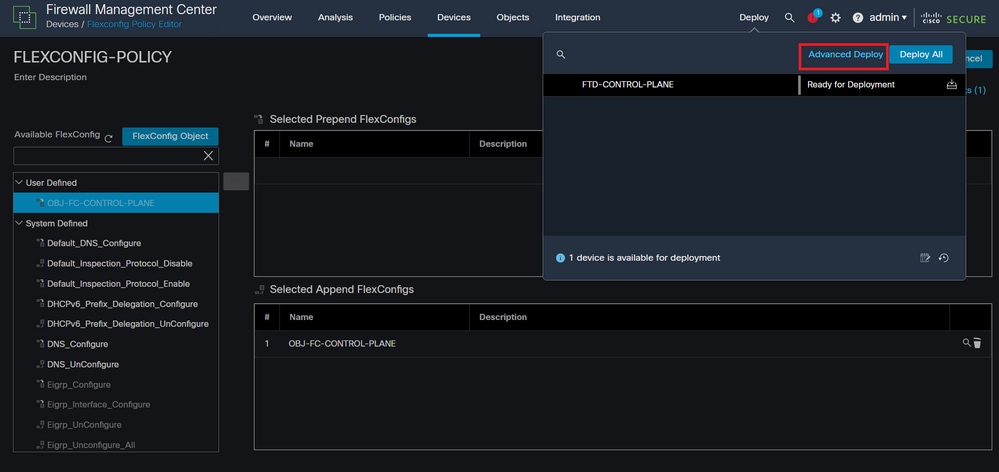 Image 19. FTD Advanced Deploy
Step 5.1. Then, select the FTD to which you want the FlexConfig policy applied. If everything is correct, then click Deploy.
 Image 20. FTD Deployment validation
Step 5.2. After this, a Deployment Confirmation window is displayed, add a comment to track down the deployment and proceed to Deploy.
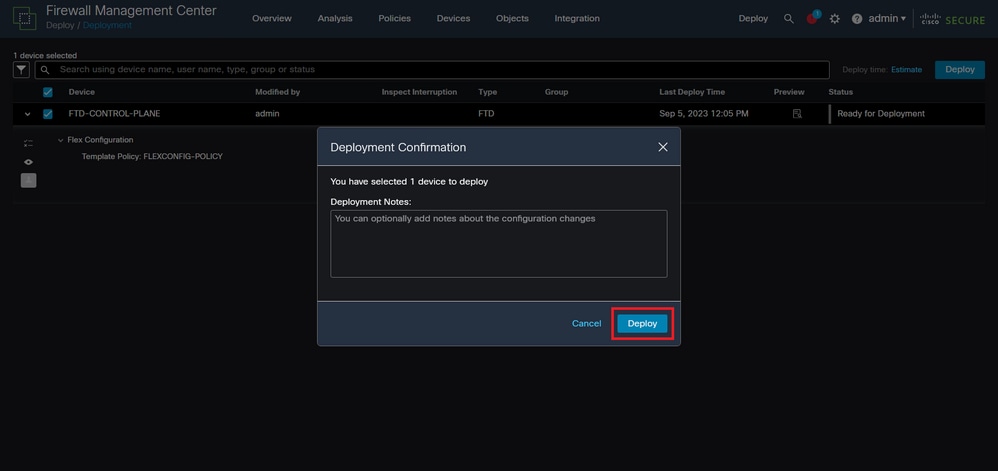 Image 21. FTD Deployment comments
Step 5.3. A warning message could appear when deploying FlexConfig changes. Click on Deploy only if you are completely certain that the policy configuration is correct.
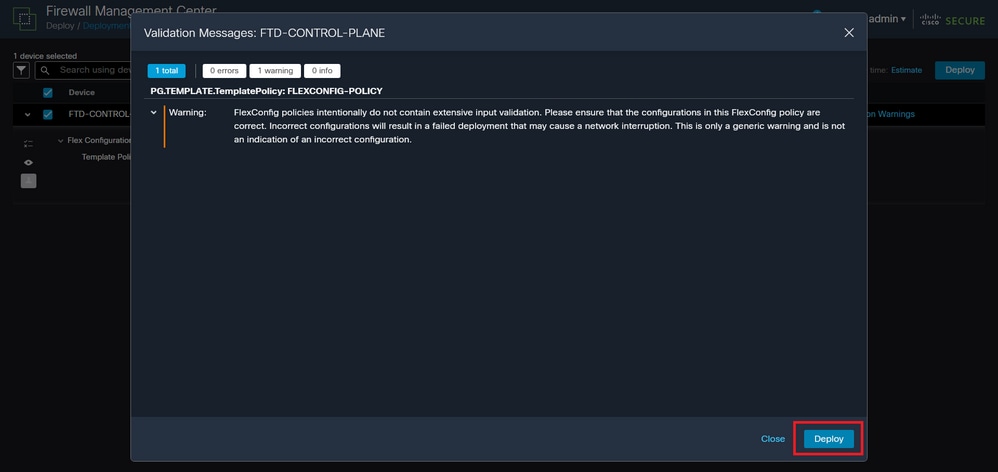 Image 22. FTD Deployment Flexconfig warning
Step 5.4. Confirm that the policy deployment is successful for the FTD.
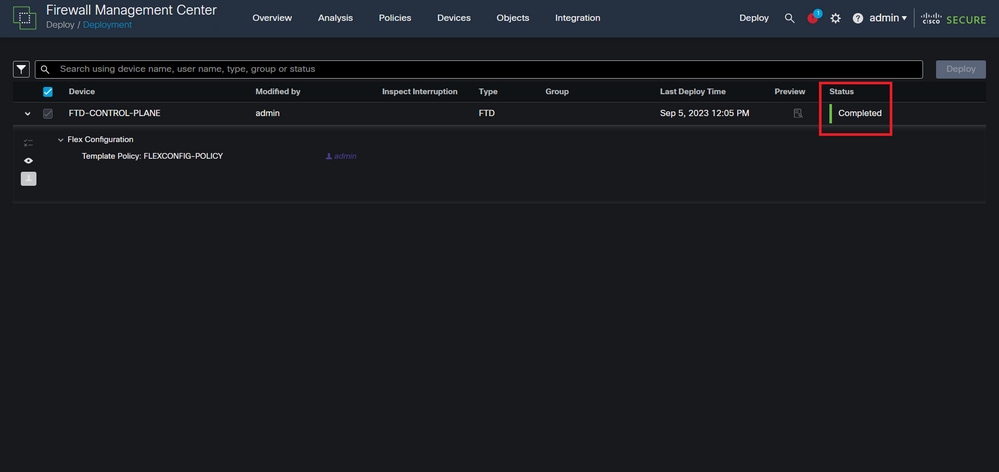 Image 23. FTD Deployment successful
Step 6. If you create a new control-plane ACL for your FTD or if you edited an existing one that is actively in use, then, it is important to highlight that the configuration changes made do not apply to already established connections to the FTD, therefore, you need to manually clear the active connection attempts to the FTD. For this, connect to the CLI of the FTD and clear the active connections.
To clear the active connection for a specific host IP address:
> clear conn address 192.168.1.10 all
To clear the active connections for a whole subnet network:
> clear conn address 192.168.1.0 netmask 255.255.255.0 all
To clear the active connections for a range of IP addresses:
> clear conn address 192.168.1.1-192.168.1.10 all
Note: It is highly recommended to use the keyword 'all' at the end of the clear conn address command to force the clearing of the active VPN brute force connection attempts to the secure firewall, mainly when the nature of the VPN brute force attack is launching a blast of constant connection attempts.
[VIDEO] Configure a control-plane ACL for FTD managed by FMC
Configure a control-plane ACL for FTD managed by FDM
This is the procedure you need to follow in an FDM to configure a control plane ACL to block incoming VPN brute force attacks to the outside FTD interface:
Step 1. Open the FDM GUI via HTTPS and Log in with your credentials.
 Image 24. FDM Log In page
Step 2. You need to create an object network. For this, navigate to Objects:
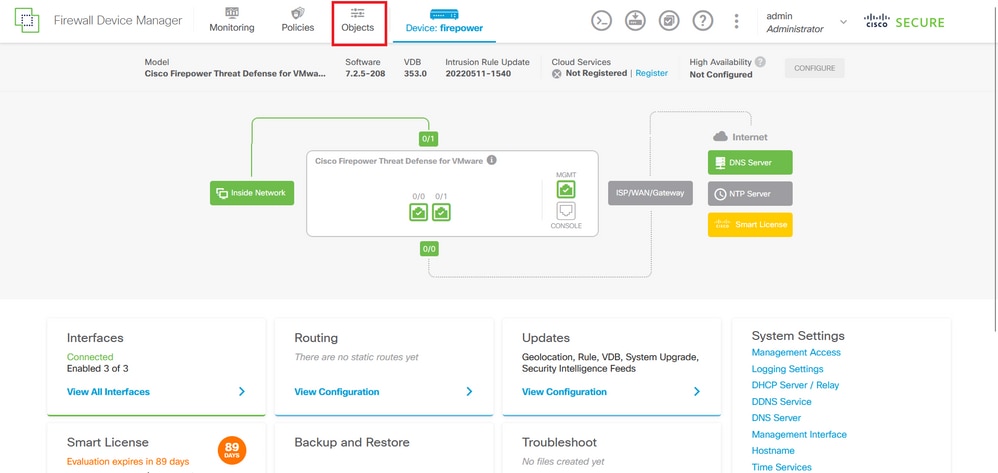 Image 25. FDM main dashboard
Step 2.1. From the left panel, select Networks and then click on the '+' button to create a new network object.
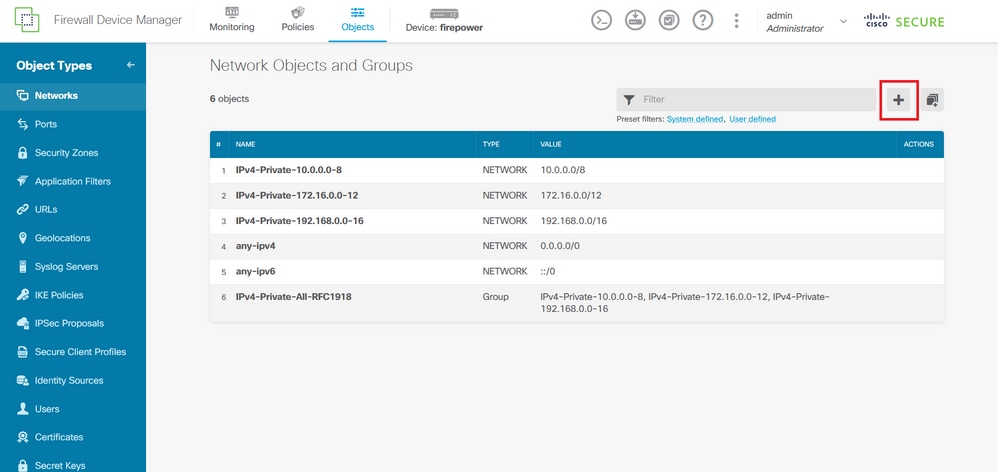 Image 26. Object creation
Step 2.2. Add a name for the network object, select the Network type for the object, add the IP address, network address or the range of IPs to match the traffic that needs to be denied to the FTD. Then, click the Ok button to complete the object network.
- In this example, the object network configured is intended to block VPN brute force attacks coming from the 192.168.1.0/24 subnet.
 Image 27. Add Network Object
Step 3. Then, you need to create an extended ACL, for this, navigate to the Device tab at the top menu.
 Image 28. Device settings page
Step 3.1. Scroll down and select View Configuration from the Advanced Configuration square as shown in the image.
 Image 29. FDM Advanced Configuration
Step 3.2. Then, from the left panel, navigate to Smart CLI > Objects and click on CREATE SMART CLI OBJECT.
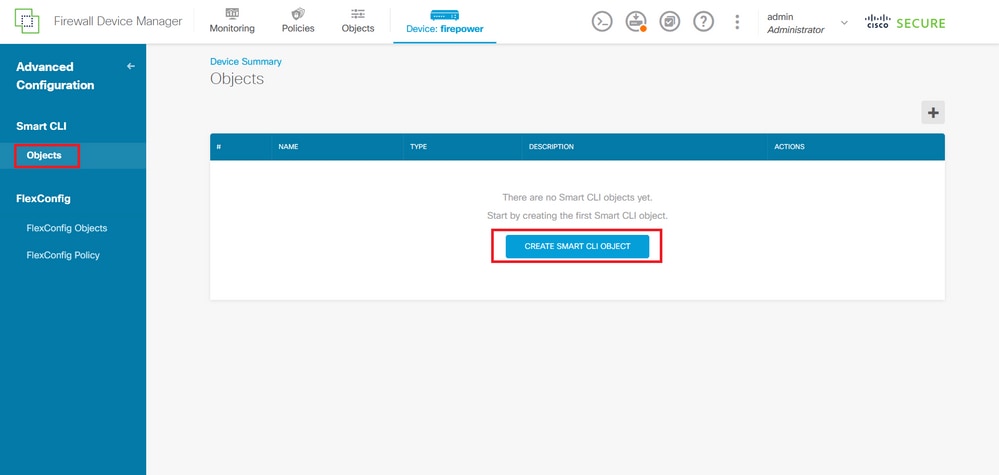 Image 30. Smart CLI Objects
Step 3.3. Add a name for the extended ACL to create, select Extended Access List from the CLI template drop-down menu, and configure the ACEs required by using the network object created in the step 2.2, then click the OK button to complete the ACL.
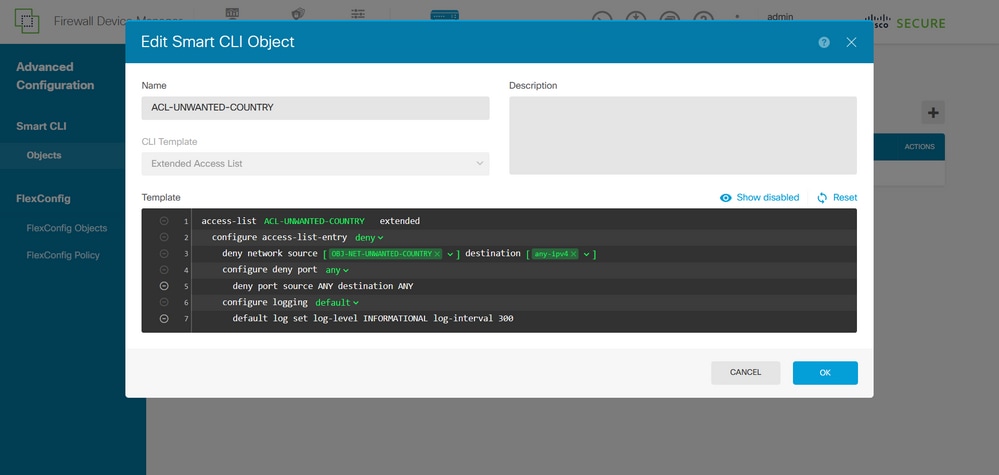 Image 31. Extended ACL creation
Note: If you need to add more ACEs for the ACL, you can do it by hovering the mouse over the left of the current ACE; then three clickable dots do not appear. Click on them and select Duplicate to add more ACEs.
Step 4. Then, you need to create a FlexConfig object, for this, navigate to the left panel and select FlexConfig > FlexConfig Objects, and click on CREATE FLEXCONFIG OBJECT.
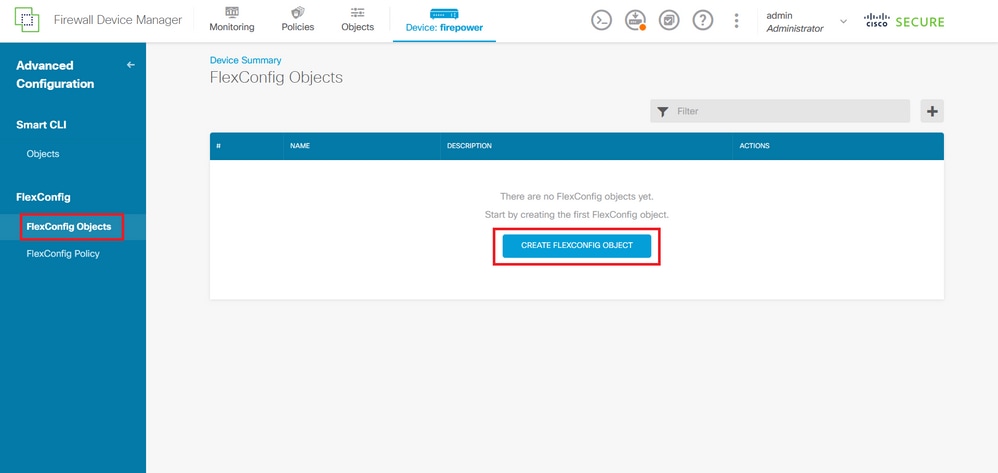 Image 32. FlexConfig Objects
Step 4.1. Add a name for the FlexConfig object to create and configure the control-plane ACL as inbound for the outside interface as shown in the image.
Command line syntax:
access-group "ACL-name" in interface "interface-name" control-plane
This translates into the next command example, which uses the extended ACL created in the Step 3.3 'ACL-UNWANTED-COUNTRY':
access-group ACL-UNWANTED-COUNTRY in interface outside control-plane
This is how it can be configured into the FlexConfig object window, after this, select the OK button to complete the FlexConfig Object.
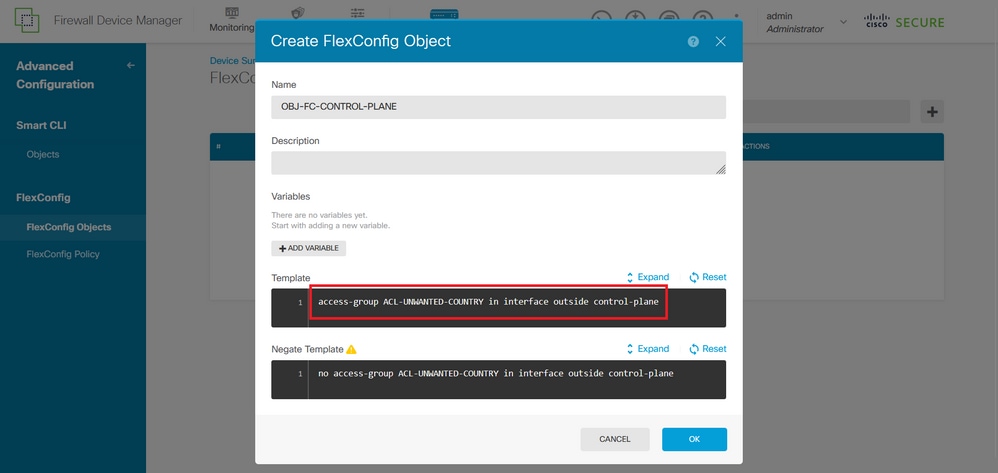 Image 33. FlexConfig Object creation
Note: It is highly recommended to configure the control-plane ACL just for the interfaces receiving incoming remote access VPN sessions in the secure firewall, like the Outside interface.
Step 5. Proceed to create a FlexConfig Policy, for this, navigate to Flexconfig > FlexConfig Policy, click on the '+' button, and select the FlexConfig object that was created in the step 4.1.
 Image 34. FlexConfig Policy
Step 5.1. Validate that the FlexConfig preview shows the correct configuration for the control-plane ACL created and click on the Save button.
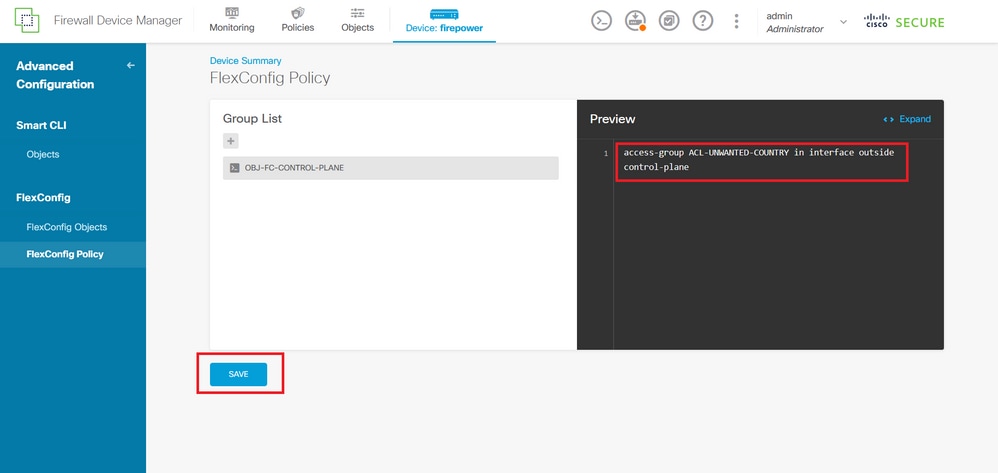 Image 35. FlexConfig Policy preview
Step 6. Deploy the configuration changes to the FTD you would like to protect against the VPN brute force attacks, for this, click on the Deployment button at the top menu, validate that the configuration changes to deploy are correct, and then, click on DEPLOY NOW.
 Image 36. Pending Deployment
Step 6.1. Validate that the policy deployment is successful.
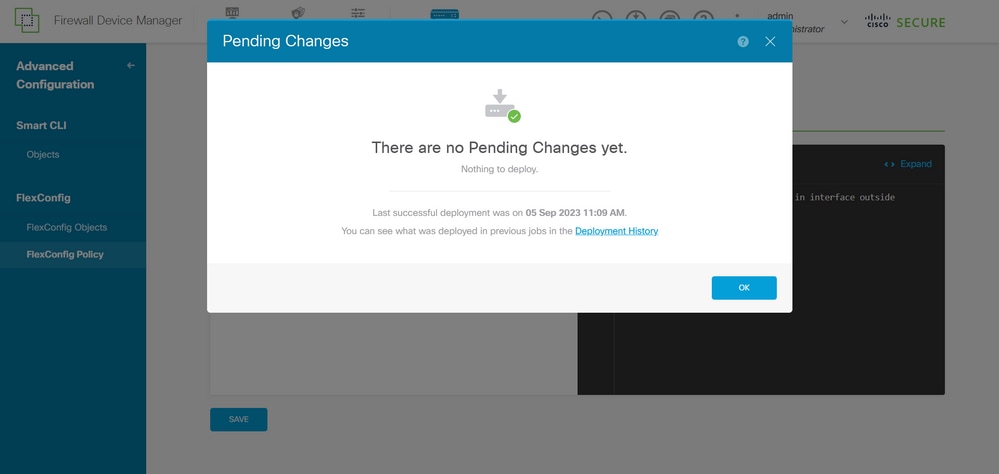 Image 37. Deployment successful
Step 7. If you create a new control-plane ACL for your FTD or if you edited an existing one that is actively in use, then, it is important to highlight that the configuration changes made do not apply to already established connections to the FTD, therefore, you need to manually clear the active connection attempts to the FTD. For this, connect to the CLI of the FTD and clear the active connections.
To clear the active connection for a specific host IP address:
> clear conn address 192.168.1.10 all
To clear the active connections for a whole subnet network:
> clear conn address 192.168.1.0 netmask 255.255.255.0 all
To clear the active connections for a range of IP addresses:
> clear conn address 192.168.1.1-192.168.1.10 all
Note: It is highly recommended to use the keyword 'all' at the end of the clear conn address command to force the clearing of the active VPN brute force connection attempts to the secure firewall, mainly when the nature of the VPN brute force attack is launching a blast of constant connection attempts.
Configure a control-plane ACL for ASA using CLI
This is the procedure you need to follow in an ASA CLI to configure a control plane ACL to block incoming VPN brute force attacks to the outside interface:
Step 1. Log in to the secure firewall ASA via CLI and get access to the 'configure terminal'.
asa# configure terminal
Step 2. Use the next command to configure an extended ACL to block a host IP address or network address for the traffic that needs to be blocked to the ASA.
- In this example, you create a new ACL called 'ACL-UNWANTED-COUNTRY' and the ACE entry configured blocks VPN brute force attacks coming from the 192.168.1.0/24 subnet.
asa(config)# access-list ACL-UNWANTED-COUNTRY extended deny ip 192.168.1.0 255.255.255.0 any
Step 3. Use the next access-group command to configure the 'ACL-UNWANTED-COUNTRY' ACL as a control-plane ACL for the outside ASA interface.
asa(config)# access-group ACL-UNWANTED-COUNTRY in interface outside control-plane
Note: It is highly recommended to configure the control-plane ACL just for the interfaces receiving incoming remote access VPN sessions in the secure firewall, like the Outside interface.
Step 4. If you create a new control-plane ACL or if you edited an existing one that is actively in use, then, it is important to highlight that the configuration changes made do not apply to already established connections to the ASA, therefore, you need to manually clear the active connection attempts to the ASA. For this, clear the active connections.
To clear the active connection for a specific host IP address:
asa# clear conn address 192.168.1.10 all
To clear the active connections for a whole subnet network:
asa# clear conn address 192.168.1.0 netmask 255.255.255.0 all
To clear the active connections for a range of IP addresses:
asa# clear conn address 192.168.1.1-192.168.1.10 all
Note: It is highly recommended to use the keyword 'all' at the end of the clear conn address command to force the clearing of the active VPN brute force connection attempts to the secure firewall, mainly when the nature of the VPN brute force attack is launching a blast of constant connection attempts.
Alternative configuration to block attacks for secure firewall using the 'shun' Command
In case of an immediate option to block attacks for the secure firewall, then you can use the 'shun' command. Theshuncommand lets you block connections from an attacking host, here you have further details about this shun command:
- Once you shun an IP address, then, all future connections from the source IP address are dropped and logged until the blocking function is removed manually.
- The blocking function of theshuncommand is applied whether or not a connection with the specified host address is currently active.
- If you specify the destination address, source and destination ports, and the protocol, then you drop the matching connection as well as placing a shun on all future connections from the source IP address; all future connections are shunned, not just those that match these specific connection parameters.
- You can only have oneshuncommand per source IP address.
- Because theshuncommand is used to block attacks dynamically, it is not displayed in thethreat defensedevice configuration.
- Whenever an interface configuration is removed, all shuns that are attached to that interface are also removed.
- Shun command syntax:
shun source_ip [ dest_ip source_port dest_port [ protocol]] [ vlan vlan_id]
- To disable a shun, use the no form of this command:
no shun source_ip [ vlan vlan_id]
To shun a host IP address, then proceed as follows for the secure firewall. In this example, the 'shun' command is used to block VPN brute force attacks coming from the source IP address 192.168.1.10.
Configuration example for FTD.
Step 1. Log in to the FTD via CLI and apply the shun command.
> shun 192.168.1.10
Shun 192.168.1.10 added in context: single_vf
Shun 192.168.1.10 successful
Step 2. You can use the show commands to confirm the shun IP addresses in the FTD and to monitor the shun hit counts per IP address:
> show shun
shun (outside) 192.168.1.10 0.0.0.0 0 0 0

> show shun statistics
diagnostic=OFF, cnt=0
outside=ON, cnt=0

Shun 192.168.1.10 cnt=0, time=(0:00:28)
Configuration example for ASA
Step 1. Log in to the ASA via CLI and apply the shun command.
asa# shun 192.168.1.10
Shun 192.168.1.10 added in context: single_vf
Shun 192.168.1.10 successful
Step 2. You can use the show commands to confirm the shun IP addresses in the ASA and to monitor the shun hit counts per IP address:
asa# show shun
shun (outside) 192.168.1.10 0.0.0.0 0 0 0

asa# show shun statistics
outside=ON, cnt=0
inside=OFF, cnt=0
dmz=OFF, cnt=0
outside1=OFF, cnt=0
mgmt=OFF, cnt=0

Shun 192.168.1.10 cnt=0, time=(0:01:39)
Note: For more information about the secure firewall shun command, check the Cisco Secure Firewall Threat Defense Command Reference
Verify
To confirm the control-plane ACL configuration is in place for the secure firewall, then proceed:
Step 1. Log in to the secure firewall via CLI and run the next commands to confirm the control-plane ACL configuration is applied.
Output example for the FTD managed by FMC:
> show running-config access-list ACL-UNWANTED-COUNTRY
access-list ACL-UNWANTED-COUNTRY extended deny ip 192.168.1.0 255.255.255.0 any

> show running-config access-group
***OUTPUT OMITTED FOR BREVITY***
access-group ACL-UNWANTED-COUNTRY in interface outside control-plane
Output example for the FTD managed by FDM:
> show running-config object id OBJ-NET-UNWANTED-COUNTRY
object network OBJ-NET-UNWANTED-COUNTRY
subnet 192.168.1.0 255.255.255.0

> show running-config access-list ACL-UNWANTED-COUNTRY
access-list ACL-UNWANTED-COUNTRY extended deny ip 192.168.1.0 255.255.255.0 any4 log default

> show running-config access-group
***OUTPUT OMITTED FOR BREVITY***
access-group ACL-UNWANTED-COUNTRY in interface outside control-plane
Output example for ASA:
asa# show running-config access-list ACL-UNWANTED-COUNTRY
access-list ACL-UNWANTED-COUNTRY extended deny ip 192.168.1.0 255.255.255.0 any

asa# show running-config access-group
***OUTPUT OMITTED FOR BREVITY***
access-group ACL-UNWANTED-COUNTRY in interface outside control-plane
Step 2. To confirm the control-plane ACL is blocking the traffic required, use the packet-tracer command to simulate an incoming TCP 443 connection to the outside interface of the secure firewall, then use the show access-list <acl-name> command, the ACL hit count can increment every time a VPN brute force connection to the secure firewall is blocked by the control-plane ACL:
- In this example, the packet-tracer command simulates an incoming TCP 443 connection sourced from host 192.168.1.10 and destined to the outside IP address of our secure firewall. The 'packet-tracer' output confirms the traffic is being dropped and the 'show access-list' output displays the hit count increments for our control-plane ACL in place:
Output example for FTD
> packet-tracer input outside tcp 192.168.1.10 1234 10.3.3.251 443
Phase: 1
Type: ACCESS-LIST
Subtype: log
Result: DROP
Elapsed time: 21700 ns
Config:
Additional Information:

Result:
input-interface: outside(vrfid:0)
input-status: up
input-line-status: up
Action: drop
Time Taken: 21700 ns
Drop-reason: (acl-drop) Flow is denied by configured rule, Drop-location: frame 0x00005623c7f324e7 flow (NA)/NA

> show access-list ACL-UNWANTED-COUNTRY
access-list ACL-UNWANTED-COUNTRY; 1 elements; name hash: 0x42732b1f
access-list ACL-UNWANTED-COUNTRY line 1 extended deny ip 192.168.1.0 255.255.255.0 any (hitcnt=1) 0x142f69bf
Output example for ASA
asa# packet-tracer input outside tcp 192.168.1.10 1234 10.3.3.5 443
Phase: 1
Type: ACCESS-LIST
Subtype:
Result: ALLOW
Elapsed time: 19688 ns
Config:
Implicit Rule
Additional Information:
MAC Access list

Phase: 2
Type: ACCESS-LIST
Subtype: log
Result: DROP
Elapsed time: 17833 ns
Config:
Additional Information:

Result:
input-interface: outside
input-status: up
input-line-status: up
Action: drop
Time Taken: 37521 ns
Drop-reason: (acl-drop) Flow is denied by configured rule, Drop-location: frame 0x0000556e6808cac8 flow (NA)/NA

asa# show access-list ACL-UNWANTED-COUNTRY
access-list ACL-UNWANTED-COUNTRY; 1 elements; name hash: 0x42732b1f
access-list ACL-UNWANTED-COUNTRY line 1 extended deny ip 192.168.1.0 255.255.255.0 any (hitcnt=1) 0x9b4d26ac
Note: If an RAVPN solution like the Cisco Secure Client VPN is implemented in the secure firewall, then, a real connection attempt to the secure firewall could be performed to confirm the control-plane ACL is working as expected to block the traffic required.
Related Bugs
- ENH | Geo-location based AnyConnect Client connections: Cisco bug ID CSCvs65322
- DOC: ASA/FTD Object Group Search does not support Control Plane ACLs: Cisco bug ID CSCwi58818
Revision History
| Revision | Publish Date | Comments |
|---|---|---|
1.0 |
21-Dec-2023 |
Initial Release |
Contributed by Cisco Engineers
- Carlos ArteagaCisco TAC Engineer
- Christian HernandezCisco Security Technical Leader
 Feedback
Contact Cisco
- Open a Support Case

- (Requires a Cisco Service Contract)