Introduction
This document describes the procedure to configure Custom Local Snort Rules in Snort2 on Firewall Threat Defense (FTD).
Prerequisites
Requirements
Cisco recommends that you have knowledge of these topics:
- Cisco Firepower Management Center (FMC)
- Firewall Threat Defense (FTD)
Components Used
The information in this document is based on these software and hardware versions:
- Cisco Firepower Management Center for VMWare 7.4.1
- Cisco Firepower 2120 7.4.1
The information in this document was created from the devices in a specific lab environment. All of the devices used in this document started with a cleared (default) configuration. If your network is live, ensure that you understand the potential impact of any command.
Background Information
Custom Local Snort Rule refers to a user-defined rule that you can create and implement within the Snort intrusion detection and prevention system that is integrated into the FTD. When you create a custom local Snort rule in Cisco FTD, you are essentially defining a new pattern or set of conditions that the Snort engine can watch for. If network traffic matches the conditions specified in your custom rule, Snort can take the action defined in the rule, such as generating an alert or dropping the packet. Administrators use custom local Snort rules to address specific threats that are not covered by the general rule sets.
In this document, you are introduced how to configure and verify a Custom Local Snort Rule designed to detect and drop HTTP response packets containing a specific string (username).

Caution: Creating Custom Local Snort Rules and providing support for them falls outside of TAC support coverage. Therefore, this document can be used as a reference only, and ask that you create and manage these custom rules at your own discretion and responsibility.
Configure
Network Diagram
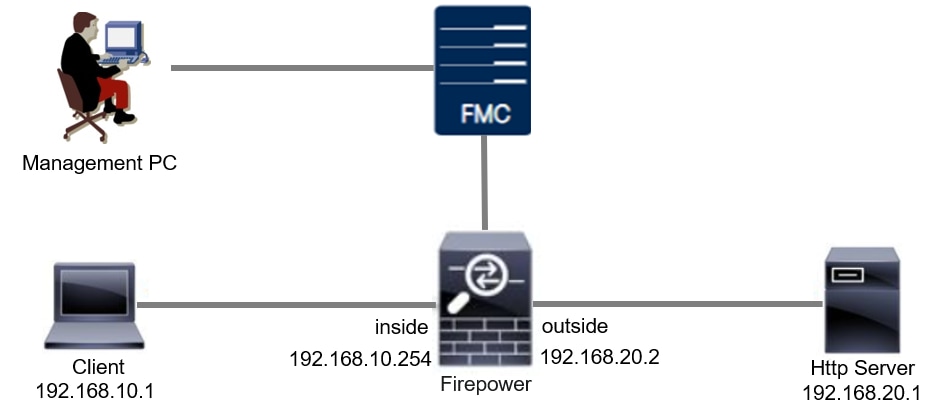
This document introduces the configuration and verification for Custom Local Snort Rule in Snort2 on this diagram.
Configuration
This is the configuration of Custom Local Snort Rule to detect and drop HTTP response packets containing a specific string (username).
Step 1. Confirm Snort Version
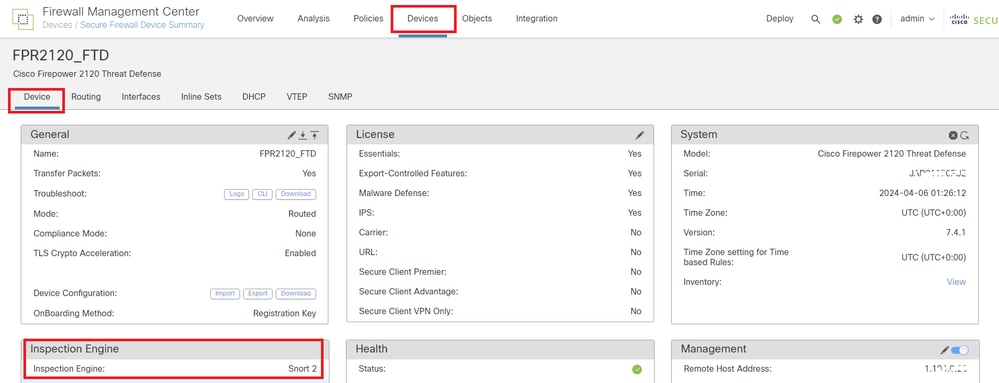
Navigate to Devices > Device Management on FMC, click Device tab. Confirming the snort version is Snort2.
 Snort Version
Step 2. Create a Custom Local Snort Rule in Snort 2
Navigate to Objects > Intrusion Rules > Snort 2 All Rules on FMC, click Create Rule button.
 Create Custom Rule
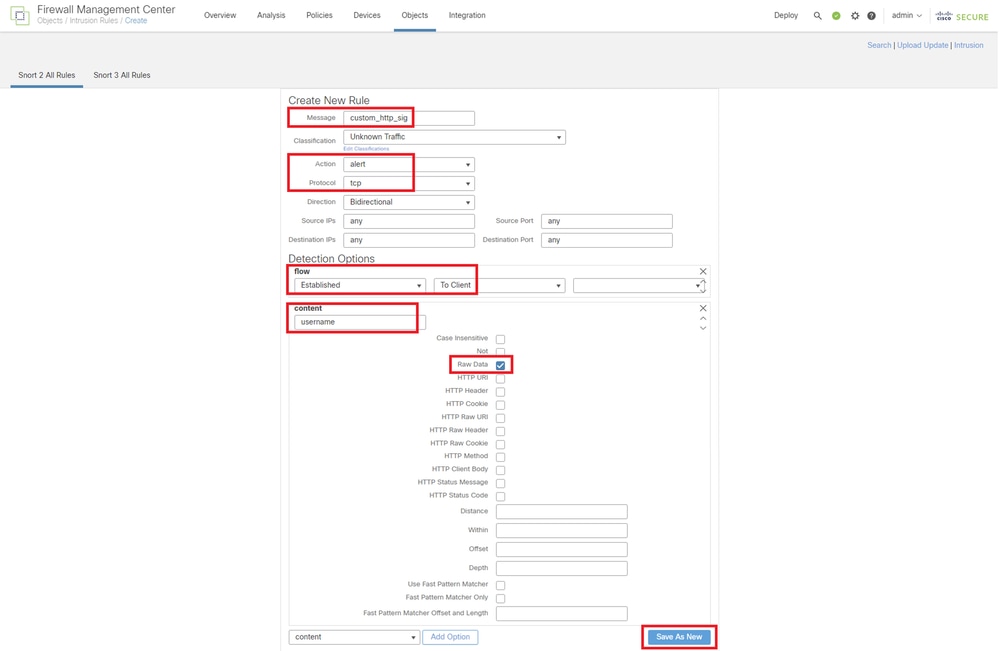
Input necessary info for Custom Local Snort Rule.
- Intrusion : custom_http_sig
- Action : alert
- Protocol : tcp
- flow : Established, To Client
- content : username (Raw Data)
 Input Necessary Info for Rule
Step 3. Confirm Custom Local Snort Rule
Navigate to Policies > Intrusion Policies on FMC, click Snort 2 Version button.
 Confirm Custom Rule
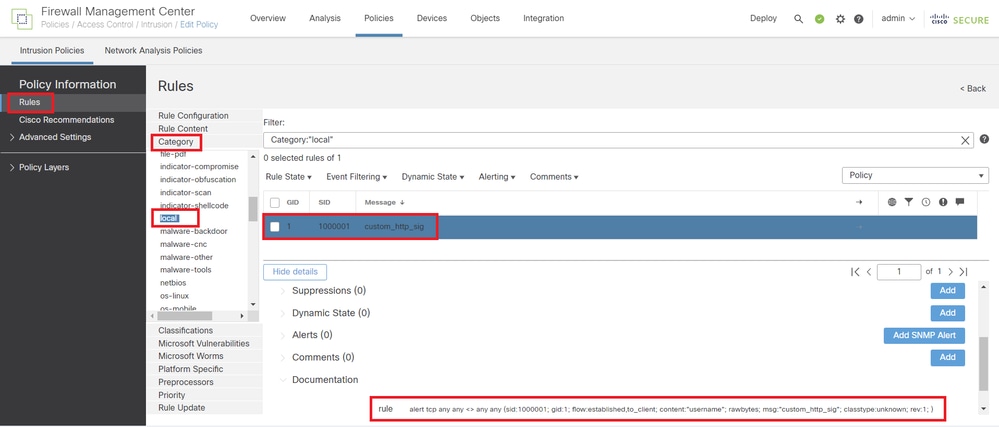
Navigate to Rules > Category > local on FMC, confirm the detail of Custom Local Snort Rule.
 Detail of Custom Rule
Step 4. Change Rule Action
Click State button, set the State to Drop and Generate Events and click OK button.
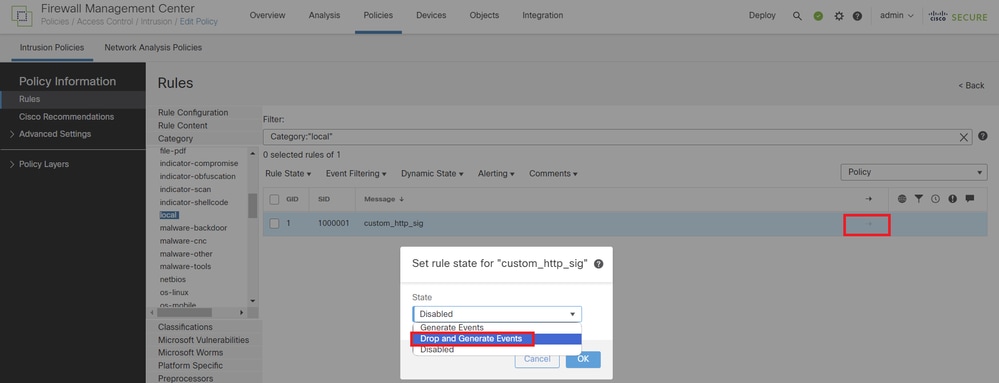 Change the Rule Action
Click Policy Information button, click Commit Changes button to save changes.
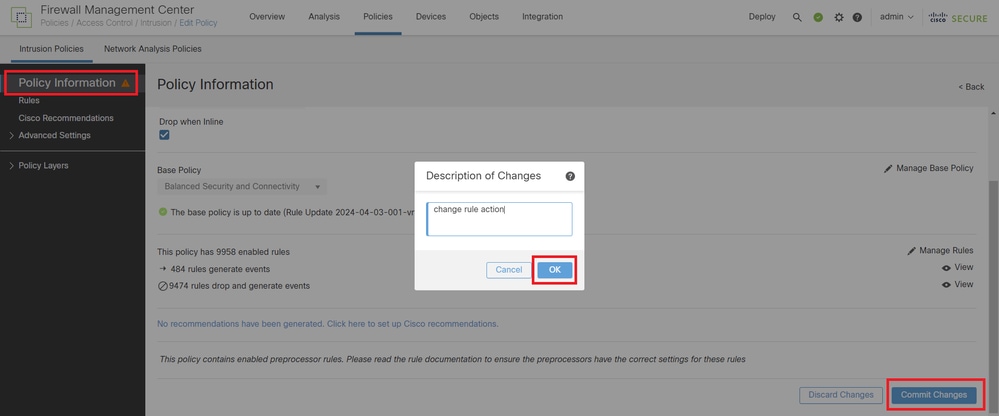 Commit Changes
Step 5. Associate Intrusion Policy with Access Control Policy (ACP) Rule
Navigate to Policies > Access Control on FMC, associate Intrusion Policy with ACP.
 Associate with ACP Rule
Step 6. Deploy Changes
Deploy the changes to FTD.
 Deploy Changes
Verify
Custom Local Snort Rule is Not Triggered
Step 1. Set Contents of File in HTTP Server
Set the contents of the test.txt file on HTTP server side to user.
Step 2. Initial HTTP Request
Access the HTTP Server (192.168.20.1/test.txt) from the browser of the client (192.168.10.1) and confirm that the HTTP communication is permitted.
 Initial HTTP Request
Custom Local Snort Rule is Triggered
Step 1. Set Contents of File in HTTP Server
Set the contents of the test.txt file on HTTP server side to username.
Step 2. Initial HTTP Request
Access the HTTP Server (192.168.20.1/test.txt) from the browser of the client (192.168.10.1) and confirm that the HTTP communication is blocked.
 Initial HTTP Request
Step 3. Confirm Intrusion Event
Navigate to Analysis > Intrusions > Events on FMC, confirm the Intrusion Event is generated by the Custom Local Snort Rule.
 Intrusion Event
Click Packets tab, confirm the detail of Intrusion Event.
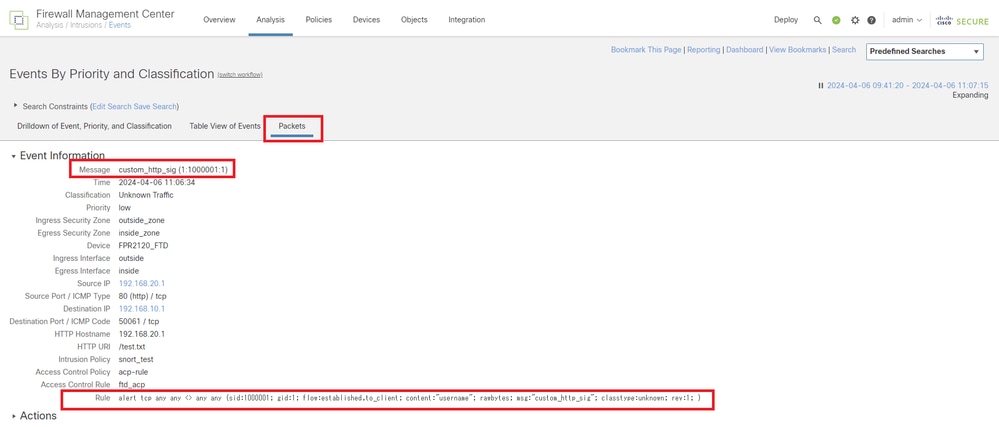 Detail of Intrusion Event
Troubleshoot
Run system support trace command to confirm the behavior on FTD. In this example, the HTTP traffic is blocked by the IPS rule (gid 1, sid 1000001).
> system support trace

Enable firewall-engine-debug too? [n]: y
Please specify an IP protocol: tcp
Please specify a client IP address: 192.168.10.1
Please specify a client port:
Please specify a server IP address: 192.168.20.1
Please specify a server port:

192.168.20.1-80 - 192.168.10.1-50075 6 AS 1-1 CID 0 Firewall: allow rule, 'ftd_acp', allow
192.168.20.1-80 - 192.168.10.1-50075 6 AS 1-1 CID 0 IPS Event: gid 1, sid 1000001, drop

192.168.20.1-80 - 192.168.10.1-50075 6 AS 1-1 CID 0 Snort id 3, NAP id 2, IPS id 1, Verdict BLOCKFLOW
192.168.20.1-80 - 192.168.10.1-50075 6 AS 1-1 CID 0 ===> Blocked by IPS


 Feedback