Update Secure Malware Analytics Appliance Air-Gap Mode
Available Languages
Download Options
Bias-Free Language
The documentation set for this product strives to use bias-free language. For the purposes of this documentation set, bias-free is defined as language that does not imply discrimination based on age, disability, gender, racial identity, ethnic identity, sexual orientation, socioeconomic status, and intersectionality. Exceptions may be present in the documentation due to language that is hardcoded in the user interfaces of the product software, language used based on RFP documentation, or language that is used by a referenced third-party product. Learn more about how Cisco is using Inclusive Language.
Contents
Introduction
This guide outlines the procedures for updating a Secure Malware Analytics Appliance in air-gap mode.
Note:Maintaining appliances in air-gap mode can diminish their effectiveness. Consider the trade-off between security and functionality before proceeding.
Prerequisites
Cisco recommends that you have knowledge of these topics:
- Basic knowledge of inputs through command line in Windows and Unix/Linux Environment
- Knowledge of Malware Analytic Appliance
- Knowledge of Cisco Integrated Management Controller (IMC)
Components Used
Cisco recommends familiarity with the following topics:
- Windows 10 and Linux based OS (For example: CentOS, RedHat)
- RUFUS 2.17
- C220 M4, M510 and M520 M5, M610 and M620 M6 (appliance models)
Information in this document is based on devices in a controlled lab environment with default configurations. If your network is live, exercise caution and thoroughly understand the potential implications of any commands before proceeding.
Background Information
Most Secure Malware Analytics appliances connect to the internet and use the online update process. However, some appliances are maintained strictly within internal networks (air-gapped). Cisco does not recommend this approach as it reduces effectiveness. This guide provides the offline update process for those who must maintain air-gapped appliances.
For offline Secure Malware Analytics updates, Cisco provides update media upon request. Follow the offline update process outlined in this document.
Media: Airgap (offline) update media isprovided by Secure Malware Analytics Support upon request. It's an ISO file that can be copied to a USB drive or HDD (with sufficient size).
Size:The size of the update media varies based on the supported versions and can increase significantly with the introduction of new virtual machines. For current releases, the size is approximately 30 GB including the desync tool, which enables incremental updates for VM-related changes.
Upgrade Boot Cycle: Each time the airgap update media is booted, it determines the next release to upgrade to, and copies the content associated with that next release onto the appliance. A given release may also initiate a package installation if that release does not have any prerequisite checks that must be run while the appliance is running. If the release includes such checks or an override to portions of the update process that could add such checks, then the update does not actually apply until the user logs into OpAdmin and invokes the update with OpAdmin > Operations > Update Appliance.
Pre-Installation Hooks: Depending on whether any pre-installation hooks are present for that specific upgrade, it either runs the upgrade immediately or reboots the appliance back into its regular operating mode to allow the user to enter the usual administrative interface and start that upgrade by hand.
Repeat As Needed: Each such media boot cycle thus upgrades (or prepares to upgrade) only one step towards the eventual target release; the user must boot as many times as necessary to upgrade to the desired destination release.
Limitations
CIMC media is not supported for air-gapped updates.
Due to licensing constraints on 3rd-party components used, upgrade media for 1.x releases does no longer be available after UCS M3 hardware has hit EOL (end-of-life). It is thus critical that UCS M3 appliances either be replaced or upgraded prior to EOL.
Requirements
Migrations: If the release notes for releases covered include scenarios where it is mandatory for migration to take place before the next version is installed, the user must follow these steps before rebooting again to avoid putting their appliance in an unusable state.
Note:The first 2.1.x release newer than 2.1.4, in particular, runs several database migrations. It is unsafe to continue until these migrations are complete. For more information, see the Threat Grid Appliance 2.1.5 Migration Note.
If starting from a release prior to 2.1.3, airgap upgrade media uses an encryption key derived from the individual license and thus needs to be customized on a per appliance basis. (The only user-visible effect is that with media built to support pre-2.1.3 origin versions, Secure Malware Analytics needs the licenses installed on those appliances beforehand, and the media won't work on any appliances not in the list for which it was built.)
If starting with release 2.1.3 or after, the airgap media is generic and customer information is not needed.
Before You Begin
- Backup. You must consider backing up your appliance before you proceed with the update.
- Review the Release Notes for the release to update to verify if there are any background migrations required before you plan to update to the newer release
- Verify the current version of your appliance: OpAdmin > Operations > Update Appliance
- Review the Secure Malware Analytics appliance version history in the Build Number/Version Lookup Table, which is available in all Threat Grid appliance documents: Release Notes, Migration Notes, Setup and Configuration Guide, and Administrator's Guide.
Update an Offline (Airgapped) Secure Malware Analytics Appliance
First check available Air Gapped version at this page: Appliance Version Lookup Table
1. Open up a TAC Support Request to get the Offline Update Media. This request should include the appliance serial number as well as the appliance build number.
2. TAC Support supply an updated ISO based on your installation.
3. Burn the ISO image to a bootable USB. Note that USB is the only supported device/method for offline updates.
Naming Conventions
This is the updated filename ex: TGA Airgap Update 2.16.2-2.17.2.
This would mean that this media can be used for an appliance running a minimum version: 2.16.2 and upgrade the appliance to version: 2.17.2.
Limitations
- CIMC media is not supported for air-gapped updates.
- Due to licensing constraints on 3rd-party components used, upgrade media for 1.x releases are no longer be available after UCS M3 hardware has hit EOL (end-of-life). It is thus critical that UCS M3 appliances either be replaced or upgraded prior to EOL.
Linux/MAC - ISO Download
Requirements
Cisco recommends that you have knowledge of these topics:
- A Linux machine with internet access to download the ISO and create the bootable USB install drive.
- The Airgap Download Instructions are provided by Secure Malware Analytics Support.
- GO Programming language. Download
- The .caibx index file (Included in the zip file provided by TAC Support).
- Desync Tool (Included in the zip file provided by Secure Malware Analytics Support).
Components Used
The information in this document is based on a Linux based OS (For example: CentOS, RedHat).
Information in this document is based on devices in a controlled lab environment with default configurations. If your network is live, exercise caution and thoroughly understand the potential implications of any commands before proceeding.
Configure
Install the GO Programming Language
# wget https://go.dev/dl/go1.23.1.linux-amd64.tar.gz
# tar -xzf go1.23.1.linux-amd64.tar.gz
# mv go /usr/local
Run these three commands after the install, if not the desync command fails
# export GOROOT=/usr/local/go
# export GOPATH=$HOME/Projects/Proj1
# export PATH=$GOPATH/bin:$GOROOT/bin:$PATH
You can verify the GO Version by:
# go version
Download the ISO using the Desync Command
Step 1. Copy the contents of the Zip File provided by Secure Malware Analytics Support including the desync.linux and .caibx file in the same directory locally on the machine.
Step 2. Change to the directory to where you stored the files:
Example:
# cd MyDirectory/TG
Step 3. Run the pwd command to ensure that you are inside the directory.
# pwd
Step 4. Once you are inside the directory that includes the desync.linux command and .caibx file, run the command of your choice to begin the download process.
Note: These are the examples for different ISO versions, please reference the .caibx file from the instructions provided by Secure Malware Analytics Support.
For version 2.16.2 to 2.17.2 ISO:
# desync extract -k -s s3+https://s3.amazonaws.com/sma-appliance-airgap-update airgap-update-2.16.2ag-2.17.2.caibx airgap-update-2.16.2ag-2.17.2.isoFor version 2.4.3.2 to 2.5 ISO:
# desync extract -k -s s3+https://s3.amazonaws.com/threatgrid-appliance-airgap-update airgap-update-2.4.3.2-2.5.caibx airgap-update-2.4.3.2-2.5.iso
For version 2.5 to 2.7.2ag ISO:
# desync extract -k -s s3+https://s3.amazonaws.com/threatgrid-appliance-airgap-update airgap-update-2.5-2.7.2ag.caibx airgap-update-2.5-2.7.2ag.iso
Once the download starts, a progress bar is shown.
Note: The download speed and the size of the upgrade media in your environment can impact the time to compose the ISO.
Please make sure to compare the MD5 of the downloaded file to the one available with the bundle provided by support to make validate the integrity of the downloaded ISO.
Once the download is completed, the ISOs are created in the same directory.
Plugin the USB to the machine and run the dd command to create the bootable USB Drive.
# dd if=airgap-update.iso of=/dev/<MY_USB> bs=64M
Where <MY_USB> is the name of your USB key (leave off the angle brackets).
Insert the USB drive and turn on or reboot the appliance. At the Cisco boot up screen, press F6 to enter the Boot Menu.
Tip:
Run the download after office hours or off-peak hours as it might affect bandwidth.
In order to stop the tool, either close the terminal or press Ctrl+c/Ctrl+z.
In order to continue, run the same command to resume the download.
Windows - ISO Download
Install the GO Programming Language
- Download required GO programming language. Install from https://golang.org/dl/ In my case I pick the Featured Version. Restart your CMD and test with
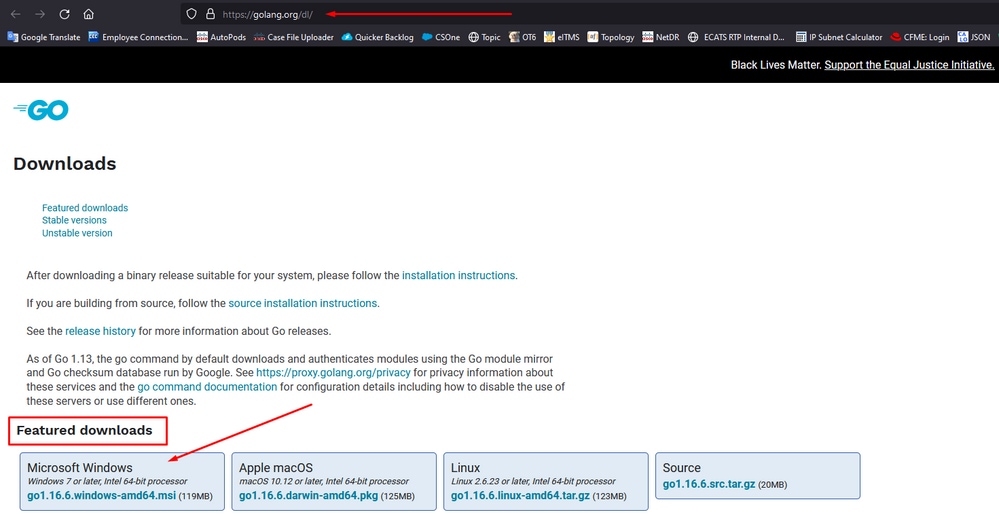
Close and re-open CMD run command to verify:
go version

Download the ISO using the Desync Command
- Install the DESYNC tool. After the execution of the command, you can notice a bunch of download prompts. Roughly after 2-3 minutes, the download should be done.
go install github.com/folbricht/desync/cmd/desync@latest
In case desync is not working using above command then change directory to C drive and run this command:

git clone https://github.com/folbricht/desync.git
Note: If git command is not working then you could download and install Git from here : https://git-scm.com/download/win.
Then run below two commands one by one :
cd desync/cmd/desync

go install
- Navigate to go -- > bin location. For instance C:\Users\<username>\go\bin and copy/paste there TAC provided .caibx index file.

- (Verify) Go back to your CMD prompt and navigate to the folder go\bin and run the download commands. You should immediately see the download proceed. Wait for the download to complete. You should now have the entire .ISO file in the same location as the previously copied .caibx index file
\$HOME/go/bin/desync extract -k -s s3+https://s3.amazonaws.com/sma-appliance-airgap-update airgap-update-2.16.2ag-2.17.2.caibx airgap-update-2.16.2ag-2.17.2.iso
For creating this specific recovery USB, it's crucial to use Rufus version 2.17, as it allows you to use essential dd options. You can find all RUFUS versions in this repository.

Boot Appliance from USB
- Insert the USB, reboot the appliance, and quickly press F6 at the Cisco boot screen to enter the Boot Menu.
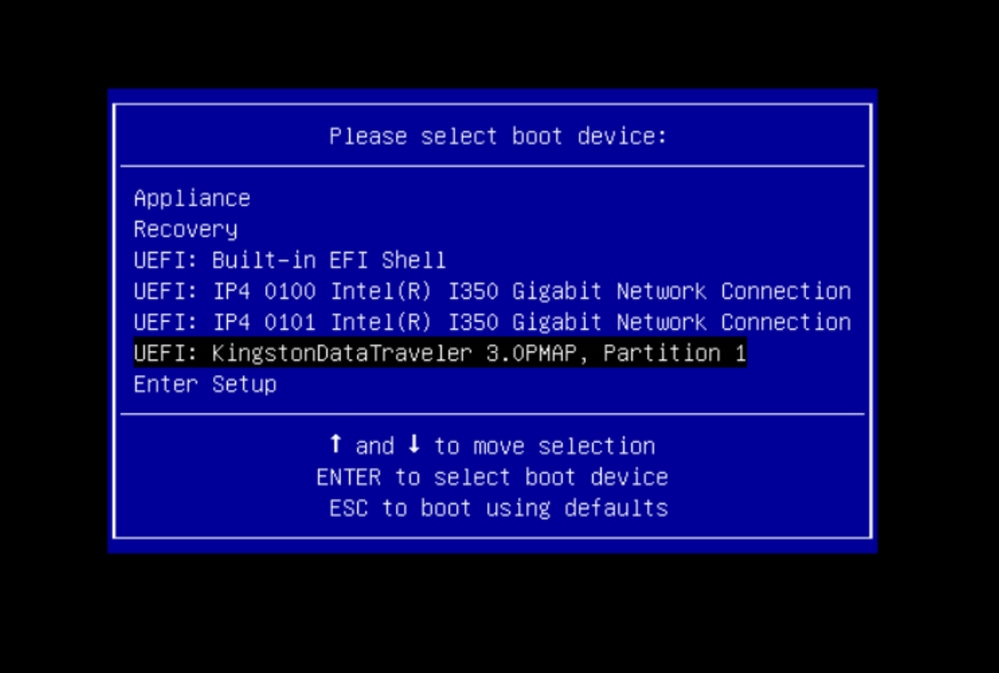
- Navigate to the USB drive containing the update and press Enter to select.

The update media determines the next release in the upgrade path and copies the content for that release onto the appliance. The appliance either runs the upgrade immediately or reboot back into its regular operating mode to allow you to enter OpAdmin and start that upgrade manually.
Once the ISO boot process is completed, reboot the Secure Malware Analytics appliance back into operation mode.
Log into the portal UI and check for any warnings that speak to whether it's safe to upgrade, etc., before proceeding.
- Navigate to the OpAdmin interface and apply the updates, if they were not automatically applied during the reboot: OpAdmin > Operations > Update Appliance NOTE: The update process includes additional reboots as a part of the update, which is made off of the USB media. For example, it's necessary to use the Reboot button on the installation page after updates are installed.
Repeat as needed for each version on the USB.
How to find the correct /dev device
With the USB still not connected to the endpoint run the command "lsblk | grep -iE 'disk|part'.
xsilenc3x@Alien15:~/testarea/usb$ lsblk | grep -iE 'disk|part'
sda           8:0    0 931.5G  0 disk
├─sda1        8:1    0   128M  0 part
└─sda2        8:2    0 931.4G  0 part /media/DATA
nvme0n1     259:0    0 238.5G  0 disk
├─nvme0n1p1 259:1    0   650M  0 part
├─nvme0n1p2 259:2    0   128M  0 part
├─nvme0n1p3 259:3    0 114.1G  0 part
├─nvme0n1p4 259:4    0   525M  0 part /boot
├─nvme0n1p5 259:5    0   7.6G  0 part [SWAP]
├─nvme0n1p6 259:6    0  38.2G  0 part /
├─nvme0n1p7 259:7    0  62.7G  0 part /home
├─nvme0n1p8 259:8    0  13.1G  0 part
└─nvme0n1p9 259:9    0   1.1G  0 part
xsilenc3x@Alien15:~/testarea/usb$
After the USB stick is connected.
xsilenc3x@Alien15:~/testarea/usb$ lsblk | grep -iE 'disk|part'
.sda           8:0    0 931.5G  0 disk
├─sda1        8:1    0   128M  0 part
└─sda2        8:2    0 931.4G  0 part /media/DATA
sdb           8:16   1   3.7G  0 disk
└─sdb1        8:17   1   3.7G  0 part /media/xsilenc3x/ARCH_201902  <--------- not observed when the USB was not connected
nvme0n1     259:0    0 238.5G  0 disk
├─nvme0n1p1 259:1    0   650M  0 part
├─nvme0n1p2 259:2    0   128M  0 part
├─nvme0n1p3 259:3    0 114.1G  0 part
├─nvme0n1p4 259:4    0   525M  0 part /boot
├─nvme0n1p5 259:5    0   7.6G  0 part [SWAP]
├─nvme0n1p6 259:6    0  38.2G  0 part /
├─nvme0n1p7 259:7    0  62.7G  0 part /home
├─nvme0n1p8 259:8    0  13.1G  0 part
└─nvme0n1p9 259:9    0   1.1G  0 part
xsilenc3x@Alien15:~/testarea/usb$
This confirms the USB device in /dev is "/dev/sdb".
Other ways to confirm, after the USB stick is connected :
The command dmesg provides some information. After the USB is connected run the command dmesg | grep -iE 'usb|attached'.
xsilenc3x@Alien15:~/testarea/usb$ dmesg | grep -iE 'usb|attached'
[842717.663757] usb 1-1.1: new high-speed USB device number 13 using xhci_hcd
[842717.864505] usb 1-1.1: New USB device found, idVendor=0781, idProduct=5567
[842717.864510] usb 1-1.1: New USB device strings: Mfr=1, Product=2, SerialNumber=3
[842717.864514] usb 1-1.1: Product: Cruzer Blade
[842717.864517] usb 1-1.1: Manufacturer: SanDisk
[842717.864519] usb 1-1.1: SerialNumber: 4C530202420924105393
[842717.865608] usb-storage 1-1.1:1.0: USB Mass Storage device detected
[842717.866074] scsi host1: usb-storage 1-1.1:1.0
[842718.898700] sd 1:0:0:0: Attached scsi generic sg1 type 0
[842718.922265] sd 1:0:0:0: [sdb] Attached SCSI removable disk  <-------
xsilenc3x@Alien15:~/testarea/usb$
The command fidsk provides information about the size, which can be used to confirm: sudo fdisk -l /dev/sdb.
xsilenc3x@Alien15:~/testarea/usb$ sudo fdisk -l /dev/sdb
Disk /dev/sdb: 3.7 GiB, 4004511744 bytes, 7821312 sectors  <-------
Units: sectors of 1 * 512 = 512 bytes
Sector size (logical/physical): 512 bytes / 512 bytes
I/O size (minimum/optimal): 512 bytes / 512 bytes
Disklabel type: dos
Disk identifier: 0x63374e06

Device     Boot Start    End Sectors  Size Id Type
/dev/sdb1  *        0 675839  675840  330M  0 Empty
/dev/sdb2         116   8307    8192    4M ef EFI (FAT-12/16/32)
xsilenc3x@Alien15:~/testarea/usb$Note: Remember to unmount the USB before the execution of the "dd" command.
Confirmation the USB device from the example is mounted.
xsilenc3x@Alien15:~/testarea/usb$ sudo mount -l | grep -i sdb
/dev/sdb1 on /media/xsilenc3x/ARCH_201902 type vfat (rw,nosuid,nodev,relatime,uid=1000,gid=1000,fmask=0022,dmask=0022,codepage=437,iocharset=iso8859-1,shortname=mixed,showexec,utf8,flush,errors=remount-ro,uhelper=udisks2) [ARCH_201902]
In order to unmount the USB device use sudo umount /dev/sdb1.
xsilenc3x@Alien15:~/testarea/usb$ sudo umount /dev/sdb1Re-check the device is not perceived as "mounted".
xsilenc3x@Alien15:~/testarea/usb$ sudo mount -l | grep -i sdbstatus=progress option
oflag=sync and status=progress options in the dd command.
When writing numerous data blocks the "status=progress" option provides information of the current writing operations. This is useful to confirm if the "dd" command is currently writing to the page cache; it can be used to show the progress and the complete amount of time in seconds of all the writing operations.
When not used, "dd" does not provide information about the progress, only the results of the writing operations is provided before "dd" returns:
[rootuser@centos8-01 tga-airgap]$ dd if=/dev/zero of=testfile.txt bs=1M count=8192
8192+0 records in
8192+0 records out
8589934592 bytes (8.6 GB, 8.0 GiB) copied, 5.03493 s, 1.7 GB/s
[rootuser@centos8-01 tga-airgap]$
When used, real-time information about the writing operations is updated every second.
[rootuser@centos8-01 tga-airgap]$ dd if=/dev/zero of=testfile.txt bs=1M count=8192 status=progress
8575254528 bytes (8.6 GB, 8.0 GiB) copied, 8 s, 1.1 GB/s <----------------
8192+0 records in
8192+0 records out
8589934592 bytes (8.6 GB, 8.0 GiB) copied, 8.03387 s, 1.1 GB/s
[rootuser@centos8-01 tga-airgap]Note: In the official documentation for the TGA offline upgrade process the command that is informed is : dd if=airgap-update.iso of=/dev/<MY_USB> bs=64M
After some tests, the following example is observed.
Once a file is created of 10MB with "dd" using the device /dev/zero.
1M x 10 = 10M (10240 kB + previous system data in dirty file page caches = 10304 kB --> this is what is perceived in the dirty page cache at the end of "dd").
[rootuser@centos8-2 testarea]$ cat /proc/meminfo | grep -iE 'dirty' && dd if=/dev/zero of=testfile.txt bs=1M \
count=10 status=progress && cat /proc/meminfo | grep -iE 'dirty' && date +%s
Dirty:                92 kB
10+0 records in
10+0 records out
10485760 bytes (10 MB, 10 MiB) copied, 0.0138655 s, 756 MB/s
Dirty:             10304 kB <----- dirty page cache after "dd" returned | data still to be written to the block device
1633260775 <---- epoch time
[rootuser@centos8-2 testarea]$ cat /proc/meminfo | grep -iE 'dirty' && date +%s
Dirty:             10372 kB
1633260778
[rootuser@centos8-2 testarea]$ cat /proc/meminfo | grep -iE 'dirty' && date +%s
Dirty:             10380 kB
1633260779
[rootuser@centos8-2 testarea]$ cat /proc/meminfo | grep -iE 'dirty' && date +%s
Dirty:             10404 kB
1633260781
[rootuser@centos8-2 testarea]$ cat /proc/meminfo | grep -iE 'dirty' && date +%s
Dirty:             10412 kB
1633260782
[rootuser@centos8-2 testarea]$ cat /proc/meminfo | grep -iE 'dirty' && date +%s
Dirty:             10424 kB
1633260783
[rootuser@centos8-2 testarea]$ cat /proc/meminfo | grep -iE 'dirty' && date +%s
Dirty:             10436 kB
1633260785
[rootuser@centos8-2 testarea]$ cat /proc/meminfo | grep -iE 'dirty' && date +%s
Dirty:                 0 kB  <--- data in the dirty page cache flushed = written to the block device
1633260786 <---- epoch time
[rootuser@centos8-2 testarea]$
```

1633260786 - 1633260775 = 11 secondsNote: After the "dd" command returned, the writing operation to the block device was not completed, it was perceived 11 seconds after the return.
If this was the "dd" command when creating the bootable USB with the TGA ISO, AND I had removed the USB from the endpoint before those 11 seconds = I would have a corrupted ISO in the bootable USB.
Explanation:
Block devices provide buffered access to hardware devices. This provides a layer of abstraction to applications when working with hardware devices.
Block devices allow an application to read/write by data blocks of different sizes; this read()/writes() is applied on the page caches (buffers) and not directly on the block device.
The kernel ( and not the application doing the read/write ) manages the movement of data from the buffers (page caches) to the block devices.
Therefore:
The application (in this case "dd") does not have control over the flush of the buffers if is not instructed to.
The option "oflag=sync" forces synchronous physical writing (by the kernel) after each output block (provided by "dd") is placed in the page cache.
oflag=sync degrades the "dd" performance when compared to not using the option; but, if it is enabled it ensures a physical write to the block device after each write() call from "dd".
Test : Using the "oflag=sync" option of the "dd" command to confirm all writing operations with the dirty page cache data was completed at the return of the "dd" command:
[rootuser@centos8-2 testarea]$ cat /proc/meminfo | grep -iE 'dirty' && dd if=/dev/zero of=testfile.txt bs=1M \
count=10 oflag=sync status=progress && cat /proc/meminfo | grep -iE 'dirty' && date +%s
Dirty:                60 kB
10+0 records in
10+0 records out
10485760 bytes (10 MB, 10 MiB) copied, 0.0841956 s, 125 MB/s
Dirty:                68 kB <---- No data remaining in the dirty page cache after "dd" returned
1633260819
[rootuser@centos8-2 testarea]$ cat /proc/meminfo | grep -iE 'dirty' && date +%s
Dirty:                36 kB
1633260821
[rootuser@centos8-2 testarea]$
No data remains from the writing operation in the dirty page cache.
The write operation was applied before (or at the same instant) the "dd" command returned (not 11 seconds after as the previous test).
Now I am sure that after the "dd" command returned there was no data in the dirty page cache related to the writing operation = no problems in the bootable USB creation (if the ISO checksum is correct).
Note: Have into consideration this flag (oflag=sync) of the "dd" command when working on this type of case.
Boot Sequence for HDD Drives for Offline Upgrades
Requirement:
We need to ensure that the HDD is formatted using the “DD” option using any tool available and the media should be copied afterward to the drive. If we do not use this formatting, we would not be able to read this media.
Once, we have the Media loaded on the HDD/USB using the “DD” formatting, we need to connect that to the TGA Appliance and restart the device.
This is the default Boot Menu selection screen. We need to press “F6” to boot the device to select the boot media
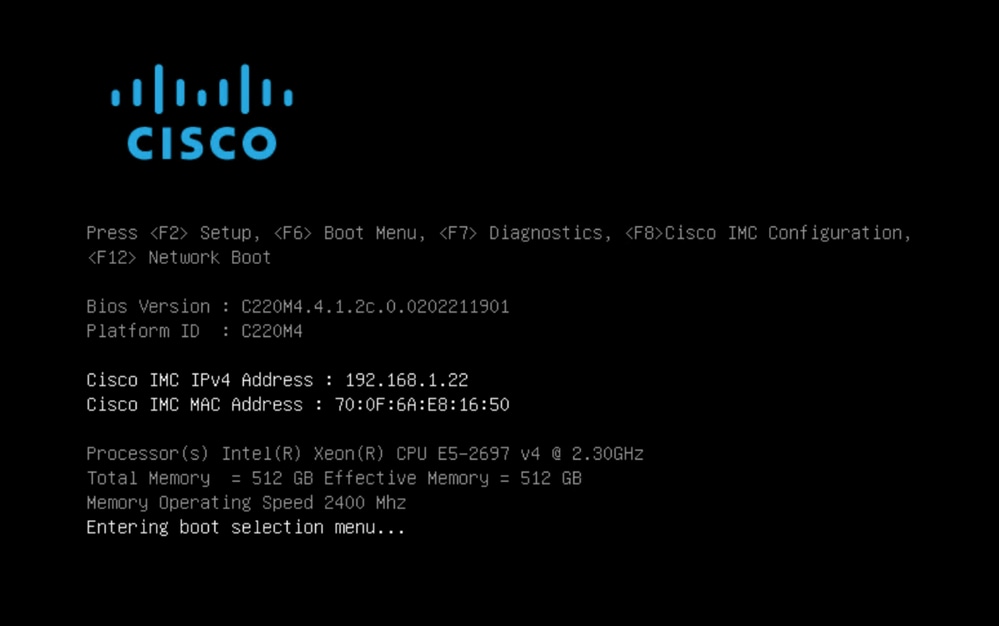
Once the device recognizes our input, it would prompt that the device would enter the boot selection menu.
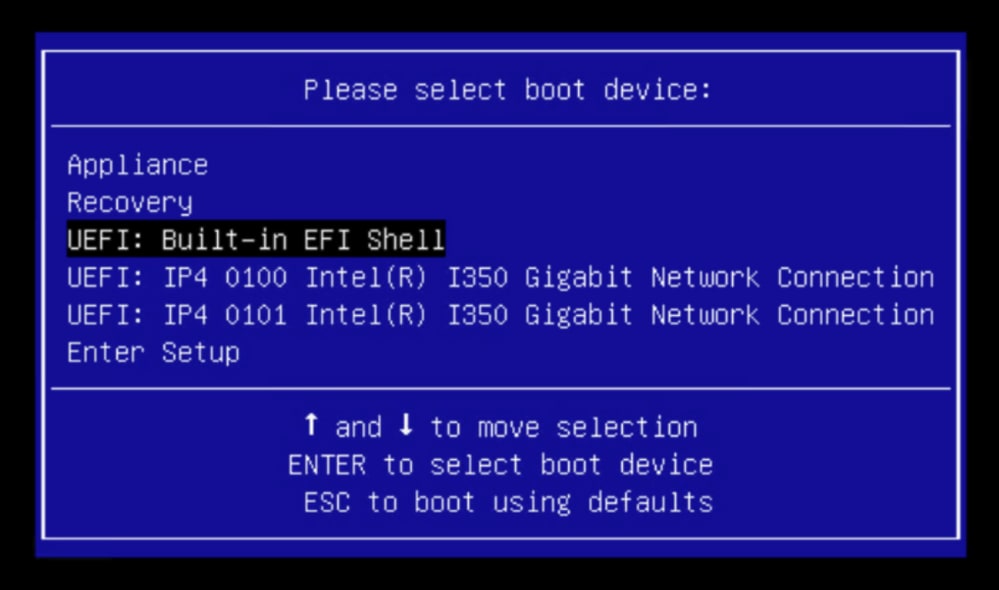
This is the prompt that can differ between different TGA Models. Ideally, we would see the option to boot using the boot media (upgrade filesystem) from this menu itself but if it is not seen, we need to log into the “EFI Shell”.
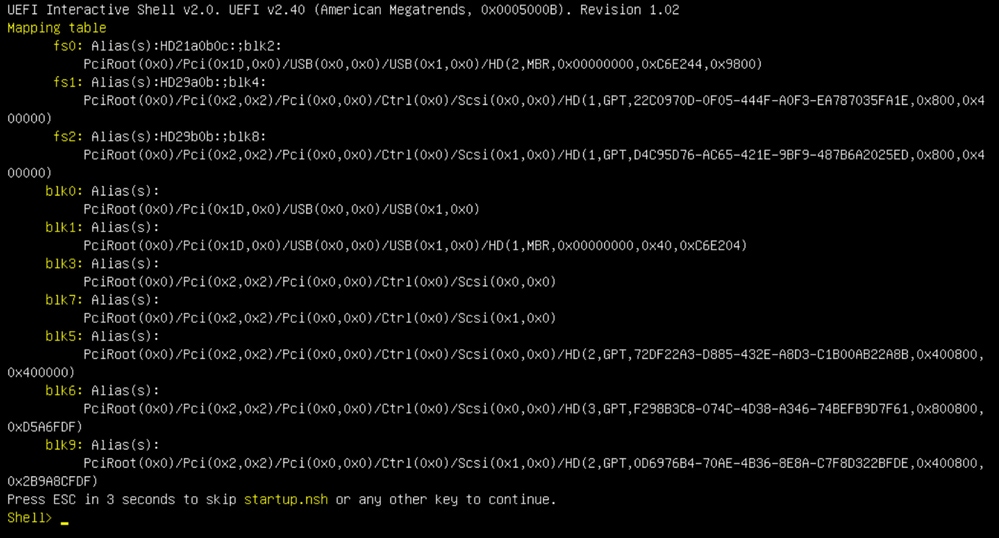
You would have to press "ESC" before the "startup.sh" script finishes to move into the EFI Shell. Once, we log into the EFI Shell, we would notice that the partitions detected in this case are 3 Filesystems: fs0:, fs1:, fs2.

Important
Identifying the correct filesystem:
- As per the above screenshot, you would be able to see that “fs0:” is the only media with “USB” in their path and hence we can be confident that this filesystem would contain the boot media (upgrade filesystem).
In case of missing filesystems:
- If only fs0: and fs1: are available and there is no fs2:, verify that the boot media (upgrade filesystem)was written in dd mode and is successfully connected.
- Boot media (upgrade filesystem) should always have a lower number than the recovery media, and they should always be next to each other; it's whether the USB-attached drive is at the beginning of the end that is likely to change (so, whether it takes the front position at fs0: or the back position at fs2:) would need to be identified
- In this case in the screenshot below, is the correct “.efi” file as it is under the “\efi\boot” partition and has the naming convention of “bootx64.efi”
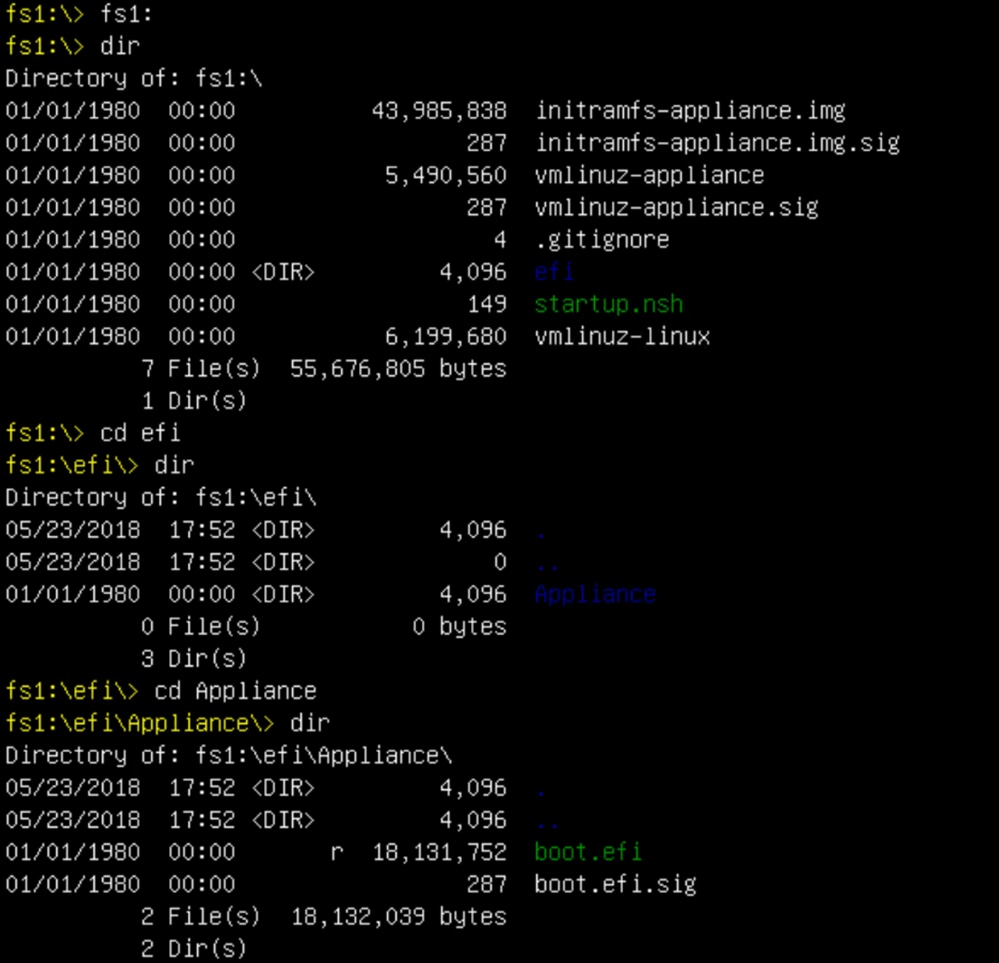
In order to boot the device in the boot media (upgrade filesystem), we must execute the “bootx64.efi” file:
fs0:\efi\boot\bootx64.efi
For your reference, we have displayed the contents of the other filesystems as well below:
fs1: This is the main boot filesystem.
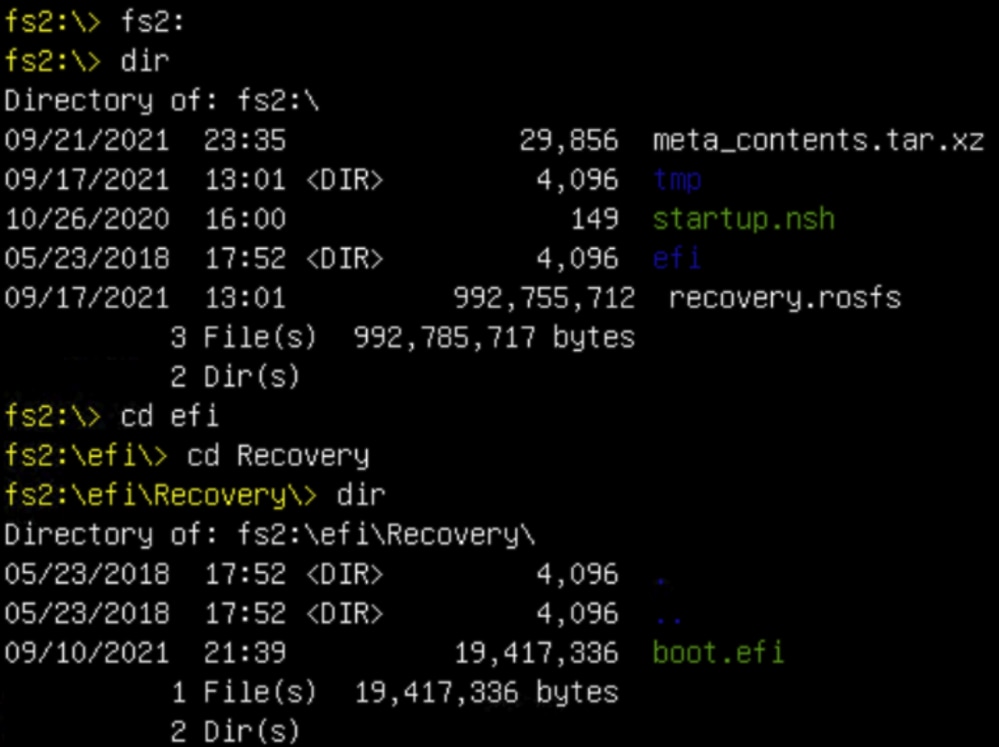
fs2: This is the Recovery image boot filesystem.
Miscellaneous Instructions:
To verify the correct filesystem which contains the mounted boot media. We can do so by browsing the different filesystems and verify the “.efi” boot file
Note: The sequence of the actual boot media (upgrade filesystem) which in this case is “fs0:” can also vary with other devices.
The name and path might vary but in all the modern images, this should be the same.
Checklist which can help to locate the correct boot media (upgrade filesystem):
- If the root of a filesystem contains “vmlinuz-appliance”, it is not the boot media (upgrade filesystem).
- If the root of a filesystem contains “meta_contents.tar.xz”, it is not the boot media (upgrade filesystem).
- If a filesystem does not contain “efi\boot\bootx64.efi”, it is not the boot media (upgrade filesystem).
Revision History
| Revision | Publish Date | Comments |
|---|---|---|
3.0 |
18-Sep-2024 |
Instructions were updated on this document |
2.0 |
09-Nov-2021 |
Initial Release |
1.0 |
08-Nov-2021 |
Initial Release |
Contributed by Cisco Engineers
- Roman ValentaCisco TAC Engineer
- Edited by Yeraldin SanchezCisco TAC Engineer
Contact Cisco
- Open a Support Case

- (Requires a Cisco Service Contract)
 Feedback