Configure Custom URL Categories in Secure Web Appliance
Available Languages
Download Options
Bias-Free Language
The documentation set for this product strives to use bias-free language. For the purposes of this documentation set, bias-free is defined as language that does not imply discrimination based on age, disability, gender, racial identity, ethnic identity, sexual orientation, socioeconomic status, and intersectionality. Exceptions may be present in the documentation due to language that is hardcoded in the user interfaces of the product software, language used based on RFP documentation, or language that is used by a referenced third-party product. Learn more about how Cisco is using Inclusive Language.
Contents
Introduction
This document describes the structure of Custom Uniform Resource Locator (URL) Categories, in Secure Web Appliance (SWA).
Prerequisites
Requirements
Cisco recommends that you have knowledge of these topics:
- How proxy works.
- Secure Web Appliance (SWA) administration.
Cisco recommends that you have:
- Physical or Virtual Secure Web Appliance (SWA) Installed.
- License activated or installed.
- The setup wizard is completed.
- Administrative Access to the SWA.
Components Used
This document is not restricted to specific software and hardware versions.
The information in this document was created from the devices in a specific lab environment. All of the devices used in this document started with a cleared (default) configuration. If your network is live, ensure that you understand the potential impact of any command.
Custom URL Categories
The URL filter engine lets you filter transactions in Access, Decryption, and Data Security Policies. When you configure URL categories for policy groups, you can configure actions for custom URL categories, if any are defined, and predefined URL categories.
You can create custom and external live-feed URL categories that describe specific Host Names and Internet Protocol (IP) Addresses. In addition, you can edit and delete URL categories.
When you include these custom URL categories in the same Access, Decryption, or Cisco Data Security Policy group and assign different actions to each category, the action of the higher included custom URL category takes precedence.
Note: If Domain Name System (DNS) resolves several IPs to a website, and if one of those IPs is custom blocked list, then the Web Security Appliance blocks the website for all IPs, irrespective of they not listed in the custom blocked list.
Live-feed URL Categories
External Live Feed Categories are used to pull the list of URLs from specific site, for example to fetch the Office 365 URLs from Microsoft.
If you select External Live Feed Category for the Category Type when Creating and Editing Custom and External URL Categories, you must select the feed format (Cisco Feed Format or Office 365 Feed Format) and then provide a URL to the appropriate feed-file server.
Here are the expected format for each feed file:
- Cisco Feed Format – This must be a comma-separated values (.csv) file; that is, a text file with a .csv extension. Each entry in the .csv file must be on a separate line, formatted as address/comma/address type
(for example: www.cisco.com,site or ad2.*\.com,regex). Valid address types are site and regex.
Here is an excerpt from a Cisco Feed Format .csv file:
www.cisco.com,site
\.xyz,regex
ad2.*\.com,regex
www.cisco.local,site
1:1:1:11:1:1::200,site - Office 365 Feed Format – This is an XML file located on a Microsoft Office 365 server, or a local server to which you saved the file. It is provided by the Office 365 service and cannot be modified.
The network addresses in the file are enclosed by XML tags, this structure: products > product > address list > address. In the current implementation, an "address list type" can be IPv6, IPv4, or URL [which can include domains and Regular Expressions (regex) patterns].
Here is a snippet of an Office 365 feed file:
<products updated="4/15/2016">
<product name="o365">
<addresslist type="IPv6">
<address>fc00:1040:401::d:80</address>
<address>fc00:1040:401::a</address>
<address>fc00:1040:401::9</address>
</addresslist>
<addresslist type="IPv4">
<address>10.71.145.72</address>
<address>10.71.148.74</address>
<address>10.71.145.114</address>
</addresslist>
<addresslist type="URL">
<address>*.cisco.com</address>
<address>*.example.local</address>
</addresslist>
</product>
<product name="LYO">
<addresslist type="URL">
<address>*.subdomain.cisco.com</address>
<address>*.example.local</address>
</addresslist>
</product>
</products>Note: Do not include http:// or https:// as part of any site entry in the file, or an error occur. In other words, www.cisco.com is parsed correctly, while http://www.cisco.com produces an error
Steps to Create Custom URL Categories
Step 1. Choose Web Security Manager > Custom and External URL Categories.
 image- Select custom Category in GUI
Step 2. To create a custom URL category, click Add Category. To edit a custom URL category, click the name of the URL category.
 image- add category from GUI
Step 3. Provide these information:
- Category Name: Enter an identifier for this URL category. This name appears when you configure URL filter for policy groups.
- List Order: Specify the order of this category in the list of custom URL categories. Enter “1” for the first URL category in the list.
The URL filter engine evaluates a client request against the custom URL categories in the order specified.
Note: When the URL filter engine matches a URL category to the URL in a client request, it first evaluates the URL against the custom URL categories included in the policy group. If the URL in the request does not match an included custom category, the URL filter engine compares it to the predefined URL categories. If the URL does not match any included custom or predefined URL categories, the request is un-categorized.
- Category Type: Choose Local Custom Category or External Live Feed Category.
- Routing Table: Choose Management or Data. This choice is available only if “split routing” is enabled; that is, it is not available with local custom categories.
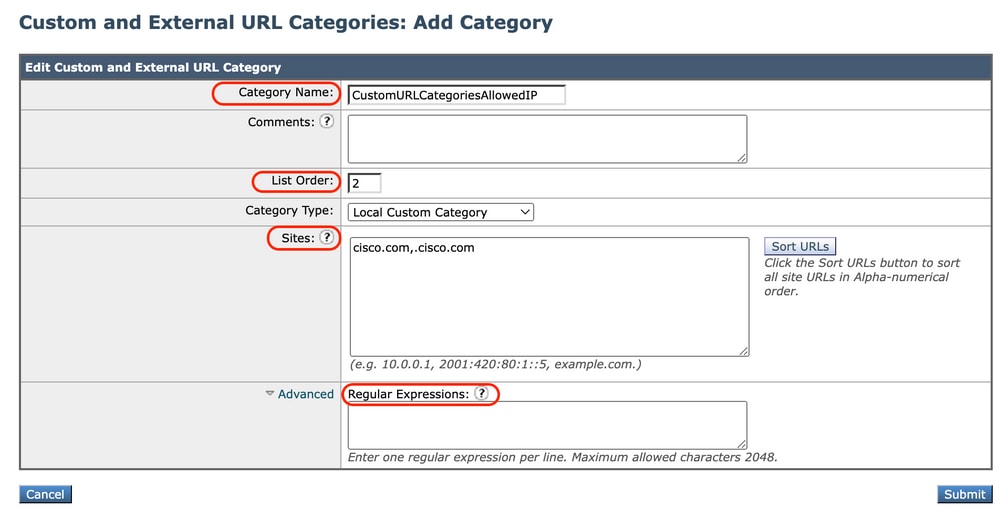 image- Local custom URL category image- Local custom URL category |
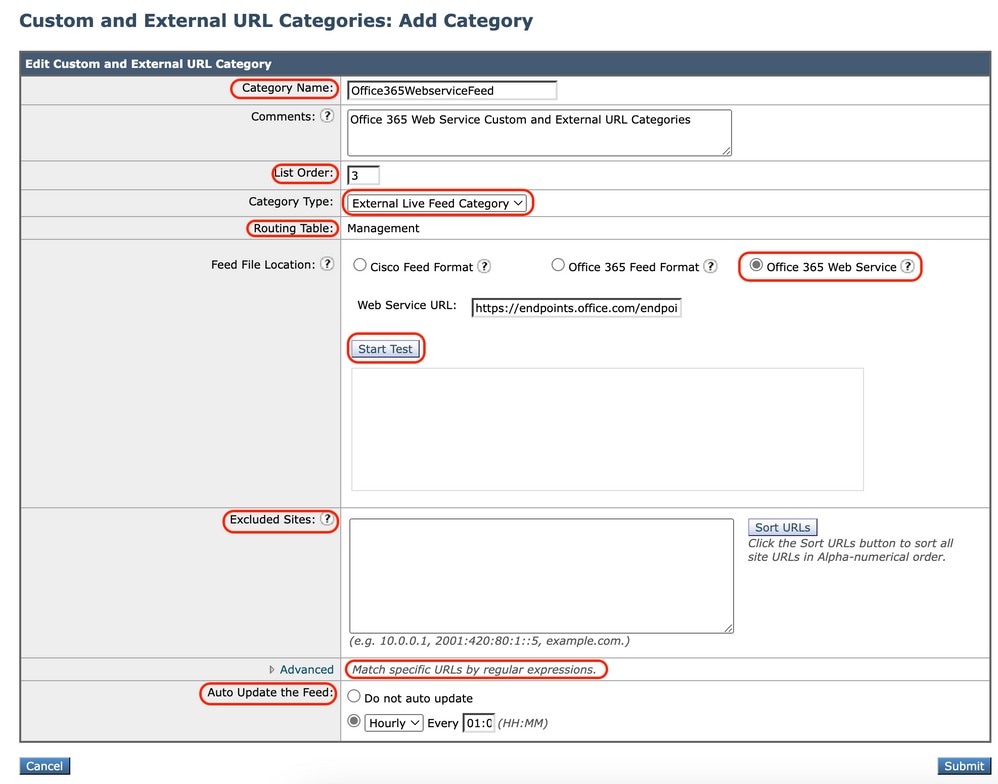 Image- Custom Url category configure Feeds Image- Custom Url category configure Feeds |
| Local Custom Category | External Live Feed Category |
Define Use Regular Expressions
The Secure Web Appliance uses a regular expression syntax that differs slightly from the regular expression syntax used by other Velocity pattern-matching engine implementations.
Further, the appliance does not support a backward slash to escape a forward slash. If you need to use a forward slash in a regular expression, simply type the forward slash without a backward slash.
Note: Technically, AsyncOS for Web uses the Flex regular expression analyzer
To test your regular Expressions you can use this link : flex lint - Regex Tester/Debugger
Caution: Regular expressions that return more that 63 characters fail and produce an invalid-entry error. Please be sure to form regular expressions that do not have the potential to return more than 63 characters
Caution: Regular expressions that perform extensive character match consume resources and can affect system performance. For this reason, regular expressions can be cautiously applied.
You can use regular expressions in these locations:
• Custom URL categories for Access Policies. When you create a custom URL category to use with Access Policy groups, you can use regular expressions to specify multiple web servers that match the pattern you enter.
• Custom user agents to block. When you edit the applications to block for an Access Policy group, you can use regular expressions to enter specific user agents to block.
Tip: You cannot set the web proxy bypass for Regular Expressions.
here is the List of Character Classes in Flex Regular Expression
| Character classes | |
|---|---|
| . | any character except newline |
| \w \d \s | word, digit, white space |
| \W \D \S | not word, digit, white space |
| [abc] | any of a, b, or c |
| [^abc] | not a, b, or c |
| [a-g] | character between a & g |
| Anchors | |
| ^abc$ | start / end of the string |
| \b | word boundary |
| Escaped characters | |
| \. \* \\ | escaped special characters |
| \t \n \r | tab, linefeed, carriage return |
| \u00A9 | unicode escaped © |
| Groups & Lookaround | |
| (abc) | capture group |
| \1 | back reference to group #1 |
| (?:abc) | non-capturing group |
| (?=abc) | positive look ahead |
| (?!abc) | negative look ahead |
| Quantifiers & Alternation | |
| a* a+ a? | 0 or more, 1 or more, 0 or 1 |
| a{5} a{2,} | exactly five, two or more |
| a{1,3} | between one & three |
| a+? a{2,}? | match as few as possible |
| ab|cd | match ab or cd |
Caution: Be wary of un-escaped dots in long patterns, and especially in the middle of longer patterns and Be wary of this meta-character (Star * ), especially in conjunction with the dot character. Any pattern contains an un-escaped dot that returns more than 63 characters after the dot is disabled.
Always escape *(star) and . (dot) with \ ( back slash ) like \* and \.
If we use .cisco.local in the regular expression the domain Xcisco.local is a match as well.
The un-escaped character affect the performance and it creates slowness during web Browsing. This is because the pattern-matching engine must go through thousands or millions of possibilities until find a match for the correct entry also it can have some security concerns regards to the similar URLs for allowed Policies
You can use the command-line interface (CLI) option advancedproxyconfig > miscellaneous > Do you want to enable URL lower case conversion for velocity regex, to enable or disable default regex conversion to lower case for case-insensitive matches. Use if you have issues with case sensitivity.
Limitations and Design Concerns
- You can use no more than 30 External Live Feed files in these URL category definitions, and each file must contain no more than 5000 entries.
- If the number of external feed entries increased, it causes performance degradation.
- It is possible to use the same address in multiple custom URL categories, but the order in which the categories are listed is relevant.
If you include these categories in the same policy, and define different actions for each, the action defined for the category listed highest in the custom URL categories table is applied.
- When a native File Transfer Protocol (FTP) request is transparently redirected to the FTP Proxy, it contains no Hostname information for the FTP server, only its IP address.
Because of this, some predefined URL categories and Web Reputation Filters that have only Hostname information does not match native FTP requests, even if the requests are destined for those servers.
If you wish to block access to these sites, you must create custom URL categories for them to use their IP addresses.
- An un-categorized URL is a URL that does not match any predefined URL category or included custom URL category
Use Custom URL Categories In Policies
The URL filter engine lets you filter transactions in Access, Decryption, and Data Security Policies. When you configure URL categories for policy groups, you can configure actions for custom URL categories, if any are defined, and predefined URL categories.
Steps To Configure URL Filters For Access Policy
Step 1. Choose Web Security Manager > Access Policies.
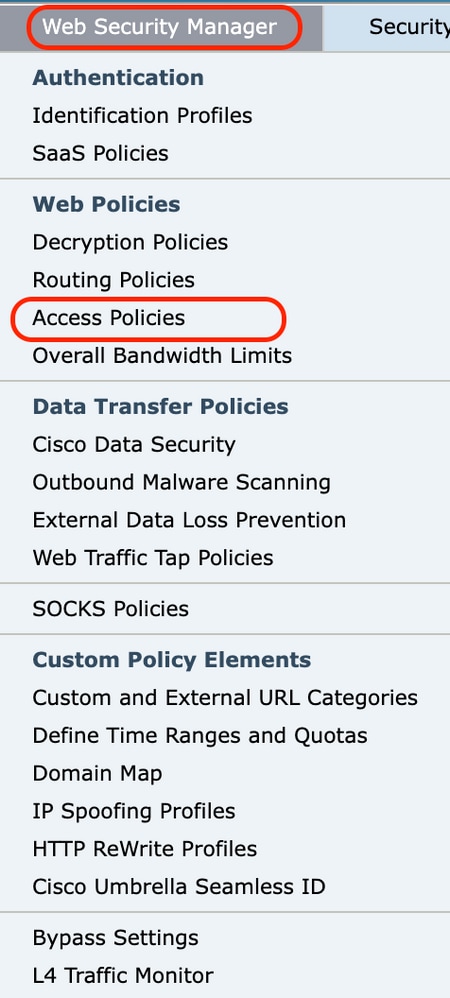 Image- Select Access Policies from GUI
Step 2. Click the link in the policies table under the URL Filter column for the policy group you want to edit.
 Image- Add Custom Category to Access Policy
Step 3. (Optional) In the Custom URL Category Filtering section, you can add custom URL categories on which to take action in this policy:
a) Click Select Custom Categories.
 Image-Select Custom URL Category
b) Choose which custom URL categories to include in this policy and click Apply.
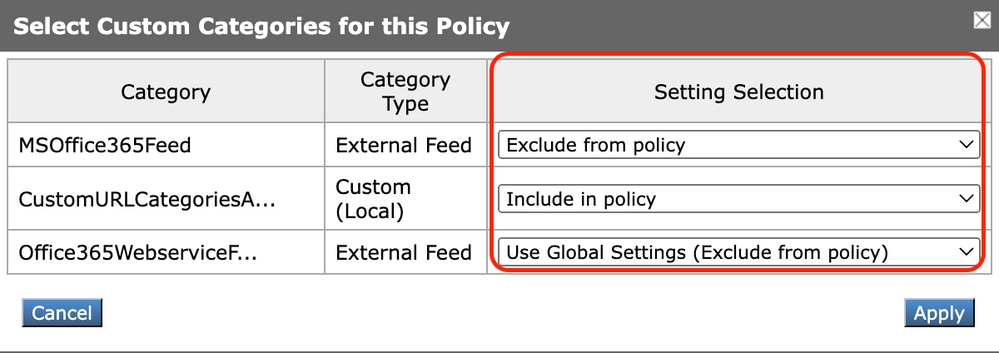 Image-Select Custom Categories to include in policy
Choose which custom URL categories the URL filter engine must compare the client request against.
The URL filter engine compares client requests against included custom URL categories, and ignores excluded custom URL categories.
The URL filter engine compares the URL in a client request to included custom URL categories before predefined URL categories.
The custom URL categories included in the policy appear in the Custom URL Category Filtering section.
Step 4. In the Custom URL Category Filtering section, choose an action for each included custom URL category.
 Image- Choose Action for Custom Category
|
Action |
Description |
|---|---|
|
Use Global Settings |
Uses the action for this category in the Global Policy Group. This is the default action for user defined policy groups. Applies to user defined policy groups only. |
|
Block |
The Web Proxy denies transactions that match this setting. |
|
Redirect |
Redirects traffic originally destined for a URL in this category to a location you specify. When you choose this action, the Redirect To field appears. Enter a URL to which to redirect all traffic. |
|
Allow |
Always allows client requests for web sites in this category. Allowed requests bypass all further filters and Malware scans. Only use this setting for trusted web sites. You can use this setting for internal sites. |
|
Monitor |
The Web Proxy neither allows nor blocks the request. Instead, it continues to evaluate the client request against other policy group control settings, such as web reputation filter. |
|
Warn |
The Web Proxy initially blocks the request and displays a warning page, but allows the user to continue by click on a hypertext link in the warning page. |
|
Quota-Based |
As a individual user approaches either the volume or time quotas you have specified, a warning is displayed. When a quota is met, a block page is displayed. . |
|
Time-Based |
The Web Proxy blocks or monitors the request during the time ranges you specify. |
Step 5. In the Predefined URL Category Filter section, choose one of these actions for each category:
-
Use Global Settings
-
Monitor
-
Warn
-
Block
-
Time-Based
-
Quota-Based
 Image- Select Action for predefined Category
Step 6. In the Uncategorized URLs section, choose the action to take for client requests to web sites that do not fall into a predefined or custom URL category. This setting also determines the default action for new and merged categories results from URL category set updates.
 Image- Choose action for uncategorized URL
Step 7. Submit and Commit Changes.
Steps To Configure URL Filters For Decryption Policy
Step 1. Choose Web Security Manager > Decryption Policies.
 Image - Chose Decryption Policy
Step 2. Click the link in the policies table under the URL Filtering column for the policy group you want to edit.
 Image - Choose URL Filter
Step 3. (Optional) In the Custom URL Category Filtering section, you can add custom URL categories on which to take action in this policy:
-
Click Select Custom Categories.
 Image - Choose Custom Categories
b. Choose which custom URL categories to include in this policy and click Apply.
 Image-Select Custom Categories to include in policy
Choose which custom URL categories the URL filter engine must compare the client request against.
The URL filter engine compares client requests against included custom URL categories, and ignores excluded custom URL categories.
The URL filter engine compares the URL in a client request to included custom URL categories before predefined URL categories.
The custom URL categories included in the policy appear in the Custom URL Category Filtering section.
Step 4. Choose an action for each custom and predefined URL category.
 Image - Choose Action For Decryption Policy
|
Action |
Description |
|---|---|
|
Use Global Setting |
Uses the action for this category in the global Decryption Policy group. This is the default action for user defined policy groups. Applies to user defined policy groups only. When a custom URL category is excluded in the global Decryption Policy, then the default action for included custom URL categories in user defined Decryption Policies is Monitor instead of Use Global Settings. You cannot choose Use Global Settings when a custom URL category is excluded in the global Decryption Policy. |
|
Pass Through |
Passes through the connection between the client and the server without inspection the traffic content. |
|
Monitor |
The Web Proxy neither allows nor blocks the request. Instead, it continues to evaluate the client request against other policy group control settings, such as web reputation filter. |
|
Decrypt |
Allows the connection, but inspects the traffic content. The appliance decrypts the traffic and applies Access Policies to the decrypted traffic as if it were a plain text Hypertext Transfer Protocol (HTTP) connection. When connection decrypted and Access Policies Applied, you can scan the traffic for Malware. |
|
Drop |
Drops the connection and does not pass the connection request to the server. The appliance does not notify the user that it dropped the connection. |
Step 5. In the Uncategorized URLs section, choose the action to take for client requests to web sites that do not fall into a predefined or custom URL category.
This setting also determines the default action for new and merged categories results from URL category set updates.
 Image - Uncategorized decryption Policy
Step 6. Submit and Commit Changes.
Caution: If you want to block a particular URL category for Hypertext Transfer Protocol Secure (HTTPS) requests, choose to decrypt that URL category in the Decryption Policy group and then choose to block the same URL category in the Access Policy group.
Steps To Configure URL Filters For Data Security Policy Groups
Step 1. Choose Web Security Manager > Cisco Data Security.
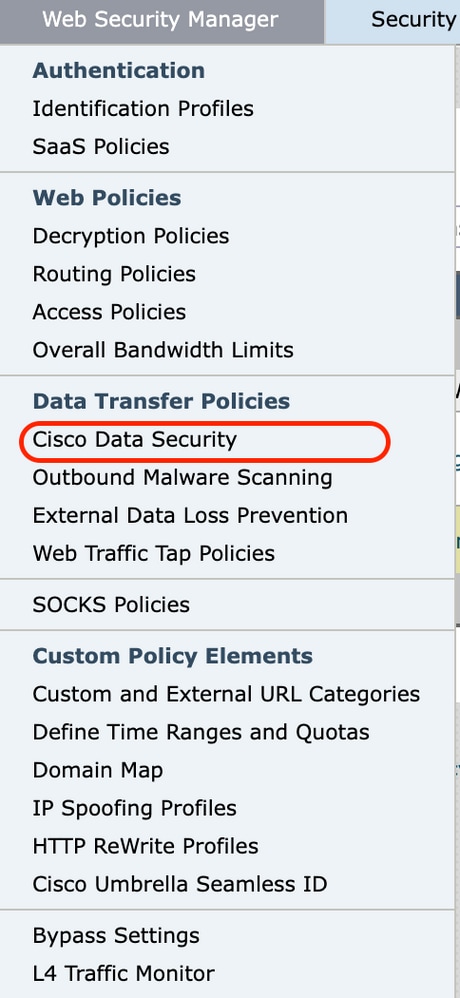 Image -Cisco Data Security
Step 2. Click the link in the policies table under the URL Filtering column for the policy group you want to edit.
 Image - Data Security choose URL filter
Step 3. (Optional) In the Custom URL Category Filtering section, you can add custom URL categories on which to take action in this policy:
-
Click Select Custom Categories.
 Image - Select Custom Field
b. Choose which custom URL categories to include in this policy and click Apply.
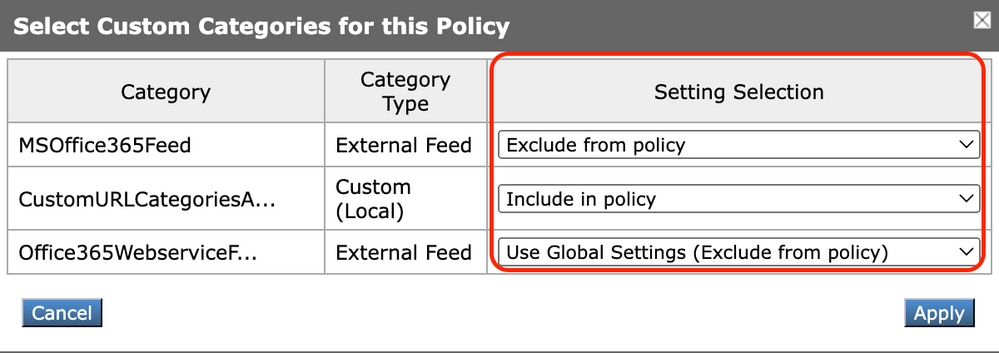 Image-Select Custom Categories to include in policy
Choose which custom URL categories the URL filter engine must compare the client request against.
The URL filter engine compares client requests against included custom URL categories, and ignores excluded custom URL categories.
The URL filter engine compares the URL in a client request to included custom URL categories before predefined URL categories.
The custom URL categories included in the policy appear in the Custom URL Category Filtering section.
Step 4. In the Custom URL Category Filtering section, choose an action for each custom URL category.
 Image - Data Security Choose Action
|
Action |
Description |
|---|---|
|
Use Global Setting |
Uses the action for this category in the Global Policy Group. This is the default action for user defined policy groups. Applies to user defined policy groups only. When a custom URL category is excluded in the global Cisco Data Security Policy, then the default action for included custom URL categories in user defined Cisco Data Security Policies is Monitor instead of Use Global Settings. You cannot choose Use Global Settings when a custom URL category is excluded in the global Cisco Data Security Policy. |
|
Allow |
Always allows upload requests for web sites in this category. Applies to custom URL categories only. Allowed requests bypass all further data security scan and the request is evaluated against Access Policies. Only use this setting for trusted web sites. You can use this setting for internal sites. |
|
Monitor |
The Web Proxy neither allows nor blocks the request. Instead, it continues to evaluate the upload request against other policy group control settings, such as web reputation filter. |
|
Block |
The Web Proxy denies transactions that match this setting. |
Step 5. In the Predefined URL Category Filtering section, choose one of these actions for each category:
-
Use Global Settings
-
Monitor
-
Block
 Image - Data Security Pre Defined URL Choose Action
Step 6. In the Uncategorized URLs section, choose the action to take for upload requests to web sites that do not fall into a predefined or custom URL category.
This setting also determines the default action for new and merged categories results from URL category set updates.
 Image - Data Security Un Categorized
Step 7. Submit and Commit Changes.
Caution: If you do not disable the maximum file size limitation, Web Security Appliance continues to validate the maximum file size when the Allow or Monitor options are selected in the URL filtering.
Steps To Configure Controlling Upload Requests With Custom URL Categories
Each upload request is assigned to an "Outbound Malware Scanning" Policy group and inherits the control settings of that policy group.
After the Web Proxy receives the upload request headers, it has the information necessary to decide if it must scan the request body.
The DVS engine scans the request and returns a verdict to the Web Proxy. The block page appears to the end user, if applicable.
|
Step 1 |
Choose Web Security Manager > Outbound Malware Scanning. |
||||||||
|
Step 2 |
In the Destinations column, click the link for the policy group you want to configure. |
||||||||
|
Step 3 |
In the Edit Destination Settings section, select "Define Destinations Scanning Custom Settings" from the drop-down menu. |
||||||||
|
Step 4 |
In the Destinations to Scan section, select one of these:
|
||||||||
|
Step 5 |
Submit your changes. |
||||||||
|
Step 6 |
In the Anti-Malware Filtering column, click the link for the policy group. |
||||||||
|
Step 7 |
In the Anti-Malware Settings section, select Define Anti-Malware Custom Settings. |
||||||||
|
Step 8 |
In the Cisco DVS Anti-Malware Settings section, select which anti-malware scan engines to enable for this policy group. |
||||||||
|
Step 9 |
In the Malware Categories section, choose whether to monitor or block the various malware categories. The categories listed in this section depend on which scan engines you enable. |
||||||||
|
Step 10 |
Submit and Commit Changes. |
Steps To Configure Control Upload Requests in External DLP Policies
Once the Web Proxy receives the upload request headers, it has the information necessary to decide if the request can go to the external DLP system for scan.
The DLP system scans the request and returns a verdict to the Web Proxy, either block or monitor (evaluate the request against the Access Policies).
|
Step 1 |
Choose Web Security Manager > External Data Loss Prevention. |
|
Step 2 |
Click the link under the Destinations column for the policy group you want to configure. |
|
Step 3 |
Under the Edit Destination Settings section, choose “Define Destinations Scanning Custom Settings.” |
|
Step 4 |
In the Destination to scan section, choose one of these options:
|
|
Step 5 |
Submit and Commit Changes. |
Bypass And Passthrough URLs
You can configure the Secure Web Appliance in transparent proxy implementation to bypass the HTTP or HTTPS requests from particular clients, or to particular destinations.

Tip: You can use passthrough for applications that require traffic to passthrough the appliance, without need to any modification, or certificate checks of the destination servers
Caution: The Domain Map feature works in HTTPS Transparent mode. This feature does not work in Explicit mode and for HTTP traffic.
-
Local Custom Category must be configured to allow the traffic to use this feature.
-
When this feature enabled, it modify or assign the server name as per the server name configured in the Domain Map, even if Server Name Indication (SNI) information is available.
-
This feature does not block traffic based on domain name if that traffic matches the Domain Map and correspond custom category, decryption policy and passthrough action are configured.
-
Authentication does not work with this pass through feature. Authentication requires decryption, but traffic is not be decrypted in this case.
-
traffic is not monitored. You must configure UDP traffic not to come to the Web Security Appliance , instead it must go directly through firewall to the Internet for applications like WhatsApp, Telegram and so on.
-
WhatsApp, Telegram and Skype works in Transparent mode. However, some apps like WhatsApp do not work in Explicit mode due to restrictions on the app.
Ensure you have an identification policy defined for the devices that require pass through traffic to specific servers. Specifically, you must:
-
Choose Exempt from authentication/identification.
-
Specify the addresses to which this Identification Profile must apply. You can use IP addresses, Classless Inter-Domain Routing (CIDR) blocks, and subnets.
|
Step 1 |
Enable HTTPS Proxy. |
||||||||||
|
Step 2 |
Choose Web Security Manager > Domain Map.
|
||||||||||
|
Step 3 |
Choose Web Security Manager > Custom and External URL Categories.
|
||||||||||
|
Step 4 |
Choose Web Security Manager > Decryption Policies.
(Optional) You can use the %( format specifier to view access log information. |
Configure Web Proxy Bypass For Web Requests
Once you add the Custom URL Categories to the proxy bypass list, all the IP addresses and the domain names of the Custom URL categories are bypassed for both the source and destination.
|
Step 1 |
Choose Web Security Manager > Bypass Settings. |
|
Step 2 |
Click Edit Bypass Settings. |
|
Step 3 |
Enter the addresses for which you wish to bypass the web proxy. Note: When you configure /0 as a subnet mask for any IP in the bypass list, the appliance bypasses all the web traffic. In this case, the appliance interprets the configuration as 0.0.0.0/0. |
|
Step 4 |
Choose the Custom URL Categories that you want to add to the proxy bypass list. |
|
Step 5 |
Submit and commit your changes. |
Caution: You cannot set the web proxy bypass for Regular Expressions.
Reports
In the "Reporting" >> URL Categories' page provides a collective display of URL statistics that includes information about top URL categories matched and top URL categories blocked.
This page displays category-specific data for bandwidth savings and web transactions.
|
Section |
Description |
|---|---|
|
Time Range (drop-down list) |
Choose the time range for your report. |
|
Top URL Categories by Total Transactions |
This section lists the top URL categories that are visited on the site in a graph format. |
|
Top URL Categories by Blocked and Warned Transactions |
Lists the top URL that triggered a block or warning action to occur per transaction in a graph format. |
|
URL Categories Matched |
Shows the disposition of transactions by URL category during the specified time range, plus bandwidth used and time spent in each category. If the percentage of uncategorized URLs is higher than 15-20%, consider these options:
|
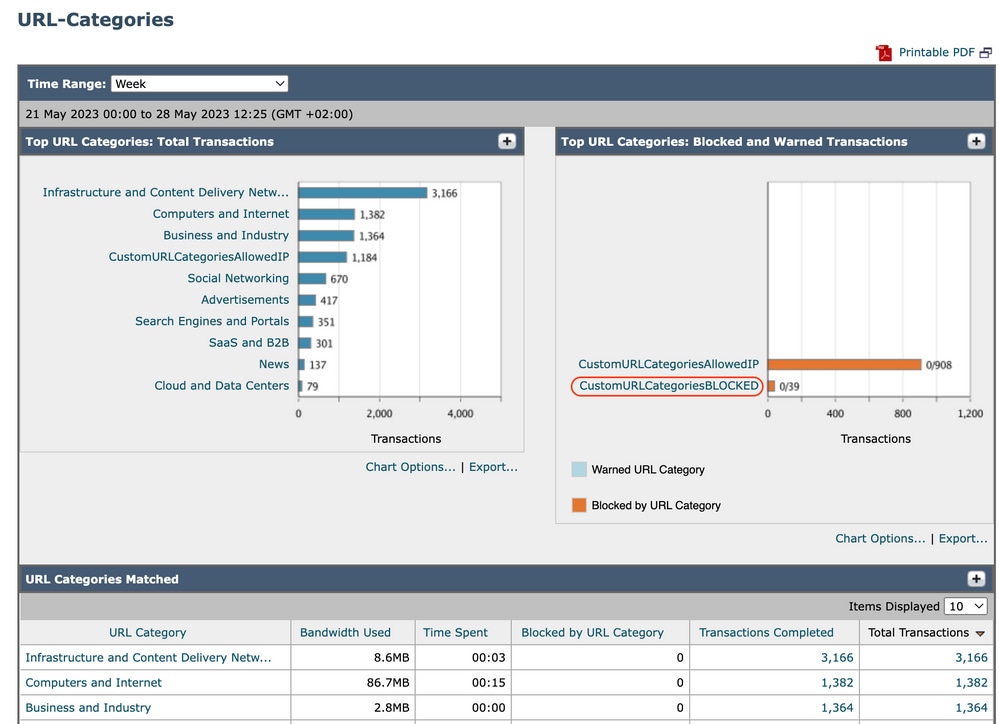 Image-URL Category Report
You can click on any category name to view more details related to that category, such as Domains Matched or users list.
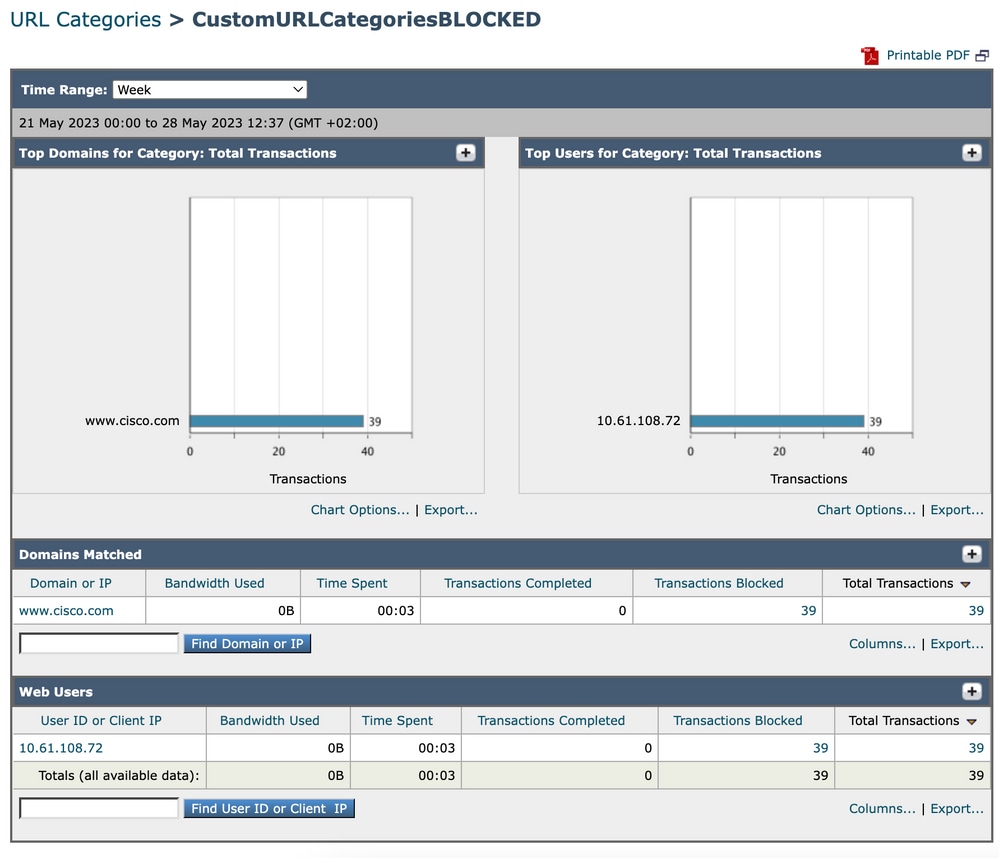 Image- Detailed Report Page
The set of Predefined URL Categories can periodically be updated automatically on your Web Security Appliance .
When these updates occur, old category names is continue to appear in reports until the data associated with the older categories is too old to be included in reports.
Report data generated after a URL category set update uses the new categories, so you can see both old and new categories in the same report.
In URL statistics on the URL Categories page from reports, it is important to understand how to interpret these data:
| Data Type | Description |
| URL Filtering Bypassed | Represents policy, port, and admin user agent blocked which occurs before URL filtering. |
| Uncategorized URL | Represents all transactions for which the URL filtering engine is queried, but no category is matched. |
View Custom URL Categories In The Access Log
The Secure Web Appliance uses the first four characters of custom URL category names preceded by “c_” in the access logs.
In this example the category name is CustomURLCategoriesBLOCKED and in the acesslogs you can see C_Cust :
1685269516.853 86 10.61.108.72 TCP_DENIED_SSL/403 0 GET https://www.cisco.com:443/ - NONE/- - DROP_CUSTOMCAT_7-DefaultGroup-DefaultGroup-NONE-NONE-NONE-NONE-NONE <"C_Cust",-,-,"-",-,-,-,-,"-",-,-,-,"-",-,-,"-","-",-,-,"-",-,"-","-","-","-","-","-","-",0.00,0,-,"-","-",-,"-",-,-,"-","-",-,-,"-",-,-> - -
Caution: Consider the custom URL category name if you use Sawmill to parse the access logs. If the first four characters of the custom URL category include a space,Sawmill cannot properly parse the access log entry. Instead, only use supported characters in the first four characters.
Tip: If you want to include the full name of a custom URL category in the access logs, add the %XF format specifier to the access logs.
When a web access policy group has a custom URL category set to Monitor and some other component (such as the Web Reputation Filters or the Different Verdicts Scanning (DVS) engine) makes the final decision to allow or block a request for a URL in the custom URL category, then the access log entry for the request shows the predefined URL category instead of the custom URL category.
For more information about how to configure custom fields in Access Logs, visit : Configure Performance Parameter in Access Logs - Cisco
Troubleshoot
Category Missmatched
From the access logs you can see the request belongs to which Custom URL Category, if the selection is not as expected:
- If the request is categorized to other custom URL Categories, check for duplicate URL or a matched Regular Expression in other Categories or Move the Custom URL Category to top and test again. it is better to inspect the machted Custom URL Category carefully.
- If the request is categorized to Pre-Defined Categories, Check the conditions in the existed Custom URL Category, if all match, try to add the IP address and test or make sure for the typo and correct regullar expression is used, if any.
Predefined Categories Are Not Up To Date
If the Predefined Categories are not up to dated, or in the accesslogs you see "err" in the URL category section, make sure TLSv1.2 is enabled for Updater.
To change the Updater SSL configuration, use these steps from GUI:
Step 1. From System Administration, choose SSL Configuration
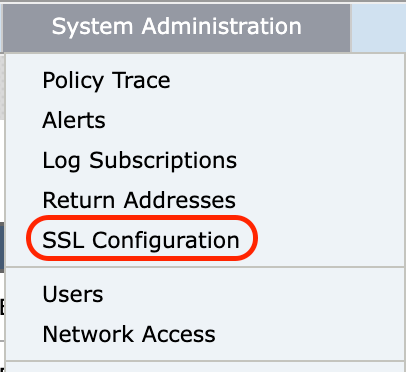 Image- ssl configuration
Step 2. Choose Edit Settings.
Step 3. In Update service section, choose TLSv1.2
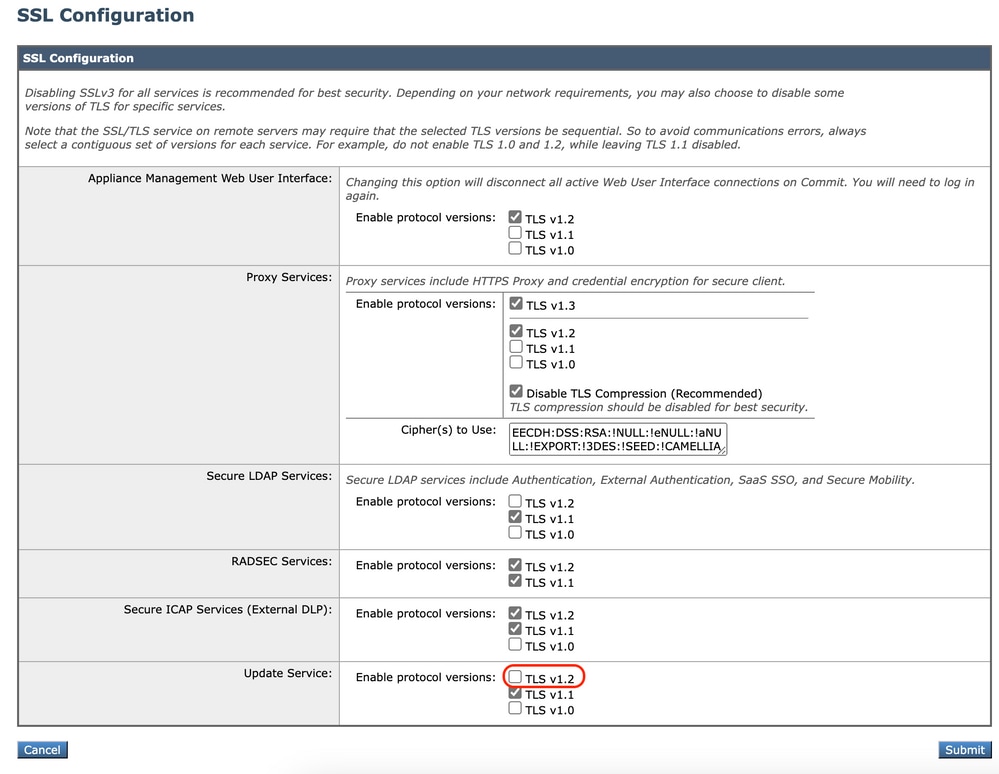 Image - Update Service TLSv1.2
Step 4. Submit and commit changes
To change the Updater SSL configuration, use these steps from CLI:
Step 1. From CLI, run sslcofig
Step 2. Type version and press enter
Step 3. Choose Updater
Step 4. Choose TLSv1.2
Step 5. Press Enter to exit the wizard
Step 6. commit the changes.
SWA_CLI> sslconfig

Disabling SSLv3 is recommended for best security.

Note that the SSL/TLS service on remote servers may require that the selected TLS versions be sequential. So to avoid communications errors, always select a contiguous set of versions for each service. For example, do not enable TLS 1.0 and
1.2, while leaving TLS 1.1 disabled.

Choose the operation you want to perform:
- VERSIONS - Enable or disable SSL/TLS versions
- COMPRESS - Enable or disable TLS compression for Proxy Service
- CIPHERS - Set ciphers for services in Secure Web Appliance
- FALLBACK - Enable or disable SSL/TLS fallback option
- ECDHE - Enable or disable ECDHE Authentication.
[]> versions

SSL/TLS versions may be enabled or disabled for the following services:

        LDAPS - Secure LDAP Services (including Authentication, External Authentication, SaaS SSO, Secure Mobility)
        Updater - Update Service
        WebUI - Appliance Management Web User Interface
        RADSEC - Secure RADSEC Services (including Authentication, External Authentication)
        SICAP - Secure ICAP Service
        Proxy - Proxy Services (including HTTPS Proxy, Credential Encryption for Secure Client)

Currently enabled SSL/TLS versions by service: (Y : Enabled, N : Disabled)

         LDAPS  Updater  WebUI   RADSEC  SICAP   Proxy
TLSv1.0    N       N       N      N/A      N       N
TLSv1.1    Y       Y       N       Y       Y       N
TLSv1.2    N       N       Y       Y       Y       Y
TLSv1.3   N/A     N/A     N/A     N/A     N/A      Y

Select the service for which to enable/disable SSL/TLS versions:

1. LDAPS
2. Updater
3. Proxy
4. RADSEC
5. SICAP
6. WebUI
7. All Services
[]> 2


Currently enabled protocol(s) for Updater are TLSv1.1.


To change the setting for a specific protocol, select an option below:

1. TLSv1.0
2. TLSv1.1
3. TLSv1.2
[]> 3

TLSv1.2 support for Update Service is currently disabled. Do you want to enable it? [N]> Y


Currently enabled protocol(s) for Updater are TLSv1.1, TLSv1.2.
Reference
Cisco Web Security Appliance Best Practices Guidelines - Cisco
Revision History
| Revision | Publish Date | Comments |
|---|---|---|
1.0 |
07-Jul-2023 |
Initial Release |
Contributed by Cisco Engineers
- Amirhossein Mojarrad
Contact Cisco
- Open a Support Case

- (Requires a Cisco Service Contract)
 Feedback