Introduction
This document describes the steps to configure external authentication on Secure Web Access (SWA) with Cisco ISE as a RADIUS server.
Prerequisites
Requirements
Cisco recommends that you have knowledge of these topics:
- Basic knowledge in Cisco Secure Web Appliance.
- Knowledge of authentication and authorization policies configuration on ISE.
- Basic RADIUS knowledge.
Cisco recommends that you also have:
- SWA and ISE administration access.
- Compatible WSA and ISE versions.
Components Used
The information in this document is based on these software versions:
The information in this document was created from the devices in a specific lab environment. All of the devices used in this document started with a cleared (default) configuration. If your network is live, ensure that you understand the potential impact of any command.
Background Information
When you enable external authentication for administrative users of your SWA, the device verifies the user credentials with a Lightweight Directory Access Protocol (LDAP) or RADIUS server as specified in external authentication configuration.
Network Topology
 Network Topology Diagram
Administrative users access SWA on port 443 with their credentials. SWA verifies the credentials with the RADIUS server.
Configure
ISE Configuration
Step 1. Add a new Network Device. Navigate to Administration > Network Resources > Network Devices > +Add.
 Add SWA as Network Device in ISE
Step 2. Assign a Name to the network device object and insert the SWA IP address.
Check the RADIUS checkbox and define a Shared Secret.

Note: The same key must be used later to configure the RADIUS server in SWA.
 Configure SWA Network Device Shared Key
Step 2.1. Click Submit.
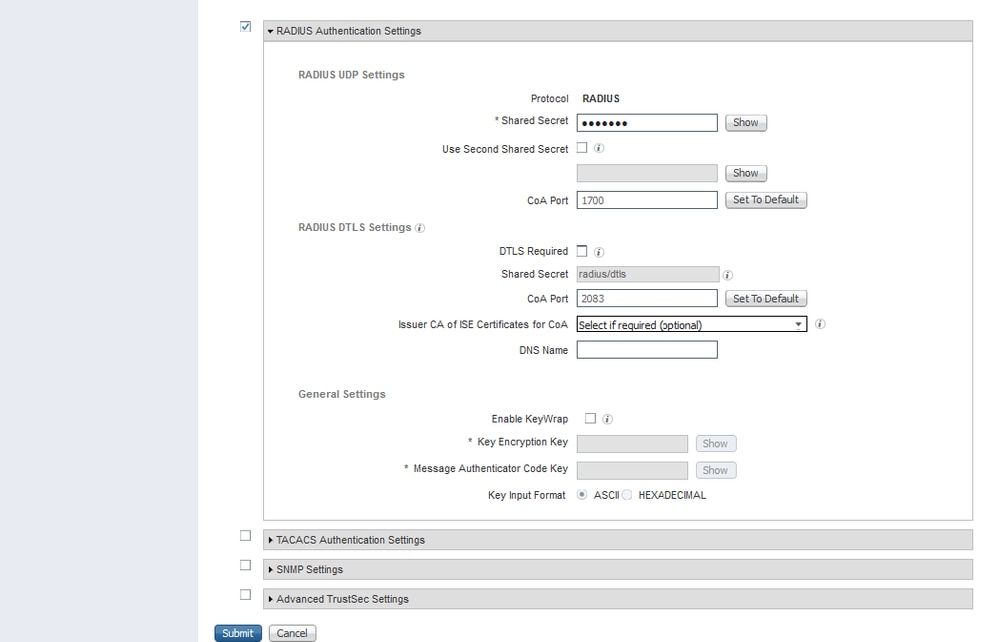 Submit Network Device Configuration
Step 3. Create the required User Identity Groups. Navigate to Administration > Identity Management > Groups > User Identity Groups > + Add.

Note: You need to configure different user groups to match different type of users.
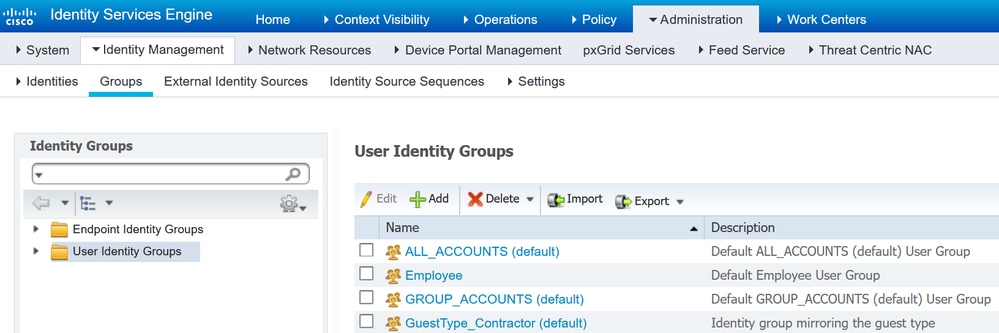 Add User Identity Group
Step 4. Input group name, description (optional) and Submit. Repeat these steps for each group. In this example, you ceate a group for Administrator users, and another one for Read-Only users.
 Add User Identity Group
 Add User Identity Group for SWA Read Only Users
Step 5. You need to create Network access users that match with user name configured in SWA.
Create the Network Access Users and add them to their correspondent group. Navigate to Administration > Identity Management > Identities > + Add.
 Add Local Users in ISE
Step 5.1. You need to create a Network Access Users with Administrator rights. Assign a name and password.
 Add Admin User
Step 5.2. Choose SWA Admin in the User Groups section.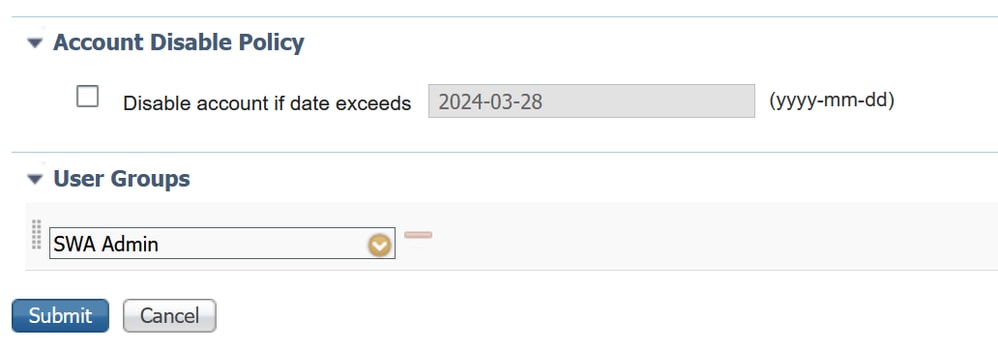 Assign Admin Group to the Admin User
Step 5.3. You need to create a user with Read Only rights. Assign a name and password.
 Add Read Only User
Step 5.4. Choose SWA ReadOnly in the User Groups section.
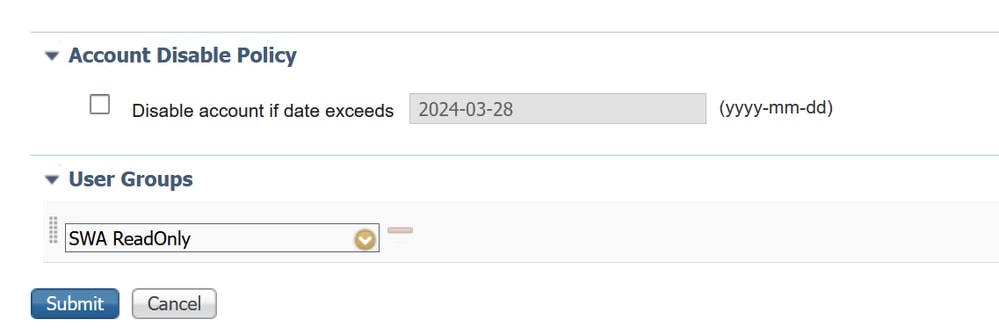 Assign Read Only User group to the Read Only User
Step 6. Create the Authorization Profile for the Admin user.
Navigate to Policy > Policy Elements > Results > Authorization > Authorization Profiles > +Add.
Define a name for the Authorization Profile and make sure the Access Type is set to ACCESS_ACCEPT.
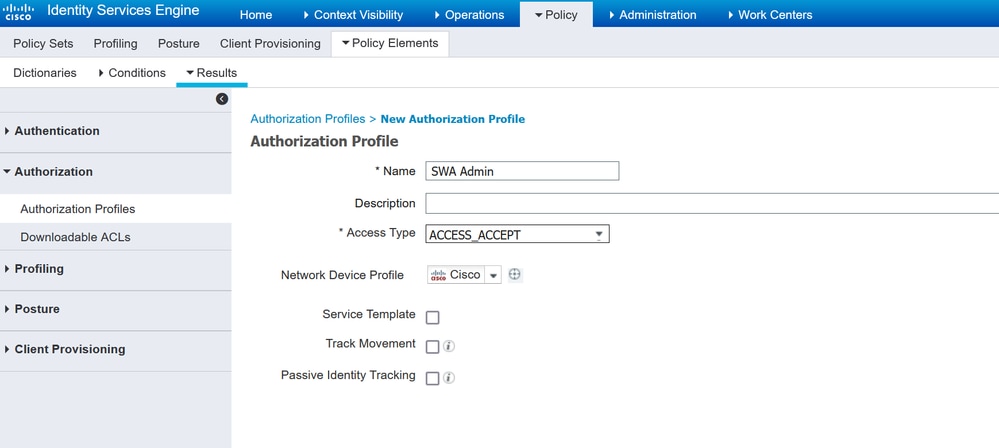 Add Authorization Profile for Admin Users
Step 6.1. In the Advanced Attributes Settings, navigate to Radius > Class--[25] and enter the value Administrator and click Submit. Add Authorization Profile for Admin Users
Step 7. Repeat step 6 to create the Authorization Profile for the Read Only User.
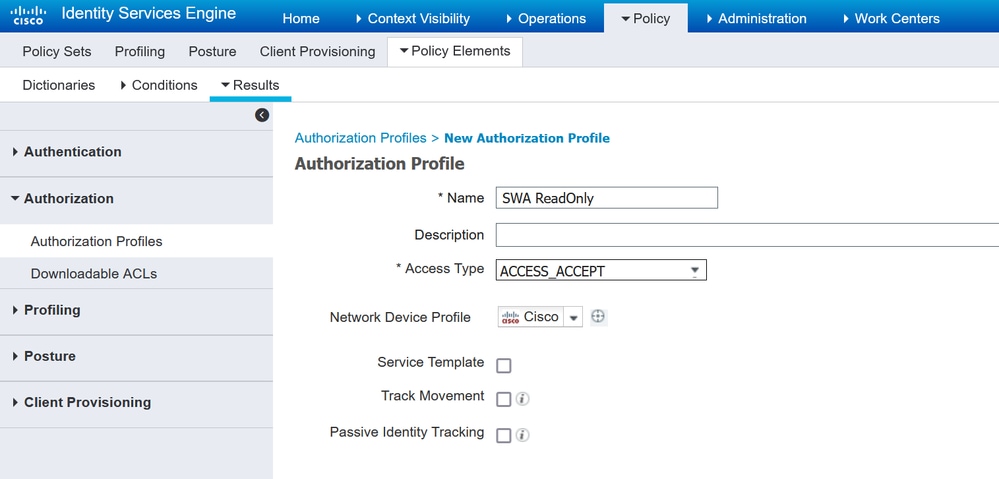 Add Authorization Profile for Read Only Users
STEP 7.1. Create the Radius:Class with the value ReadUser instead Administrator this time.
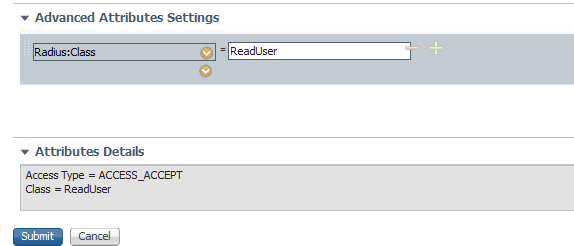 Add Authorization Profile for Read Only Users
Step 8. Create Policy Sets that matches the SWA IP address. This is to prevent access to other devices with these user credentials.
Navigate to Policy > PolicySets and click + icon placed at the upper left corner.
 Add Policy Set in ISE
Step 8.1. A new line is placed at the top of your Policy Sets.
Name the new policy and add a condition for RADIUS NAS-IP-Address attribute to match the SWA IP address.
Click Use to keep the changes and exit the editor.
 Add Policy to Map SWA Network Device
Step 8.2. Click Save.
 Policy Save

Tip: In this article, the Default Network Access Protocols list is allowed. You can create a new list and narrow down as needed.
Step 9. To view the new Policy Sets, click the > icon in the View column. Expand the Authorization Policy menu and click the + icon to add a new rule to allow the access to the user with admin rights.
Set a name.
Step 9.1. To create a condition to match Admin user group, click + icon. Add Authorization Policy Condition
Step 9.2. Set the conditions to match the Dictionary Identity Group with Attribute Name Equals User Identity Groups: SWA admin. Select Identity Group as Condition
Step 9.3. Scroll down and select User Identity Groups: SWA admin.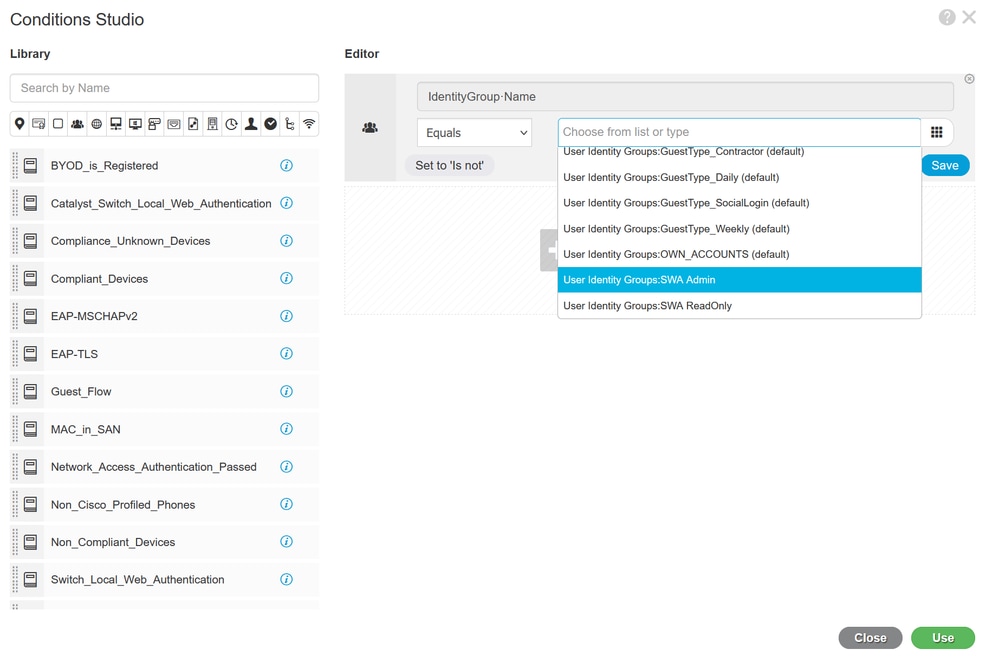 Scroll Down abd Select Identity Group Name
Step 9.4. Click Use.
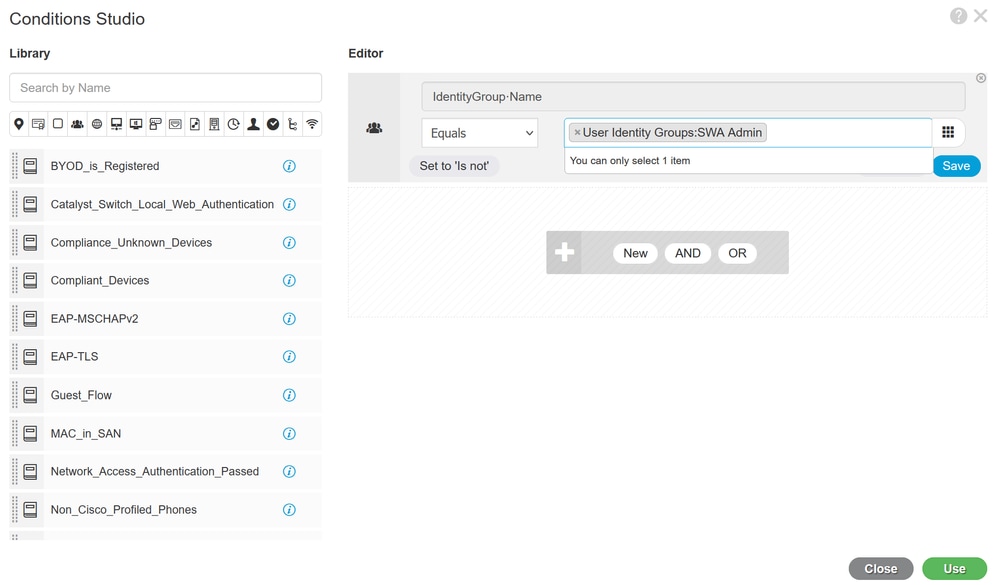 Select Authorization Policy for SWA Admin User Group
Step 10. Click the + icon to add a second rule to allow the access to the user with read-only rights.
Set a name.
Set the conditions to match the Dictionary Identity Group with Attribute Name Equals User Identity Groups: SWA ReadOnly and click Use.
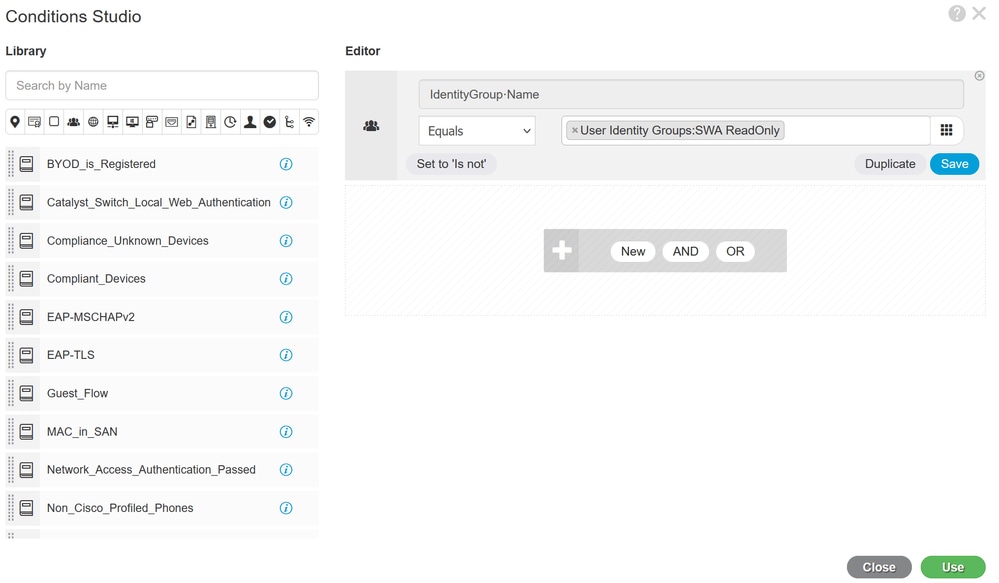 Select Authorization Policy for ReadOnly User Group
Step 11. Set the Authorization Profile respectively for each rule and click Save.
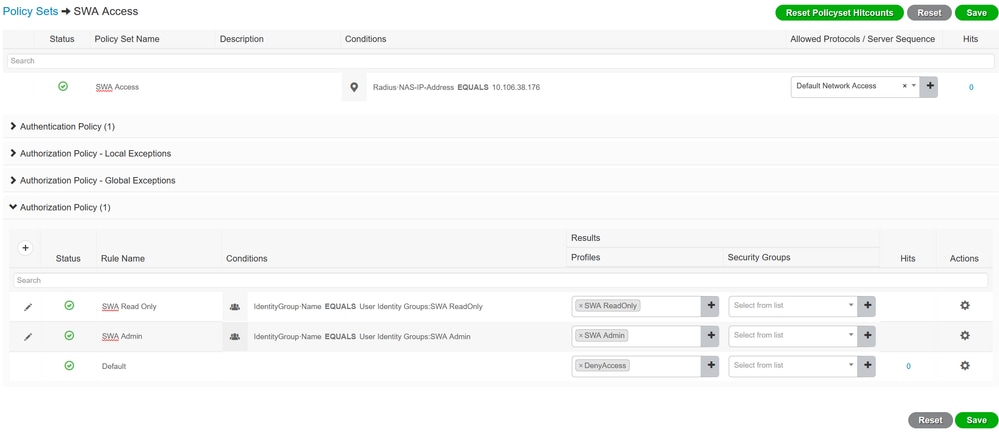 Select Authorization Profile
SWA Configuration
Step 1. From SWA GUI navigate to System Administration and click Users.
Step 2. Click Enable in External Authentication.
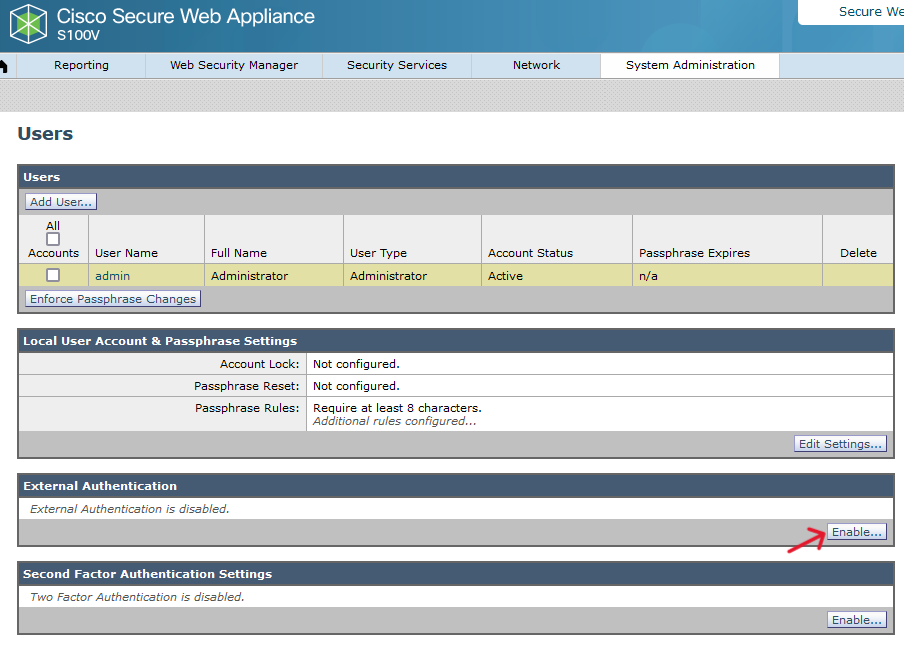 Enable External Authentication in SWA
Step 3. Enter IP address or FQDN of the ISE in RADIUS Server Hostname field and enter the same Shared Secret that is configured in the Step 2, ISE Configuration.
Step 4. Select Map externally authenticated users to multiple local roles in Group Mapping.
Step 4.1. Enter Administrator in the RADIUS CLASS Attribute field and select the Role Administrator.
Step 4.2. Enter ReadUser in the RADIUS CLASS Attribute field and select the Role Read-Only Operator.
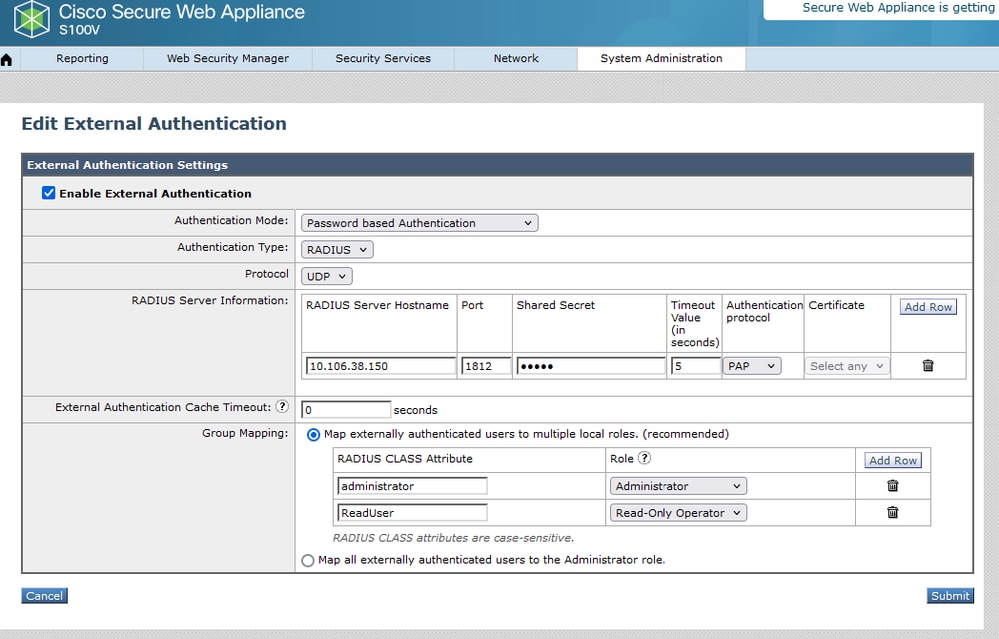 External Authentication Configuration for RADIUS Server
Step 5: To configure Users in SWA, click Add User. Enter User Name and select User Type required for the desired role. Enter Passphrase and Retype Passphrase, which is required for GUI access if the appliance cannot connect to any external RADIUS server.

Note: If the appliance cannot connect to any external server, it tries to authenticate the user as a local user defined on the Secure Web Appliance.
 User configuration in SWA
Step 6: Click Submit and Commit Changes.
Verify
Access SWA GUI with the configured user credentials and check the live logs in ISE. To check the live logs in ISE navigate to Operations > Live Logs:
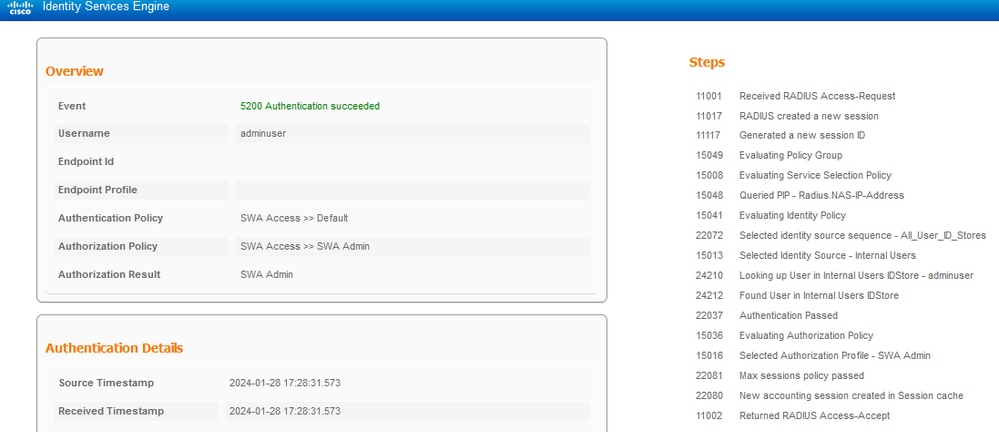 Verify User Login ISE
Related Information


 Feedback