Introduction
This document describes the steps to configure certificates for the Secure Web Appliance (SWA) Management Web Interface.
Prerequisites
Requirements
Cisco recommends that you have knowledge of these topics:
Cisco recommends that you have:
- Physical or Virtual SWA installed.
- Administrative Access to the SWA Graphical User Interface (GUI).
- Administrative Access to the SWA Command Line Interface (CLI).
Components Used
This document is not restricted to specific software and hardware versions.
The information in this document was created from the devices in a specific lab environment. All of the devices used in this document started with a cleared (default) configuration. If your network is live, ensure that you understand the potential impact of any command.
Web User Interface Certificate
First we need to choose the type of certificates which we want to use in SWA Management Web User Interface (Web UI).
By default, SWA uses the "Cisco Appliance Demo Certificate:"
- CN = Cisco Appliance Demo Certificate
- O = Cisco Systems, Inc
- L = San Jose
- S = California
- C = US
You can create a Self Signed Certificate in SWA or import you own certificated that has been generated by your Internal Certificate Authority (CA) server.
The SWA does not support including Subject Alternative Names (SAN) when generating a Certificate Signing Request (CSR). Additionally, the SWA self-signed certificates do not support SAN attributes either. To utilize certificates with SAN attributes, you must create and sign the certificate yourself, ensuring that it includes the necessary SAN details. Once you have generated this certificate, you can upload it to the SWA to be used. This approach allows you to specify multiple hostnames, IP addresses, or other identifiers, providing greater flexibility and security for your network environment.
Note: The certificates must include the private key and it must be in PKCS#12 format.
Steps to Modify Web Interface Certificate
Step 1. Log in to GUI and select Network from the top menu.
Step 2. Choose Certificate Management.
Step 3. From Appliance Certificates Select Add Certificate.
Step 4. Select Certificate Type (Self Signed Certificate or Import Certificate).
 Image - Choose Certificate Type
Step 5. If you select the Self-Signed Certificate, use these steps. Otherwise, skip to Step 6.
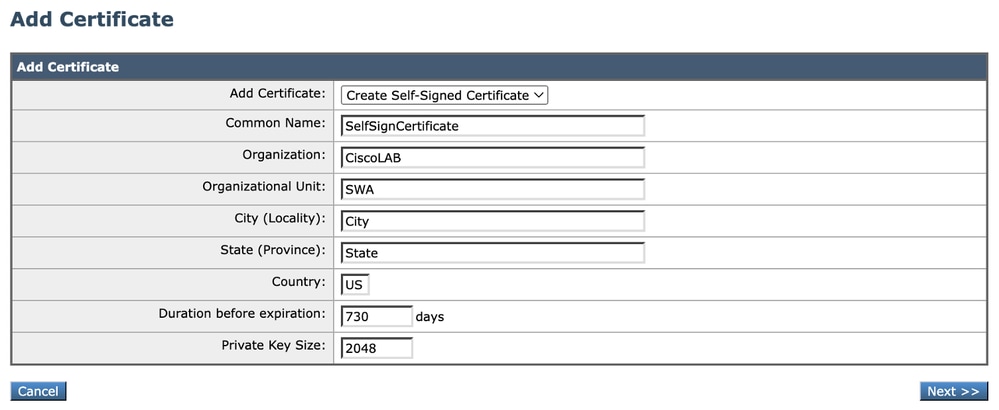
Step 5.1. Complete the fields.
 Image - Self Sign Certificate Details
Note: The Private key size must be in the range of 2048 to 8192.
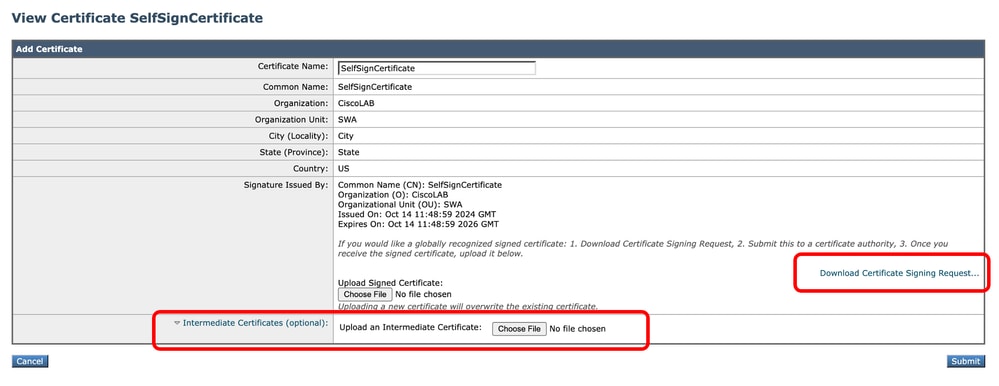
Step 5.2. Click Next.
 Image - Download CSR
Step 5.3. (Optional ) You can download the CSR and sign it with your organization CA Server, then Upload the Signed certificate and Submit.

Caution: If you would liekt to sign the CSR, with your CA server, make sure to Submit and Commit the page before signing or uploading the signed certificate. The profile you created during the CSR generation process includes your private key.
Step 5.4.Submit if the current Self-Signed Certificate is appropriate.
Step 5.5. Skip to Step 7.
Step 6. If you choose Import Certificate.
Step 6.1. Import Certificate File (PKCS#12 format is required).
Step 6.2. Enter the Password for the Certificate file.
 Image - Import Certificate
Step 6.3. Click Next.
Step 6.4. Submit changes.
Step 7. Commit Changes.
Step 8. Log in to the CLI.
Step 9. Type certconfig and press Enter.
Step 10. Type SETUP.
Step 11. Type Y, then press Enter.
Note: When the certificate is changed, administrative users who are currently logged in to the web user interface can experience a connection error and could lose un-submitted changes. This occurs only if the certificate is not already marked as trusted by the browser.
Step 12. Choose 2 to select from available list of certificates.
Step 13. Select the Number of desired Certificate to use for GUI.
Step 14. If you have intermediate certificate, and want to add them Type Y else type N .
Note: if you need to add the intermediate certificate, you have to paste the intermediate cert in PEM format and end with '.' (Only dot).
SWA_CLI> certconfig

Choose the operation you want to perform:
- SETUP - Configure security certificate and key.
- OCSPVALIDATION - Enable OCSP validation of certificates during upload
- RESTRICTCERTSIGNATURE - Enable restricted signature validation of certificates during upload
- OCSPVALIDATION_FOR_SERVER_CERT - Enable OCSP validation for server certificates
- FQDNVALIDATION - FQDN validation for certificate
[]> SETUP

Currently using the demo certificate/key for HTTPS management access.

When the certificate is changed, administrative users who are currently logged in to the web user interface may experience a connection error and could lose unsubmitted changes. This
occurs only if the certificate is not already marked as trusted by the browser.

Do you want to continue? [Y]> Y

Management (HTTPS):
Choose the operation you want to perform:
1. PASTE - Copy paste cert and key manually
2. SELECT - select from available list of certificates
[1]> 2

Select the certificate you want to upload
1. SelfSignCertificate
2. SWA_GUI.cisco.com
[1]> 1

Do you want add an intermediate certificate? [N]> N

Successfully updated the certificate/key for HTTPS management access.
Step 15. Type commit to save the changes.
Test the Certificate From Command Line
You can check the certificate using the openssl command:
openssl s_client -connect <HOSTNAME/FQDN>:<Management_TCP_Port>
In this example, the hostname is SWA.cisco.com and the management interface is set as default (TCP port 8443).
On the second line in the output, you can see the certificate details:
openssl s_client -connect SWA.cisco.com:8443
CONNECTED(00000003)
depth=0 C = US, CN = SelfSignCertificate, L = City, O = CiscoLAB, ST = State, OU = SWA
Common Errors
Here are some common errors you can face while trying to create or modify your GUI certificate.
Error Invalid PKCS#12 Format
 Image - Invalid PKCS#12 format
There could be two causes of this error:
- The Certificate file is damaged and is not valid.
Try to open the certificate, if you get an error while opening, you can re-generate or download the certificate again.
2. The CSR that was previously generated is no longer valid.
When you generate a CSR, you must make sure to Submit and Commit your changes. The reason is that your CSR was not saved when you logged out or changed pages. The profile that you created when you generated the CSR contains the private key required for successfully uploading your certificate. Once this profile is gone, the private key is gone. Therefore, another CSR must be generated and then once again taken to your CA.
Days Must Be an Integer
 Image - Days Must Be an Integer Error
This error is due to the uploaded certificate being expired or having 0-day validity.
To solve the issue, please check the certificate expiration date and make sure your SWA date and time is correct.
Certificate Validation Error
This error means the Root CA or the Intermediate CA are not added in the Trusted Root Certificate list in SWA. To solve the issue, if you are using both Root CA and Intermediate CA:
1. Upload the Root CA to SWA, then Commit.
2. Upload the Intermediate CA, then Commit the changes again.
3. Upload your GUI certificate.

Note: To upload the Root or Intermediate CA, from the GUI: Network. In the Certificate Management section, choose Manage Trusted Root Certificates. In Custom Trusted Root Certificates click Import to upload your CA certificates.
Invalid Password
 Image - Invalid Password
This error Indicates the PKCS#12 certificate password is incorrect. To solve the error, type the correct password, or regenerate the certificate.
The Certificate is Not Yet Valid
 Image - The Certificate is Not Yet Valid
1. Ensure the SWA date and time are correct.
2. Check the certificate date and ensure the "Not Before" date and time are correct.

Tip: If you have just generated the certificate, please wait for a minute then upload the certificate.
Restart GUI service from CLI
To restart the WebUI service you can use these steps from CLI:
Step 1. Log in to CLI.
Step 2. Type diagnostic (This is a hidden command and does not auto type with TAB).
Step 3. Choose SERVICES.
Step 4. Select WEBUI.
Step 5. Choose RESTART.
Related Information


 Feedback