Extract ACL from CSM in CSV Format through API Method
Available Languages
Download Options
Bias-Free Language
The documentation set for this product strives to use bias-free language. For the purposes of this documentation set, bias-free is defined as language that does not imply discrimination based on age, disability, gender, racial identity, ethnic identity, sexual orientation, socioeconomic status, and intersectionality. Exceptions may be present in the documentation due to language that is hardcoded in the user interfaces of the product software, language used based on RFP documentation, or language that is used by a referenced third-party product. Learn more about how Cisco is using Inclusive Language.
Contents
Introduction
This document describes how to extract the Access Control Lists (ACL), in Comma-Separated Values (CSV) format, of a device managed by the Cisco Security Manager (CSM) through the CSM API Method.
Prerequisites
Requirements
Cisco recommends that you have knowledge of these topics:
- Cisco Security Manager (CSM)
- CSM API
- API basic knowledge
Components Used
The information in this document is based on these software and hardware versions:
- CSM Server
- CSM API license
Product Name: L-CSMPR-API
Product Description: L-CSMPR-API : Cisco Security Manager Pro - License to enable API Access
- Adaptative Security Appliance (ASA) managed by CSM
- An API client. You can use cURL, Python, or Postman. This article demonstrates the whole process with Postman.
CSM client application must be closed. If a CSM client application is open, must be by a different user than the one who uses the API method. Otherwise, API returns an error. For additional prerequisites to use the API feature you can use the next guide. API Prerequisites
The information in this document was created from the devices in a specific lab environment. All of the devices used in this document started with a cleared (default) configuration. If your network is live, ensure that you understand the potential impact of any command.
Background Information
Cisco Security Manager (CSM) has some functionalities for the managed devices configuration which need to be implemented through API.
One of these configuration options is the method to extract a list of the Access Control List (ACL) configured in each device managed by CSM. The use of the CSM API is the only way to achieve this requirement so far.
For these purposes, Postman used as the API Client and CSM version 4.19 SP1, ASA 5515 version 9.8(4).
Network Diagram
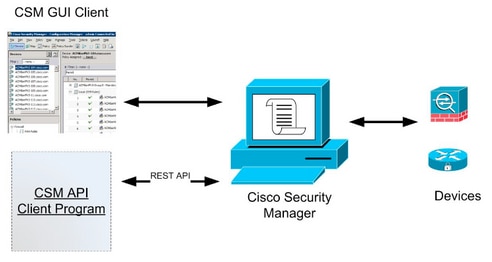
CSM API License Installation/Verification
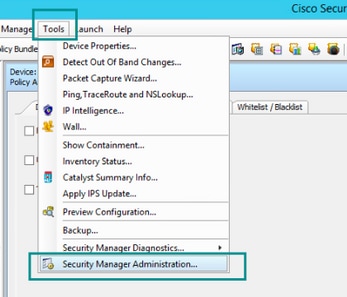
CSM API is a licensed feature, you can verify that the CSM has an API license, in the CSM client, navigate to Tools > Security Manager Administration > Licensing page to confirm that you have a license already installed.
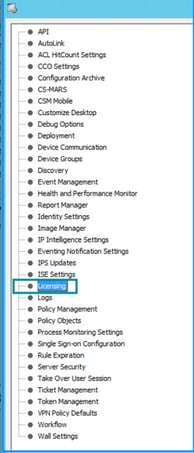
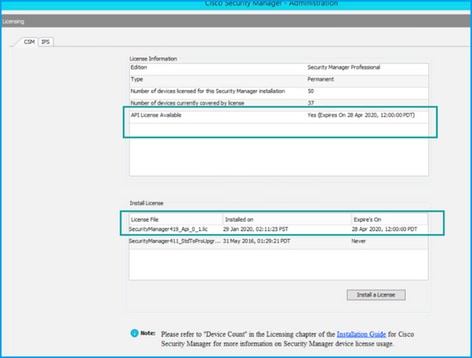
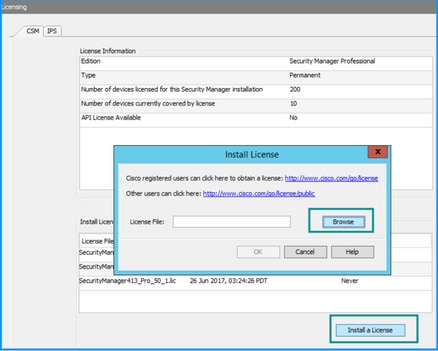
If there's no API license applied but you already have the .lic file you can install your license, click the Install a License button, you must store the license file under the same disk where the CSM server is located.
To install a newer Cisco Security Manager license follow these steps:
Step 1. Save the attached license file (.lic) from the email you received to your file system.
Step 2. Copy the saved license file to a known location on the Cisco Security Manager server file system.
Step 3. Launch the Cisco Security Manager Client.
Step 4. Navigate to Tools->Security Manager Administration...
Step 5. From the Cisco Security Manager - Administration window, select Licensing
Step 6. Click the Install a License button.
Step 7. From the Install License dialog, select the Browse button.
Step 8. Navigate to and select the saved license file on the Cisco Security Manager server file system and select the OK button.
Step 9. From the Install License dialog box, click the OK button.
Step 10. Confirm the License Summary information displayed and click the Close button.
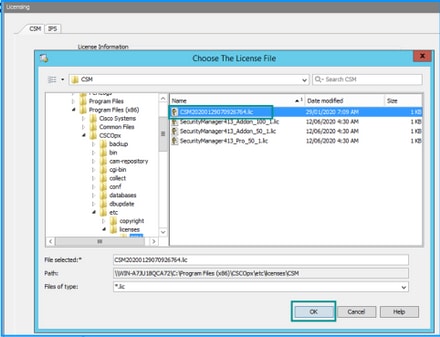
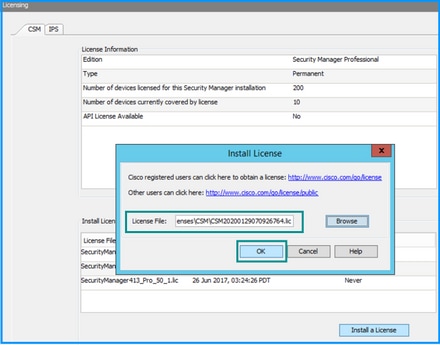
The API license can only be applied on a server licensed for the CSM professional edition. The license cannot be applied to CSM running a Standard edition of the license. API License Requirements
Configuration steps
API Client Settings
If you use Postman there are some settings you need to configure, it depends on each API client but must be similar.
- Proxy disabled
- SSL verification - OFF
CSM Settings
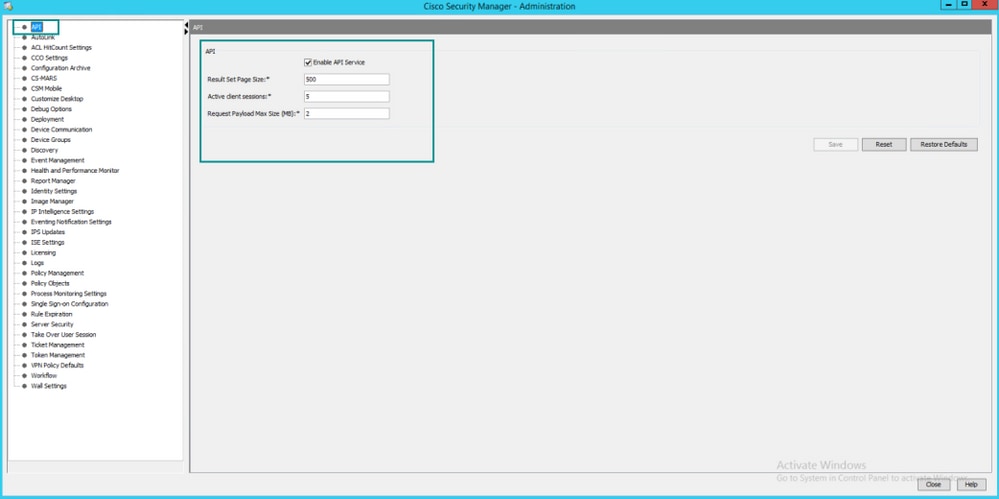
- Enabled API. Under Tools > Security Manager Administration > API
Work with CSM API
You need to configure in the API client the below two calls:
1. Login Method
2. Get ACL values
For reference through the process:
CSM access details used in this lab:
CSM Hostname (IP Address): 192.168.66.116. In the API we use the hostname in the URL.
User: admin
Password: Admin123
Log in Method
This method must be called prior to any other method called on other services.
Request
1. HTTP Method : POST
2. URL: https://<hostname>/nbi/login
3. Body:
<?xml version="1.0" encoding="UTF-8"?>
<csm:loginRequest xmlns:csm="csm"
<protVersion>1.0</protVersion>
<reqId>123</reqId>
<username>admin</username>
<password>Admin123</password>
<heartbeatRequested>true</heartbeatRequested>
<callbackUrl>https://192.168.66.116/nbi/login</callbackUrl>
</csm:loginRequest>
Where:
Username: The CSM client username associated with the session
Password: The CSM client password associated with the session.
reqId: This attribute uniquely identifies a request done by the client, this value echoes by the CSM Server in the associated response. It can be set to anything the user wishes to use as an identifier.
heartbeatRequested: This attribute may be optionally defined. If the attribute is set to true, then the CSM client receives a heartbeat callback from the CSM server. The server tries to ping the client with a frequency close to (inactivity timeout) / 2minutes. If the client does not respond to the heartbeat, then the API retries the heartbeat during the next interval. If the heartbeat is successful, then the session inactivity timeout is reset.
callbackUrl: The URL at which the CSM server makes the callback. This needs to be specified if the heartbeatRequested is true. Only HTTPS based callback URLs are allowed
4. Send
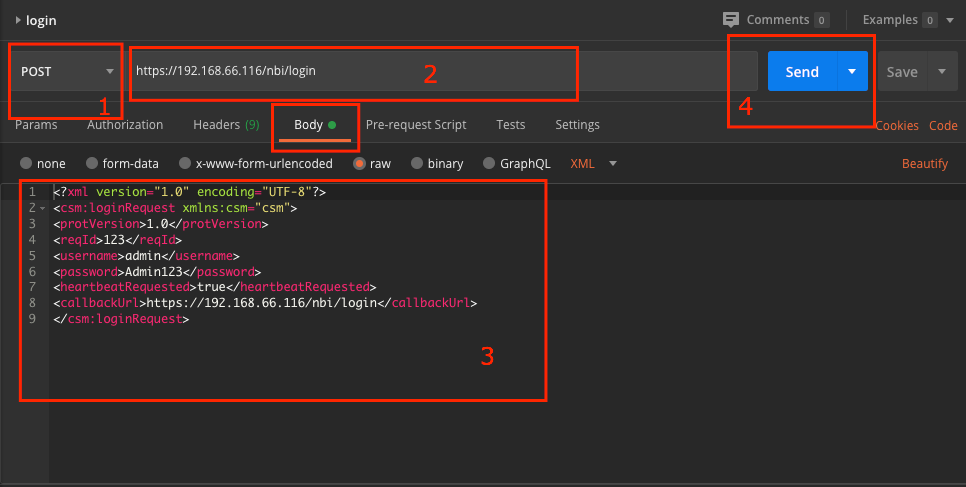 Select raw option to see as in this example.
Response
The Login API validates the user credentials and returns a session token as a secure cookie. The session value is stored under the asCookie key, you must save this asCookie value.
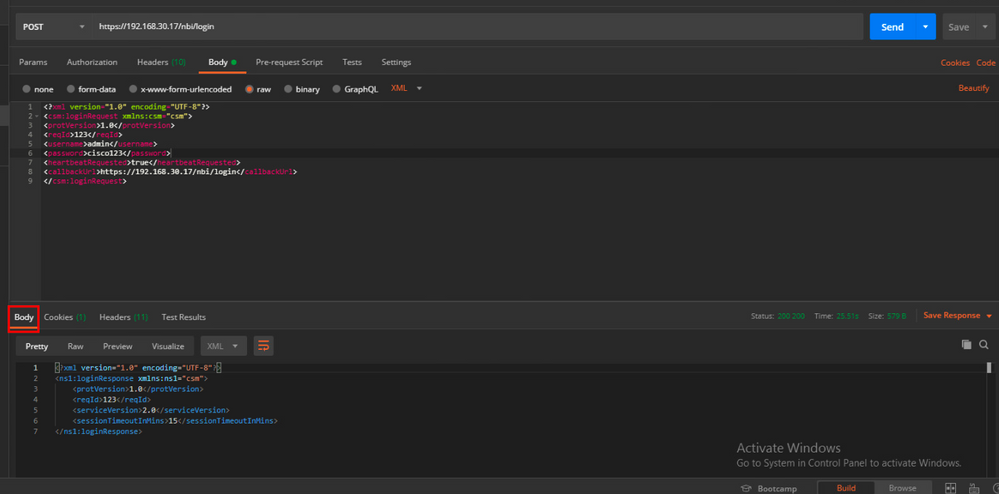
Get ACL Rules
Method execDeviceReadOnlyCLICmds. The set of commands that can be executed by this method is read-only commands such as statistics, monitoring commands that provide additional information about the operation of the particular device.
Method details from the CSM API User Guide
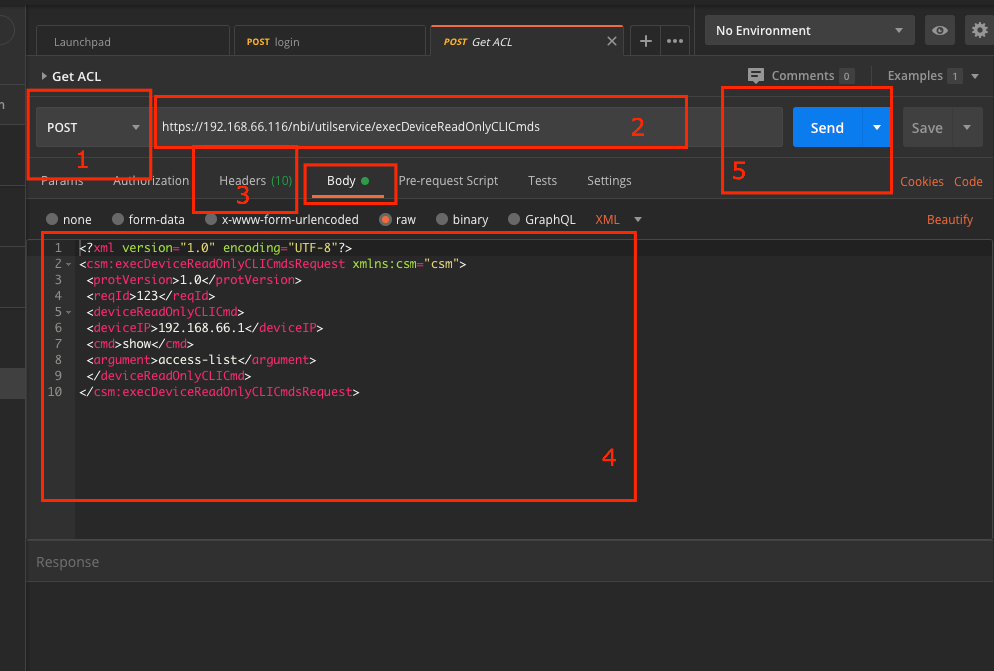
Request
1. HTTP Method: POST
2. URL: https://hostname/nbi/utilservice/execDeviceReadOnlyCLICmds
3. HTTP Header: The cookie returned by the login method that identifies the authentication session.
Input asCookie value obtained previously from Method Login.
Key: Input “asCookie”
Value: Input value obtained.
Click on checkbox to enable it.
4. Body:
<?xml version="1.0" encoding="UTF-8"?>
<csm:execDeviceReadOnlyCLICmdsRequest xmlns:csm="csm">
<protVersion>1.0</protVersion>
<reqId>123</reqId>
<deviceReadOnlyCLICmd>
<deviceIP>192.168.66.1</deviceIP>
<cmd>show</cmd>
<argument>access-list</argument>
</deviceReadOnlyCLICmd>
</csm:execDeviceReadOnlyCLICmdsRequest>Note: The XML body above can be used to execute any "show" command, for example: "show run all", "show run object", "show run nat", etc.
The XML "<deviceReadOnlyCLICmd>" element denotes that the command specified within "<cmd>" and "<argument>" MUST be read only.
Where:
deviceIP: The device IP address that the command must be executed against.
cmd: Fixed command ”show”. The regex allows mixed case [sS][hH][oO][wW]
argument: The show command arguments. Like “run” to show the running config of the device or “access-list” to show the access list details.
5. Send
Response

Verify
You have the option to Save Response as a File. Navigate to Save Response > Save to a file. Then select the file location and save it as a .csv type.
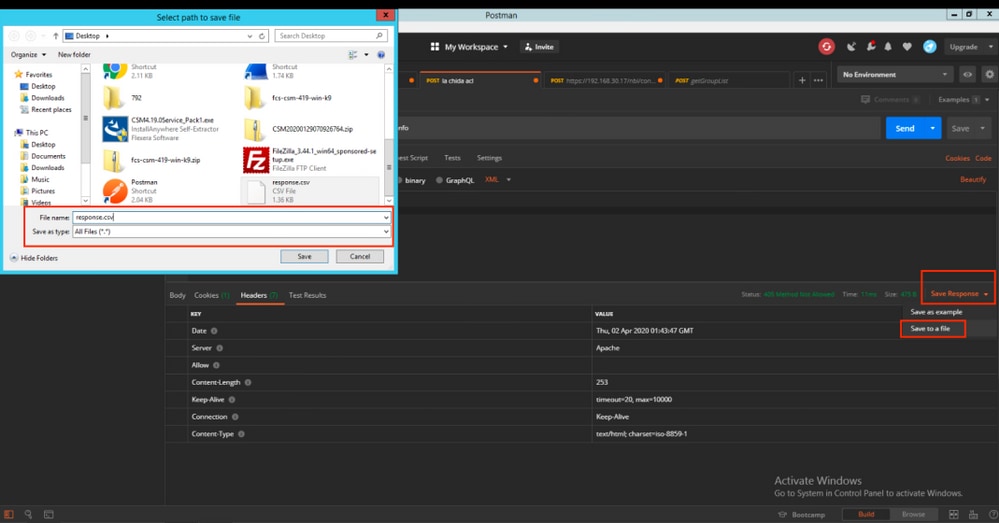
Then you must be able to open this .csv file with Excel Application, for example. From the .csv file type, you can save the output as other file types, such as PDF, TXT, etc.
Troubleshoot
Possible failure responses using API.
1. No API License Installed.
Cause: API License expired, not installed, or not enabled.
Possible solution: Verify license's expiration date, under Tools > Security Manager Administration > Licensing page
Verify API feature is enabled under Tools > Security Manager Administration > API
Confirm settings of the CSM API License Installation/Verification section above of this guide.
2. Bad CSM IP Address use for the API login.
Cause: IP Address of the CSM Server is wrong in the URL of the API call.
Possible solution: Verify in the URL of the API client that the hostname is the right IP Address of the CSM server.
URL: https://<hostname>/nbi/login
3. Wrong ASA IP Address.
Cause: The IP address defined on the Body between the <deviceIP></deviceIP> tags must not be the right one.
Possible solution: Confirm the right device IP address is defined within the Body Syntax.
4. No connection to the firewall.
Cause: The device has no connection with the CSM
Possible solution: Run a Test Connectivity from the CSM server and troubleshoot further connectivity to the device.
For further Error Codes and Description find further details in the Cisco Security Manager API Specification Guide in the next link.
Contributed by Cisco Engineers
- Berenice GuerraCisco TAC Engineer
- Raphael MorenoCisco TAC Engineer
- Ricardo GutierrezCisco TAC Engineer
Contact Cisco
- Open a Support Case

- (Requires a Cisco Service Contract)

 Feedback