ASA 7.2(2): SSL VPN Client (SVC) for Public Internet VPN on a Stick Configuration Example
Available Languages
Contents
Introduction
This document describes how to set up an Adaptive Security Appliance (ASA) 7.2.2 to perform SSL VPN on a stick. This setup applies to a specific case in which the ASA does not allow split tunneling and users connect directly to the ASA before they are permitted to go to the Internet.
Note: In ASA version 7.2.2, the intra-interface keyword of the same-security-traffic permit configuration mode command allows all traffic to enter and exit the same interface (not just IPsec traffic).
Prerequisites
Requirements
Ensure that you meet these requirements before you attempt this configuration:
-
The hub ASA Security Appliance needs to run version 7.2.2
-
Cisco SSL VPN Client (SVC) 1.x
Note: Download the SSL VPN Client package (sslclient-win*.pkg) from Cisco Software Download (registered customers only) . Copy the SVC to the flash memory on the ASA. The SVC is to be downloaded to the remote user computers in order to establish the SSL VPN connection with the ASA. Refer to Installing the SVC Software section of the Cisco Security Appliance Command Line Configuration Guide, Version 7.2 for more information.
Components Used
The information in this document is based on these software and hardware versions:
-
Cisco 5500 Series Adaptive Security Appliance (ASA) that runs software version 7.2(2)
-
Cisco SSL VPN Client version for Windows 1.1.4.179
-
PC that runs Windows 2000 Professional or Windows XP
-
Cisco Adaptive Security Device Manager (ASDM) version 5.2(2)
The information in this document was created from the devices in a specific lab environment. All of the devices used in this document started with a cleared (default) configuration. If your network is live, make sure that you understand the potential impact of any command.
Conventions
Refer to the Cisco Technical Tips Conventions for more information on document conventions.
Background Information
The SSL VPN Client (SVC) is a VPN tunneling technology that gives remote users the benefits of an IPSec VPN client without the need for network administrators to install and configure IPSec VPN clients on remote computers. The SVC uses the SSL encryption that is already present on the remote computer as well as the WebVPN login and authentication of the security appliance.
To establish an SVC session, the remote user enters the IP address of a WebVPN interface of the security appliance in the browser, and the browser connects to that interface and displays the WebVPN login screen. If the user satisfies the login and authentication, and the security appliance identifies the user as requiring the SVC, the security appliance downloads the SVC to the remote computer. If the security appliance identifies the user as having the option to use the SVC, the security appliance downloads the SVC to the remote computer while presenting a link on the user screen to skip the SVC installation.
After downloading, the SVC installs and configures itself, and then the SVC either remains or uninstalls itself (depending on the configuration) from the remote computer when the connection terminates.
Configure
In this section, you are presented with the information to configure the features described in this document.
Note: Use the Command Lookup Tool (registered customers only) to obtain more information on the commands used in this section.
Network Diagram
This document uses this network setup:
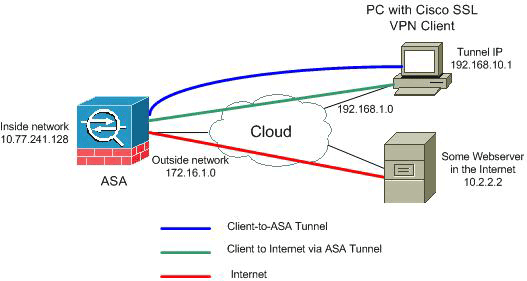
Note: The IP addressing schemes used in this configuration are not legally routable on the Internet. They are RFC 1918 ![]() addresses which have been used in a lab environment.
addresses which have been used in a lab environment.
ASA 7.2(2) Configurations Using ASDM 5.2(2)
This document assumes the basic configurations, such as interface configuration, are already made and working properly.
Note: Refer to Allowing HTTPS Access for ASDM in order to allow the ASA to be configured by the ASDM.
Note: WebVPN and ASDM cannot be enabled on the same ASA interface unless you change the port numbers. Refer to ASDM and WebVPN Enabled on the Same Interface of ASA for more information.
Complete these steps in order to configure the SSL VPN on a stick in ASA:
-
Choose Configuration > Interfaces, and check the Enable traffic between two or more hosts connected to the same interface check box in order to allow SSL VPN traffic to enter and exit the same interface.
-
Click Apply.
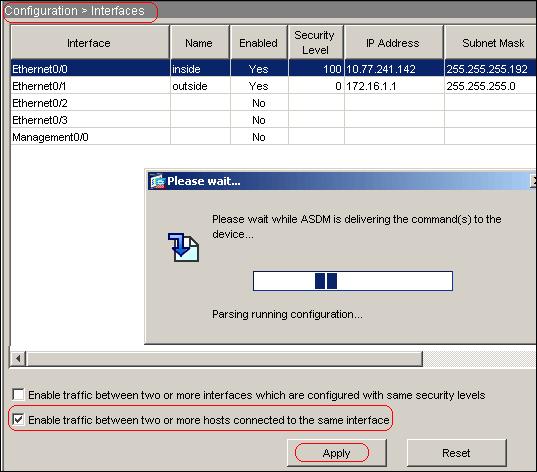
Note: Here is the equivalent CLI configuration command:
Cisco ASA 7.2(2) ciscoasa(config)#same-security-traffic permit intra-interface
-
Choose Configuration > VPN > IP Address Management > IP Pools > Add in order to create an IP address pool named vpnpool.
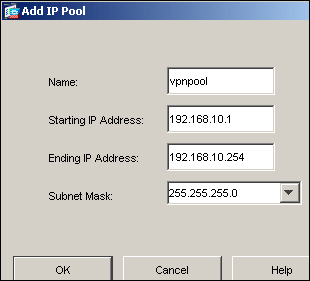
-
Click Apply.
Note: Here is the equivalent CLI configuration command:
Cisco ASA 7.2(2) ciscoasa(config)#ip local pool vpnpool 192.168.10.1-192.168.10.254
-
Enable WebVPN:
-
Choose Configuration > VPN > WebVPN > WebVPN Access, and select the outside interface.
-
Click Enable.
-
Check the Enable Tunnel Group Drop-down List on WebVPN Login Page check box in order to allow users to choose their respective groups from the Login page.
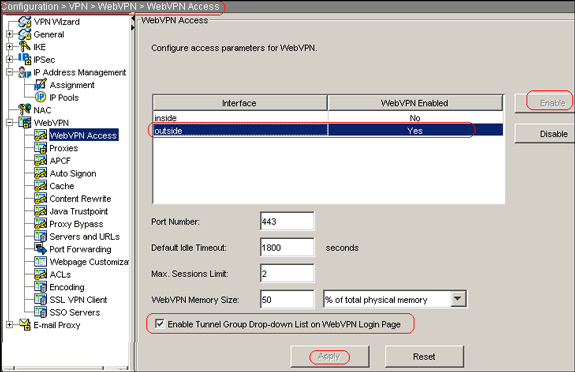
-
Click Apply.
-
Choose Configuration > VPN > WebVPN > SSL VPN Client > Add in order to add the SSL VPN Client image from the flash memory of ASA.
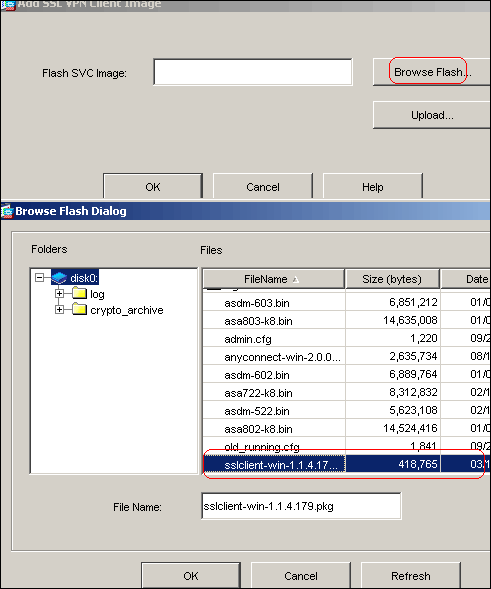
-
Click OK.
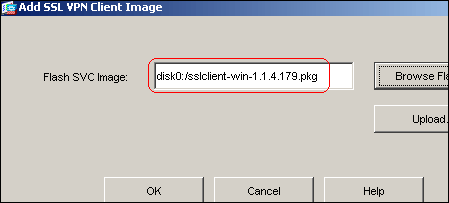
-
Click OK.
-
Click SSL VPN Client check box.
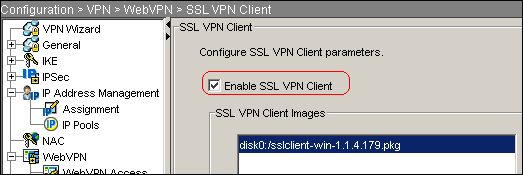
Note: Here are the equivalent CLI configuration commands:
Cisco ASA 7.2(2) ciscoasa(config)#webvpn ciscoasa(config-webvpn)#enable outside ciscoasa(config-webvpn)#svc image disk0:/sslclient-win-1.1.4.179.pkg 1 ciscoasa(config-webvpn)#tunnel-group-list enable ciscoasa(config-webvpn)#svc enable
-
-
Configure the group policy:
-
Choose Configuration > VPN > General > Group Policy > Add (Internal Group Policy) in order to create an internal group policy named clientgroup.
-
Click the General tab, and select the WebVPN check box in order to enable the WebVPN as tunneling protocol.
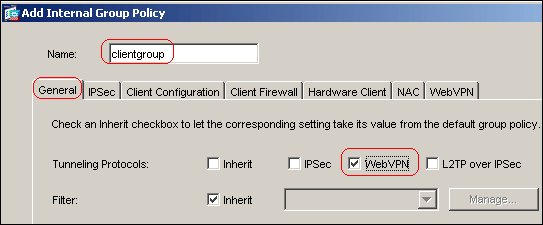
-
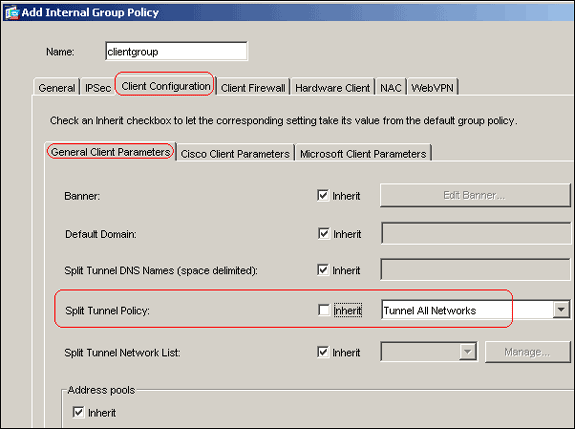
Click the Client Configuration tab, and then click the General Client Parameters tab.
-
Choose Tunnel All Networks from the Split Tunnel Policy drop-down list in order to make all the packets travel from the remote PC through a secure tunnel.
-
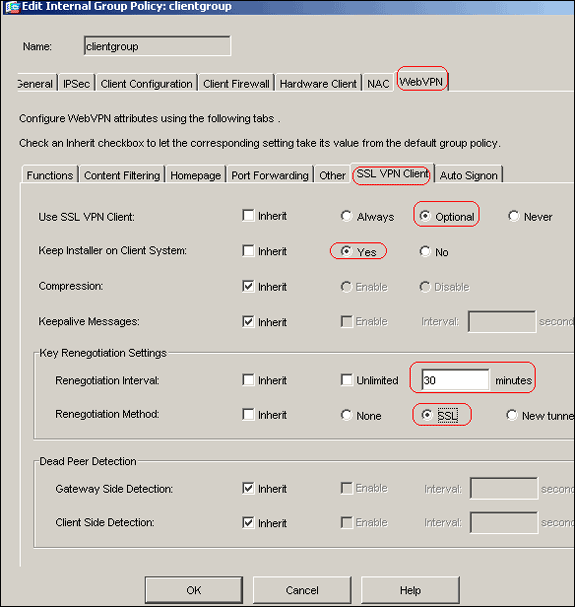
Click the WebVPN > SSLVPN Client tab, and choose these options:
-
For the Use SSL VPN Client option, uncheck the Inherit check box, and click the Optional radio button.
This option allows the remote client to choose whether or not to download the SVC. The Always choice ensures that the SVC is downloaded to the remote workstation during each SSL VPN connection.
-
For the Keep Installer on Client System option, uncheck the Inherit check box, and click the Yes radio button
This option allows the SVC software to remain on the client machine. Therefore, the ASA is not required to download the SVC software to the client each time a connection is made. This option is a good choice for remote users who often access the corporate network.
-
For the Renegotiation Interval option, uncheck the Inherit box, uncheck the Unlimited check box, and enter the number of minutes until rekey.
Note: Security is enhanced by setting limits on the length of time a key is valid.
-
For the Renegotiation Method option, uncheck the Inherit check box, and click the SSL radio button.
Note: Renegotiation can use the present SSL tunnel or a new tunnel created specifically for renegotiation.
Your SSL VPN Client attributes should be configured as shown in this image:
-
-
Click OK, and then click Apply.

Note: Here are the equivalent CLI configuration commands:
Cisco ASA 7.2(2) ciscoasa(config)#group-policy clientgroup internal ciscoasa(config)#group-policyclientgroup attributes ciscoasa(config-group-policy)#vpn-tunnel-protocol webvpn ciscoasa(config-group-policy)#split-tunnel-policy tunnelall ciscoasa(config-group-policy)#webvpn ciscoasa(config-group-webvpn)#svc required ciscoasa(config-group-webvpn)#svc keep-installer installed ciscoasa(config-group-webvpn)#svc rekey time 30 ciscoasa(config-group-webvpn)#svc rekey method ssl
-
-
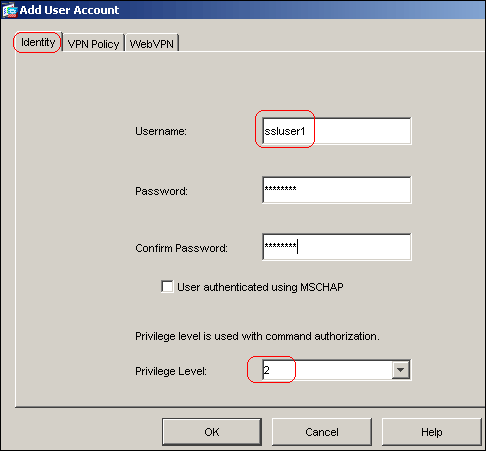
Choose Configuration > VPN > General > Users > Add in order to create a new user account ssluser1.
-
Click OK, and then click Apply.
Note: Here is the equivalent CLI command:
Cisco ASA 7.2(2) ciscoasa(config)#username ssluser1 password asdmASA@ -
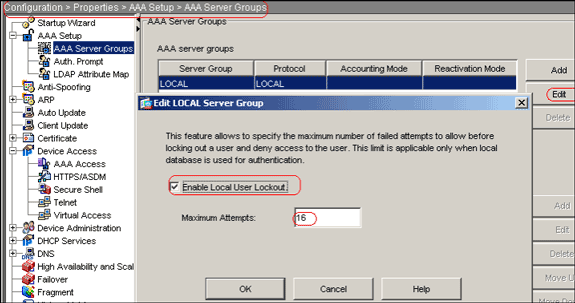
Choose Configuration > Properties > AAA Setup > AAA Servers Groups > Edit.
-
Select the the default server group LOCAL, and click Edit.
-
In the Edit LOCAL Server Group dialog box, click the Enable Local User Lockout check box, and enter 16 in the Maximum Attempts text box.
-
Click OK.
Note: Here is the equivalent CLI command:
Cisco ASA 7.2(2) ciscoasa(config)#aaa local authentication attempts max-fail 16
-
Configure the tunnel group:
-
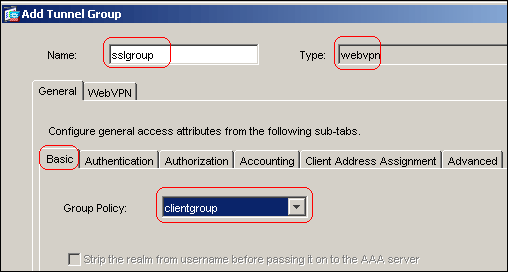
Choose Configuration > VPN > General > Tunnel Group > Add(WebVPN access) in order to create a new tunnel group named sslgroup.
-
Click the General tab, and then click the Basic tab.
-
Choose clientgroup from the Group Policy drop-down list.
-
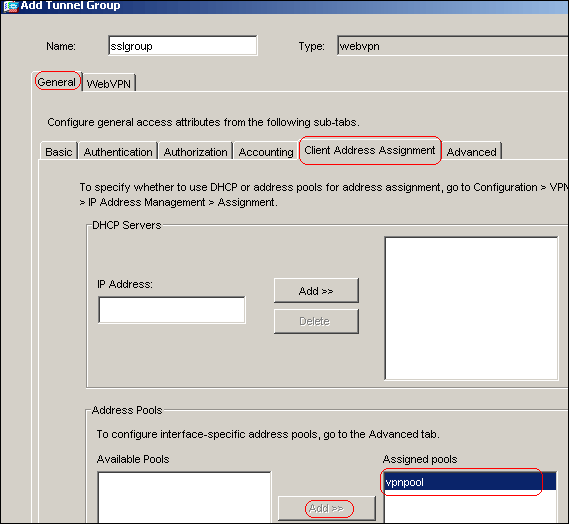
Click the Client Address Assignment tab, and then click Add in order to assign the available address pool vpnpool.
-
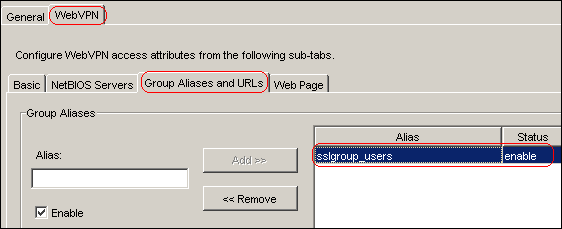
Click the WebVPN tab, and then click the Group Aliases and URLs tab.
-
Type the alias name in the parameter box, and click Add in order to add it to the list of group names on the Login page.
-
Click OK, and then click Apply.
Note: Here are the equivalent CLI configuration commands:
Cisco ASA 7.2(2) ciscoasa(config)#tunnel-group sslgroup type webvpn ciscoasa(config)#tunnel-group sslgroup general-attributes ciscoasa(config-tunnel-general)#address-pool vpnpool ciscoasa(config-tunnel-general)#default-group-policy clientgroup ciscoasa(config-tunnel-general)#exit ciscoasa(config)#tunnel-group sslgroup webvpn-attributes ciscoasa(config-tunnel-webvpn)#group-alias sslgroup_users enable
-
-
Configure NAT:
-
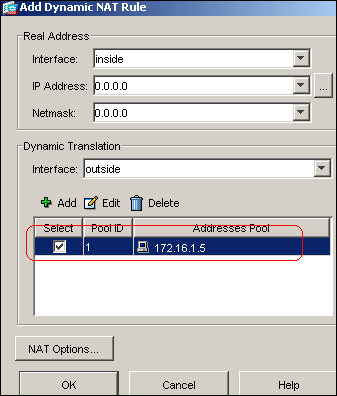
Choose Configuration > NAT > Add > Add Dynamic NAT Rule to allow the traffic that comes from the inside network to be translated with the use of the outside IP address 172.16.1.5.
-
Click OK.
-
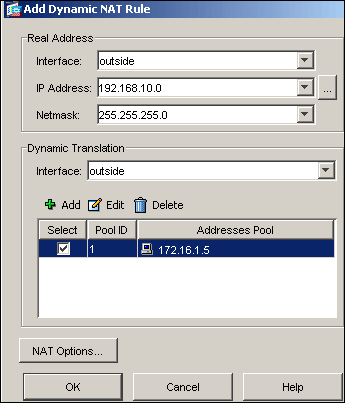
Choose Configuration > NAT > Add > Add Dynamic NAT Rule to allow the traffic that comes from the outside network 192.168.10.0 to be translated with the use of the outside IP address 172.16.1.5.
-
Click OK.

-
Click Apply.
Note: Here are the equivalent CLI configuration commands:
Cisco ASA 7.2(2) ciscoasa(config)#global (outside) 1 172.16.1.5 ciscoasa(config)#nat (inside) 1 0.0.0.0 0.0.0.0 ciscoasa(config)#nat (outside) 1 192.168.10.0 255.255.255.0
-
ASA 7.2(2) CLI Configuration
| Cisco ASA 7.2(2) |
|---|
ciscoasa#show running-config : Saved : ASA Version 7.2(2) ! hostname ciscoasa enable password 8Ry2YjIyt7RRXU24 encrypted names ! interface Ethernet0/0 nameif inside security-level 100 ip address 10.77.241.142 255.255.255.192 ! interface Ethernet0/1 nameif outside security-level 0 ip address 172.16.1.1 255.255.255.0 ! interface Ethernet0/2 shutdown no nameif no security-level no ip address ! interface Ethernet0/3 shutdown no nameif no security-level no ip address ! interface Management0/0 shutdown no nameif no security-level no ip address ! passwd 2KFQnbNIdI.2KYOU encrypted ftp mode passive same-security-traffic permit intra-interface !--- Command that permits the SSL VPN traffic to enter !--- and exit the same interface. access-list 100 extended permit icmp any any pager lines 24 mtu inside 1500 mtu outside 1500 ip local pool vpnpool 192.168.10.1-192.168.10.254 !--- The address pool for the SSL VPN Clients. no failover icmp unreachable rate-limit 1 burst-size 1 asdm image disk0:/asdm-522.bin no asdm history enable arp timeout 14400 global (outside) 1 172.16.1.5 !--- The global address for Internet access used by VPN Clients. !--- Note: Uses an RFC 1918 range for lab setup. !--- Apply an address from your public range provided by your ISP. nat (inside) 1 0.0.0.0 0.0.0.0 !--- The NAT statement to define what to encrypt !--- (the addresses from vpn-pool). nat (outside) 1 192.168.10.0 255.255.255.0 access-group 100 in interface outside route outside 0.0.0.0 0.0.0.0 172.16.1.2 1 timeout xlate 3:00:00 timeout conn 1:00:00 half-closed 0:10:00 udp 0:02:00 icmp 0:00:02 timeout sunrpc 0:10:00 h323 0:05:00 h225 1:00:00 mgcp 0:05:00 mgcp-pat 0:05:0 timeout sip 0:30:00 sip_media 0:02:00 sip-invite 0:03:00 sip-disconnect 0:02: timeout uauth 0:05:00 absolute group-policy clientgroup internal !--- Create an internal group policy "clientgroup." group-policy clientgroup attributes vpn-tunnel-protocol webvpn !--- Enable webvpn as tunneling protocol. split-tunnel-policy tunnelall !--- Encrypt all the traffic coming from the SSL VPN Clients. webvpn svc required !--- Activate the SVC under webvpn mode svc keep-installer installed !--- When the security appliance and the SVC perform a rekey, they renegotiate !--- the crypto keys and initialization vectors, increasing the security of !--- the connection. svc rekey time 30 --- Command that specifies the number of minutes from the start of the !--- session until the rekey takes place, from 1 to 10080 (1 week). svc rekey method ssl !--- Command that specifies that SSL renegotiation takes place during SVC rekey. username ssluser1 password ZRhW85jZqEaVd5P. encrypted !--- Create an user account "ssluser1." aaa local authentication attempts max-fail 16 !--- Enable the AAA local authentication. http server enable http 0.0.0.0 0.0.0.0 inside no snmp-server location no snmp-server contact snmp-server enable traps snmp authentication linkup linkdown coldstart tunnel-group sslgroup type webvpn !--- Create a tunnel group "sslgroup" with type as WebVPN. tunnel-group sslgroup general-attributes address-pool vpnpool !--- Associate the address pool vpnpool created. default-group-policy clientgroup !--- Associate the group policy "clientgroup" created. tunnel-group sslgroup webvpn-attributes group-alias sslgroup_users enable !--- Configure the group alias as sslgroup-users. telnet timeout 5 ssh timeout 5 console timeout 0 ! class-map inspection_default match default-inspection-traffic ! ! policy-map type inspect dns preset_dns_map parameters message-length maximum 512 policy-map global_policy class inspection_default inspect dns preset_dns_map inspect ftp inspect h323 h225 inspect h323 ras inspect netbios inspect rsh inspect rtsp inspect skinny inspect esmtp inspect sqlnet inspect sunrpc inspect tftp inspect sip inspect xdmcp ! service-policy global_policy global webvpn enable outside !--- Enable WebVPN on the outside interface. svc image disk0:/sslclient-win-1.1.4.179.pkg 1 !--- Assign an order to the SVC image. svc enable !--- Enable the security appliance to download SVC images to remote computers. tunnel-group-list enable !--- Enable the display of the tunnel-group list on the WebVPN Login page. prompt hostname context Cryptochecksum:d41d8cd98f00b204e9800998ecf8427e : end ciscoasa# |
Establish the SSL VPN Connection with SVC
Complete these steps in order to establish a SSL VPN connection with ASA.
-
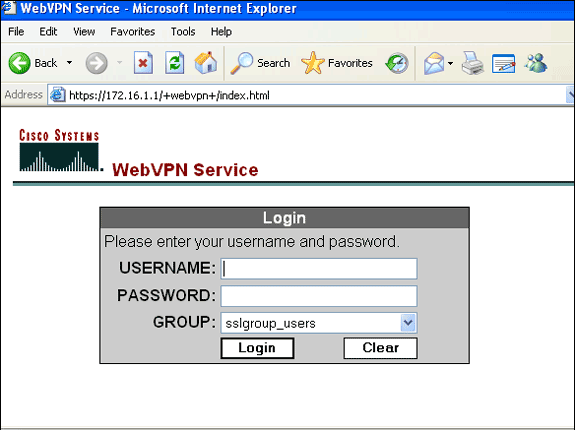
Type in the Address field of your web browser the URL or IP address for the WebVPN interface of the ASA.
For example:
https://<IP address of the ASA WebVPN interface>
-
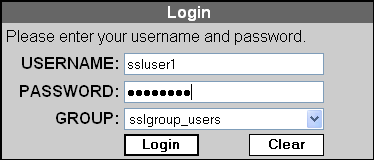
Enter your user name and password, and then choose your respective group from the Group drop-down list.
Note: ActiveX software must be installed in your computer before you download the SSL VPN Client.
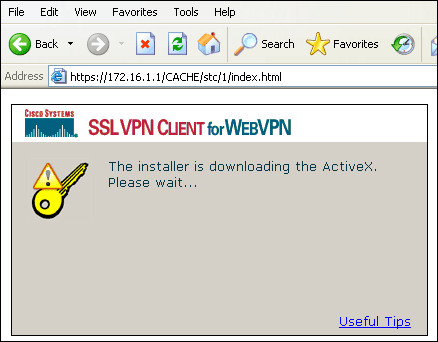
This dialog box appears as the connection is established:

This message appears once the connection is established:

-
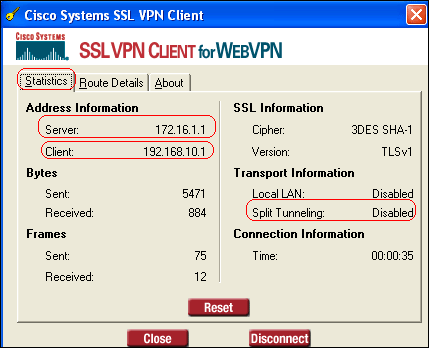
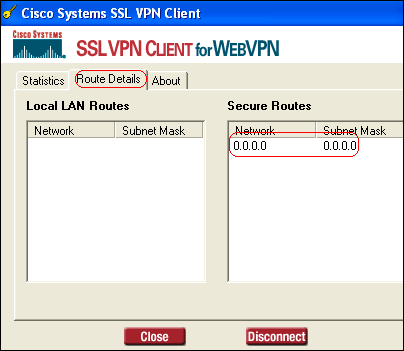
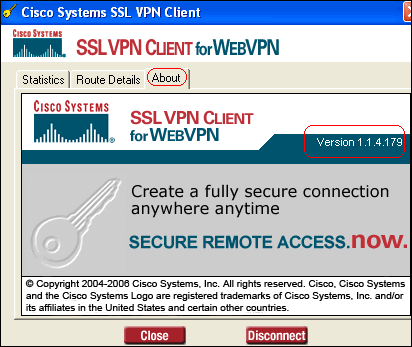
Once the connection is established, double-click the yellow key icon that appears in the task bar of your computer.
The Cisco Systems SSL VPN Client dialog box displays information about the SSL connection.
Verify
Use this section in order to confirm that your configuration works properly.
The Output Interpreter Tool (registered customers only) (OIT) supports certain show commands. Use the OIT to view an analysis of show command output.
-
show webvpn svc—Displays the SVC images stored in the ASA flash memory.
ciscoasa#show webvpn svc
1. disk0:/sslclient-win-1.1.4.179.pkg 1
  CISCO STC win2k+ 1.0.0
  1,1,4,179
  Fri 01/18/2008 15:19:49.43

1 SSL VPN Client(s) installed
-
show vpn-sessiondb svc—Displays the information about the current SSL connections.
ciscoasa#show vpn-sessiondb svc

Session Type: SVC

Username     : ssluser1
Index        : 1
Assigned IP  : 192.168.10.1           Public IP    : 192.168.1.1
Protocol     : SVC                    Encryption   : 3DES
Hashing      : SHA1
Bytes Tx     : 131813                 Bytes Rx     : 5082
Client Type  : Mozilla/4.0 (compatible; MSIE 6.0; Windows NT 5.1; SV1)
Client Ver   : Cisco Systems SSL VPN Client 1, 1, 4, 179
Group Policy : clientgroup
Tunnel Group : sslgroup
Login Time   : 12:38:47 UTC Mon Mar 17 2008
Duration     : 0h:00m:53s
Filter Name  :
-
show webvpn group-alias—Displays the configured alias for various groups.
ciscoasa#show webvpn group-alias
Tunnel Group: sslgroup   Group Alias: sslgroup_users enabled
-
In ASDM, choose Monitoring > VPN > VPN Statistics > Sessions in order to view information about the current WebVPN sessions in the ASA.

Troubleshoot
This section provides information you can use to troubleshoot your configuration.
-
vpn-sessiondb logoff name <username>—Allows you to log off the SSL VPN session for the specified user name.
ciscoasa#vpn-sessiondb logoff name ssluser1
Called vpn_remove_uauIth: success!
webvpn_svc_np_tear_down: no ACL
NFO: Number of sessions with name "ssluser1" logged off : 1
Similarly, you can use the command vpn-sessiondb logoff svc in order to terminate all the SVC sessions.
Note: If the PC goes to standby or hibernate mode, then the SSL VPN connection can be terminated.
webvpn_rx_data_cstp
webvpn_rx_data_cstp: got message
SVC message: t/s=5/16: Client PC is going into suspend mode (Sleep, Hibernate, etc)
Called vpn_remove_uauth: success!
webvpn_svc_np_tear_down: no ACL
ciscoasa#show vpn-sessiondb svc
INFO: There are presently no active sessions
-
Debug webvpn svc <1-255>—Provides the real-time WebVPN events in order to establish the session.
Ciscoasa#debug webvpn svc 7

ATTR_CISCO_AV_PAIR: got SVC ACL: -1
webvpn_rx_data_tunnel_connect
CSTP state = HEADER_PROCESSING
http_parse_cstp_method()
...input: 'CONNECT /CSCOSSLC/tunnel HTTP/1.1'
webvpn_cstp_parse_request_field()
...input: 'Host: 172.16.1.1'
Processing CSTP header line: 'Host: 172.16.1.1'
webvpn_cstp_parse_request_field()
...input: 'User-Agent: Cisco Systems SSL VPN Client 1, 1, 4, 179'
Processing CSTP header line: 'User-Agent: Cisco Systems SSL VPN Client 1, 1, 4,
179'
Setting user-agent to: 'Cisco Systems SSL VPN Client 1, 1, 4, 179'
webvpn_cstp_parse_request_field()
...input: 'X-CSTP-Version: 1'
Processing CSTP header line: 'X-CSTP-Version: 1'
Setting version to '1'
webvpn_cstp_parse_request_field()
...input: 'X-CSTP-Hostname: tacweb'
Processing CSTP header line: 'X-CSTP-Hostname: tacweb'
Setting hostname to: 'tacweb'
webvpn_cstp_parse_request_field()
...input: 'X-CSTP-Accept-Encoding: deflate;q=1.0'
Processing CSTP header line: 'X-CSTP-Accept-Encoding: deflate;q=1.0'
webvpn_cstp_parse_request_field()
...input: 'Cookie: webvpn=16885952@10@1205757506@D4886D33FBF1CF236DB5E8BE70B1486
D5BC554D2'
Processing CSTP header line: 'Cookie: webvpn=16885952@10@1205757506@D4886D33FBF1
CF236DB5E8BE70B1486D5BC554D2'
Found WebVPN cookie: 'webvpn=16885952@10@1205757506@D4886D33FBF1CF236DB5E8BE70B1
486D5BC554D2'
WebVPN Cookie: 'webvpn=16885952@10@1205757506@D4886D33FBF1CF236DB5E8BE70B1486D5B
C554D2'
Validating address: 0.0.0.0
CSTP state = WAIT_FOR_ADDRESS
webvpn_cstp_accept_address: 192.168.10.1/0.0.0.0
CSTP state = HAVE_ADDRESS
No subnetmask... must calculate it
SVC: NP setup
webvpn_svc_np_setup
SVC ACL Name: NULL
SVC ACL ID: -1
SVC ACL ID: -1
vpn_put_uauth success!
SVC: adding to sessmgmt
SVC: Sending response
CSTP state = CONNECTED
-
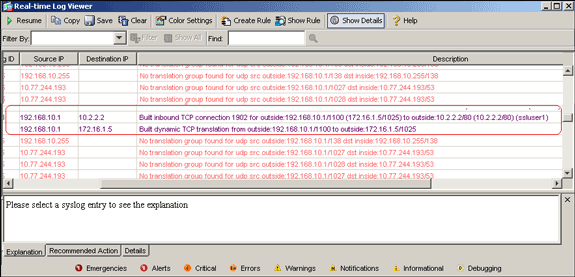
In ASDM, choose Monitoring > Logging > Real-time Log Viewer > View in order to view the real-time events. These examples show session information between the SVC 192.168.10.1 and Webserver 10.2.2.2 in the Internet via ASA 172.16.1.5.
Related Information
Revision History
| Revision | Publish Date | Comments |
|---|---|---|
1.0 |
19-Feb-2014 |
Initial Release |
Contact Cisco
- Open a Support Case

- (Requires a Cisco Service Contract)


 Feedback