Introduction
This document describes Remote Authentication Dial In User Service (RADIUS) authentication feature which was introduced in the Secure Malware Analytics Appliance (formerly Threat Grid) version 2.10. It allows users to log in to the Admin portal as well as Console portal with credentials stored in the Authentication, Authorization and Accounting (AAA) server that supports RADIUS over DTLS authentication (draft-ietf-radext-dtls-04). In this case, Cisco Identity Services Engine was used.
In this document you find necessary steps to configure the feature.
Prerequisites
Requirements
Cisco recommends that you have knowledge of these topics:
- Secure Malware Analytics Appliance (formerly Threat Grid)
- Identity Services Engine (ISE)
Components Used
The information in this document is based on these software and hardware versions:
- Secure Malware Analytics Appliance 2.10
- Identity Services Engine 2.7
The information in this document was created from the devices in a specific lab environment. All of the devices used in this document started with a cleared (default) configuration. If your network is live, make sure that you understand the potential impact of any command.
Configure
This section provides detailed instructions on how to configureSecure Malware Analytics Appliance and ISE for RADIUS Authentication feature.
Note: In order to configure the authentication, ensure that communication on port UDP 2083 is allowed between Secure Malware Analytics Appliance Clean interface and ISE Policy Service Node (PSN).
Configuration
Step 1. Prepare Secure Malware Analytics Appliance certificate for authentication.
RADIUS over DTLS uses mutual certificate authentication which means that the Certificate Authority (CA) certificate from ISE is needed. First check what CA signed RADIUS DTLS certificate:
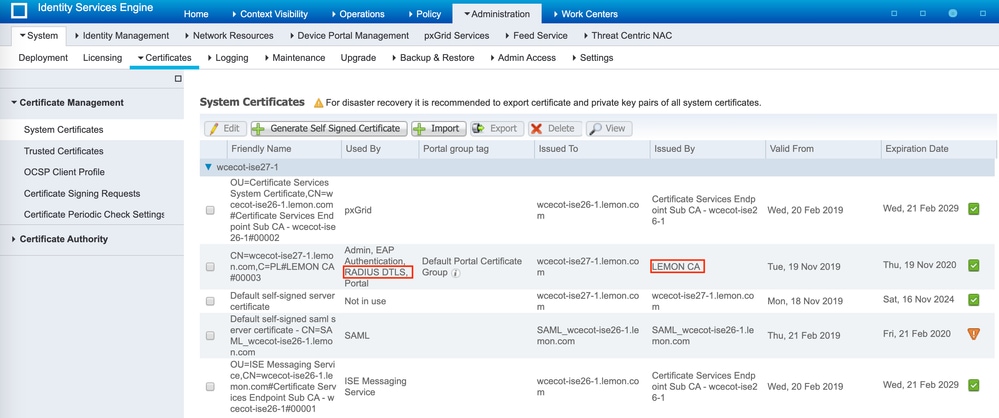
Step 2. Export the CA certificate from ISE.
Navigate to Administration > System > Certificates > Certificate Management > Trusted Certificates, locate the CA, select Export as shown in the image, and save the certificate to the disk for later:

Step 3. Add Secure Malware Analytics Appliance as Network Access Device.
Navigate to Administration > Network Resources > Network Devices > Add to create a new entry for TG and enter the Name, IP address of the Clean interface and select DTLS Required as shown in the image. Click Save at the bottom:
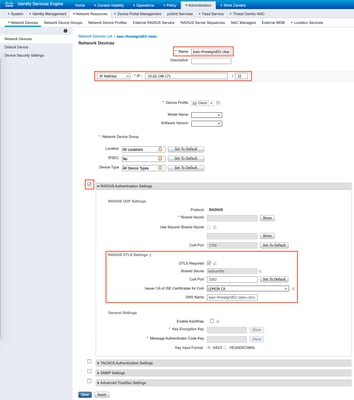
Step 4. Create an Authorization Profile for Authorization Policy.
Navigate to Policy > Policy elements > Results > Authorization > Authorization Profiles and click Add. Enter Name and select Advanced Attributes Settings as shown in the image and click Save:
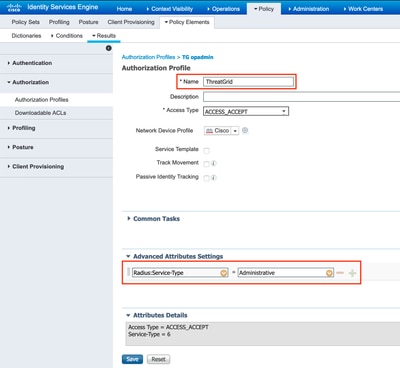
Step 5. Create an authentication policy.
Navigate to Policy > Policy Sets and click +. Enter Policy Set Name and set the condition to NAD IP Address, assigned to the Secure Malware Analytics Appliance's clean interface, click Save as shown in the image:

Step 6. Create an authorization policy.
Click the > to go to the authorization policy, expand the Authorization Policy, click + and configure as shown in the image, after you finish click Save:

Tip: You can create one authorization rule for all your users that match both conditions, Admin and UI.
Step 7. Create an identity certificate for Secure Malware Analytics Appliance.
Secure Malware Analytics Appliance's client certificate must be based on the Elliptic Curve key:
openssl ecparam -name secp256r1 -genkey -out private-ec-key.pem
You must create CSR based on that key and then it has to be signed by the CA which ISE trusts. Check Import the Root Certificates to the Trusted Certificate Store page for more information of how to add CA certificate to ISE Trusted Certificate Store.
Step 8. Configure Secure Malware Analytics Appliance to use RADIUS.
Log in to admin portal, navigate to Configuration > RADIUS. In RADIUS CA Certificate paste the content of the PEM file collected from ISE, in Client Certificate paste PEM formatted certificate received from CA and in Client Key paste content of private-ec-key.pem file from the previous step as shown in the image. Click Save:
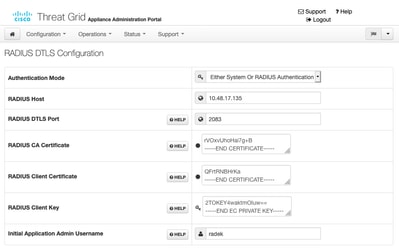
Note: You must reconfigure Secure Malware Analytics Appliance after you save RADIUS settings.
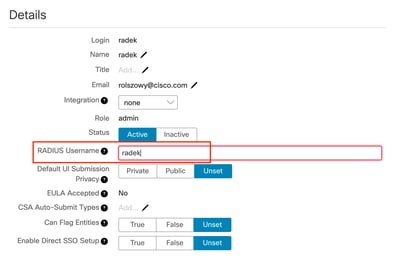
Step 9. Add RADIUS Username to console users.
In order to log in to console portal, you must add the RADIUS Username attribute to the respective user as shown in the image:
Step 10. Enable RADIUS only authentication.
After successful log in to the admin portal, a new option appears, which completely disables local system authentication and leaves the only RADIUS-based one.

Verify
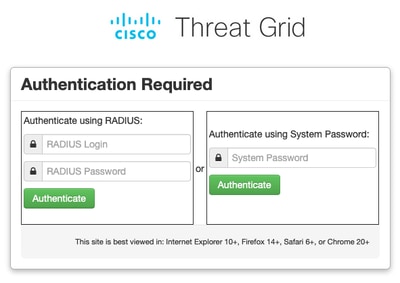
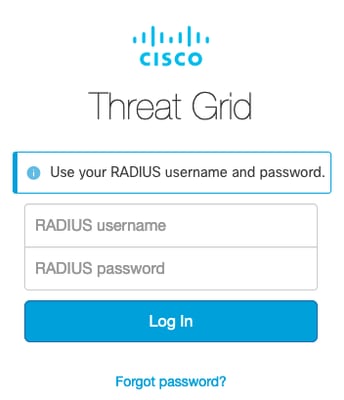
After Secure Malware Analytics Appliance has been reconfigured, log off and now the log in pages look like in the images, admin and console portal respectively:
Troubleshoot
There are three components that could cause problems: ISE, network connectivity and Secure Malware Analytics Appliance.
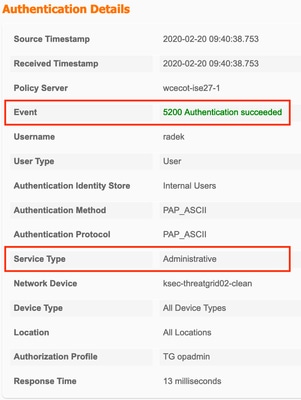
- In ISE, ensure that it returns ServiceType=Administrative to Secure Malware Analytics Appliance's authentication requests. Navigate to Operations > RADIUS > Live Logs on ISE and check details:

- If you do not see these requests, do a packet capture on ISE. Navigate to Operations > Troubleshoot > Diagnostic Tools > TCP Dump, provide the IP in Filter field of the TG's clean interface, click Start and try to log in on Secure Malware Analytics Appliance:
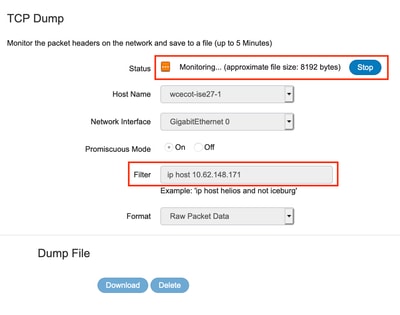
You must see that number of bytes increased. Open pcap file in Wireshark for more information.
- If you see the error "We're sorry, but something went wrong" after you click Save in Secure Malware Analytics Appliance and the page looks like this:

That means that you most probably used RSA key for the client certificate. You must use ECC key with the parameters specified in step 7.


 Feedback