Configure Secure Web Appliance Initial Setup
Available Languages
Download Options
Bias-Free Language
The documentation set for this product strives to use bias-free language. For the purposes of this documentation set, bias-free is defined as language that does not imply discrimination based on age, disability, gender, racial identity, ethnic identity, sexual orientation, socioeconomic status, and intersectionality. Exceptions may be present in the documentation due to language that is hardcoded in the user interfaces of the product software, language used based on RFP documentation, or language that is used by a referenced third-party product. Learn more about how Cisco is using Inclusive Language.
Introduction
This document describes the steps required to configure the Secure Web Appliance (SWA) for the first time.
Prerequisites
Requirements
Cisco recommends that you have knowledge of these topics:
- SWA administration.
- Fundamental networking principles.
Cisco recommends that you have:
- Physical or Virtual SWA Installed.
- Administrative Access to the SWA Graphical User Interface (GUI).
- Administrative Access to the SWA Command Line Interface (CLI).
- Administrative Access to the SWA Console.
- Valid SWA License or Access to Smart License Management portal (In case you are using Smart License).
Components Used
This document is not restricted to specific software and hardware versions.
The information in this document was created from the devices in a specific lab environment. All of the devices used in this document started with a cleared (default) configuration. If your network is live, ensure that you understand the potential impact of any command.
Installing SWA
The Cisco SWA is a forward proxy solution designed to enhance web security and control for organizations. Available in both virtual and physical forms, the SWA provides flexible deployment options to meet diverse needs. The virtual SWA supports several hypervisor platforms, including Microsoft Hyper-V, VMware ESX and KVM, ensuring compatibility with a range of virtual environments. For those who prefer a physical appliance, Cisco offers three distinct models: S100, S300 and S600. Each model is designed to cater to different levels of performance and capacity requirements, ensuring that organizations can find the right fit for their specific web security needs.
To download your virtual machine image you can visit: https://software.cisco.com/download/home .
Installing the virtual Cisco SWA is a straightforward process that begins with selecting the appropriate hypervisor platform. First, download the virtual SWA installation file from the Cisco website. For VMware ESX, deploy the OVA file, ensuring you configure the network settings and allocate sufficient resources such as CPU, memory, and storage. For Microsoft Hyper-V, import the downloaded VHD file into the Hyper-V Manager, and configure the virtual machine settings accordingly. For KVM, use the virt-manager or virsh command-line tool to define and start the virtual machine using the downloaded image. Once the virtual machine is up and running, you can use steps in this article to do the initial setup.
Initial Setup
After installing the SWA, Proceed with these steps for initial deployment.

Note: For the initial setup, you need to have access to SWA via Console, SSH and GUI.
|
Connection Method |
Stage |
Configuration Steps |
|
Console |
Configure IP Address |
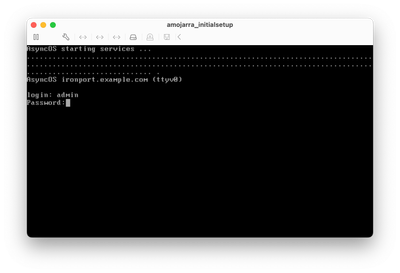
Step 1. Enter the Username and Password to log in to the CLI. 
Tip: The default Username is admin and the default Password is ironport.
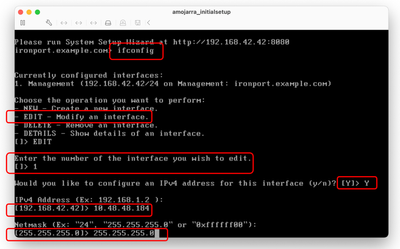
Step 2. Run ifconfig. Step 3. Choose Edit. Step 4. Enter the number associated with your Management Interface. Step 5. Select Y to edit the default IPv4 Address. Step 6. Enter the IP address Step 7. Enter the Subnet Mask.
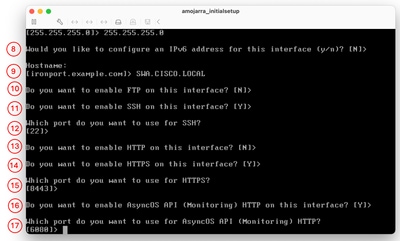
Step 8. If you would like to configure IPv6, type Y in answer to the question "Would you like to Configure IPv6?", else you can leave this as default (No) and press Enter. Step 9. Enter a fully qualified domain name (FQDN) as the host name. Step 10. If you would like to enable the File Transfer Protocol (FTP) Access to the Management Interface, Choose Y, or else press Enter. Step 11. The Secure Shell (SSH) is set to Enabled by default. it is advised to have the SSH enabled. Type Y to continue. Step 12. (Optional) You can change the default SSH port from TCP 22 to any port number you would like as long as there are no port conflicts else, press enter to use the default port (TCP/22). Step 13. If you would like to have Hypertext Transfer Protocol (HTTP) access to the Management Interface, type Y and set the Port number for HTTP access. Otherwise, you can choose N to only have Hypertext Transfer Protocol Secure (HTTPS) access to the management Interface. Step 14. Type Y and press Enter to enable HTTPS access to the Managment Interface. Step 15. You can change the default HTTPS port number from 8443 to any port number you would like as long as there are no port conflicts else, press enter to use the default port (TCP/8443). Step 16. Application Programming Interface (API) by default is set to Enable, if you are not using API you can disable the API by typing N and press Enter. Step 17. If you choose to have the API enabled, you can change the default API port number from 6080 to any port number you would like as long as there are no port conflicts else, press enter to use the default port (TCP/6080).
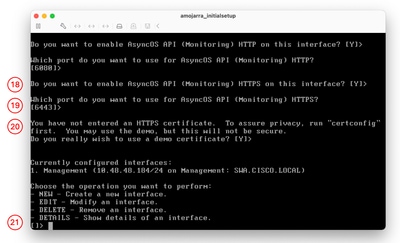
Step 18. AsyncOS API (monitoring) is the new GUI on the SWA, if you would like to use the new user interface reports, set this option to Y (Default), Else you can type N and skip to Step 20 Step 19. You can change the default New GUI HTTPS port number from 6443 to any port number you would like as long as there are no port conflicts else, press enter to use the default port (TCP/6443). Step 20. SWA Management Interface uses Cisco Demo Certificate. Type Y to accept the Demo certificate. you can change the GUI certificate after the initial setup. Step 21. Press Enter to exit the ifconfig wizard.
|
Configure Default Gateway |
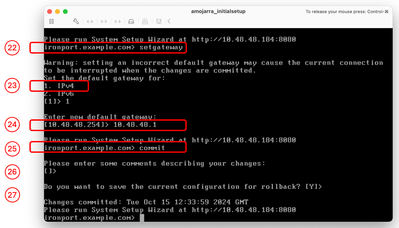
Step 22. Run setgateway. Step 23. Choose the IPv4 if your Management Interface has been configured with IPv4, else choose IPv6. Step 24. Enter your default gateway IP address. Step 25. Save the changes by running commit. Step 26. (Optional) you can add Notes about the changes you are saving Step 27. (Optional) you can have SWA to back up the configuration before applying the changes.
|
|
|
SSH |
Import Traditional License |

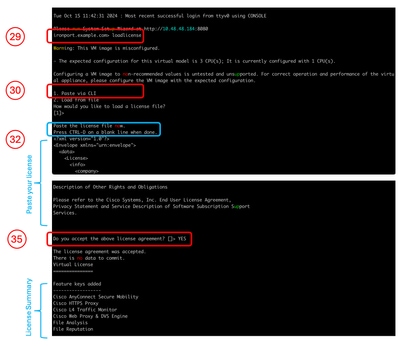
Note: If you are using Smart License skip to Step 36. Step 28. Connect to SWA via SSH. Step 29. Run loadlicense Step 30. Choose Paste via CLI. Step 31. Open your license file with a text editor. and copy all its content Step 32. Paste the license in the SSH shell. Step 33. Press Enter to navigate to a new line. Step 34. Hold Control and press D. Step 35. Read the License agreement and type YES to agree with the conditions.
Skip to Step 58. |
|
GUI |
Configure DNS Server |
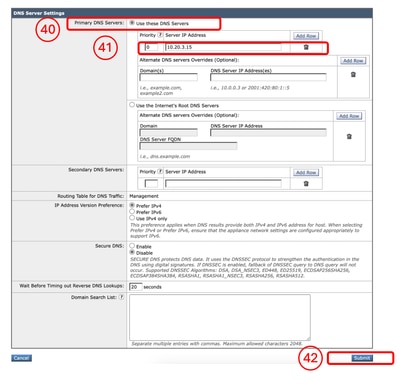
Step 37. Log in to the GUI ( the default is HTTPS://<SWA FQDN or IP Address>:8443) Step 38. Navigate to Network and choose DNS. Step 39. Click Edit Settings. Step 40. in the Primary DNS Servers section, select Use these DNS Servers. Step 41. Set the Priority to 0 and enter your DNS server IP address. 
Note: You can add more than one DNS server by choosing Add Row. Step 42. Submit. Step 43. Commit the changes.
|
Configure Smart License |
Step 44. In the GUI from System Administration, choose Smart Software Licensing. Step 45. Choose EnableSmart Software Licensing. 
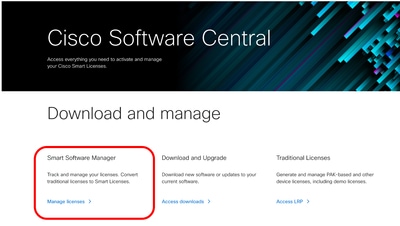
Caution: You cannot roll back from Smart License to Classic License, after you enable Smart License feature on your appliance. Step 46. Click OK to continue configuring Smart License. Step 47. Commit the changes. Step 48. To obtain the token to register your SWA, Log in to Cisco Software Central (https://software.cisco.com/#) Step 49. Click Manage Licenses.
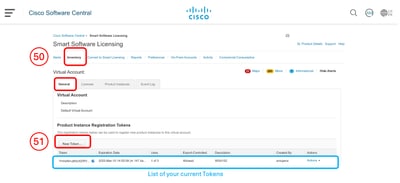
Step 50. In Smart Software Licensing choose Inventory. Step 51. In the General Tab Create a New Token or use your available Tokens.
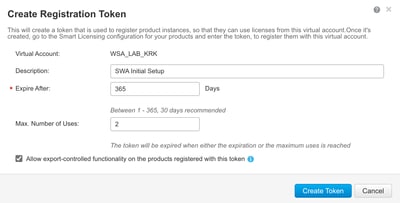
Step 52. Enter the required information and Create Token.
Step 53. Click On the Blue Icon in front of the newly added token and copy its content.
Step 54. In the SWA GUI navigate to System Administration and choose Smart Software Licensing. 
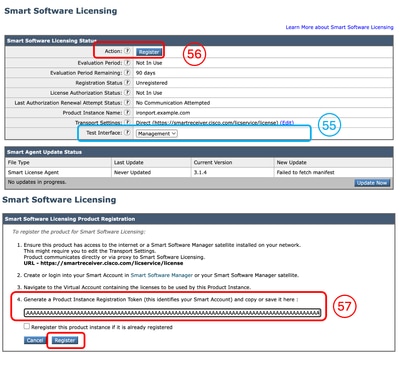
Note: If you are already on the Smart Software Licensing page, please refresh the page. Step 55. (Optional) If the SWA has no Internet access from the Management Interface, you can change the Test Interface to the Interfaces that are allowed to access the Internet. 
Tip: For more Information about multiple Interface configuration and routing tables, please check the Network Configuration section in this article. Step 56. Click Register. Step 57. Paste the Token and click Register.

Note: To verify your registration, wait for a couple of minutes, refresh the Smart Licensing page in SWA, and check the Registration Status.
|
|
System Setup Wizard |
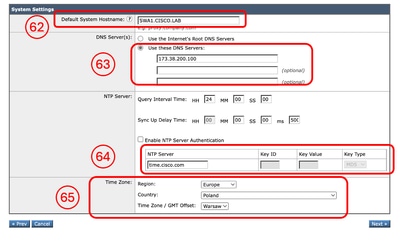
Step 58. In the SWA GUI navigate to System Administration and choose System Setup Wizard. Step 59. Read and accept the terms of this license agreement Step 60. Click Begin Setup. Step 61. Choose Standard from the Appliance Mode of Operation section. Step 62. Enter the Default System Hostname. 
Note: Previous hostname that was created in Step 9 was related to the Management Interface and not the SWA. Step 63. Enter the DNS Server(s) IP address. Step 64. you can configure your Network Time Protocol (NTP) Server. 
Tip: If your NTP Server Requires Authentication, you can configure the Key parameters. Step 65. Select the Time Zone that applies to the SWA and Click Next.
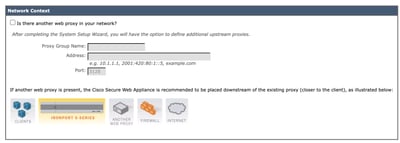
Step 66. (Optional) If you are using any upstream Proxy in your network, you can configure it on the Network Context page or else leave it as default and click Next.
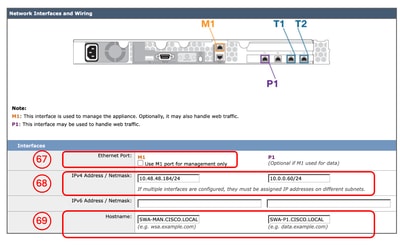
Step 67. (Optional) In case you need to separate the Management INterface Traffic from the Data Interfaces (P1 and P2 Interfaces) Traffic, Select Use M1 port for management only. Step 68. (Optional) You can add or modify the Network Interfaces IP address from IPv4 Address / Netmask or IPv6 Address / Netmask section. Step 69. (Optional) You can add or modify the Network Interfaces Hostname and click Next. 
Note: The P1 port can be enabled and configured through the System Setup Wizard. If you wish to enable the P2 interface, this must be done after completing the System Setup Wizard.
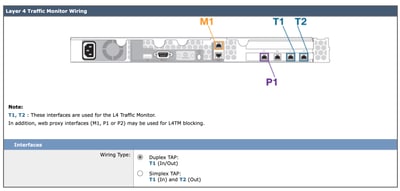
Step 70. (Optional) In case you are planing to configure Layer 4 Traffic Monitor (L4TM) you can configure the Duplex setting, or else you can leave as default and click Next.
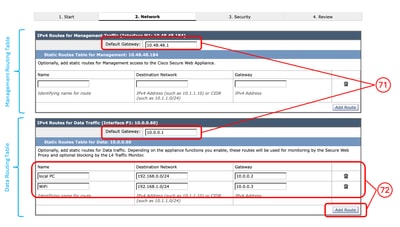
Step 71. (Optional) In IPv4 Routes for Management page you can Modify the Default Gateway Step 72. (Optional) You can Add Route to create Static Routes. 
Note: In case you choose "Use M1 port for management only" on Step 67, there would be two separate Routing table for the Management Interface and the Data Interfaces (P1 and P2).
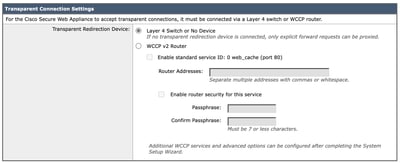
Step 73. (Optional) If you would like to setup Transparent Proxy deployment, via Web Cache Communication Protocol (WCCP), you can configure WCCP settings, or else you can leave the default Layer 4 Switch or No Device and click Next.
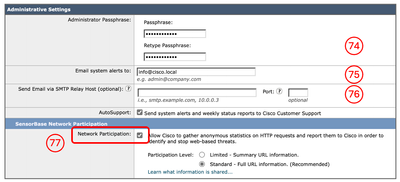
Step 74. Setup a new password for the admin account. Step 75. Enter an Email address that is expected to receive system alerts. Step 76. (Optional) Provide the Simple Mail Transfer Protocol (SMTP) Relay host information, else leave it as blank If no internal relay host is defined, SMTP uses DNS lookup of the MX record. Step 77. (Optional) If you would like to disable Participating in the Cisco SensorBase Network, un-check the Network Participation check box, or else leave is as default and click Next. 
Note: Participating in the Cisco SensorBase Network means that Cisco collects data and shares that information with the SensorBase threat management database.
Step 78. (Optional) You can change the default actions for Global Policy, L4TM, and Cisco Data Security Filtering, or else you can leave them as default and click Next.
Step 79. Review your configuration. If you need to make changes, click the Previous button to return to the previous page, or else click Install This Configuration. |
Network Configuration
To Configure the Network interface you can use both CLI or GUI.
|
Command / Path |
Action |
|
|
Configure Network Interface Cards from CLI |
CLI > ifconfig |
New: If the Interface is not listed in the ifconfig output, but exists in the Virtual Machine or the physical Appliance, you can use this command to show the interface in the list. Edit: This action is to edit the IP address, Subnet Mask, Interface hostname or other related parameters. Details: Show details of an interface, such as MAC Address, Media Type, Duplex Mode and so on. Delete: Removes the Interface from the ifconfig list, and removes the IP address if assigned previously. |
|
Configure Network Interface Cards from GUI |
GUI > Network > Interfaces |
You can Edit the Interface IP address and hostname. You can Enable, Disable or modify the port number of the Appliance Management Services such as FTP, SSH, HTTP access and HTTPS access. |
Routing Table
Routes are essential for determining where to direct network traffic. The SWA handles these types of traffic:
- Data traffic: This includes traffic processed by the Web Proxy from end users browsing the Internet.
- Management traffic: This encompasses traffic generated by managing the appliance via the web interface, as well as traffic for management services such as SWA upgrades, component updates, DNS, authentication, and other related tasks.
By default, both types of traffic uses the routes defined for all configured network interfaces. However, you have the option to separate the routing so that management traffic uses a dedicated management routing table and data traffic uses a separate data routing table.
|
Management Traffic |
Data Traffic |
|
WebUI |
HTTP Proxy |

Note: If you select the "Use M1 port for management only" option, an additional routing table called the Data Routing table is added to the SWA. This routing table has only one configurable default gateway; any additional routing paths must be configured manually.
Related Information
- User Guide for AsyncOS 15.2 for Cisco Secure Web Appliance
- Cisco Secure Email and Web Virtual Appliance Installation Guide
- Configure Custom URL Categories in Secure Web Appliance - Cisco
-
Configure SCP Push Logs in Secure Web Appliance with Microsoft Server
-
Enable Specific YouTube Channel/Video and Block Rest of YouTube in SWA
Revision History
| Revision | Publish Date | Comments |
|---|---|---|
1.0 |
30-Oct-2024 |
Initial Release |
Contributed by Cisco Engineers
- Amirhossein MojarradTechnical Consulting Engineer
Contact Cisco
- Open a Support Case

- (Requires a Cisco Service Contract)



 Feedback