Unified Computing System Quality of Service Configuration Example
Available Languages
Contents
Introduction
Cisco Unified Computing System (UCS) provides two methods to implement quality of service (QoS):
-
System Classes —Specifies the bandwidth allocation for certain types of traffic across the entire system.
-
QoS Policies —Assigns system classes for individual vNICs and vHBAs.
Prerequisites
Requirements
Cisco recommends that you have knowledge of Cisco UCS software and hardware administration.
Ensure that you meet these requirements before you attempt this configuration:
Components Used
The information in this document is based on Cisco UCS.
The information in this document was created from the devices in a specific lab environment. All of the devices used in this document started with a default configuration. If your network is live, make sure that you understand the potential impact of any command.
Conventions
Refer to the Cisco Technical Tips Conventions for more information on document conventions.
Configure
In this section, you are presented with the information to configure the features described in this document.
Note: Use the Command Lookup Tool (registered customers only) to obtain more information on the commands used in this section.
Network Diagram
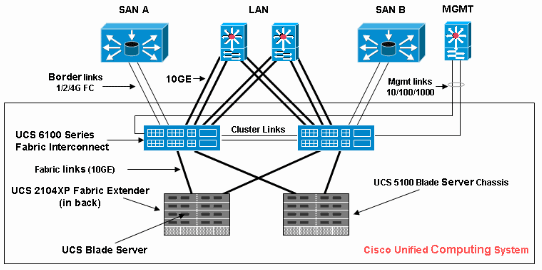
Below is a typical topology used with the Cisco UCS:

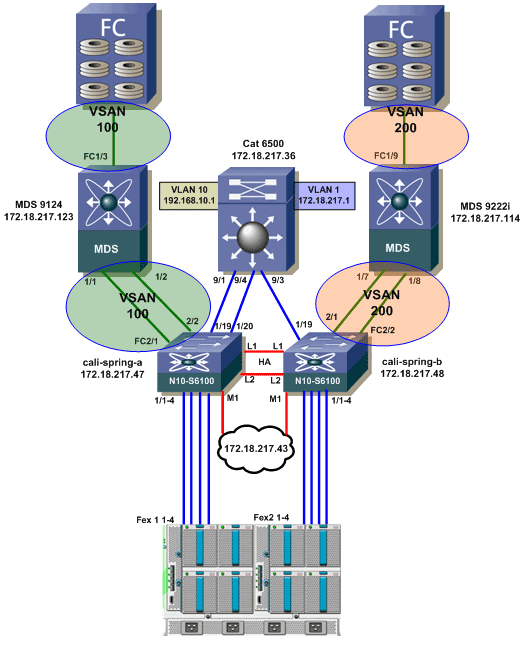
Here is the network diagram used for this configuration example:

System Classes
Cisco UCS uses Data Center Ethernet (DCE) to handle all traffic inside a Cisco UCS system. This industry standard enhancement to Ethernet divides the bandwidth of the Ethernet pipe into eight virtual lanes. System classes determine how the DCE bandwidth in these virtual lanes is allocated across the entire Cisco UCS system.
Each system class reserves a specific segment of the bandwidth for a specific type of traffic. This provides a level of traffic management, even in an oversubscribed system. For example, you can configure the Fibre Channel Priority system class to determine the percentage of DCE bandwidth allocated to FCoE traffic.
This table describes the system classes:
| System Class | Description |
|---|---|
| Platinum Priority Gold Priority Silver Priority Bronze Priority | Set the quality of service for all servers that include on of these system classes in the quality of service definition in the service profile associated with the server. Each of these system classes manages one lane of traffic. All of the properties of these system classes are available for you to assign custom settings and policies. |
| Best Effort Priority | Sets the quality of service for the lane that is reserved for Basic Ethernet traffic. Some properties of this system class are preset and cannot be modified. For example, this class has a drop policy to allow it to drop data packets if required. |
| Fibre Channel Priority | Sets the quality of service for the lane that is reserved for Fibre Channel over Ethernet traffic. Some properties of this system class are preset and cannot be modified. For example, this class has a no-drop policy to ensure it never drops data packets. |
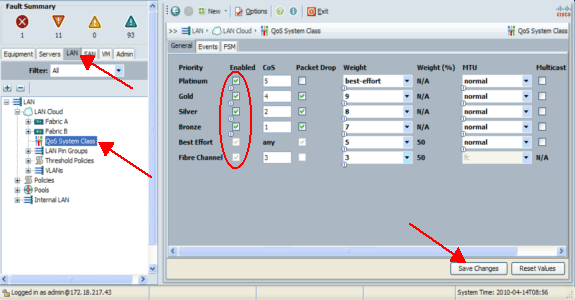
Complete these steps in order to configure system classes:
-
Log in to Cisco UCS Manager.

-
In the navigation pane, click the LAN tab.
-
Expand LAN > LAN Cloud.
-
Click the QoS System Class node.
-
On the General tab, check the Enabled check box next to each Priority option for the system class that you want to configure to meet the traffic management needs of the system, and then configure the values as described:
-
COS values range from 0 to 7 (where 0 is the lowest value and 6 is highest value). COS 7 is reserved for internal traffic. COS value "any" equals to best effort.
-
If you check the Packet Drop check box, packets will be dropped for that specific class.
-
Weight values range from 1 to 10. The bandwidth percentage can be determined by adding the channel weights for all channels then divide the channel weight you wish to calculate the percentage for by the sum of all weights.
Note: Not all properties are configurable for all system classes.
-
-
Click Save Changes in order to save your changes.
QoS Policies
QoS policies assign a system class to the outgoing traffic for a vNIC or vHBA. You must include a QoS policy in a vNIC policy or vHBA policy and then include that policy in a service profile to configure the vNIC or vHBA.
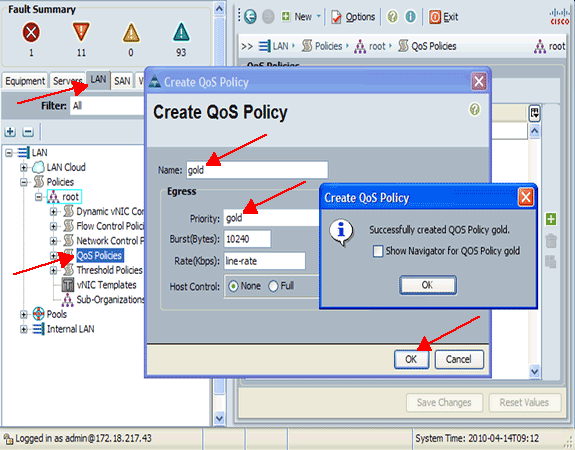
Complete these steps in order to create QoS policies:
-
Log in to Cisco UCS Manager.

-
In the navigation pane, click the LAN tab.
-
Expand LAN > Policies > Organization Name.
If the system does not implement multi-tenancy, all policies are under the root organization.
-
Right-click QoS Policy, and choose Create QoS Policy.
-
In the Create QoS Policy dialog box, enter in the Name field a unique name for the policy.
-
From the Priority drop-down list, choose the system class you want to assign to traffic through the vNIC.
-
Click OK.
Verify
There is currently no verification procedure available for this configuration.
Troubleshoot
There is currently no specific troubleshooting information available for this configuration.
Related Information
Revision History
| Revision | Publish Date | Comments |
|---|---|---|
1.0 |
28-Apr-2010 |
Initial Release |
Contact Cisco
- Open a Support Case

- (Requires a Cisco Service Contract)


 Feedback