Introduction
This document describes how to recover a 6400 Series Fabric Interconnect (FI) from the loader prompt when you have non-usable images on the FI.
Prerequisites
Requirements
Cisco recommends that you have knowledge of these topics:
- Cisco Unified Computing System Manager (UCSM)
- 6400 Series Fabric Interconnects
- Command Line Interface (CLI)
Components Used
The information in this document is based on 6400 Series Fabric Interconnects.
The information in this document was created from the devices in a specific lab environment. All of the devices used in this document started with a cleared (default) configuration. If your network is live, ensure that you understand the potential impact of any command.
Background Information
- You can perform these steps when both or any fabric interconnect goes down during firmware upgrade, gets rebooted, and is stuck at the loader prompt, and you do not have working images on the fabric interconnect.
- The solution in this document requires a Universal Serial Bus (USB) drive loaded with the necessary files or a file transfer protocol, such as Trivial File Transfer Protocol (TFTP). Both solutions also require a console cable to the FI, if using TFTP, it also requires a cable to the management port of the FI.
- The USB must be formatted with the File Allocation Table (FAT) filesystem.
- An extraction tool such as 7-Zip or WinRAR is necessary to extract the binaries from the UCS Infrastructure files.
Problem: 6400 Series Fabric Interconnect Reboots and is Stuck at the Loader Prompt
This is most commonly seen when the FI goes down during a firmware upgrade, gets rebooted, and is stuck at the loader prompt. Some other scenarios you can encounter the loader prompt are when unexpected power outages occur or severe filesystem issues are present.
Solution
Restore the 6400 FI filesystem with the images on a USB or TFTP, a console connection is required. If TFTP is used a cable to the FI management port is also required. Transfer and activate the newly installed files on the FI, configure the FI as necessary and, confirm it no longer boots to the loader prompt.
Caution: This article must be used only when the FI is not recoverable any other way and cannot be booted. Please contact Cisco TAC if you are unsure for any reason.
Restore the Fabric Interconnect via USB
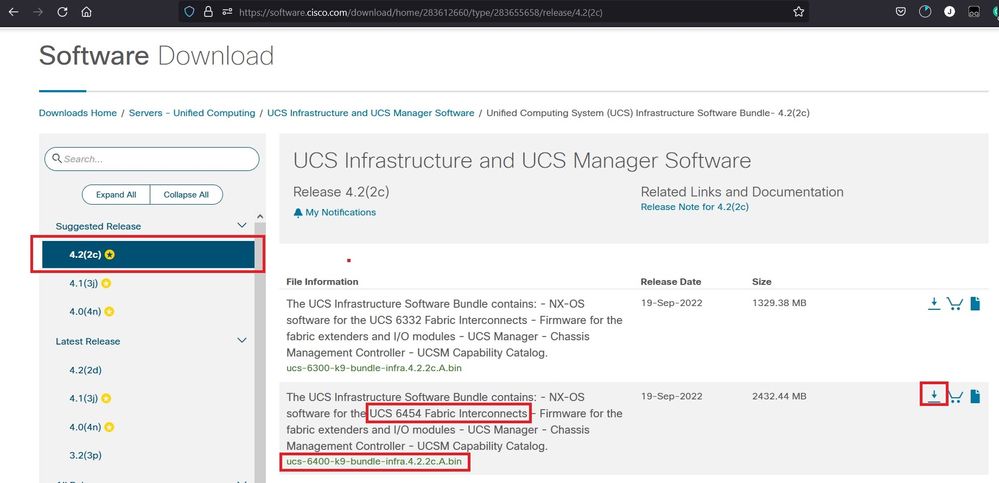
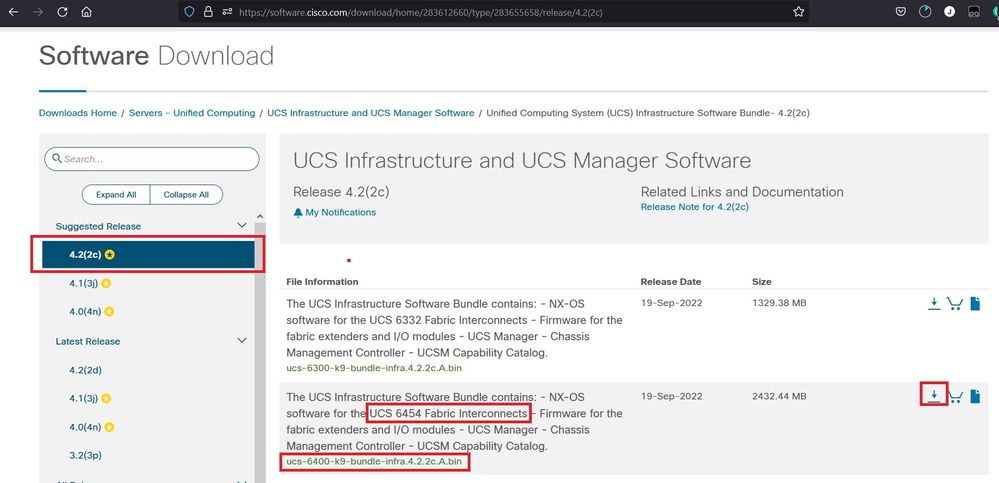
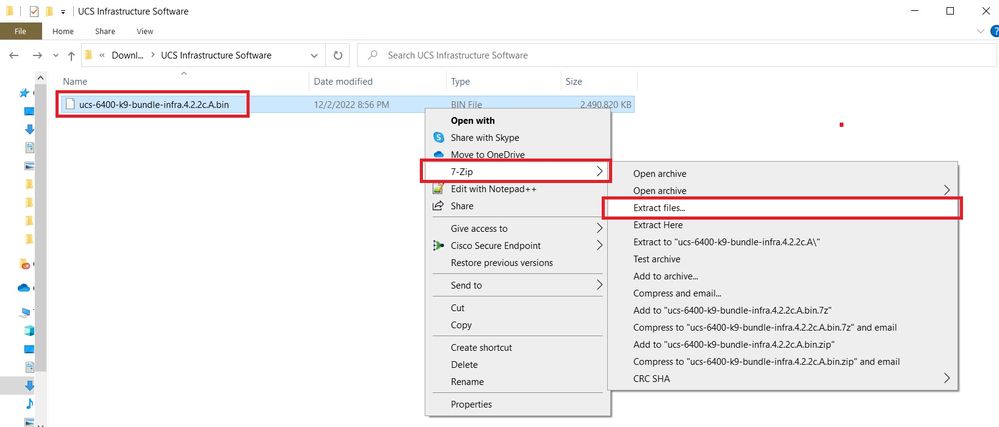
Step 1. Launch a browser and navigate to the software section on the Cisco website. Download the proper UCS Infrastructure Software Bundle version for 6400 Series FI. In the example shown in the image, version 4.2(2c) A bundle is used.
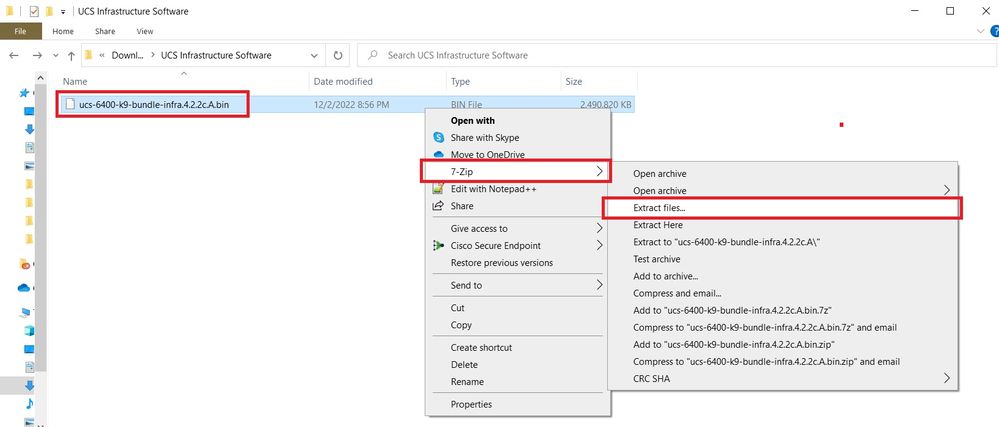
Step 2. Right-click on the UCS Infrastructure Software Bundle file and select Extract Files.
Note: This step requires you to have an extraction tool such as 7-Zip, WinRAR, and so on.
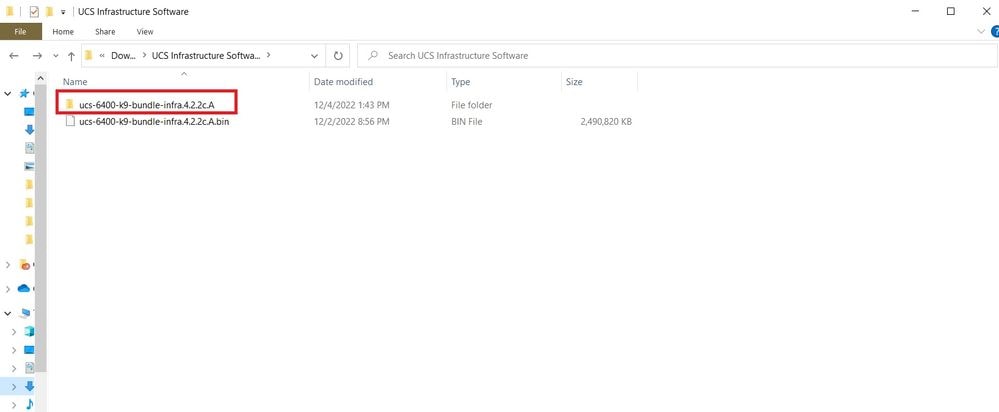
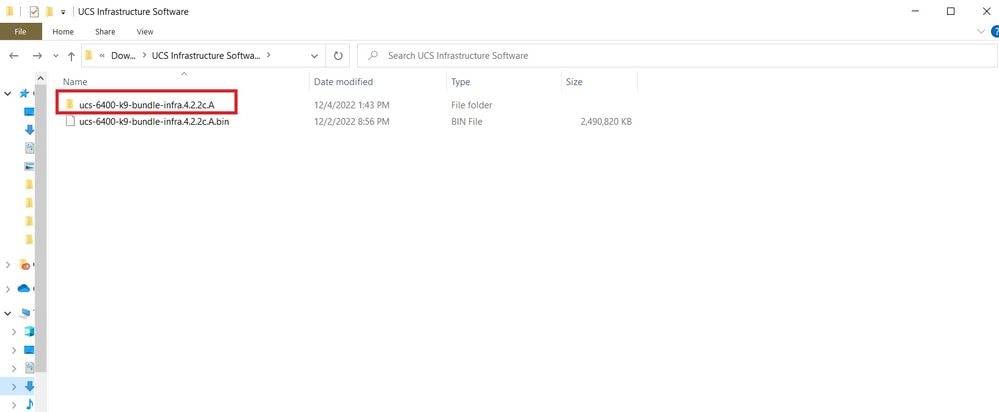
Step 3. Double-click on the newly extracted UCS Infrastructure Software Bundle folder.
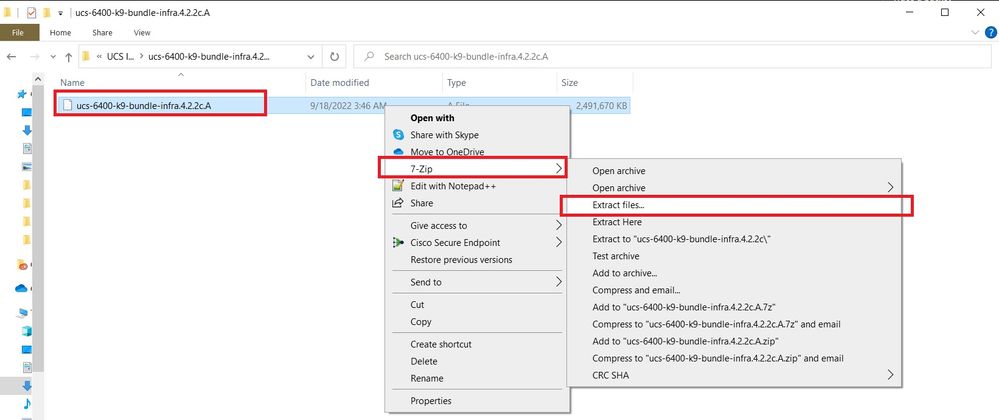
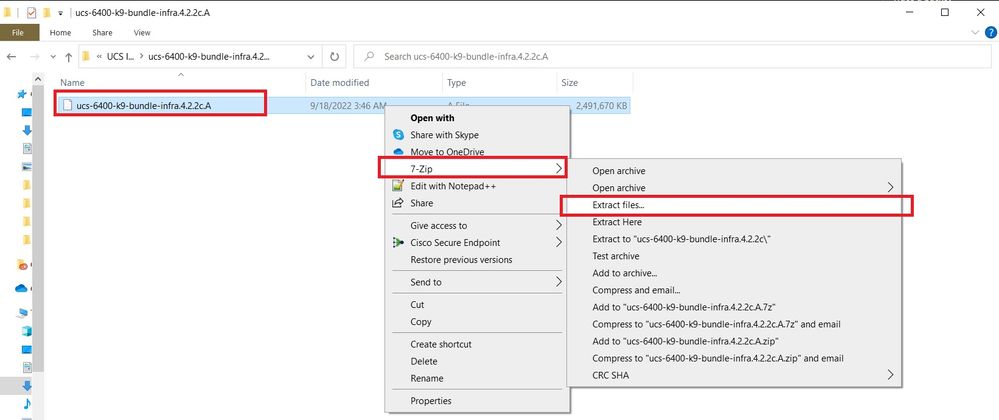
Step 4. Right-click on the UCS Infrastructure Software Bundle inside the folder and select Extract Files.
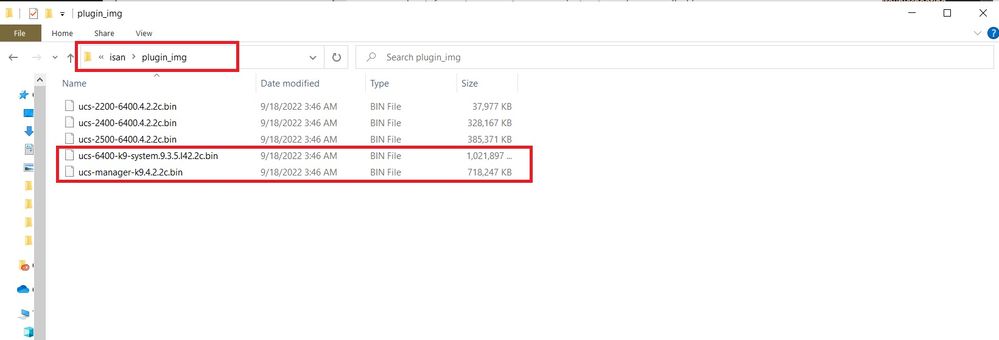
Step 5. Double-click on the newly extracted folder. Navigate to isan > plugin_img and copy the system and manager files to your USB.
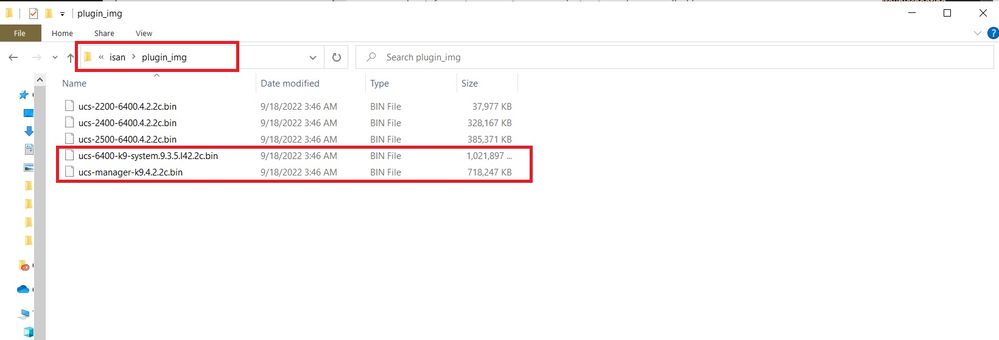
Step 6. Directly connect a console cable and insert the USB to the FI. Open a terminal emulator and reboot the switch, as it begins to power on continue to press Ctrl-C to break into the loader prompt.
Tip: If you see any sort of image attempting to load or the FI is hung you have likely missed the loader. Power cycle the FI and continuously press Ctrl-C immediately after powering it on.
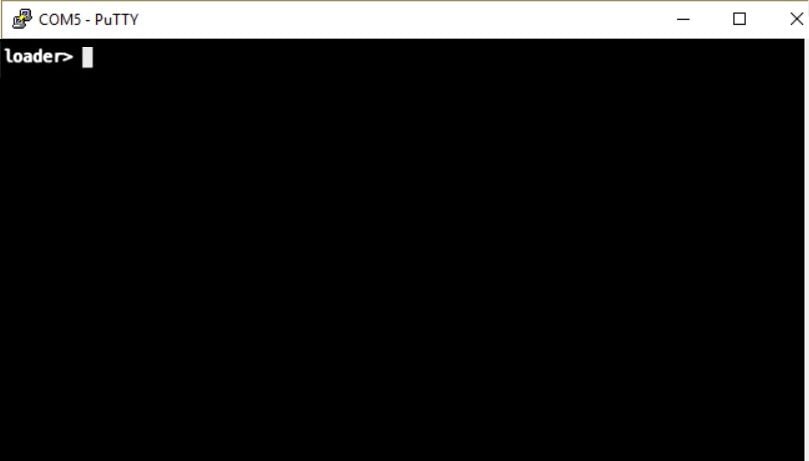
Step 7. Run the command cmdline recoverymode=1 to enter recovery mode at the loader prompt.
loader > cmdline recoverymode=1
Step 8. Boot the system image from the physically inserted USB.
loader> boot usb1:ucs-6400-k9-system.9.3.5.I42.2c.bin
Step 9. Run the command start to enter bash and then mount | egrep "sda|mtdblock" to display the partitions.
switch(boot)# start
bash-4.2# mount | egrep "sda|mtdblock"
/dev/sda8 on /opt type ext4
/dev/sda9 on /workspace type ext4
/dev/sda10 on /spare type ext4
/dev/sda5 on /mnt/cfg/0 type ext3
/dev/sda6 on /mnt/cfg/1 type ext3
/dev/sda3 on /mnt/pss type ext3
/dev/sda4 on /bootflash type ext3
/dev/sda7 on /logflash type ext3
/dev/mtdblock4 on /opt/db/nvram type ext2
Note: In some situations, you can see mtdblock0 instead of mtdblock4, if so, be sure to unmount mtdblock0 in Step 10.
Step 10. Run the command umount for all the present partitions individually.
bash-4.2# umount /dev/sda3
bash-4.2# umount /dev/sda4
bash-4.2# umount /dev/sda5
bash-4.2# umount /dev/sda6
bash-4.2# umount /dev/sda7
bash-4.2# umount /dev/sda8
bash-4.2# umount /dev/sda9
bash-4.2# umount /dev/sda10
bash-4.2# umount /dev/mtdblock4
Note: If any of the umount commands return target is busy, move on to the next partition to be unmounted and try to unmount the busy partition last.
Step 11. Run a filesystem check on all the unmounted partitions individually.
bash-4.2# e2fsck -y /dev/sda3
bash-4.2# e2fsck -y /dev/sda4
bash-4.2# e2fsck -y /dev/sda5
bash-4.2# e2fsck -y /dev/sda6
bash-4.2# e2fsck -y /dev/sda7
bash-4.2# e2fsck -y /dev/sda8
bash-4.2# e2fsck -y /dev/sda9
bash-4.2# e2fsck -y /dev/sda10
bash-4.2# e2fsck -y /dev/mtdblock4
Step 12. Initialize the system flash and wait for completion.
bash-4.2# init-system
Initializing the system ...
Checking flash ...
Erasing Flash ...
Partitioning ...
UCSM Partition size:10485760
Wipe all partitions
Reinitializing NVRAM contents ...Initialization completed.
Step 13. Mount the bootflash and USB. Copy the system and manager file from the USB to the bootflash and create a symlink.
bash-4.2# mount /dev/sda4 /bootflash
bash-4.2# mount /dev/sdb1 /mnt/usbslot1
bash-4.2# cp /mnt/usbslot1/ucs-6400-k9-system.9.3.5.I42.2c.bin /bootflash
bash-4.2# cp /mnt/usbslot1/ucs-manager-k9.4.2.2c.bin /bootflash
bash-4.2# ln -sf /bootflash/ucs-manager-k9.4.2.2c.bin /bootflash/nuova-sim-mgmt-nsg.0.1.0.001.bin
bash-4.2# reboot
Step 14. The switch reboots and returns at the loader prompt, this is expected behavior. Boot the system image off of the bootflash.
loader > boot bootflash:ucs-6400-k9-system.9.3.5.I42.2c.bin
Booting bootflash:ucs-6400-k9-system.9.3.5.I42.2c.bin
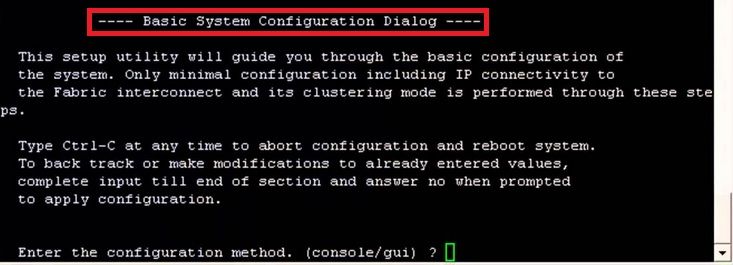
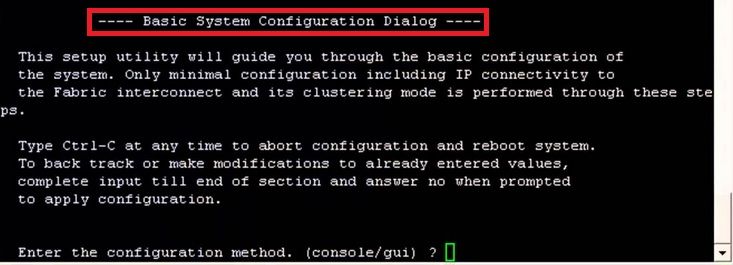
Step 15. After the switch completely boots, the Basic System Configuration Dialog is displayed. Configure the FI per your environment.
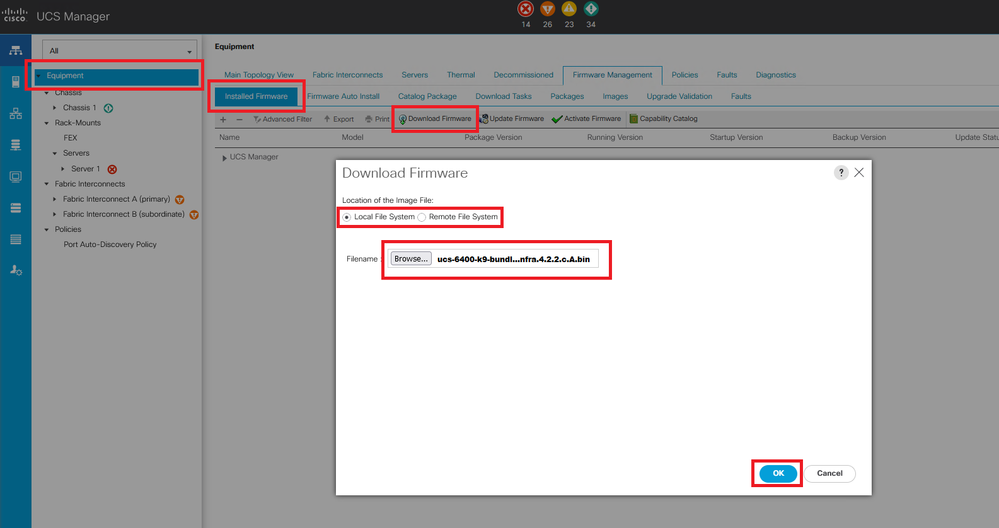
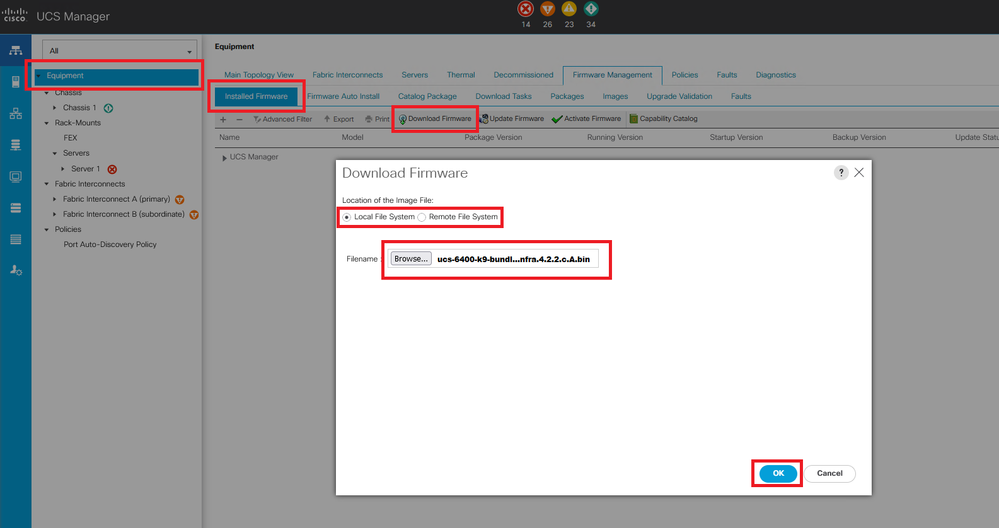
Step 16. Once the switch is configured, log into the Graphical User Interface (GUI). Navigate to Equipment > Installed Firmware > Download Firmware. In this step, you must use the UCS infrastructure A file that you previously downloaded, not the extracted files. Select Local File System or Remote File System > Browse. Choose the infrastructure file, then select Ok.
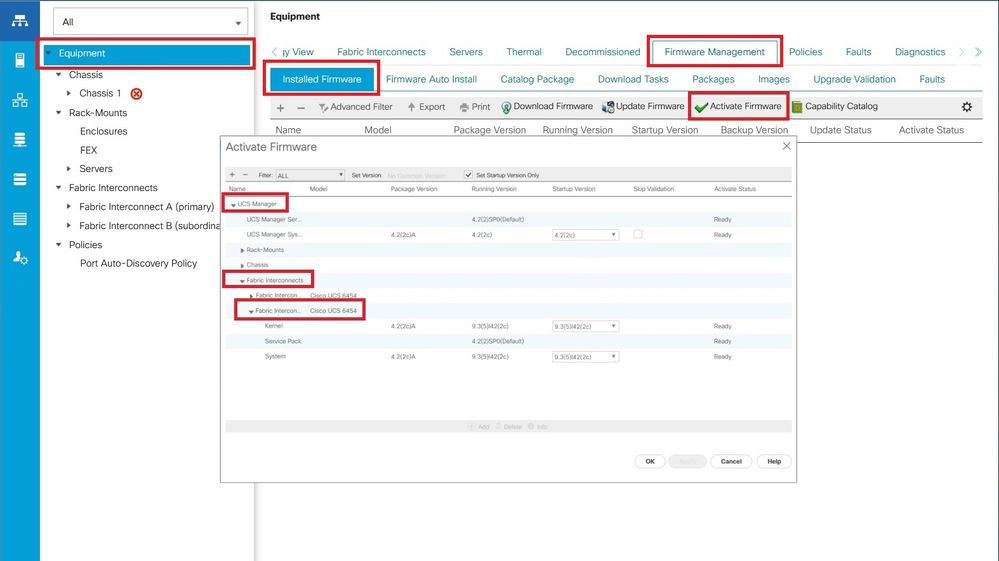
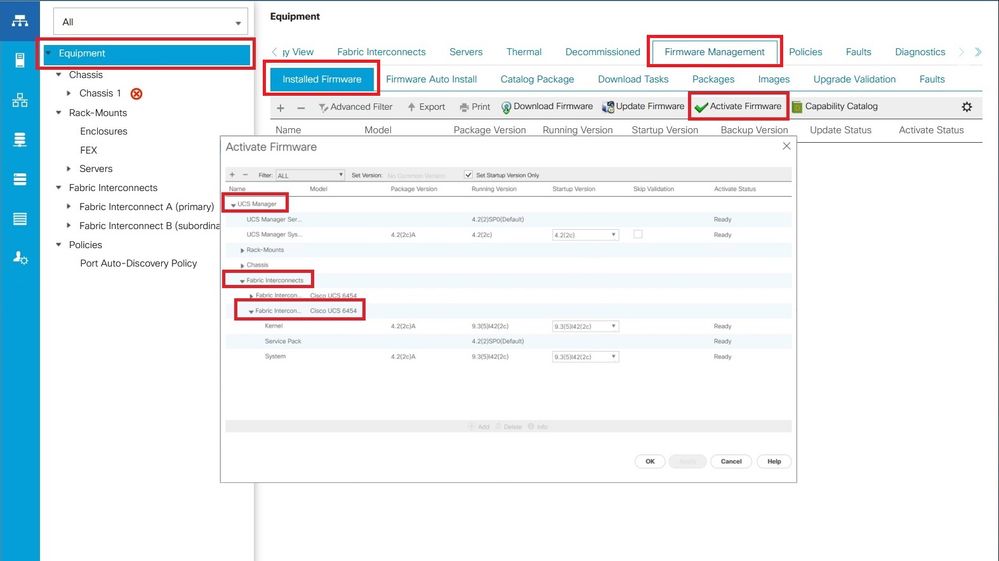
Step 17. Navigate to Equipment > Firmware Management > Installed Firmware > Activate Firmware > UCS Manager > Fabric Interconnects and select the drop-down for the FI in question.
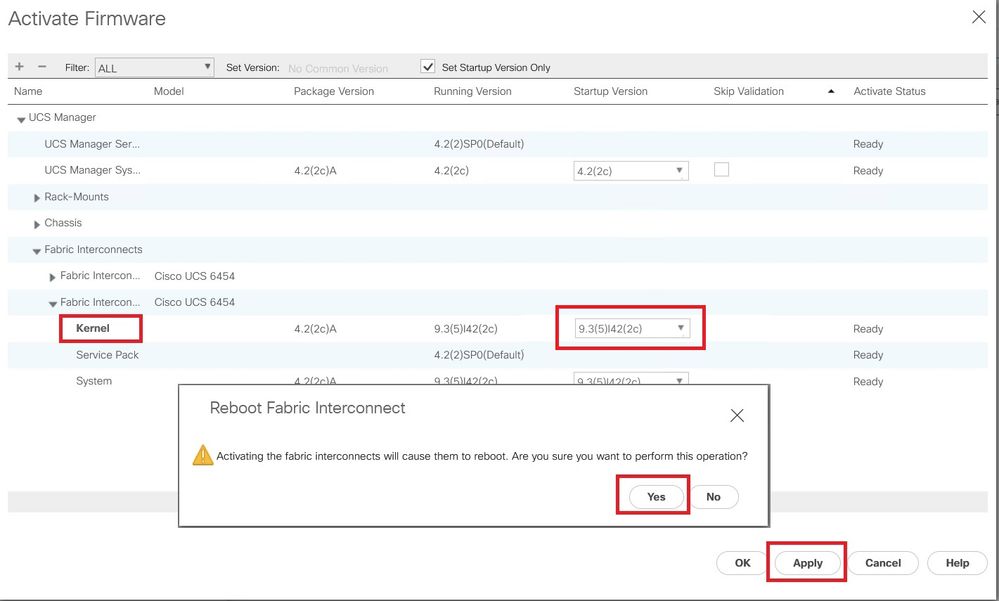
Step 18. Navigate to the kernel drop-down and choose the proper version. Select Apply > Yes.
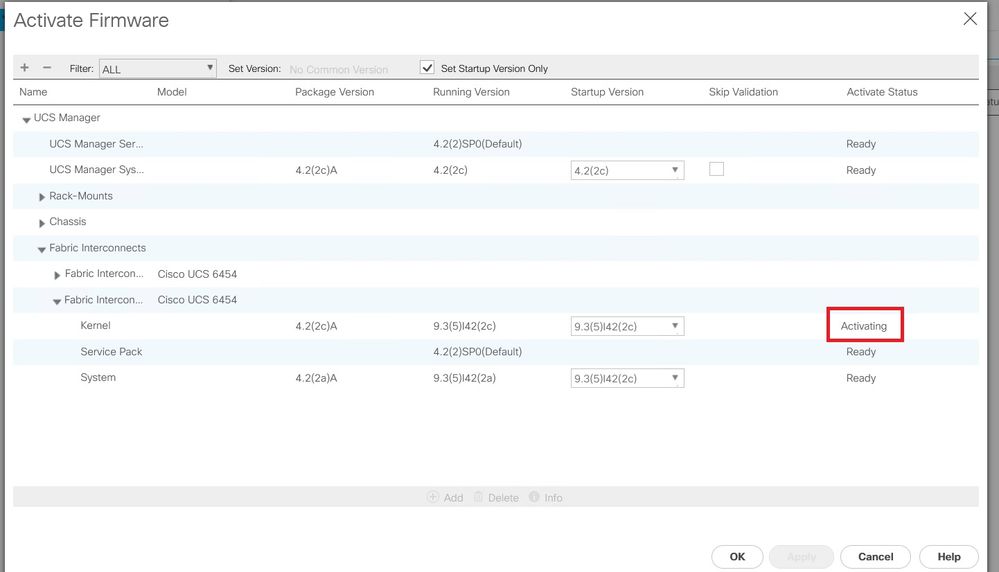
Step 19. The kernel status is now Activating, allow 20 minutes or more for the status to be Ready.
Step 20. Once all the firmware is ready, verify your FI boots successfully through a manual reboot. Use connect local-mgmt x, where x represents the FI you have rebuilt. If your FI boots back to the loader prompt contact Cisco TAC.
TAC-FI-REBUILD-A# connect local-mgmt b
TAC-FI-REBUILD-B(local-mgmt)# reboot
Before rebooting, please take a configuration backup.
Do you still want to reboot? (yes/no):yes
Restore the Fabric Interconnect via TFTP
Step 1. Launch a browser and navigate to the software section on the Cisco website. Download the proper UCS Infrastructure Software Bundle version for 6400 Series FI. In the example shown in the image, version 4.2(2c) A bundle is used.
Step 2. Right-click on the UCS Infrastructure Software Bundle file and select Extract Files.
Note: This step requires you to have an extraction tool such as 7-Zip, WinRAR, and so on.
Step 3. Double-click on the newly extracted UCS Infrastructure Software Bundle folder.
Step 4. Right-click on the UCS Infrastructure Software Bundle inside the folder and select Extract Files.
Step 5. Double-click on the newly extracted folder. Navigate to isan > plugin_img and copy the system and manager files to your TFTP server root directory.
Step 6. Connect a console and management cable to the FI. Open a terminal emulator and reboot the switch, as it begins to power on continue to press Ctrl-C to break into the loader prompt.
Tip: If you see any sort of image attempting to load or the FI is hung you have likely missed the loader. Power cycle the FI and continuously press Ctrl-C immediately after powering it on.
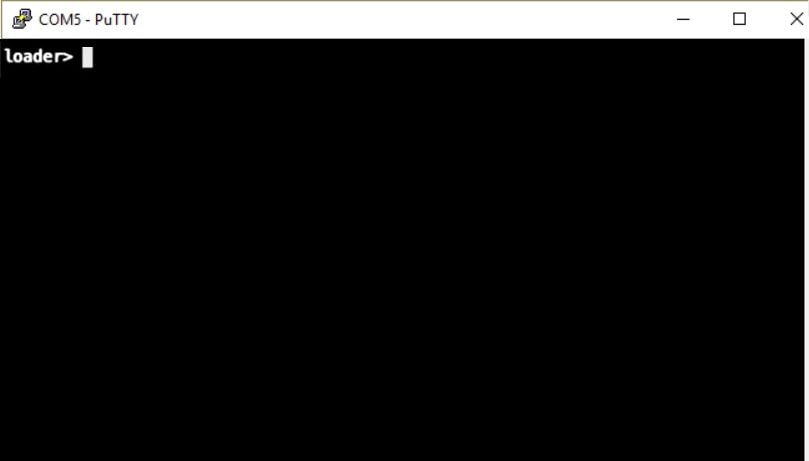
Step 7. Issue the command cmdline recoverymode=1 to enter recovery mode and configure the management interface.
loader > cmdline recoverymode=1
loader > set ip x.x.x.x y.y.y.y
loader > set gw z.z.z.z
Note: X represents the FI IP, Y represents the subnet mask, and Z represents the gateway.
Step 8. Boot the system image from the TFTP server.
loader> boot tftp://x.x.x.x/ucs-6400-k9-system.9.3.5.I42.2c.bin
Note: X represents the TFTP server IP.
Step 9. Run the command start to enter bash and then mount | egrep "sda|mtdblock" to display the partitions.
switch(boot)# start
bash-4.2# mount | egrep "sda|mtdblock"
/dev/sda8 on /opt type ext4
/dev/sda9 on /workspace type ext4
/dev/sda10 on /spare type ext4
/dev/sda5 on /mnt/cfg/0 type ext3
/dev/sda6 on /mnt/cfg/1 type ext3
/dev/sda3 on /mnt/pss type ext3
/dev/sda4 on /bootflash type ext3
/dev/sda7 on /logflash type ext3
/dev/mtdblock4 on /opt/db/nvram type ext2
Note: In some situations, you can see mtdblock0 instead of mtdblock4, if so, be sure to unmount mtdblock0 in Step 10.
Step 10. Run the command umount for all the present partitions individually.
bash-4.2# umount /dev/sda3
bash-4.2# umount /dev/sda4
bash-4.2# umount /dev/sda5
bash-4.2# umount /dev/sda6
bash-4.2# umount /dev/sda7
bash-4.2# umount /dev/sda8
bash-4.2# umount /dev/sda9
bash-4.2# umount /dev/sda10
bash-4.2# umount /dev/mtdblock4
Note: If any of the umount commands return target is busy, move on to the next partition to be unmounted and try to unmount the busy partition last.
Step 11. Run a filesystem check on all the unmounted partitions individually.
bash-4.2# e2fsck -y /dev/sda3
bash-4.2# e2fsck -y /dev/sda4
bash-4.2# e2fsck -y /dev/sda5
bash-4.2# e2fsck -y /dev/sda6
bash-4.2# e2fsck -y /dev/sda7
bash-4.2# e2fsck -y /dev/sda8
bash-4.2# e2fsck -y /dev/sda9
bash-4.2# e2fsck -y /dev/sda10
bash-4.2# e2fsck -y /dev/mtdblock4
Step 12. Initialize the system flash and wait for completion.
bash-4.2# init-system
Initializing the system ...
Checking flash ...
Erasing Flash ...
Partitioning ...
UCSM Partition size:10485760
Wipe all partitions
Reinitializing NVRAM contents ...Initialization completed.
Step 13. Exit from the bash shell and return to the switch boot prompt.
bash-4.2# exit
switch(boot)#
Step 14. Configure the management interface from the switch boot prompt.
switch(boot)# config terminal
switch(boot)(config)# interface mgmt 0
switch(boot)(config-if)# ip address x.x.x.x y.y.y.y
switch(boot)(config-if)# no shut
switch(boot)(config-if)# exit
switch(boot)(config)# ip default-gateway z.z.z.z
switch(boot)(config)# exit
switch(boot)#
Note: X represents the FI IP, Y represents the subnet mask, and Z represents the gateway.
Step 15. Copy the manager and system files from TFTP to bootflash.
switch(boot)# copy tftp://x.x.x.x/ucs-manager-k9.4.2.2c.bin bootflash:
switch(boot)# copy tftp://x.x.x.x/ucs-6400-k9-system.9.3.5.I42.2c.bin bootflash:
Step 16. Issue the command start to invoke the bash shell, create a symlink, and then reboot.
bash-4.2# start
bash-4.2# ln -sf /bootflash/ucs-manager-k9.4.2.2c.bin /bootflash/nuova-sim-mgmt-nsg.0.1.0.001.bin
bash-4.2# reboot
Step 17. The switch reboots and returns at the loader prompt, this is expected behavior. Boot the system image off of the bootflash.
loader > boot bootflash:ucs-6400-k9-system.9.3.5.I42.2c.bin
Booting bootflash:ucs-6400-k9-system.9.3.5.I42.2c.bin
Step 18. After the switch completely boots, the Basic System Configuration Dialog is displayed. Configure the FI per your environment.
Step 19. Once the switch is configured, log into the Graphical User Interface (GUI). Navigate to Equipment > Installed Firmware > Download Firmware. In this step, you must use the UCS infrastructure A file that you previously downloaded, not the extracted files. Select Local File System or Remote File System > Browse. Choose the infrastructure file, then select Ok.
Step 20. Navigate to Equipment > Firmware Management > Installed Firmware > Activate Firmware > UCS Manager > Fabric Interconnects and select the drop-down for the FI in question.
Step 21. Navigate to the kernel drop-down and choose the proper version. Select Apply > Yes.
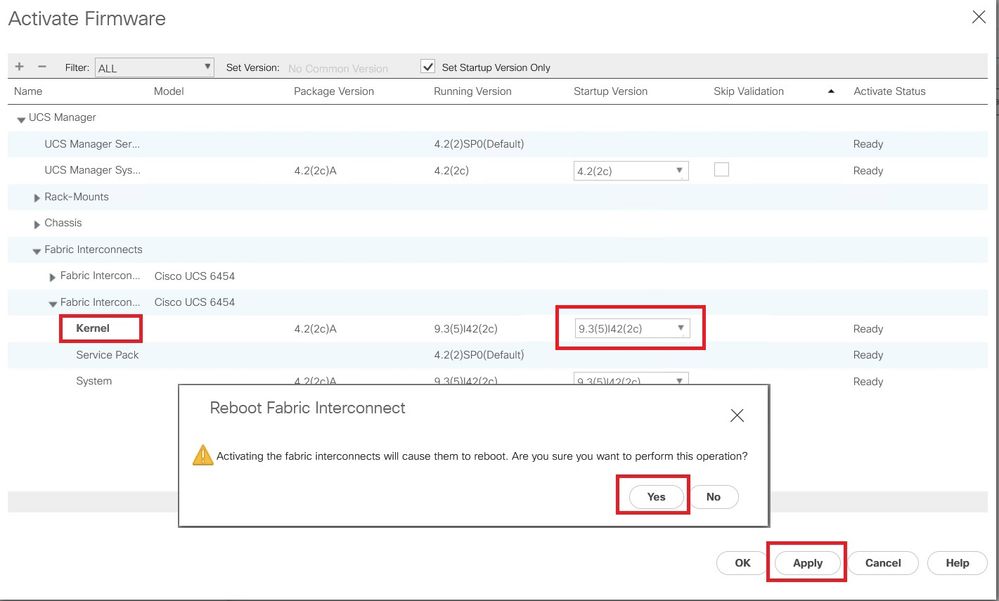
Step 22. The kernel status is now Activating, allow 20 minutes or more for the status to be Ready.
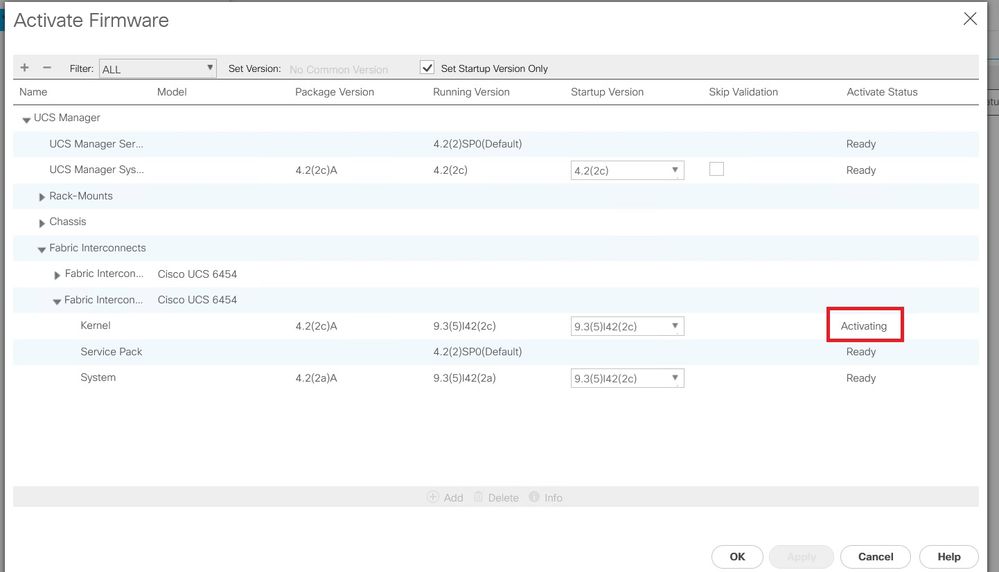
Step 23. Once all the firmware is ready, verify your FI boots successfully through a manual reboot. Use connect local-mgmt x, where x represents the FI you have rebuilt. If your FI boots back to the loader prompt contact Cisco TAC.
TAC-FI-REBUILD-A# connect local-mgmt b
TAC-FI-REBUILD-B(local-mgmt)# reboot
Before rebooting, please take a configuration backup.
Do you still want to reboot? (yes/no):yes
Related information


 Feedback