Background
"Power on hours" is an important metric for SSD lifespan determination. In order to identify the affected Solid State Drives(SSD), you will need to download 3rdparty utilities that will allow you to see the Power-On Hours(PoH)and in some cases the model#for the affected SSD. Below you will find the instructions on where to get the utilities and how to use them.
Where to get the utilities
There are4different utilities to choose from depending on your OS and needs. Please review the below table.
Steps on how to use each utility.
Each utility requires some knowledge on installing software in Linux, VMware and Windows. Be sure to read any readme files before installing.
SmartMonTools for Windows - JBOD mode
Note: If you are using a RAID controller, you cannot collect this data through Windows
- Installation:
- Go the download link posted in the table above and download and install the smartmontools utility
- Get the smartctl Windows setup file through above link.
- Execute the setup file:
smartmontools-7.1-1.win32-setup.exe
- Open the command prompt
- Go to folder:
C:\Program Files\smartmontools\bin
- Check Drive Firmware Version:
- Run below command to get the device name of target drive.
smartctl –scan

[jbod windows smartmon fw 1]
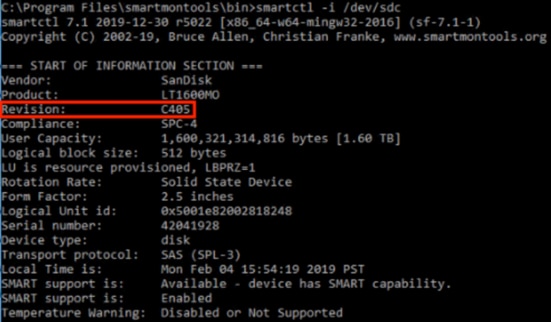
- Read drive firmware version as below:
smartctl -i /dev/sdc
[jbod windows smartmon fw 2]
- Check Power On Hours:
- Once installed, you will be using the ‘smartctl’ utility within the smartmontools package.
- Open up CMD, go to the smartmontools directory and find the list of SSDs by typing:
smartctl.exe --scan
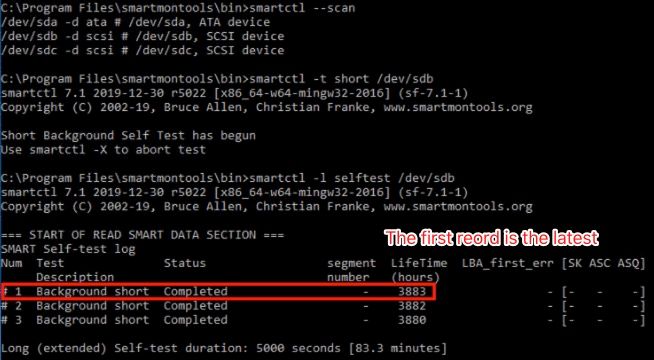
- Once you identify which SSD you want to check, you can then type the following two commands in order to get the output needed (where X is the drive letter you wish to check😞
smartctl -t short /dev/sdX – Wait 10 seconds before running the second command
smartctl -l selftest /dev/sdX
- Look for the “Lifetime” hours from the 1st line. That will be the latest record of PoH.
[jbod windows smartmon]
SmartMonTools for Linux – JBOD Mode
- Installation:
- Go the download link posted in the table above and download and install the smartmontools utility.
- Get the smartctl installation file Linux version through above link.
- Untar the installation file.
tar -zxvf smartmontools-7.1.tar.gz
- Go to folder:
smartmontools-7.1
- Run below commands in order.
./configure
make
make install
- Check Drive Firmware Version:
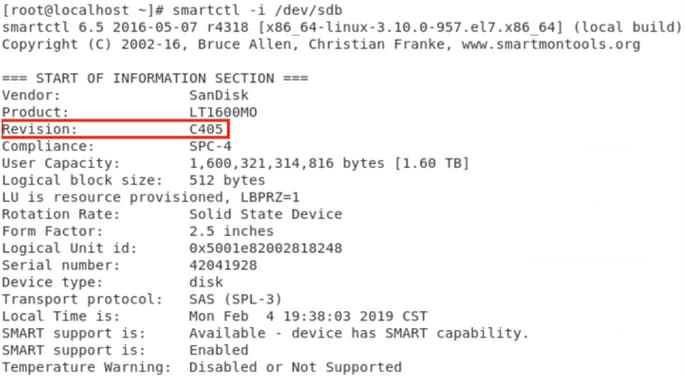
- ‘sdb’ is the device name of target drive.
smartctl -i /dev/sdb
[jbod linux smartmon fw]
- Check Power On Hours (POH)
- Go to the smartmontools directory and find the list of SSDs by typing:
esxcli storage core device list
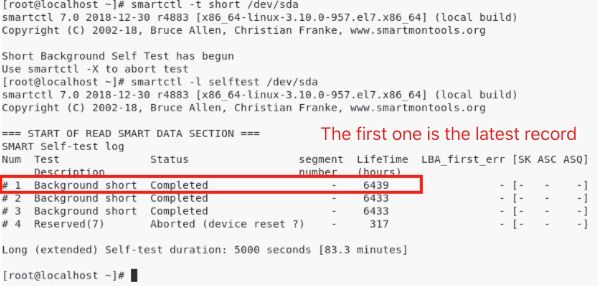
- Once you identify which SSD you want to check, you can thentype the following two commands in order to get the output needed (where X is the drive letter you wish to check😞
smartctl -t short /dev/sdX – Wait 10 seconds before running the second command
smartctl -l selftest /dev/sdX
- Look for the “Lifetime” hours from the 1st line. That will be the latest record of PoH.
[jbod linux smartmon]
SmartMonTools for ESXi – JBOD Mode
- Installation:
- Go the download link posted in the table above and download and install the smartmontools utility
- Get the smartctl ESXi installation file through above link.
- Enable shell and SSH on the ESXi host.

[jbod esxi smartmon install]
- Upload file ‘smartctl-6.6-4321.x86_64.vib’ into ESXi host ‘tmp’ folder through ftp tool.
- SSH to the ESXi host.
- Set the ViB acceptance level to CommunitySupported.
esxcli software acceptance set --level=CommunitySupported
- Then install the package.
esxcli software vib install -v /tmp/smartctl-6.6-4321.x86_64.vib
- Check the Drive Firmware Version
- SSH to the ESXi host. Then run below command to get the device name and firmware version of target drive.
esxcli storage core device list
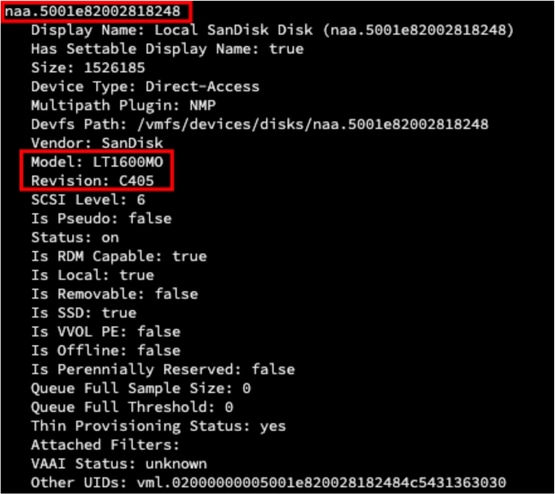
[jbod esxi smartmon fw]
- Check Power On Hours (POH)
- Go to the smartmontools directory and find the list of SSDs by typing
esxcli storage core device list
- Once you identify which SSD you want to check, you can then type the following two commands in order to get the output needed (where naa.xxx is the drive letter you wish to check😞
/opt/smartmontools/smartctl -d scsi -t short /dev/disks/naa.xxx – Wait 10 seconds before running the second command
/opt/smartmontools/smartctl -d scsi -l selftest /dev/disks/naa.xxx
- Look for the “Lifetime” hours from the 1st line. That will be the latest record of PoH.
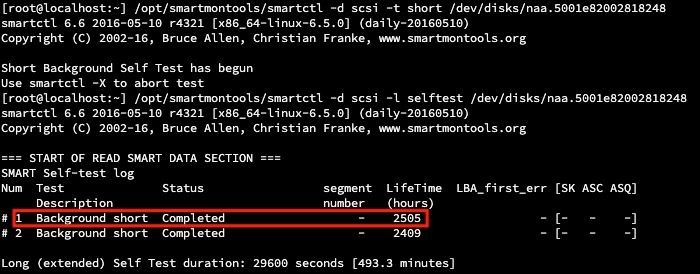
[jbod esxi smartmon]
Sg3_utils for Windows - JBOD mode
- Installation
- Go the download link posted in the table above and download and install the sg3_utils utility
- Get the smartctl Windows setup file through above link.
- Execute the setup file:
smartmontools-7.1-1.win32-setup.exe
- Open the command prompt
- Go to folder:
C:\Program Files\smartmontools\bin
- Check the Drive Firmware Version:
- Run below command to get the device name of target drive.
smartctl –scan

[jbod windows sg3_utils fw 1]
- Read drive firmware version as below
smartctl -i /dev/sdc
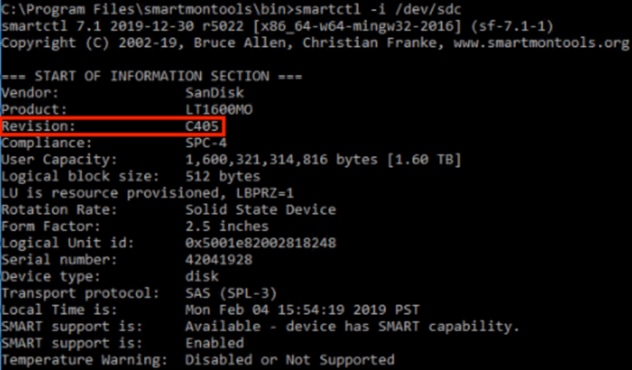
[jbod windows sg3_utils fw 2]
- Check Power On Hours:
- Go to the sg3_utils directory and find the list of SSDs by typing:
sg_scan
- Once you identify which SSD you want to check, you can then type the following command(where X is the drive letter you wish to check):
sg_logs --page=0x15 pdX
- Look for the “Accumulated power on minutes”.
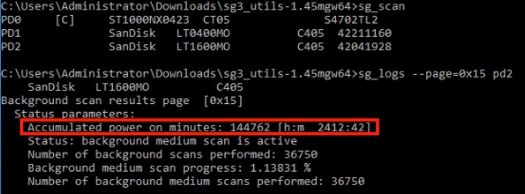
[jbod windows sg3_utils]
Sg3_utils for Linux - JBOD mode
- Installation:
- Go the download link posted in the table above and download and install the sg3_utils utility
- Get the sg3_utils installation file Linux version through above link.
- Untar the installation file.
tar -zxvf sg3_utils-1.45.tgz
- Go to folder ‘sg3_utils-1.45’.
- Run below commands in order.
./configure
make
make install
- Check Drive Firmware Version
- ‘sdb’ is the device name of target drive.
sg_logs --page=0x33 /dev/sdb

[jbod linux sg3_utils fw]
- Check Power On Hours
- Once you identify which SSD you want to check, you can then type the following command(where X is the drive letter you wish to check):
sg_logs --page=0x15 /dev/sdX
- Look for the “Accumulated power on minutes”.

[jbod linux sg3_utils.jpg]
Sandisk Tool for Windows - JBOD mode
- Installation:
- Go the download link posted in the table above and download and install the sg3_utils utility
- Get the smartctl Windows setup file through above link.
- Execute the setup file
smartmontools-7.1-1.win32-setup.exe
- Open a command prompt
- Go to folder:
C:\Program Files\smartmontools\bin
- Check Drive Firmware Version
- Run below command to get the device name of target drive.
smartctl –scan

[jbod windows sandisk fw]
- Check Power On Hours
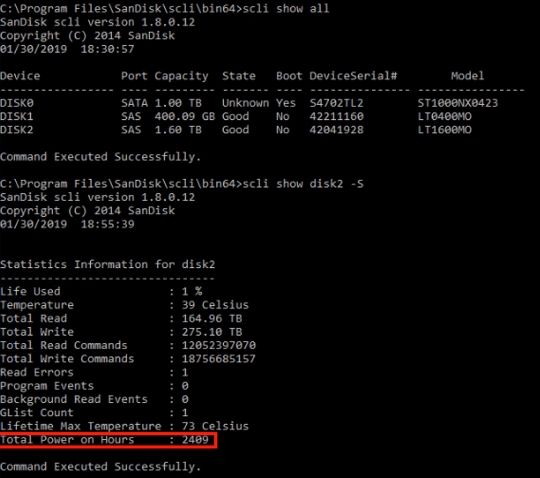
- To identify the drive you want to check, type the command:
scli show all
- Once you identify which SSD you want to check, you can then type the following command(where X is the drive letter you wish to check):
scli show diskX -S
- Look for “Total Power on Hours”.
[jbod windows sandisk]
Sandisk Tool for Linux - JBOD mode
- Installation
- Go the download link posted in the table above and download and install the sg3_utils utility
- Get the scli installation file Linux version through above link.
- Unzip the installation file.
- Go to folder:
Linux_1.8.0.12/generic/x86_64
- Run below command to let ‘scli’ be executable.
chmod +x scli
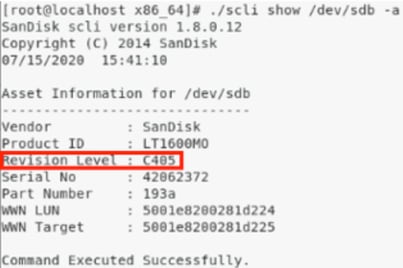
- Check Drive Firmware Version
- ‘sdb’ is the device name of target drive.
./scli show /dev/sdb -a
[jbod linux sandisk fw]
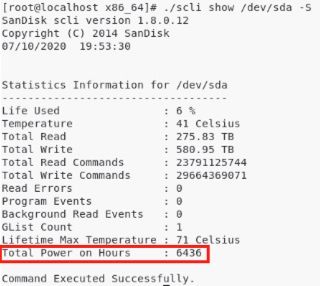
- Check Power On Hours
- Once you identify which SSD you want to check, you can then type the following command(where X is the drive letter you wish to check):
./scli show /dev/sdX -S
- Look for “Total Power on Hours”.
[jbod linux sandisk]
SmartMonTools for Linux - RAID mode
- Installation
- You will need to install both smartmontools and storcli utility to collect the data.
- Go the download link posted in the table above and download and install the smartmontools utility
- Get the smartctl installation file Linux version through above link.
- Untar the installation file.
tar -zxvf smartmontools-7.1.tar.gz
- Go to folder:
smartmontools-7.1
- Run below commands in order.
./configure
make
make install
- Now go to the download link posted in the table above and download and install the storcli utility.
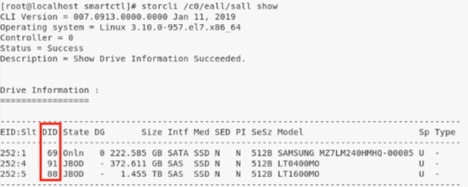
- To identify the drive you want to check, go to the storcli directory and type the command:
storcli /c0/eall/sall show
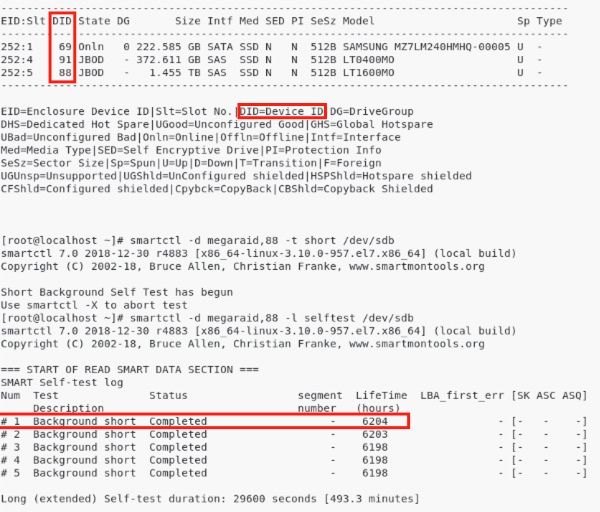
- Look for the Device ID(DID). The Device ID will be needed in the future steps.
[raid linux smartmon fw 1]
- Check Drive Firmware Version
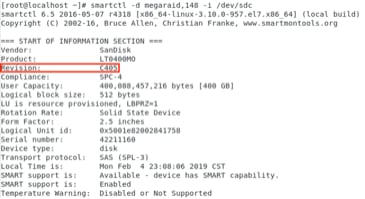
- ‘148’ in below command is the device ID (DID) of target drive. And ‘sdc’ is its device name.
smartctl -d megaraid,148 -i /dev/sdc
[raid linux smartmon fw 2]
- Check Power On Hours
- Once you identify which SSD you want to check, you can then type the following two commands in order to get the output needed (where X is the Device ID you got from step 4😞
Note: In order for this to work, you need to make sure and use the ‘megaraid’switch in the command when using a RAID set. Otherwise it won’t work.
smartctl -d megaraid,N -t short /dev/sdX – Wait 10 seconds before running the second command
smartctl -d megaraid,N -l selftest /dev/sdX
- Look for the “Lifetime” hours from the 1st line. That will be the latest record of PoH.
[raid linux smartmon]
Note: SmartMonTools does not work in RAID for ESXi. sg3_utils and Sandisk Tool do not work in RAID for all OSes.


 Feedback