Introduction
This document describes the procedure to use the Intel BootUtil tool in order to configure Intel network cards such as x710 on Cisco UCS C240 M5 series servers. The motive of this article is to avoid the physical access & bootable USB drive requirements to use Intel BootUtility in order to configure the adapters.
Prerequisites
Requirements
Cisco recommends that you have knowledge of these topics:
- EFI shell on Cisco UCS Server
- UCS-C Network boot
Components Used
The information in this document is documented based on these hardware and software versions:
- UCS C240 M5 server
- Intel NIC x710 DA2 and DA4
The information in this document was created from the devices in a specific lab environment. All of the devices used in this document started with a cleared (default) configuration. If your network is live, ensure that you understand the potential impact of any command.
Configure
Important Links
- bootutil.txt
https://downloadmirror.intel.com/19186/eng/bootutil.txt
- Upgrade, Enable, or Disable Flash with the Intel® Ethernet Flash Firmware Utility, Guide:
https://www.intel.in/content/www/in/en/support/articles/000005790/software/manageability-products.html
- Currently available download:
https://downloadcenter.intel.com/download/19186?_ga=2.121336584.1073827514.1518177765-1043234715.1518177765
Step 1.
- Download the PREBOOT.exe file from Link 3.
- Install the .exe file in any windows computer or extract it.
- In the installed folder, for example, C:\Intel22.10\APPS.
- Copy the folder BootUtil to desktop or anywhere.
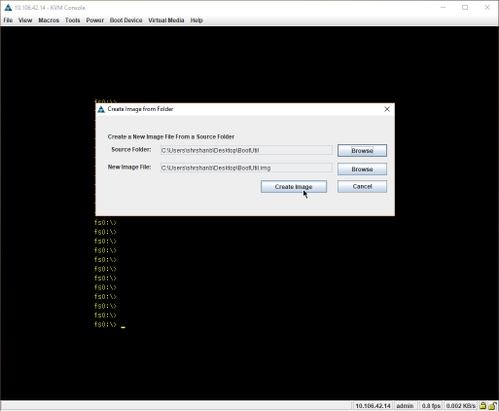
- In Cisco UCS KVM, navigate to Virtual Media > Create Image > Create Image from folder.
- Source Folder: Select copied BootUtil folder.
- New image file name will automatically populate with .img extension.
- Click Create Image as shown in the image.
Step 2.
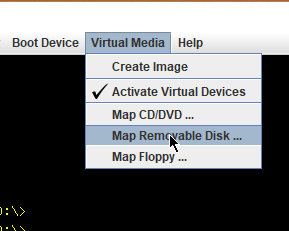
- Map the image. Navigate to Virtual Media > Map Removable Disk... as shown in the images.
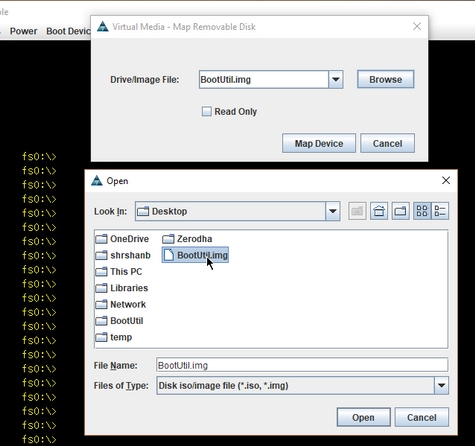
- Boot the server into UEFI Shell as shown in the image.
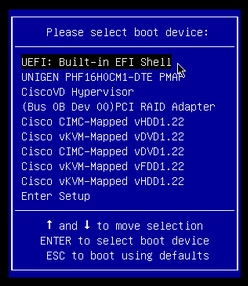
- Either run map –r in order to refresh the mounted devices to shell or find it manually. (You might need to reboot the host and boot into UEFI again.)
Step 3.
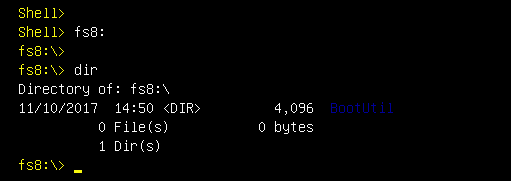
- Enter to the file system and perform these steps:
shell > fs0:  or any fs<number>:

fs0:\> dir
- This must show us the folder BootUtil.
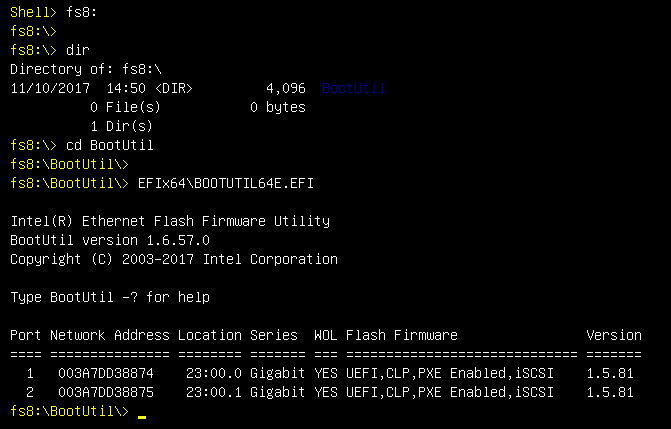
fs0:\> cd BootUtil

fs0:\BootUtil> EFIx64\BOOTUTIL64E.EFI
- You can list the NIC card and ports, you can also see much information, review web link 1 and 2 and as shown in the image.
Now, you can configure the NIC ports as per our requirement.
Example
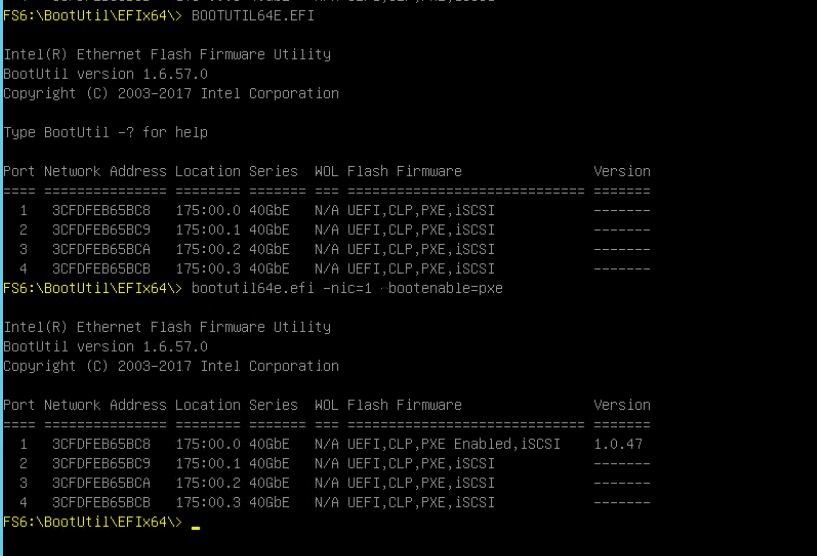
This section is subjected to NIC cards availability in the lab, a screenshot is here from the testing/QA team as shown in the image.
The command used in this screenshot is in order to make port-1 on NIC card to be PXE Enabled:
fs6:\BootUtil\EFIx64\> bootutil64e.efi -nic=1 bootenable=pxe
Verify
There is currently no verification procedure available for this configuration.
Troubleshoot
There is currently no specific troubleshooting information available for this configuration.
