LDAP Authentication Configuration Example for UCS Central
Available Languages
Contents
Introduction
This document provides a sample configuration for the Lightweight Directory Access Protocol (LDAP) authentication for Cisco Unified Computing System (UCS) Central. The procedures use the UCS Central graphical user interface (GUI), an example domain of bglucs.com, and an example username of testuser.
In version 1.0 of the UCS Central software, LDAP is the only remote authentication protocol supported. Version 1.0 has very limited support for remote authentication and LDAP configuration for the UCS Central itself. However, you can use UCS Central in order to configure all the options for the UCS Manager domains managed by UCS Central.
Limitations of UCS Central remote authentication include:
-
RADIUS and TACACS are not supported.
-
LDAP group membership mapping for role assignment and LDAP provider groups for multiple domain controllers are not supported.
-
LDAP uses only the CiscoAVPair attribute or any unused attribute in order to pass the role. The role passed is one of the predefined roles in UCS Central local database.
-
Multiple authentication domains/protocols are not supported.
Prerequisites
Requirements
Ensure that you meet these requirements before you attempt this configuration:
-
UCS Central is deployed.
-
Microsoft Active Directory is deployed.
Components Used
The information in this document is based on these software and hardware versions:
-
UCS Central Version 1.0
-
Microsoft Active Directory
The information in this document was created from the devices in a specific lab environment. All of the devices used in this document started with a cleared (default) configuration. If your network is live, make sure that you understand the potential impact of any command.
Conventions
Refer to the Cisco Technical Tips Conventions for more information on document conventions.
Gather Information
This section summarizes the information you need to gather before you start configuration.
Note: Use the Command Lookup Tool (registered customers only) to obtain more information on the commands used in this section.
Bind User Details
Bind user can be any LDAP user in the domain who has read access to the domain; a bind user is required for LDAP configuration. UCS Central uses the username and password of the bind user in order to connect and query the Active Directory (AD) for user authentication and so forth. This example uses the Administrator account as the bind user.
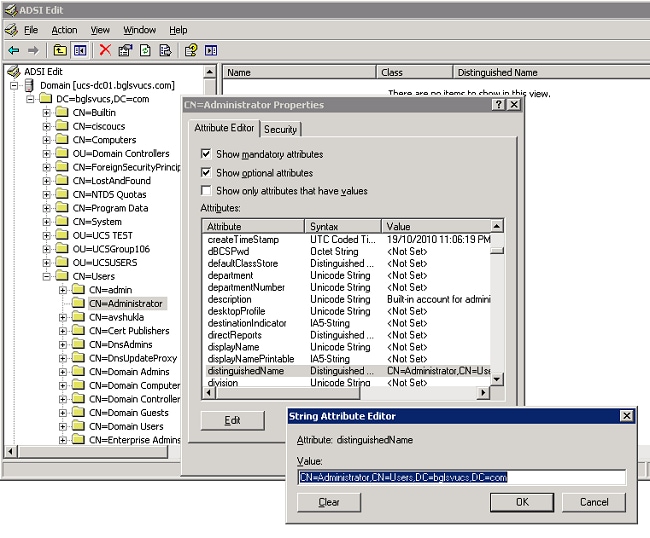
This procedure describes how an LDAP administrator can use the Active Directory Service Interfaces (ADSI) Editor in order to find the DN.
-
Open the ADSI Editor.
-
Find the bind user. The user is in the same path as in the AD.
-
Right-click the user, and choose Properties.
-
In the Properties dialog box, double-click distinguishedName.
-
Copy the DN from the Value field.
-
Click Cancel in order to close all windows.
To obtain the password for the bind user, contact the AD administrator.
Base DN Details
Base DN is the DN of the organizational unit (OU) or the container where the search for the user and user details begins. You can use the DN of an OU created in the AD for the UCS or UCS Central. However, you may find it simpler to use the DN for the domain root itself.
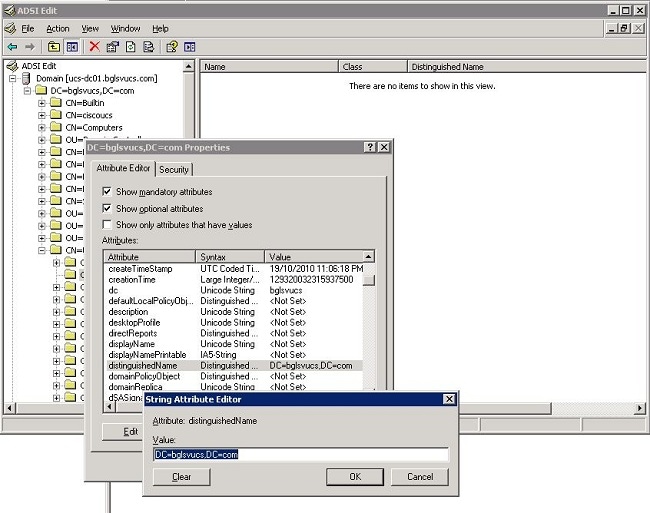
This procedure describes how an LDAP administrator can use the ADSI Editor in order to find the Base DN.
-
Open the ADSI Editor.
-
Find the OU or the container to be used as the base DN.
-
Right-click the OU or the container, and choose Properties.
-
In the Properties dialog box, double-click distinguishedName.
-
Copy the DN from the value field, and note any other details you need.
-
Click Cancel in order to close all windows.
Provider Details
Provider plays a key role in the LDAP authentication and authorization in UCS Central. Provider is one of the AD servers that UCS Central queries in order to search and authenticate the user and in order to get user details such as role information. Be sure to gather the hostname or IP address of the Provider AD server.
Filter Property
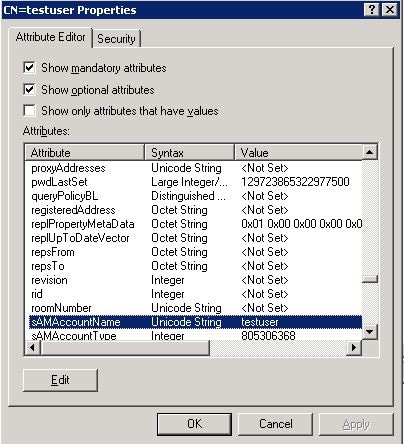
The filter field or property is used in order to search the AD database. The user ID entered at login is passed back to the AD and compared against the filter.
You can use sAMAccountName=$userid as the filter value. sAMAccountName is an attribute in the AD and has the same value as the AD user ID, which is used in order to log in to the UCS Central GUI.
Add and Configure Attributes
This section summarizes the information you need in order to add the CiscoAVPair attribute (if required) and update the CiscoAVPair attribute or other, predefined attribute before you start LDAP configuration.
The attribute field specifies the AD attribute (under the user property), which passes back the role to be assigned to the user. In Release 1.0a of the UCS Central software, either the custom attribute CiscoAVPair or any other unused attribute in the AD can be unitized in order to pass this role.
Note: Use the Command Lookup Tool (registered customers only) to obtain more information on the commands used in this section.
Add CiscoAVPair Attribute
In order to add a new attribute to the domain, expand the schema of the domain, and add the attribute to the class (which, in this example, is user).
This procedure describes how to expand the schema on a Windows AD server and add the CiscoAVPair attribute.
-
Log in to an AD server.
-
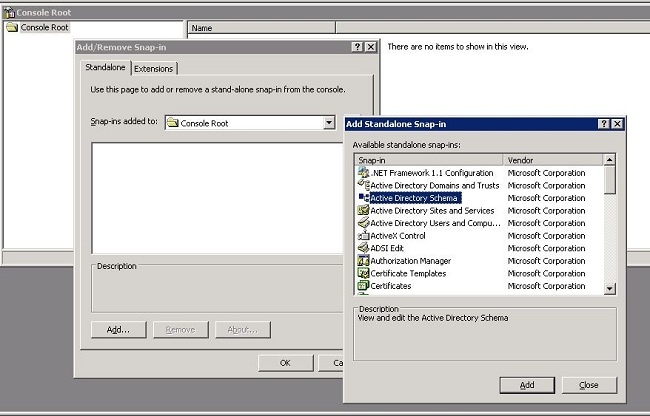
Click Start > Run, type mmc, and press Enter in order to open an empty Microsoft Management Console (MMC) console.
-
In the MMC, click File > Add/Remove Snap-in > Add.
-
In the Add Standalone Snap-in dialog box, select the Active Directory Schema, and click Add.
-
In the MMC, expand Active Directory Schema, right-click Attributes, and choose Create Attribute.
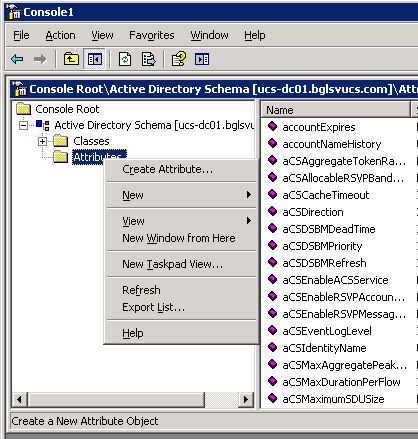
The Create New Attribute dialog box appears
-
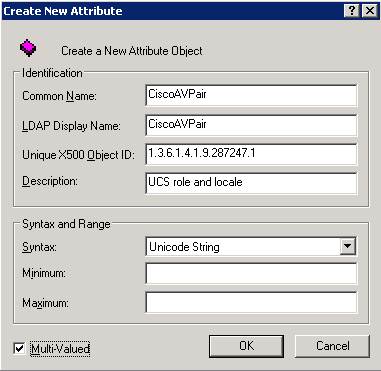
Create an attribute named CiscoAVPair in the remote authentication service.
-
In the Common Name and LDAP Display Name fields, enter CiscoAVPair.
-
In the Unique 500 Object ID field, enter 1.3.6.1.4.1.9.287247.1.
-
In the Description field, enter UCS role and locale.
-
In the Syntax field, select Unicode String from the drop-down list.
-
Click OK in order to save the attribute and close the dialog box.
Once the attribute is added to the schema, it must be mapped or included in the user class. This allows you to edit the user property and to specify the value the role to be passed.
-
-
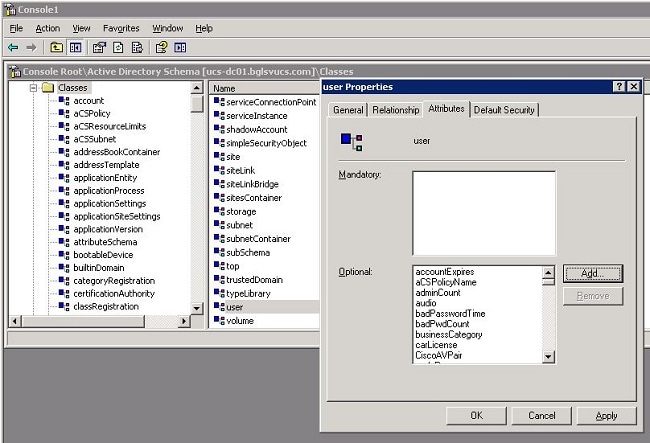
In the same MMC used for the AD schema expansion, expand Classes, right-click user, and choose Properties.
-
In the user Properties dialog box, click the Attributes tab, and click Add.
-
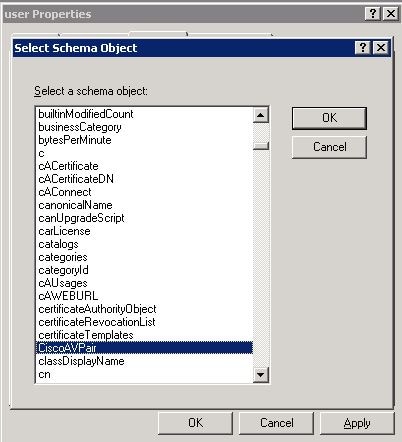
In the Select Schema Object dialog box, click CiscoAVPair, and click OK.
-
In the user Properties dialog box, click Apply.
-
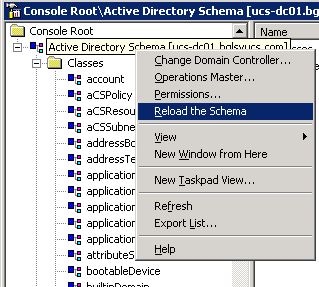
Right-click Active Directory Schema, and choose Reload the Schema in order to include the new changes.
-
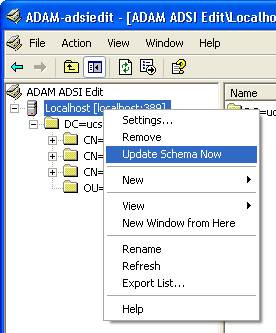
If necessary, use the ADSI Editor to update the schema. Right-click Localhost, and choose Update Schema Now.
Update CiscoAVPair Attribute
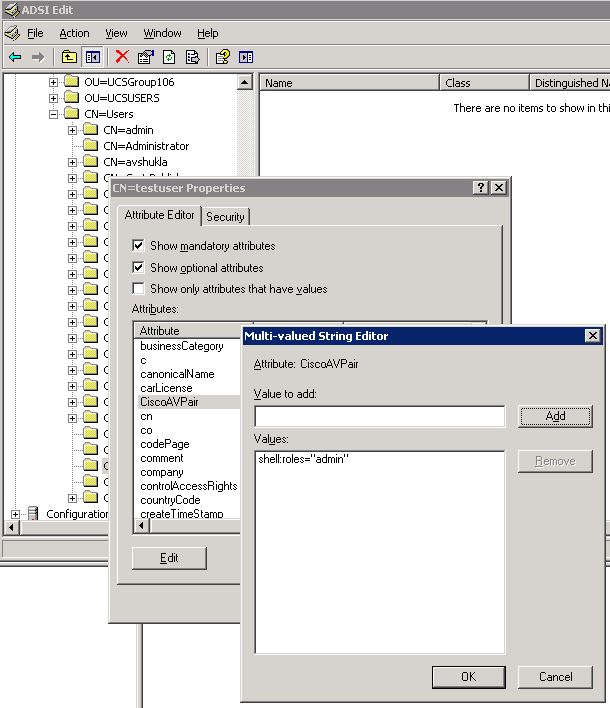
This procedure describes how to update the CiscoAVPair attribute. The syntax is shell:roles="<role>".
-
In the ADSI Edit dialog box, locate the user who needs access to UCS Central.
-
Right-click the user, and choose Properties.
-
In the Properties dialog box, click the Attribute Editor tab, click CiscoAVPair, and click Edit.
-
In the Multi-valued String Editor dialog box, enter the value shell:roles="admin" in the Values field and click OK.
-
Click OK in order to save the changes and close the Properties dialog box.
Update Predefined Attribute
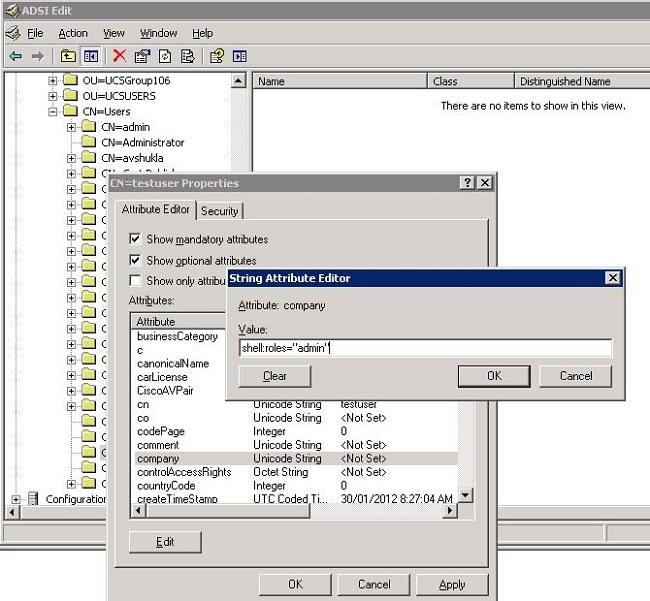
This procedure describes how to update a predefined attribute, where the role is one of the predefined user roles in UCS Central. This example uses the attribute company in order to pass the role. The syntax is shell:roles="<role>".
-
In the ADSI Edit dialog box, locate the user who needs access to the UCS Central.
-
Right-click the user, and choose Properties.
-
In the Properties dialog box, click the Attribute Editor tab, click company, and click Edit.
-
In the String Attribute Editor dialog box, enter the value shell:roles="admin" in the Value field, and click OK.
-
Click OK in order to save the changes and close the Properties dialog box.
Configure LDAP Authentication on UCS Central
The LDAP configuration in UCS Central is completed under Operations Management.
-
Log in to UCS Central under a local account.
-
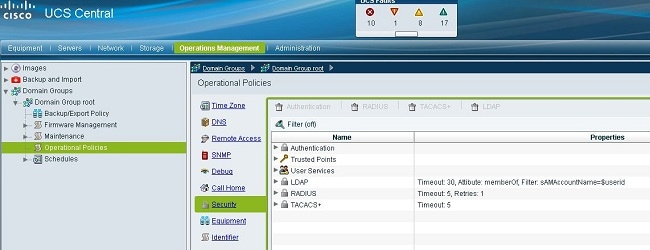
Click Operations Management, expand Domain Groups, and click Operational Policies > Security.
-
In order to configure LDAP authentication, take these steps:
-
Configure the LDAP provider group (not available in Release 1.0a).
Configure LDAP Provider
-
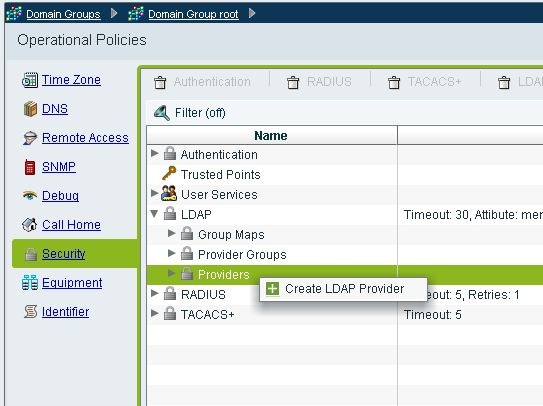
Click LDAP, right-click Providers, and choose Create LDAP Provider.
-
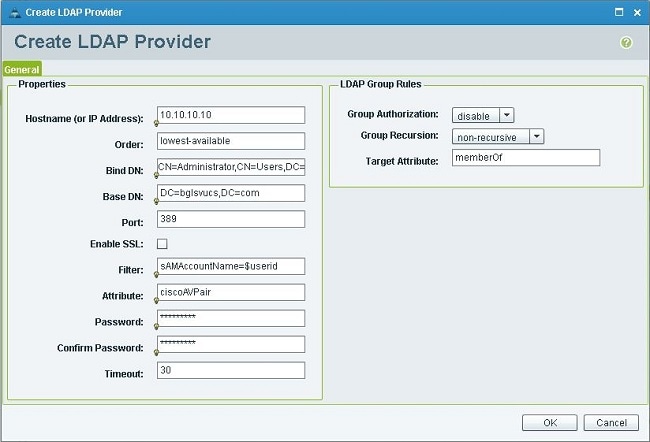
In the Create LDAP Provider dialog box, add these details, which were gathered earlier.
-
Hostname or IP of the provider
-
Bind DN
-
Base DN
-
Filter
-
Attribute (either CiscoAVPair or a predefined attribute such as company
-
Password (password of the user used in the bind DN)
-
-
Click OK in order to save the configuration and close the dialog box.
Note: No other value needs to be modified on this screen. The LDAP group rules are not supported for the UCS Central authentication in this release.
Configure LDAP Provider Group
Note: In Release 1.0a, provider groups are not supported. This procedure describes how to configure a dummy provider group to use in the configuration later.
-
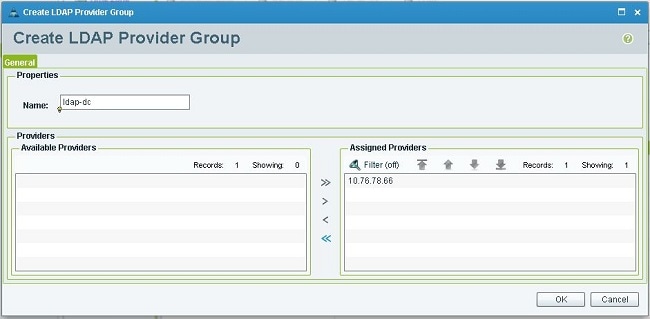
Click LDAP, right-click Provider Group, and choose Create LDAP Provider Group.

-
In the Create LDAP Provider Group dialog box, enter the name for the group in the Name field.
-
From the list of available providers on the left, select the provider, and click the greater than symbol ( >) in order to move that provider to Assigned Providers on the right.
-
Click OK in order to save the changes and close the screen.
Change Native Authentication Rule
Release 1.0a does not support multiple authentication domains as in UCS Manager. In order to work around this, you need to modify the native authentication rule.
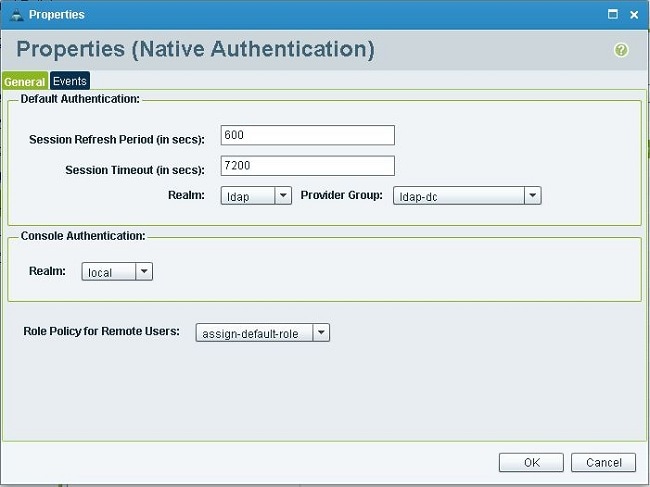
Native authentication has the option to modify the authentication for default logins or console logins. Since multiple domains are not supported, you can use either the local account or an LDAP account, but not both. Change the value of Realm in order to use either local or LDAP as the source of authentication.
-
Click Authentication, right-click Native Authentication, and choose Properties.
-
Determine if you want Default Authentication, Console Authentication, or both. Use Default Authentication for the GUI and command-line interface (CLI). Use Console Authentication for the virtual machine (VM) kernel-based virtual machine (KVM) view.
-
Choose ldap from the Realm drop-down list. The value of Realm determines whether local or LDAP is the source of authentication.
-
Click OK in order to close the page.
-
On the Policies page, click Save if required in order to save the changes.
Note: Do not log out of your current session or modify the console authentication until you verify that the LDAP authentication works correctly. Console authentication provides a way to revert to the previous configuration. Refer to the Verify section.
Verify
This procedure describes how to test LDAP authentication.
-
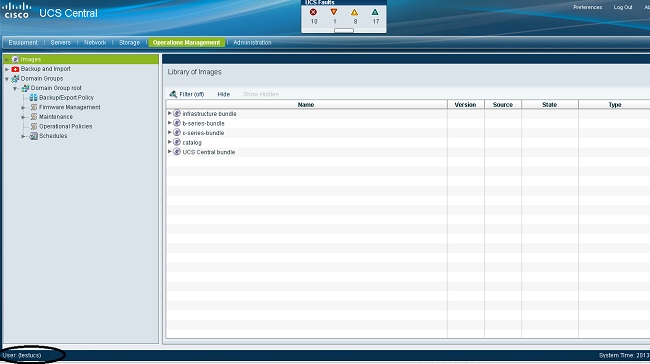
Open a new session in UCS Central, and enter the username and password. You do not need to include a domain or character before the username. This example uses testucs as the user from the domain.

-
LDAP authentication is successful if you see the UCS Central dashboard. The user is displayed at the bottom of the page.
Troubleshoot
There is currently no specific troubleshooting information available for this configuration.
Related Information
Revision History
| Revision | Publish Date | Comments |
|---|---|---|
1.0 |
13-Mar-2013 |
Initial Release |
Contact Cisco
- Open a Support Case

- (Requires a Cisco Service Contract)


 Feedback