Introduction
This document describes how to configure and troubleshoot VMQ for Windows Server 2019 on C Series Servers with VIC 1400.
Prerequisites
Requirements
There are no specific requirements for this document.
Components Used
The information in this document is based on these software and hardware versions:
- UCS C220M6
- VIC 1467
- CIMC 4.2(2a)
- Windows Server 2019
- 5.11.14.1 NENIC Driver
The information in this document was created from the devices in a specific lab environment. All of the devices used in this document started with a cleared (default) configuration. If your network is live, ensure that you understand the potential impact of any command.
Configure
CIMC
From Cicso Integrated Management Controller (CIMC), start by navigating to Networking > Adapter Card MLOM (1) > vNICs (2) then select the virtual network interface card (vNIC) you would like to configure (3).
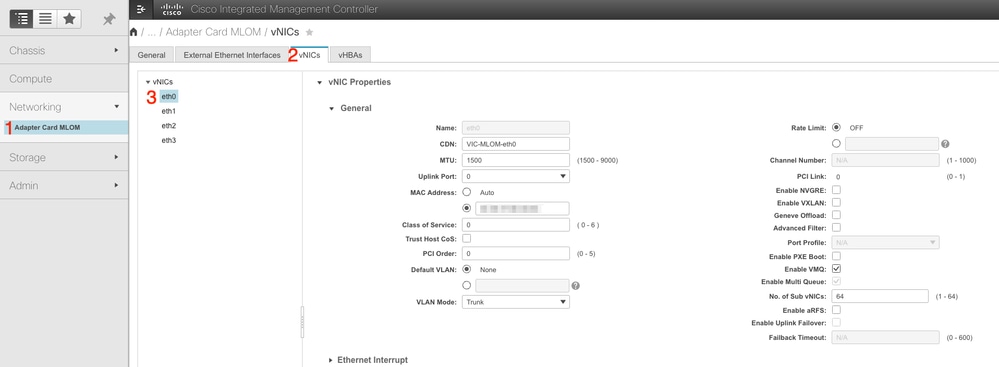 Use CIMC to Locate vNICS
Once here, ensure the Enable VMQ box is checked (4).
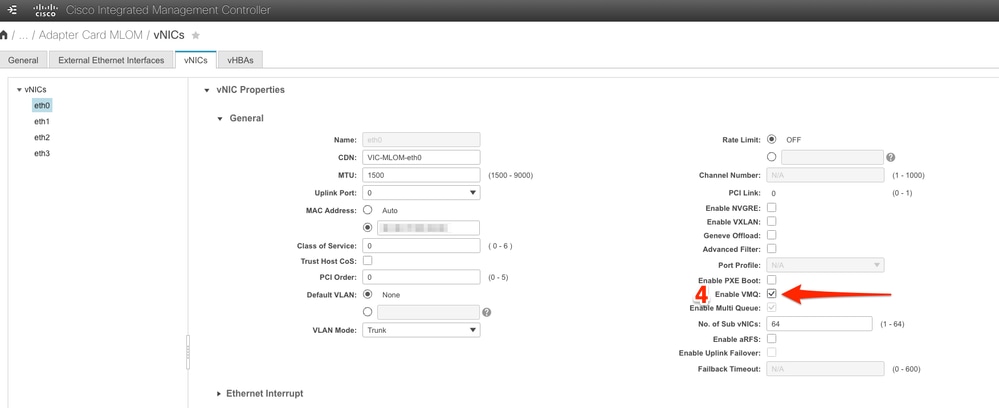 Enable VMQ from the vNIC
Next is the queue structure definition. The queue structure is comprised of 4 main components from the CIMC perspective: Ethernet Interrupt, Ethernet Receive Queue (Rx Queue), Ethernet Transmit Queue (Tx Queue), and Completion Queue (CQ).
This is the white paper for the VIC 1400 series which outlines the calculation of the queue structures. It is recommended to read through this to get a better understanding of how these calculations are made.
Cisco UCS VIC 1400 Series Best Practices in Ethernet Fabric White Paper
However, the parameters are the most important take away:
● TX queue = Sub vNIC or vPort
● RX queue = 8 * (Tx Queue)
● CQ = TX + RX
● Interrupt = Max of (RX queue or at least 2xCPU+ 4)
There is one value which is not calculated and must be decided on before running through the calculations. That is the Sub vNIC or vPorts. For the sake of this lab, 4 Virtual Machines are used which corresponds to 4vPorts. Therefore:
● TX queue = 4
● RX queue = 8 * (4) = 32
● CQ = 4 + 32 = 36
● Interrupt = Max of (32 or at least 2x2+ 4 = 8(32 is used as it is greater than 8 )
Once you have the queue parameters from the calculations, scroll down on the vNIC page and enter Interrupt value into the Ethernet Interrupt (1) filed, the RX Queue value into the Ethernet Receive Queue (2) field, Ethernet Transmit Queue (3) , and Completion Queue (4).
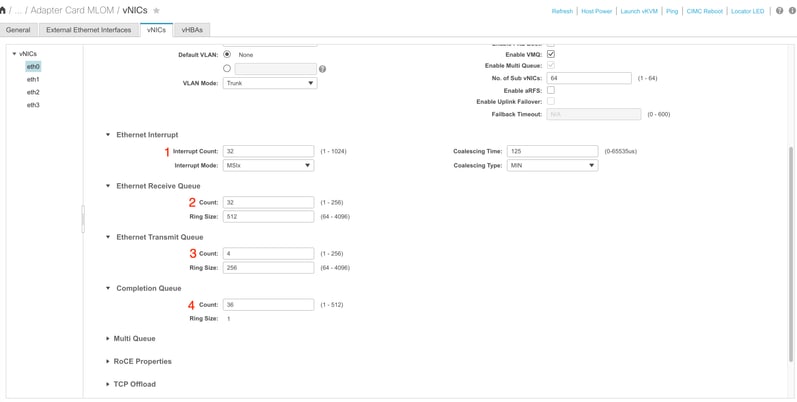
This is the most important part of the virtual machine multi queue (VMQ) configuration as if the queue structure is incorrectly calculated, VMQ is not going to work in Windows.

Note: If you are using a vSwitch with teamed NICs in Windows, you MUST configure all vNICs identically in CIMC.
Windows
From WIndows Server, you need to verify VMQ is enabled on the desired virtual machines. VMQ is enabled by default in most cases, but you must verify.
To ensure VMQ is enabled, press the Windows Key and search for Hyper-V Manager.
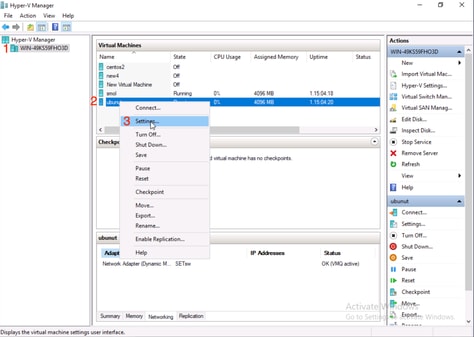
Once you are in Hyper-V Manager, click on your local host on the left hand side (1), and then right click on the virtual machine (2) which you want to verify VMQ is enabled on and click Settings (3).
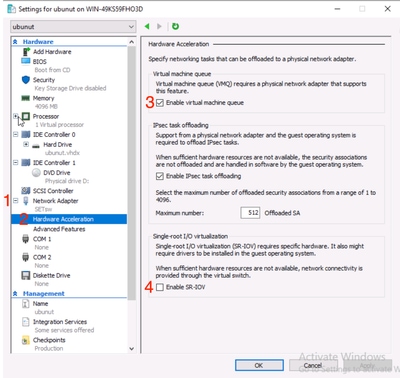
Once in settings, navigate to and expand Network Adapter (1). After expanding, click Hardware Acceleration (2). Finally, verify the Enable Virtual Machine Queue box is checked (3).
While here, you also need to verify Enable SR-IOV is NOT checked (4).
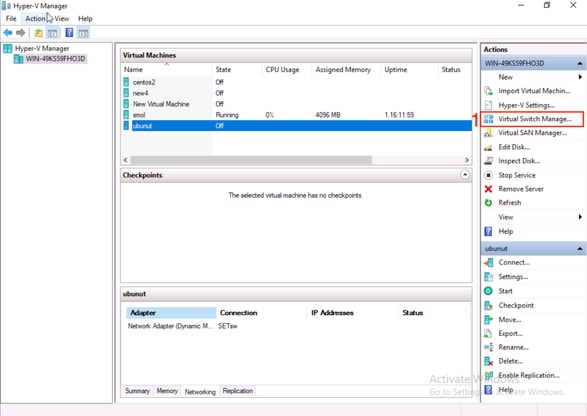
Next, ensure Microsoft Windows Platform Filtering is disabled on the Virtual Switch in use. To do this, navigate to the Hyper-V Manager, and click Virtual Switch Manager (1).
From there, expand the switch (1) you are using, and click Extensions (2). Then uncheck Microsoft Windows Platform Filtering (3).
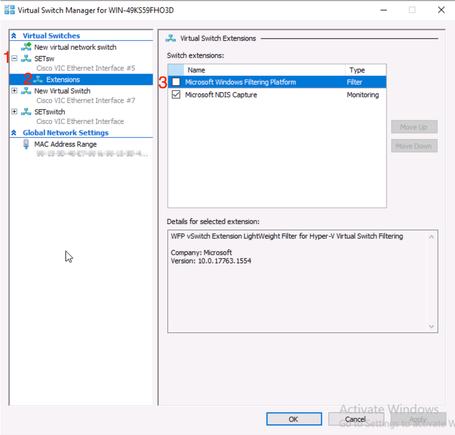 Disable Microsoft Windows Filtering Platform

Note: If you are using a vSwitch with teamed NICs in Windows, you MUST configure all vNICs identically in CIMC.
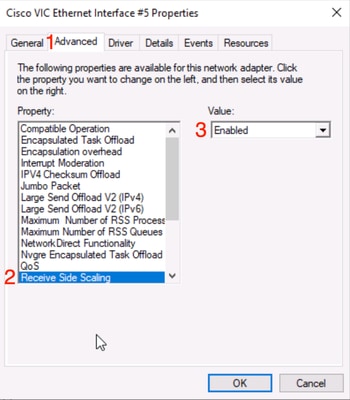
Also, ensure Receive Side Scaling (RSS) is enabled for each interface you want VMQ enabled on. To do this, press the Windows Key and search for Device Manager.
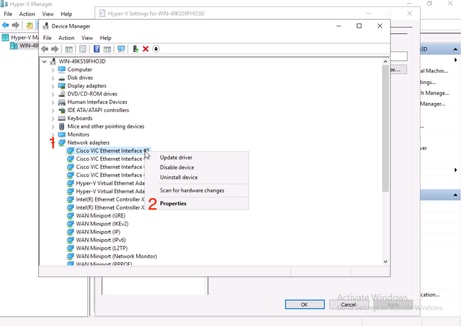
From device manager, locate Network Adapters (1) , and select the Properties (2) for the Interfaces you want VMQ enabled on.
Navigate to Advanced (1), then scroll down to locate Receive Side Scaling (2) and ensure it is Enabled (3).
Verify
CIMC
There is no verification that can be done from the CIMC perspective.
Windows
The first place to check if VMQ is active is in Windows within Hyper-V manager.
Open Hyper-V Manage and click the virtual machine that you want to verify. Then click Networking (1) towards the bottom. Underneath Status (2), OK (VMQ Active) can be observed.
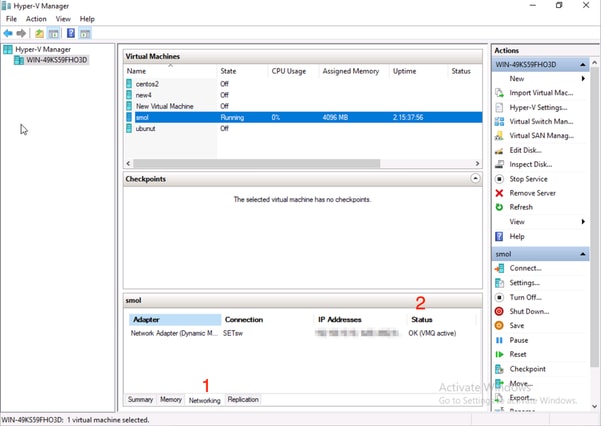 Verify if VMQ is Active in Windows
If you only see OK under status and not OK (VMQ Active), then VMQ was not successfully configured and VMQ is not working.
The next place to verify if VMQ is active is in Powershell. Press the Windows Key and search for Powershell, then run these commands:
Get-NetAdapterVmqQueue
Get-vm | get-vmnetworkadapter | select vmname, vmqusage
 Verify VMQ is Active Via Powershell
There are two things to look for in the outputs. First, ensure multiple queues are being used under QueueID (1). When you see Queue IDs of 1 and 2, that means VMQ is working.
Second, verify the VmqUsage (2) is greater than 0. As long as the value is greater then 0, that means VMQ is in use.
Troubleshooting
Windows
First, check if CIMC is presenting VMQ to Windows Server. Press the Windows Key and search for Powershell, then enter this command:
Get-NetAdapterVmq

Then, you want to check the Enabled column. If VMQ is showing up as disabled, that means VMQ is not enabled at the hardware level. Navigate to the vNIC configuration in CIMC and ensure VMQ is enabled.
If VMQ shows enabled, but under the Networking tab in the Hyper-V Manager, you see a Status of OK, it is likely the VMQ Queue Parameters were improperly configured. Run through the calculations again and update your parameters.
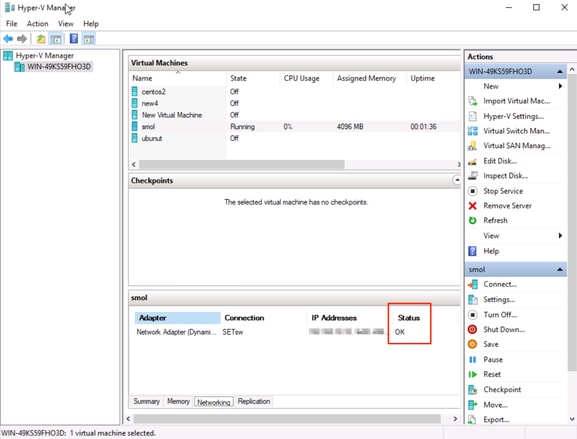 VMQ Not Active in Windows
Here is an example of a bad VMQ Queue Configuration. (Still based on 4 VMs):
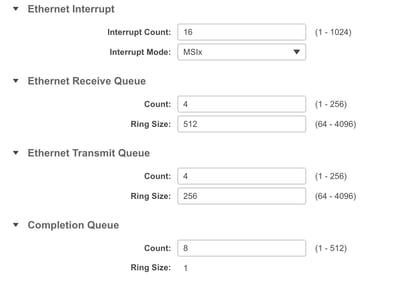
Here are the issues with this configuration:
● TX queue = 4 Starting off with a correct number
● RX queue = 8 * (4) != 4 Miscalculation
● CQ = 4 + 4 = 8 While the math checks out, garbage in/garbage out. Because of the incorrect RX queue calculation, the CQ value is incorrect.
● Interrupt = Max of (RX queue or atleast 2xCPU+ 4) The entered value of 16 is not equal to the RX queue or (2x2cpus +4).
To correct this, you would fix the RX Queue calculation which would be 32. The correct CQ and Interrupt counts can then be calculated.
Conclusion
Properly configuring VMQ can be frustrating and difficult. It is imperative you ensure the VMQ Queue structure is properly configured in CIMC.


 Feedback