Unified Computing System KVM Console Access to Blade Server Configuration Example
Available Languages
Contents
Introduction
The KVM console is a video over IP representation of the video output on the blade. The KVM console access to server blades in Cisco UCS is conceptually similar to any industry standard KVM console access to the blade. This configuration example describes how to access the KVM console from the blade view via the Unified Computing System (UCS) Manager. Additionally, once the server profile association is complete, you can access the same KVM console from the Server Profile view as well. The KVM console service is provided by the blade's BMC and can be accessed via the external IP address only (that is, a pool of external routable addresses).
In order to use the KVM console to access the blade server, a pool of IP addresses is assigned as a management interface into the server blades. These IP addresses represent the KVM console access. Note that these IP addresses need to be externally routable for remote access to the servers via the KVM console.
This configuration example describes how to configure KVM console access to the blade in the Cisco UCS environment via these methods:
Prerequisites
Requirements
Cisco recommends that you:
-
Have a working knowledge of Cisco UCS server blade software and hardware.
-
Be familiar with the UCS management application.
-
Understand the impact and implications of the different commands described in this document.
-
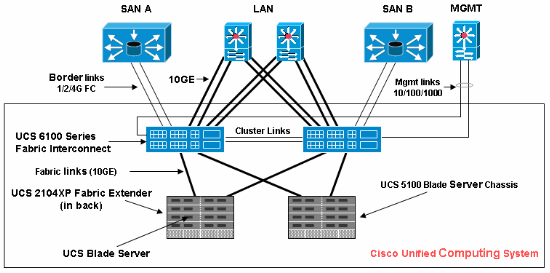
Be familiar with the UCS components and topology. Refer to the Network Diagram for a typical solution.
Components Used
The information in this document is based on the Cisco Unified Computing System.
The information in this document was created from the devices in a specific lab environment. All of the devices used in this document started with a cleared (default) configuration. If your network is live, make sure that you understand the potential impact of any command.
Network Diagram
A typical Cisco UCS topology is similar to this network diagram:
Conventions
Refer to the Cisco Technical Tips Conventions for more information on document conventions.
Configure
In this section, you are presented with the information to configure the features described in this document.
UCS Manager GUI
Complete these steps in order to use the UCS GUI to configure KVM console access to the blade server:
-
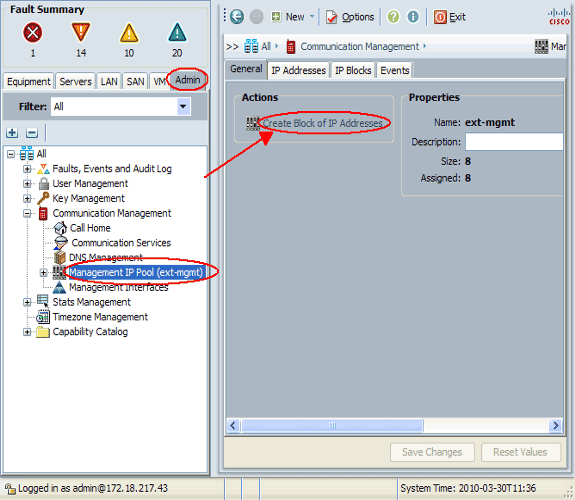
In the navigation pane, click the Admin tab.
-
Expand Communication Services, and choose Management IP Pool (ext-mgmt).
-
Click Create Block of IP Addresses.
-
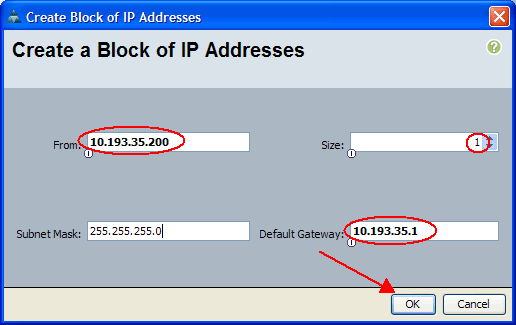
Enter the appropriate information in order to create the block of IP addresses, and then click OK.
Note: The IP addresses in the block must be routable outside.
UCS Manager CLI
Complete these steps in order to use the UCS CLI to configure KVM console access to the blade server:
-
Enter org mode.
-
Enter ip-pool and then ext-mgmt mode.
-
Enter the pool ip address block.
-
Commit transaction.
Power-A Power-A# Power-A# Power-A#scope org Power-A /org #scope ip-pool ext-mgmt Power-A /org/ip-pool #scope pooled 10.193.35.200 Power-A /org/ip-pool/pooled #commit-buffer Power-A /org/ip-pool/pooled # Power-A /org/ip-pool/pooled #show detail Pooled: IP Address: 10.193.35.200 Subnet: 255.255.255.0 Def Gw: 10.193.35.1 Assigned: Yes Assigned To: sys/chassis-1/blade-2/mgmt/ipv4-pooled-addr Power-A /org/ip-pool/pooled #
Verify
Complete these steps in order to verify KVM console access has been configured correctly:
-
In the navigation pane, click the Equipment tab.
-
Expand any chassis on which the blade is installed.
-
Expand the Servers tab.
-
Select the blade server.
-
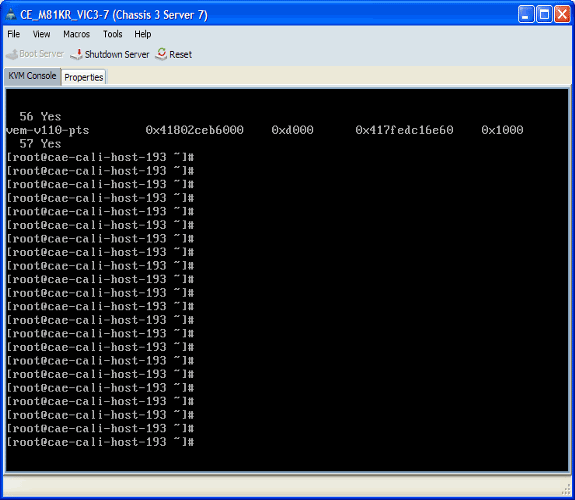
Click the General tab, and then click KVM Console.
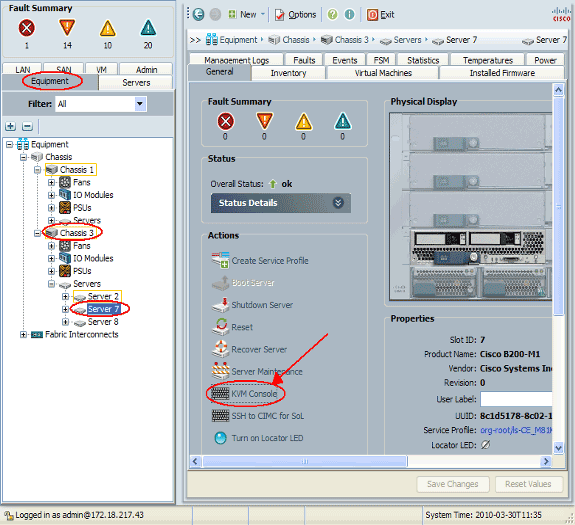
The KVM console should successfully connect to the blade server as shown in this image:
Troubleshoot
There is currently no specific troubleshooting information available for this configuration.
Related Information
Revision History
| Revision | Publish Date | Comments |
|---|---|---|
1.0 |
28-Apr-2010 |
Initial Release |
Contact Cisco
- Open a Support Case

- (Requires a Cisco Service Contract)


 Feedback