Will Boot Configuration Checks for UCS
Available Languages
Contents
Introduction
This document explains how to use the UCS Will Boot feature and the commands to quickly perform configuration status check.
The UCS Will Boot feature allows users to quickly perform a cursory check in order to ensure that the blade is configured properly to allow the BIOS to proceed. The Will Boot configuration check is to verify both CPU and DIMM configuration. This check helps users quickly debug booting problems.
Cisco UCS provides several tools to aid in the Will Boot configuration checks. These tools include: command line show status and show post commands as well as UCS Manager GUI Overall Status, Faults, and View POST Results .
Prerequisites
Requirements
Cisco recommends that you:
-
Have a working knowledge of Cisco UCS Server Blade software and hardware.
-
Be familiar with Cisco UCS components and topology.
-
Be familiar with Cisco UCS Manager application.
Components Used
The information in this document is based on Cisco Unified Computing System (UCS).
Conventions
Refer to the Cisco Technical Tips Conventions for more information on document conventions.
Configure
The UCS Will Boot feature provides configuration checks for CPU and DIMM. In this section, you are presented with the information with required CPU and DIMM configuration.
Required CPU Configuration (to run)
-
B200/B250—Lowest number CPU must be present
-
B440—CPU1 or CPU2 (the two lowest) Processor sockets must be installed for the card to run. If CPU1 or CPU2 is installed and works, any other combination runs.
Note: As of now, Cisco supports only 2 or 4 CPU configuration.
-
CPU matching is not enforced.
Required DIMM Configuration (to run)
-
B200/B250—DIMM in A0, B0 or C0 must be populated.
-
B440—One matched DIMM pair on either CPU1 or CPU2. DIMM in lowest bank of any channel with present CPU must be populated.
-
DIMM matching is not required. For example, there is no requirement to install DIMM uniformly across CPU.
How to Perform Configuration Check
-
Overall Status
-
Faults
-
View PowerOn Self-Test (POST) Results
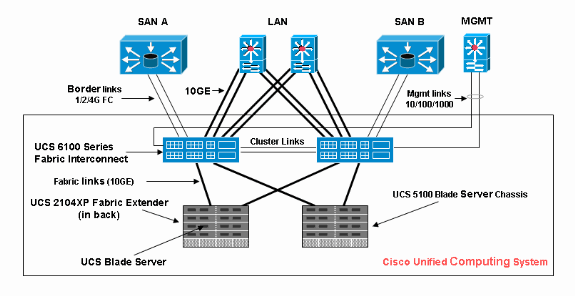
Network Diagram
This is a typical topology used with Cisco Unified Computing System (UCS):
Scenarios—Configuration Check
Check the Overall Status first, then check Faults and POST Results.
Verify the Overall Status
The first thing to verify is the Overall Status. This feature in Cisco UCS allows users to quickly check the overall status of the server. This section explains how to view the overall status and how it looks like when UCS detects CPU or DIMM failures. Complete these steps:
-
Log in to Cisco UCS Manager.
-
In the navigation pane, choose the Equipment tab.
-
Choose Equipment > Chassis > Chassis Number > Servers, and then choose the server you would like to check the overall status.
-
In the work pane to the right, choose General tab. You see Overall Status: in Status.
-
In a normal condition, the Overall Status should be displayed ok.
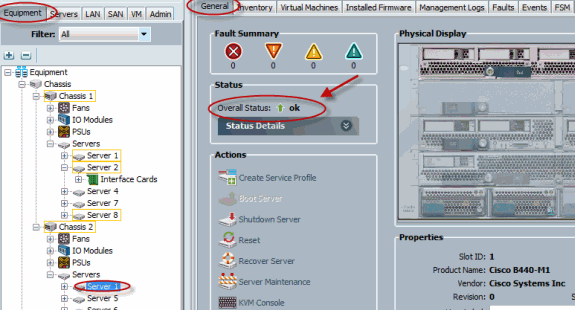
-
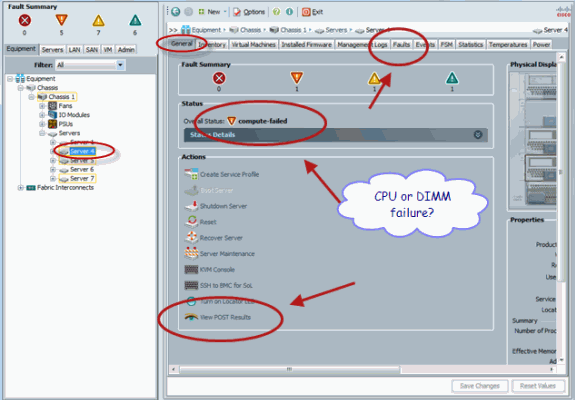
If the blade is not configured appropriately and UCS detects CPU or DIMM failures, it shows compute-failed. The UCS with overall status compute-failed is shown in this figure.
-
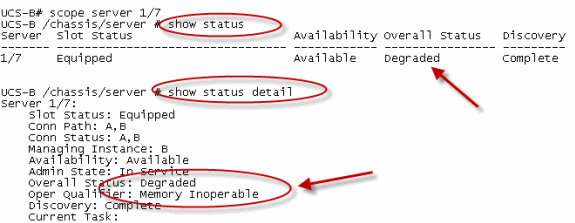
You can also check the Overall Status if you issue the show status command.

Check Faults Details
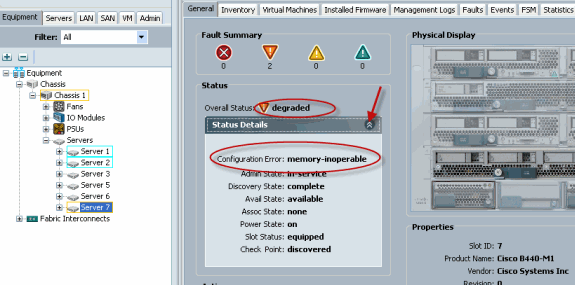
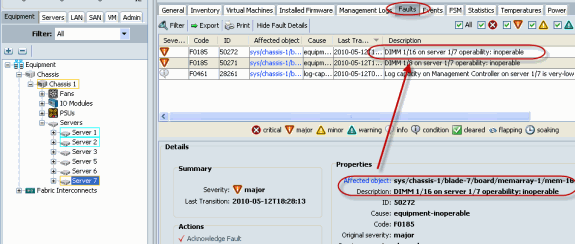
You can view status details for a server blade. This section explains how to view the status details and faults description. If UCS detects part of CPUs/DIMMs inoperable, the Overall Status shows Degraded. As shown here, the UCS Manager displays the blade is in degraded overall status. Complete these steps:
-
Log in to Cisco UCS Manager.
-
In the navigation pane, choose the Equipment tab.
-
Choose Equipment > Chassis > Chassis Number > Servers, and then choose the server you would like to check the overall status.
-
In the work pane to the right, choose General. Check for the overall status under Status.
-
Choose the Status Details view window in order to check the status details.
-
Click Faults tab in order to view the faults description and details.
-
The detailed status also can be viewed if you use the show status details command.
View POST Results
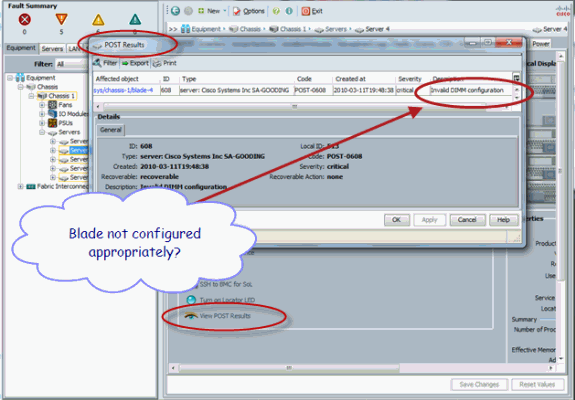
You can view any error collected during the Power On Self-Test process for a server blade. This section explains how to view the POST Results. Complete these steps:
-
In the Navigation pane, click the Equipment tab.
-
On the Equipment tab, choose Equipment > Chassis > Chassis Number > Servers.
-
Choose the server for which you want to view the POST results.
-
In the Work pane, click the General tab.
-
In the Actions area, click View POST Results.
The POST Results dialog box lists the POST results for the server blade.
-
Click OK in order to close the POST Results dialog box.
-
You can also view POST Results if you use show post command.

Verify
There is currently no verification procedure available for this configuration.
Related Information
Revision History
| Revision | Publish Date | Comments |
|---|---|---|
1.0 |
08-Jul-2010 |
Initial Release |
Contact Cisco
- Open a Support Case

- (Requires a Cisco Service Contract)


 Feedback