Introduction
This beginner-level document describes the minimum settings required in order to configure the Cisco Virtual Machine Fabric Extender (VM-FEX) with Hyper-V on Windows Server 2012 with Unified Computing System (UCS) Release 2.1. It does not explain all the options in detail. Refer to the Cisco UCS Manager VM-FEX for Hyper-V GUI Configuration Guide, Release 2.1 for more information.
In order to configure VM-FEX with Hyper-V on UCS Release 2.2, refer to Cisco UCS Manager VM-FEX for Hyper-V GUI Configuration Guide, Release 2.2.
Prerequisites
Requirements
Cisco recommends that you have a working knowledge of these topics:
- Cisco UCS and UCS Manager (UCSM)
- Windows Server 2012 and Hyper-V Version 3.0
Components used
These are the minimum prerequisites needed in order to configure VM-FEX with Hyper-V:
- UCS Version 2.1(1a) or later
- Server that Contains a Cisco VIC Adapter
- Windows Server 2012 or later
The information in this document was created from the devices in a specific lab environment. All of the devices used in this document started with a cleared (default) configuration. If your network is live, make sure that you understand the potential impact of any command.
Background information
VM-FEX
Cisco VM-FEX technology allows you to extend the switching fabric to the virtual machine level. The regular software-based switching done at the hypervisor layer for the virtual machine is bypassed, and the switching is performed directly in the fabric interconnect. VM-FEX is implemented in a Windows Hyper-V environment with the use of Single Root I/O Virtualization (SR-IOV) and Intel Virtualization Technology for Directed I/O (VT-d) technologies.
SR-IOV
SR-IOV allows multiple Virtual Machines (VMs) to share a single Peripheral Component Interconnect Express (PCIe) network adapter inside a host. SR-IOV defines these functions:
- Physical function (PF) - PFs are full PCIe functions that include the SR-IOV capabilities. These appear as regular static Virtual Network Interface Controllers (vNICs) on the UCS.
- Virtual function (VF) - VFs are lightweight PCIe functions that help in data transfer. A VF is derived from, and managed through, a VF.
Configure
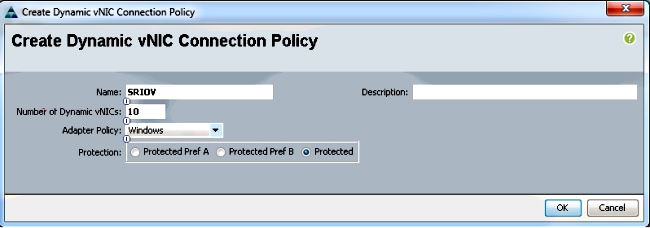
- Create a Dynamic vNIC connection policy.
- Navigate to LAN > Policies.
- Create a Dynamic vNIC connection Policy with the required number of dynamic vNICs (VF).
- Use the predefined Windows adapter policy.
- Create a service profile to be used for VM-FEX.
- Create a Service profile from Servers > Service Profiles. Choose the Create Service Profile (expert) option.
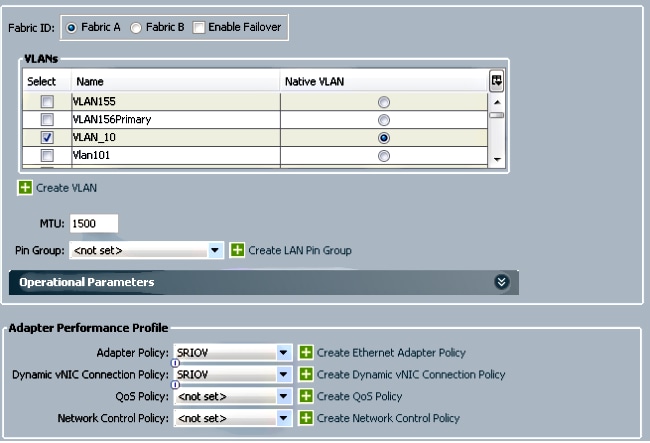
- When you create the static vNICs (PF):
- Choose the predefined SRIOV adapter policy.
- Choose the Dynamic vNIC connection policy that you created in Step 1.
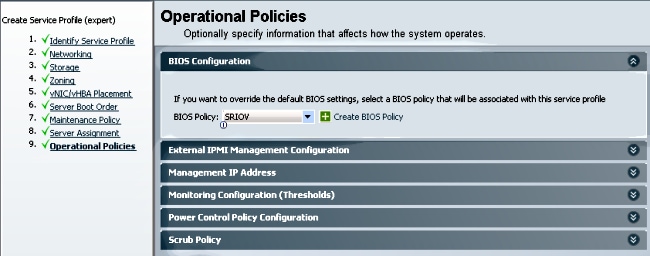
- Choose the predefined SRIOV BIOS policy. This mandatory step enables these settings under the BIOS settings:
- Virtualization Technology (VT) and Direct Cache Access enabled under Advanced > Processor.
- Interrupt Remap and VT for Directed I/O enabled under Advanced > Intel Directed IO.
- Create a port-profile, cluster, and a port-profile client.
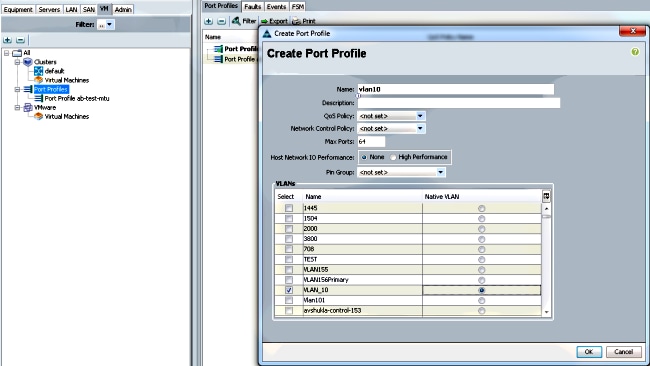
- Navigate to VM > Port Profiles.
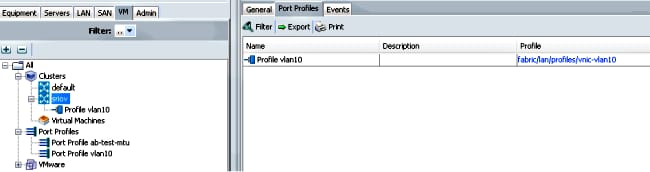
- Create a Port Profile. This defines the configuration for the port that connects to the VM.
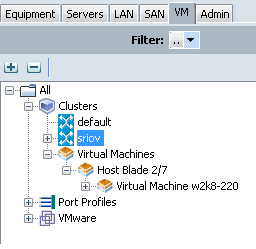
- Create a separate cluster to be used with Hyper-V (recommended step).
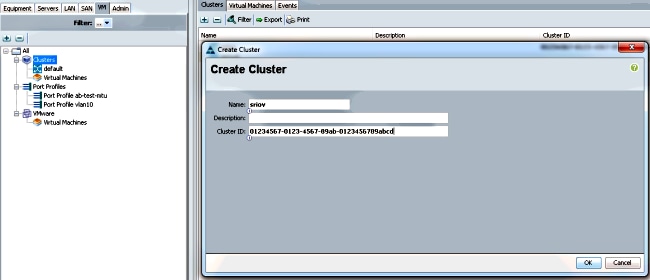
- Associate the required port-profiles to this cluster.
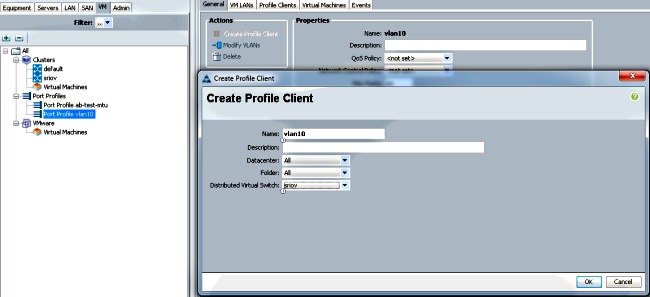
- Right-click the port-profile, and choose the Create Profile Client.
- Choose the cluster that you created for the Distributed Virtual Switch. The port-profile appears under the cluster.
- Install the PF, VF, and VM-FEX switch drivers.
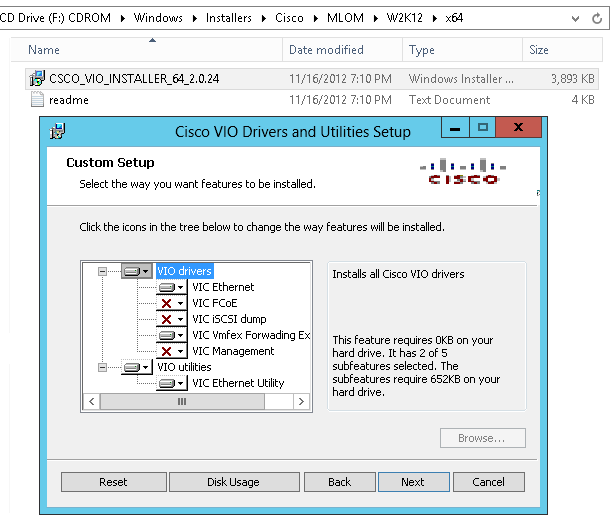
- On the Windows 2012 host, install the PF drivers and the VM-FEX switching extension.
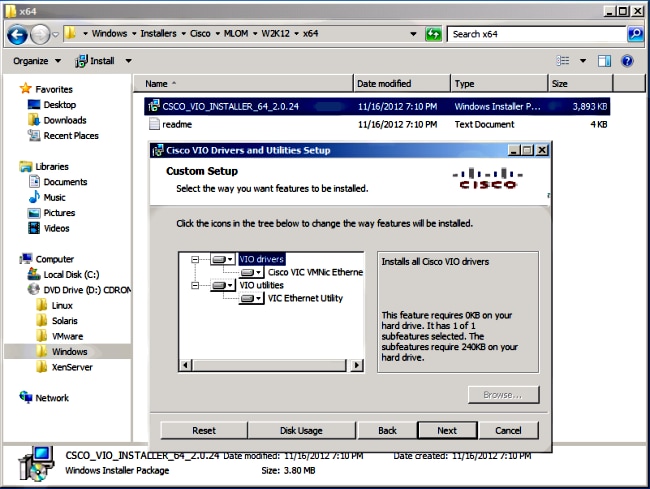
- Download the B-series drivers bundle. Use the CSCO_VIO_INSTALLER_version.msi file for this purpose. For example, with the 2.1(1a) drivers bundle, look for CSCO_VIO_INSTALLER_64_2.0.24.msi at /Windows/Installers/Cisco/<adapter>/W2k12/x64.
- Run the file as an administrator, and install the VIC Ethernet and VIC VMFex forwarding extension.
- Use the same msi file on the VM, and install the VIC VMNic Ethernet driver.
- Create the Virtual Switch with the Hyper-V manager.
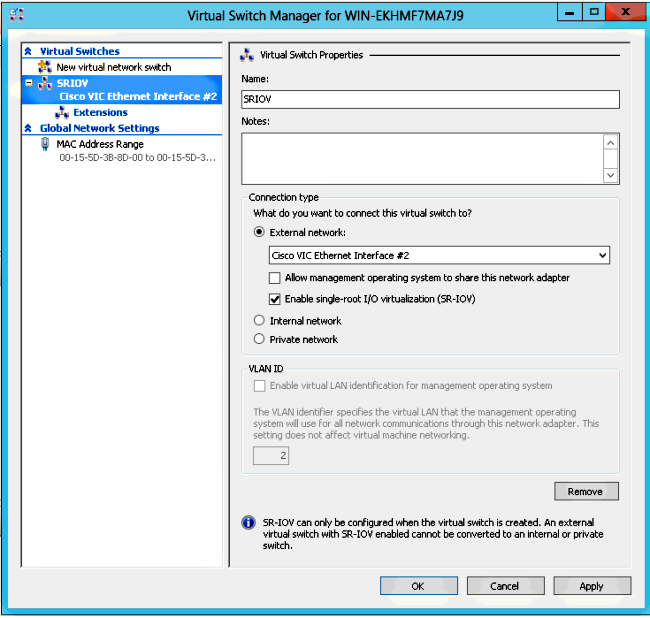
- On the Windows 2012 host, create a virtual switch with the Virtual Switch manager. This switch is used for SR-IOV.
- When you create the switch, choose Enable single-root I/O virtualization (SR-IOV). This setting is enabled only when you create the virtual switch.
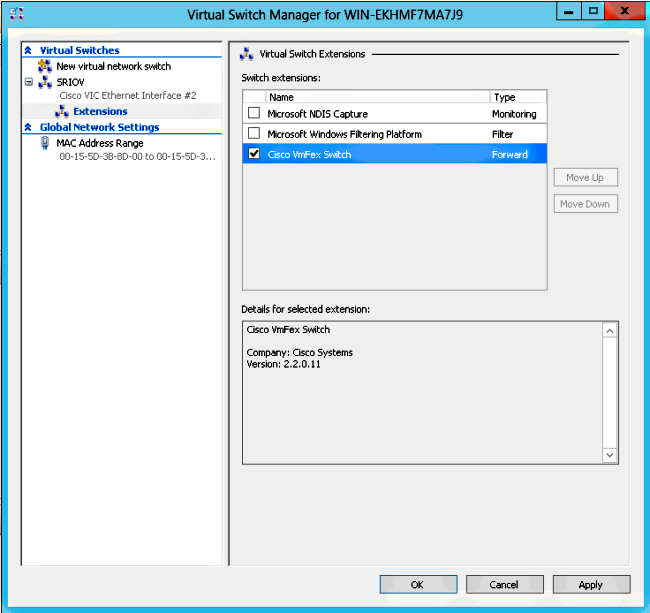
- From the Extensions section, enable the Cisco VMFex Switch forwarding extension.
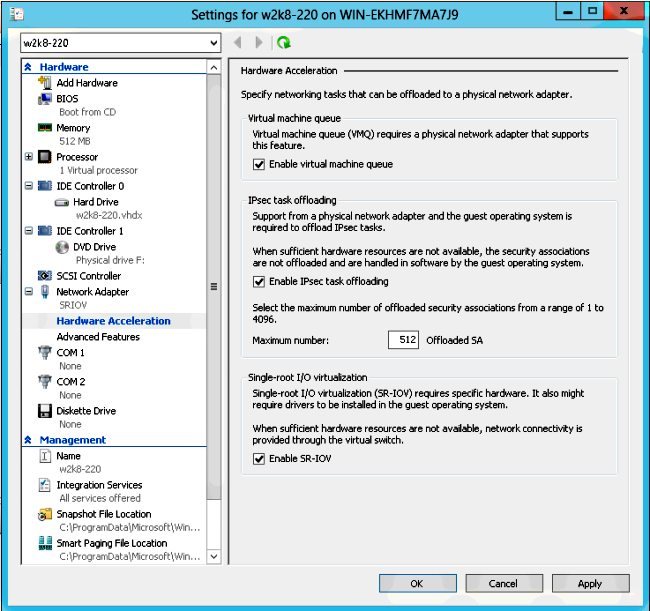
- Attach the network adapter of the VM that is going to be on VM-FEX to this newly-created virtual switch. Also, from the Hardware Acceleration section, check the Enable SR-IOV check box.
- Install the port-profile utility and the port-profile management snap-in.
- Attach the VM to VM-FEX (with the port-profile management snap-in here).
- Open Cisco Vmfex Port-Profile Manager from the shortcut on the desktop or from \Program Files\Cisco Systems\VIO Software\Utilities\Ethernet Utilities\Vmfex Utilities\Snapin as well.
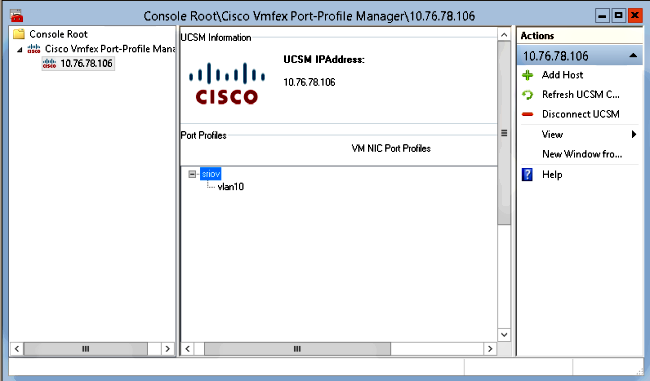
- In order to attach it to the UCSM, click Add UCSM, and enter the IP address, username, and password. Once added, it lists the available clusters and the port-profiles under each cluster.
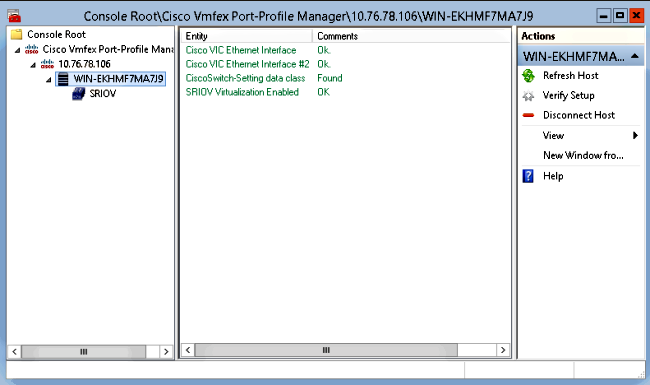
- Add the Hyper-V host with Add Host, which gives you the option to add a local computer or a remote computer.
- When you add a remote computer, the host name can be used if the machine that runs the port-profile manager snap-in and the Hyper-V host are in the same domain.
- If not, add it with the IP address. The credentials entered here should be in the form of username@domain for domain users and hostname\user for local users.
- Once added, all virtual switches that have SR-IOV enabled in the host are displayed as well.
- Attach the port-profile to a cluster with the Attach to Cluster option. Once attached, the cluster name appears next to the port-profile name. The cluster name is not displayed in the case of the default cluster.
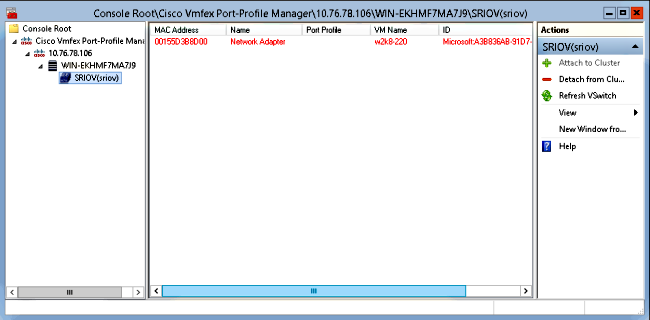
- In order to attach a VM, select the VM (VM NIC) that appears in the middle pane, and click Attach/Modify Port profile. The available port-profiles under the cluster are displayed. Choose the appropriate port-profile.
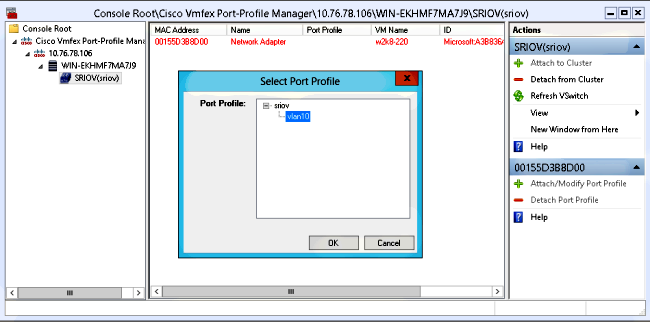
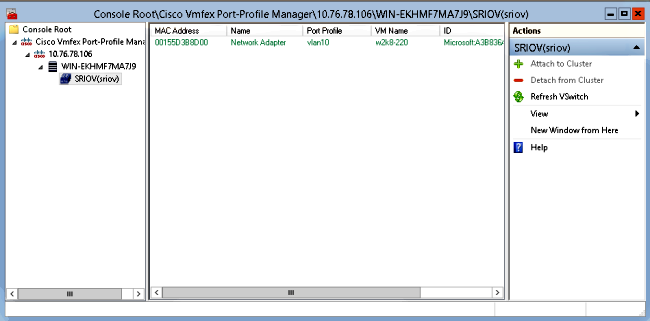
- Once added, the display turns from Red to Green for the Network Adapter. Also, the VM shows as attached from the UCSM GUI.
Verify
There is currently no verification procedure available for this configuration.
Troubleshoot
Here is a list of common issues encountered when you configure VM-FEX with Hyper-V:
- The virtual switch does not show up when you add the host with the port-profile management snap-in: SR-IOV is not enabled for the virtual switch inside Hyper-V.
- The cluster name does not appear next to the virtual switch after you add it to the cluster: If the cluster name is >38 characters (including hyphen), Cisco bug ID CSCue71661 can cause this problem.
- You are not able to add UCSM with the management snap-in: Verify that the UCSM is reachable from the snap-in client and that HTTPS is enabled on the UCS. You can verify this on the GUI from Admin > Communication Management > Communication Services.
Related Information


 Feedback