Manage FindIT Network Management Users
Available Languages
Objective
The User Management page of the FindIT Network Manager and FindIT Network Probe allows you to define users that can access the FindIT Network, and also allows you to implement password complexity requirements and session settings for those users.
FindIT Network supports two types of users: admin and operator. An admin has full access to the FindIT Network features, while an operator can do everything except managing users. When the FindIT Network Manager is first installed, a default admin user is created with the username and password both set to cisco.
This article provides instructions on how to add, edit, or delete users, and change password complexity and user session settings.
Manage FindIT Network Management Users
Add a New User
Step 1. Log in to the Administration GUI of your FindIT Network Manager or FindIT Network Probe.

Note: In this example, FindIT Network Manager is used.
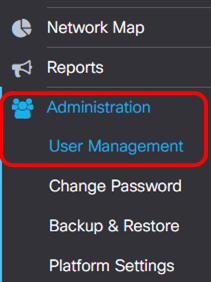
Step 2. Choose Administration> User Management.

Step 3. Click the + button to add or create a new user.

Step 4. Enter your username in the User Name field.

Note: In this example, John is used.
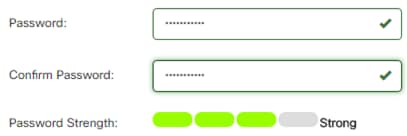
Step 5. Enter your password in the Password field.

Step 6. Re-enter your password in the Confirm Password field.

The Password Strength meter displays the security strength of the entered password. In this example, the password strength is Strong.
Step 7. Click a radio button from the User Type area.

The options are:
- Administrator — This user type has full access to the FindIT Network features.
- Operator — This user type has full access to the FindIT Network features except managing users.
Note: In this example, Operator is chosen.
Step 8. Click OK.

You should now have added a new user.

Modify a User
To modify an existing user, do the following:
Step 1. Choose Administration > User Management.

Step 2. Check the check box next to the user name that you want to modify then click the Edit icon.

Note: In this example, the check box next to John is checked.
Step 3. (Optional) Check the Change password check box to change the current password.

Note: Alternatively, you can uncheck this check box to retain the current password. If you choose this option, skip to Step 5.
Step 4. (Optional) Enter a new password in the Password field.

Step 5. (Optional) Re-enter the password in the Confirm Password field.

The Password Strength meter displays the security strength of the entered password. In this example, the password strength is Strong.
Step 6. Click a radio button from the User Type area.

The options are:
- Administrator — This user type has full access to the FindIT Network features.
- Operator — This user type has full access to the FindIT Network features except managing users.
Note: In this example, Administrator is chosen.
Step 7. Click OK.

You should now have modified an existing user.

Delete a User
To delete an existing user, do the following:
Step 1. Choose Administration > User Management.

Step 2. Check the check box next to the user name that you want to modify then click the Delete button.

Note: In this example, John is chosen.
Step 3. Click Ok to proceed.

You should now have deleted a user.

Configure Password Complexity
To enable or change password complexity requirements, do the following:
Step 1. Choose Administration > User Management.

Step 2. (Optional) Check the Password Complexity Settings check box to enable complexity rules for passwords. If this feature is enabled, new passwords must conform to the following default settings:
- Should have a minimum length of eight characters.
- Should contain characters from at least three character classes (uppercase letters, lowercase letters, numbers, and special characters available on a standard keyboard).
- Should be different from the current password.

Note: Alternatively, you can uncheck this check box to disable the password complexity settings of the local user. If you choose this option, skip to Step 6.
Step 3. Enter a value in the Minimum Password Length field. The default value is 8, and the range is 6 to 64 characters.

Note: In this example, 12 is used.
Step 4. Enter a value in the Minimum number of character classes field. The default value is 3, and the range is 0 to 4 characters.

Note: In this example, 4 is used.
Step 5. (Optional) Check the Enable check box in the The new password must be different than the current one to require a unique password upon password change.

Step 6. Click Save.

You should now have changed the password complexity settings for local users.
Configure User Session Setting
To enable or change password complexity requirements, do the following:
Step 1. Choose Administration > User Management.

Step 2. Enter a value in the Idle Timeout (min) field. The default value is 60, and the range is 10 to 60 minutes.

Note: In this example, 30 minutes is used.
Step 3. Enter a value in the Absolute Timeout (hour) field. This is the maximum amount of time a session can be active. The default value is 24, and the range is 1 to 24 hours.

Note: In this example, 12 hours is used.
Step 4. Click Save.

You should now have configured the user session settings.
Contact Cisco
- Open a Support Case

- (Requires a Cisco Service Contract)
 Feedback