Manage Screensaver Settings on a Cisco IP Phone 8800 Series Multiplatform Phone
Available Languages
Objective
The Cisco IP Phone 8800 Series Multiplatform Phones comprise a set of full-featured Voice-over-Internet Protocol (VoIP) phones that provide voice communication over an IP network. The phones provide all the features of traditional business phones, such as call forwarding, redialing, speed dialing, transferring calls, and conference calling. The Cisco IP Phone 8800 Series Multiplatform Phones are targeted for solutions that are centered on third-party Session Initiation Protocol (SIP)-based IP Private Branch Exchange (PBX).
The Cisco IP Phone 8800 Series Multiplatform Phones allow you to customize settings such as the phone name, wallpaper, logo, screen saver, brightness display, back light setting, and so on. You can configure a screensaver or screensavers for the Cisco IP Phone according to your preference. When the phone is idle for a specified time, it enters screensaver mode.
This article provides instructions on how to manage the screensaver settings through the web-based utility or the Graphical User Interface (GUI) of your Cisco IP Phone 8800 Series Multiplatform Phone.
Applicable Devices
- 8800 Series
Software Version
- 11.0.1
Manage Wallpaper on a Cisco IP Phone 8800 Series
Configure Screensaver through the Web-based Utility
Step 1. Access the web-based utility of your IP Phone then log in as Admin.
Note: To learn how to configure the password on your 7800 or 8800 Series Multiplatform Phone, click here.

Step 2. Click advanced.

Step 3. Click Voice.
Note: Available options may vary according to the exact model of your device. In this example, Cisco 8861 IP Phone is used.

Step 4. Click User.

Step 5. In the Screen area, choose Yes from the Screen Saver Enable drop-down list. This option is disabled by default.

Step 6. In the Screen Saver Wait field, enter the number of seconds of idle time to elapse before the screen saver starts. The default is 300 seconds.

Note: In this example, 60 seconds is used.
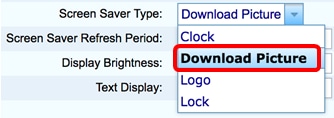
Step 7. Choose the display type from the Screen Saver Type drop-down list.
The options are:
- Clock — The phone displays the date and time on the phone screen. This is the default setting.
- Download Picture — The phone displays the background picture.
- Logo — The phone displays the configured background logo. If this option is chosen, skip to Step 9.
- Lock — The phone displays a moving padlock icon. When the phone is locked, the status line displays a scrolling message. Press any key to unlock your phone.

Note: In this example, Download Picture is chosen.
Step 8. (Optional) Enter the Uniform Resource Locator (URL) address of the background picture in the Picture Download URL field.

Note: In this example, tftp://192.168.100.114/TFTP/image/cisco-wallpaper-800x480.png is used.
Step 9. (Optional) Enter the URL address of the background picture in the Logo URL field.

Note: In this example, tftp://192.168.100.114/TFTP/image/cisco-logo-800x480.png is used.
Step 10. (Optional) Enter the number of seconds before the screensaver should refresh in the Screen Saver Refresh Period field.

Note: In this example, 30 seconds is used.
Step 11. Click Submit All Changes.

You should now have successfully configured the screensaver settings on your Cisco IP Phone 8800 Series Multiplatform Phone through the web-based utility.
After 60 seconds of inactivity, the screensaver below will be displayed.

Configure Screensaver through the GUI of the IP Phone
Step 1. Press the Applications button on your IP Phone.

Step 2. Choose User preferences using the Navigation cluster  button.

Step 3. Choose Screen preferences.

Step 4. Press the Navigation cluster  navigation button to toggle the Screen saver On.

Step 5. Press the Set softkey to save the screensaver setting.

Step 6. Choose Screen saver settings.

Step 7. Press the Navigation cluster  left or right buttons to choose the Screen saver type.

The options are:
- Clock — The phone displays the date and time on the phone screen. This is the default setting.
- Download Picture — The phone displays the background picture. If this option is chosen, follow the instructions using the web-based utility.
- Logo — The phone displays the configured background logo. If this option is chosen, follow the instructions using the web-based utility.
- Lock — The phone displays a moving padlock icon. When the phone is locked, the status line displays a scrolling message. Press any key to unlock your phone.
Note: In this example, Logo is chosen.
Step 8. In the Trigger interval (sec) field, enter the number of seconds of idle time to elapse before the screensaver starts. The default is 300 seconds.

Note: In this example, 60 seconds is used.
Step 9. (Optional) In the Refresh interval (sec) field, enter the number of seconds of idle time to elapse before the screensaver should refresh. The default is 10 seconds.

Note: In this example, the Refresh interval is set to 30 seconds.
Step 10. Press the Set softkey to save the screensaver settings.

You should now have successfully managed the screensaver settings on your Cisco IP Phone 8800 Series Multiplatform Phone through the GUI.
After 60 seconds of inactivity, the wallpaper below is displayed as the screensaver of the phone.

 Feedback