Inter-VLAN Routing on an RV34x Router with Targeted ACL Restrictions
Available Languages
Objective
This article explains how to configure Inter-Virtual Local Area Network (VLAN) routing on an RV34x series router with targeted Access Control List (ACL) to restrict certain traffic. Traffic can be restricted by IP address, a group of addresses, or by protocol type.
Introduction
VLANs are great, they define broadcast domains in a Layer 2 network. Broadcast domains are typically bounded by routers because routers do not forward broadcast frames. Layer 2 switches create broadcast domains based on the configuration of the switch. Traffic cannot pass directly to another VLAN (between broadcast domains) within the switch or between two switches. VLANs give you the ability to keep different departments independent from each other. For example, you might not want the sales department to have any involvement with the accounting department.
Independence is fantastic, but what if you want the end users in the VLANs to be able to route between each other? The sales department might need to submit records or timesheets to the accounting department. The accounting department might want to send notifications to the sales team on their paychecks or sales numbers. That is when inter-VLAN routing saves the day!
For inter-VLAN communication, an Open Systems Interconnections (OSI) layer 3 device, usually a router, is needed. This layer 3 device needs to have an Internet Protocol (IP) address in each VLAN interface and have a connected route to each of those IP subnets. The hosts in each IP subnet can then be configured to use the respective VLAN interface IP addresses as their default gateway. Once configured, end users can send a message to an end user in the other VLAN. Sounds perfect, right?
But wait, what about the server in accounting? There is sensitive information on that server that has to stay protected. Have no fear, there is a solution to that too! Access Rules or policies on the RV34x series router allow the configuration of rules to increase security in the network. ACLs are lists that block or allow traffic from being sent to and from certain users. Access Rules can be configured to be in effect all the time or based on defined schedules.
This article will walk you through the steps of configuring a second VLAN, inter-VLAN routing, and an ACL.
Applicable Devices
- RV340
- RV340W
- RV345
- RV345P
Software Version
- 1.0.03.16
Topology
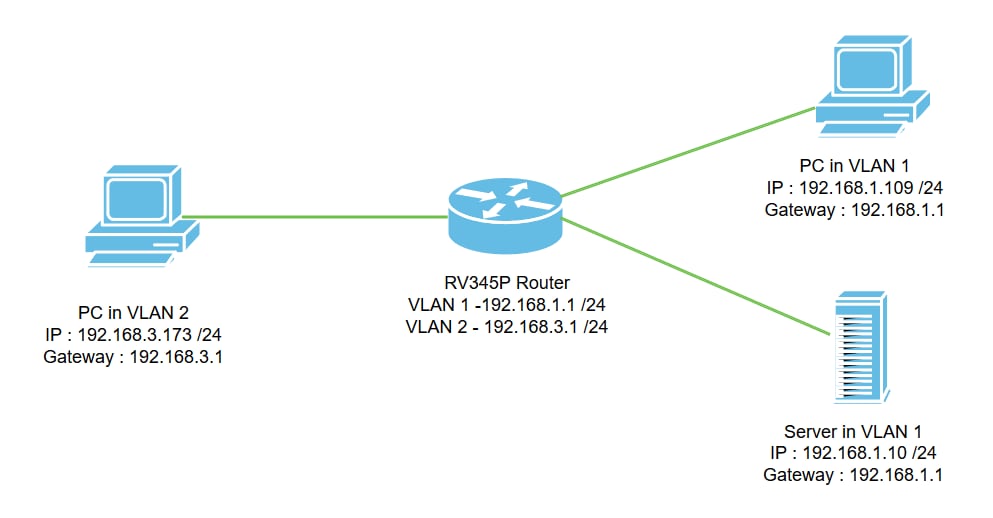
In this scenario, inter-VLAN routing will be enabled for both VLAN1 and VLAN2 so that users in these VLANs can communicate with each other. As a security measure, we will prevent VLAN2 users from being able to access the VLAN1 server [Internet Protocol version 4 (IPv4): 192.168.1.10 /24].
Router ports used:
- The Personal Computer (PC) in VLAN1 is connected on the LAN1 port.
- The Personal Computer (PC) in VLAN2 is connected on the LAN2 port.
- The server in VLAN1 is connected on the LAN3 port.
Configuration
Step 1. Log in to the web-configuration utility of the router. To add a new VLAN interface on the router, navigate to LAN > LAN/DHCP Settings and click on the plus icon under the LAN/DHCP Settings Table.

Note: The VLAN1 interface is created on the RV34x router by default and the Dynamic Host Configuration Protocol (DHCP) server for IPv4 is enabled on that.
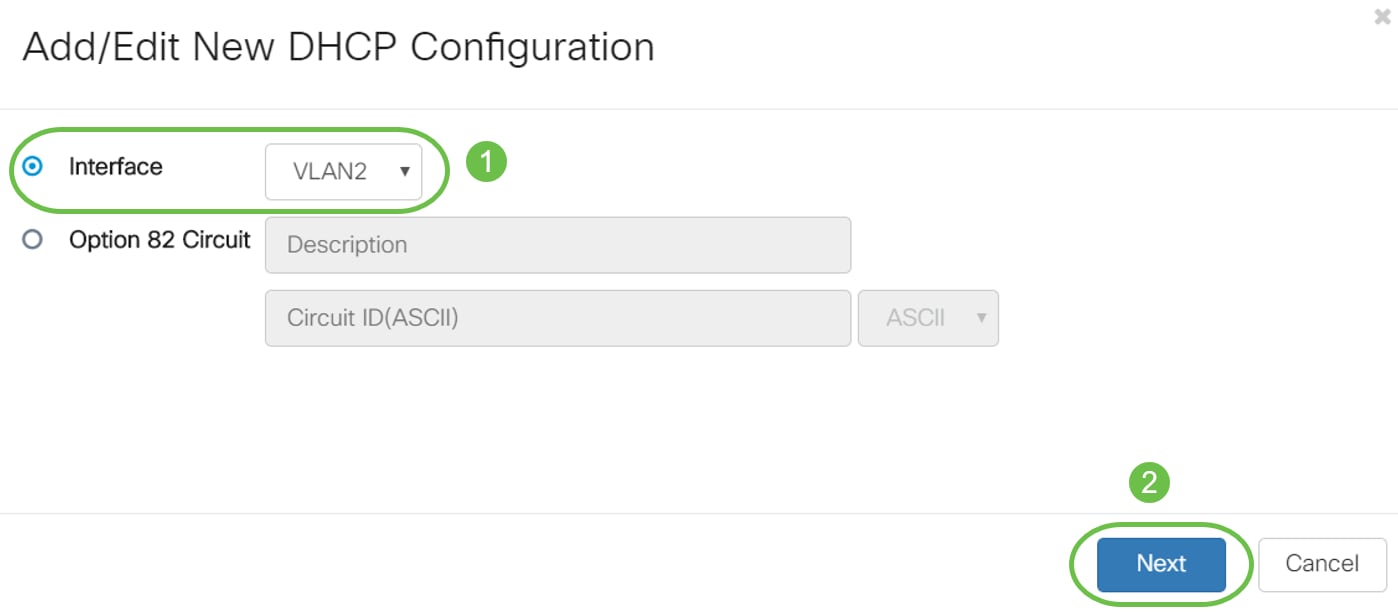
Step 2. A new pop-up window will open with VLAN2 Interface selected, click Next.
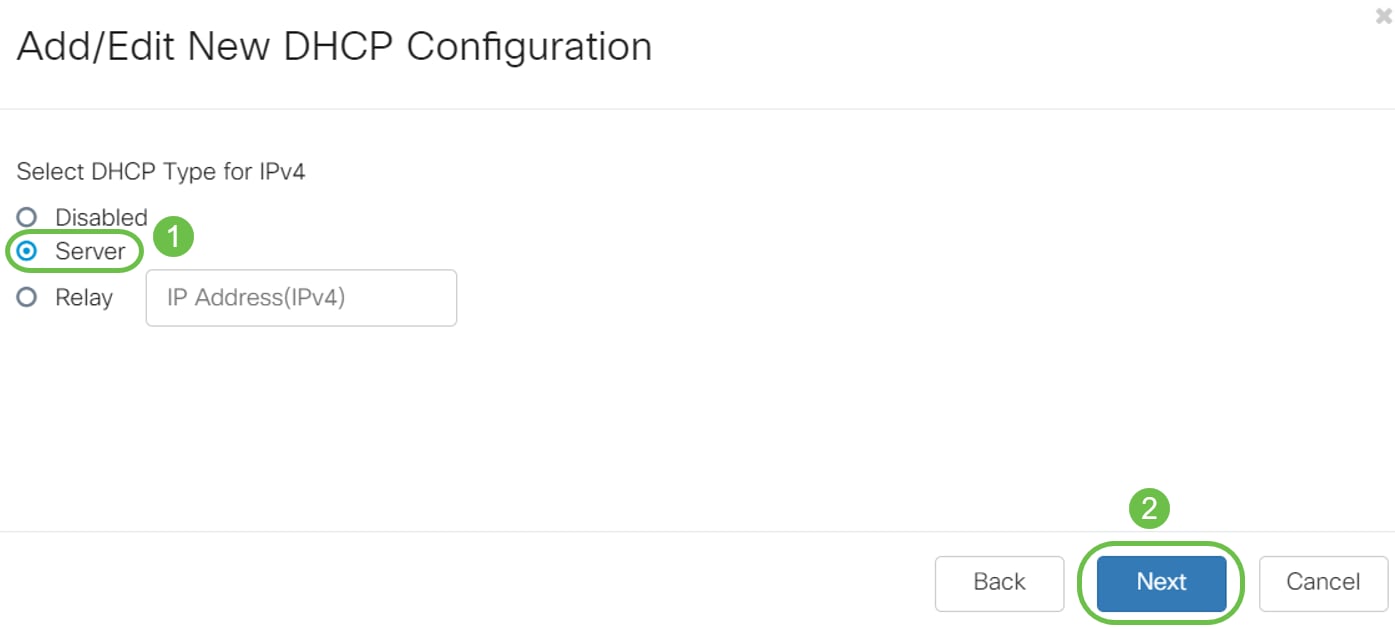
Step 3. To enable the DHCP server on the VLAN2 interface, under Select DHCP Type for IPv4 select Server. Click Next.
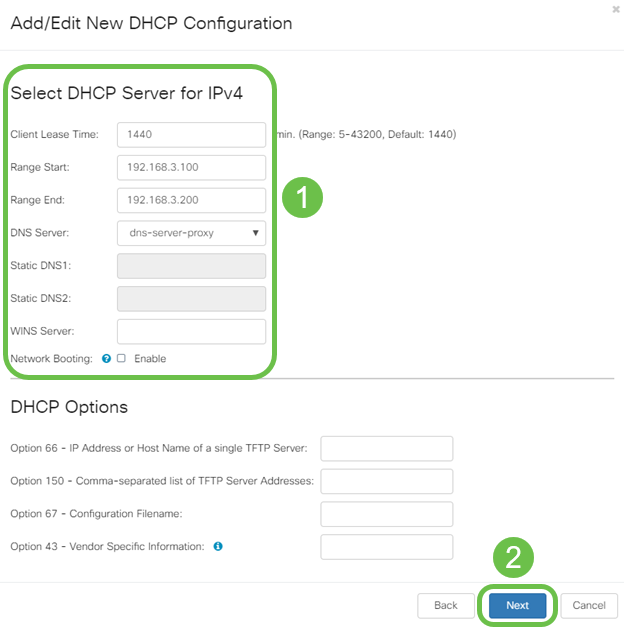
Step 4. Enter the DHCP server configuration parameters including Client Lease Time, Range Start, Range End, and DNS Server. Click Next.
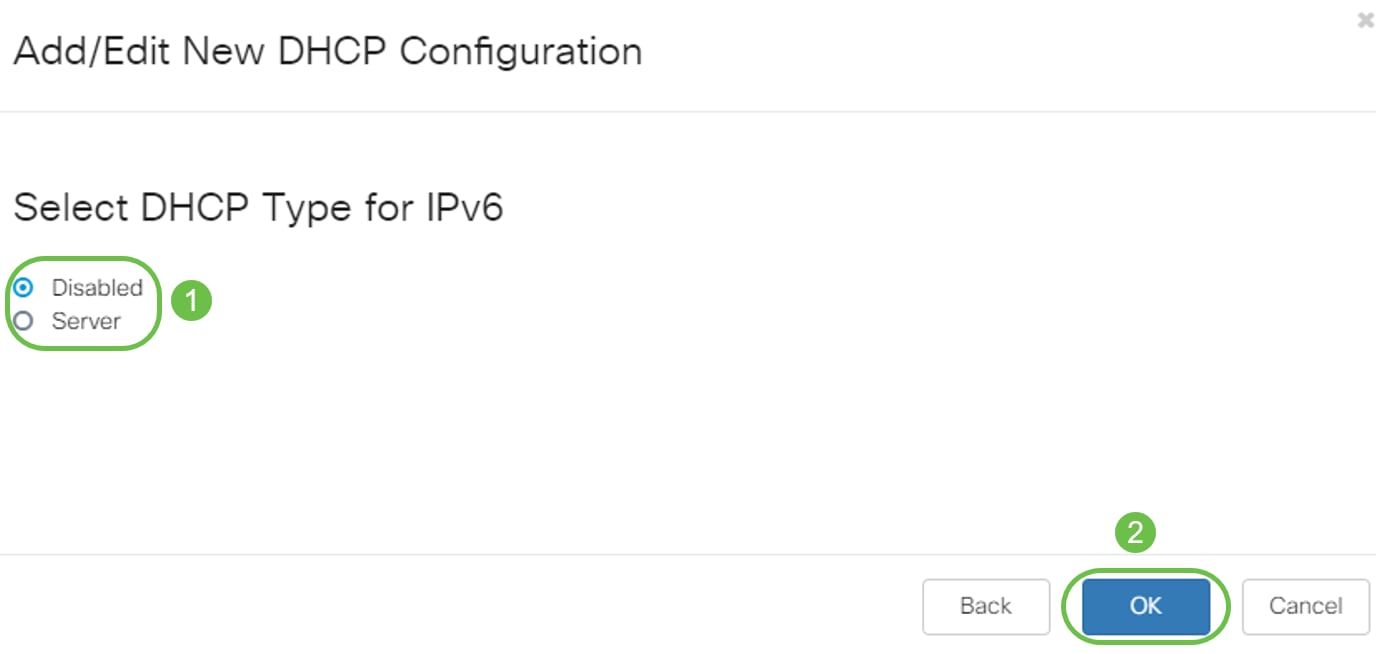
Step 5. (Optional) You may disable the DHCP Type for IPv6 by selecting the Disabled check box as this example is based on IPv4. Click OK. DHCP server configuration is complete.
Note: You may use IPv6.
Step 6. Navigate to LAN > VLAN Settings and verify that the Inter-VLAN Routing is enabled for both the VLANs, VLAN1 and VLAN2. This configuration will enable the communications between both the VLANs. Click Apply.

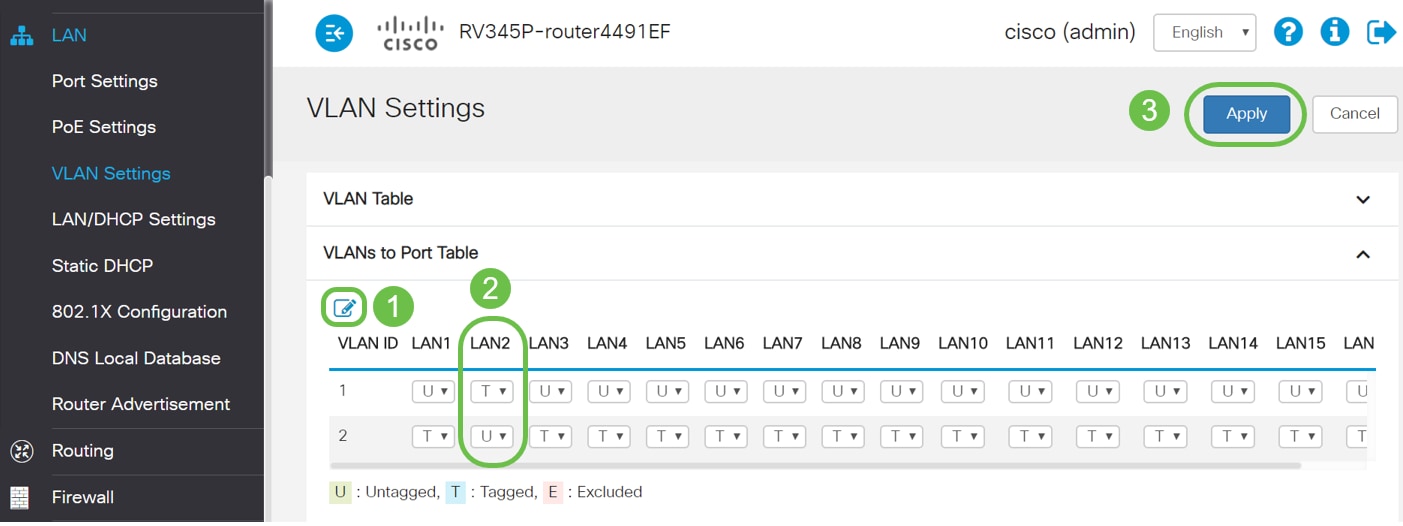
Step 7. To assign the untagged traffic for VLAN2 on the LAN2 port, click on the edit button under the VLANs to Port Table option. Now, under the LAN2 port select the T (Tagged) option for VLAN1 and U (Untagged) option for VLAN2 from the drop-down menu. Click Apply to save the configuration. This configuration will forward the untagged traffic for VLAN2 on LAN2 port so that the PC Network Interface Card (NIC), normally not capable of VLAN tagging, can get the DHCP IP from VLAN2 and be a part of VLAN2.
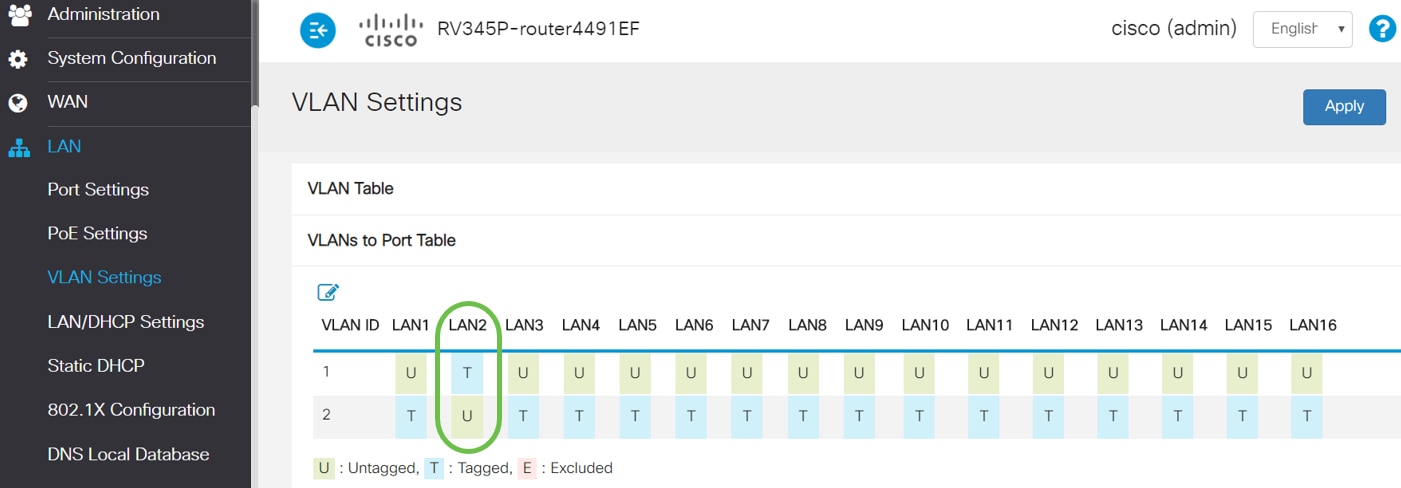
Step 8. Verify that the VLAN2 settings for the LAN2 port is showing as U (Untagged). For the remaining LAN ports VLAN2 settings will T (Tagged) and VLAN1 traffic will be U (Untagged).
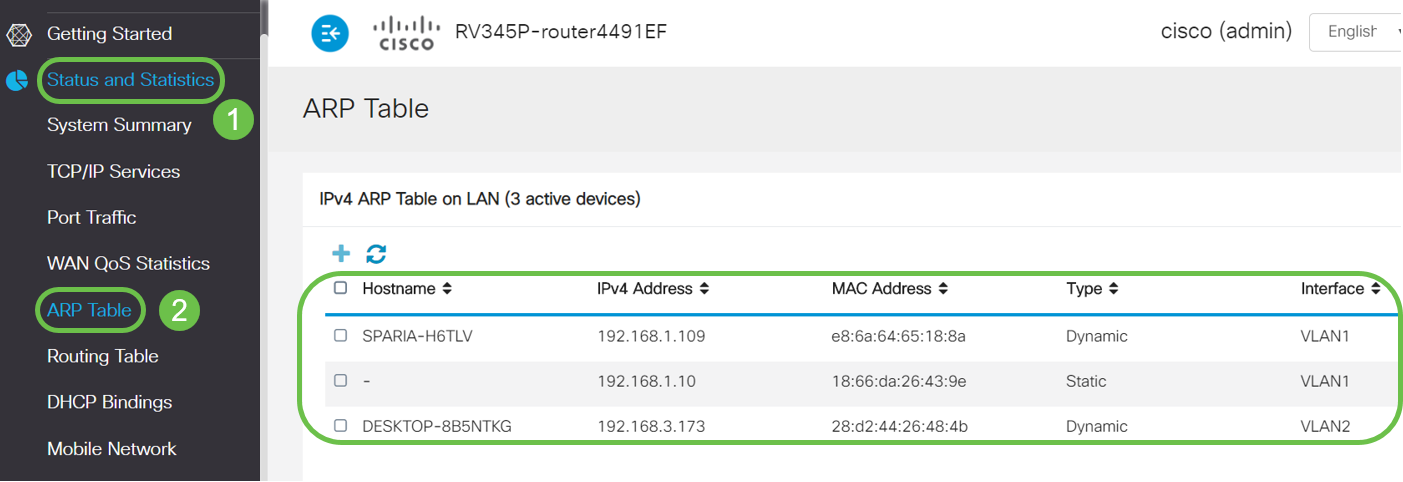
Step 9. Navigate to Status and Statistics > ARP Table and verify the dynamic IPv4 Address for the PCs are on different VLANs.
Note: The server IP on VLAN1 has been assigned statically.
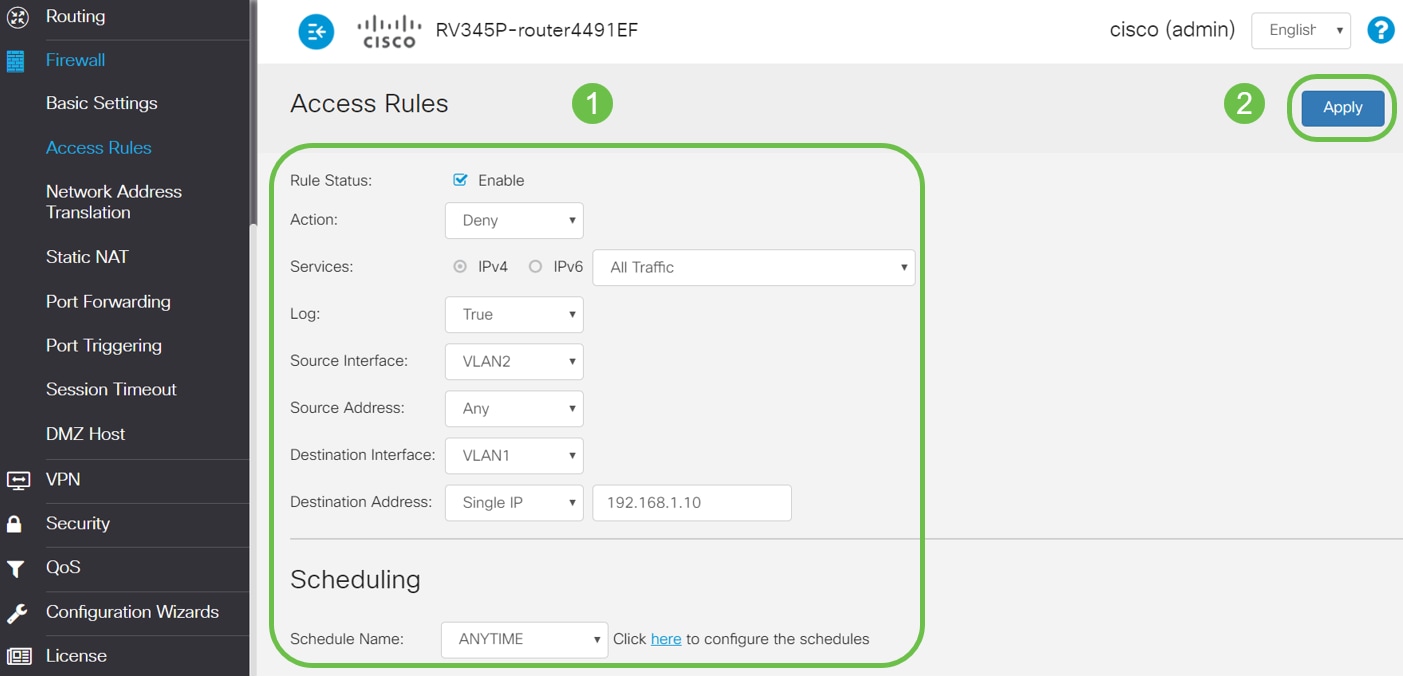
Step 10. Apply ACL to restrict the server (IPv4: 192.168.1.10/24) access from VLAN2 users. To configure the ACL, navigate to Firewall > Access Rules and click on the plus icon to add a new rule.

Step 11. Configure the Access Rules parameters. For this scenario the parameters will be as follows:
Rule Status: Enable
Action: Deny
Services: All Traffic
Log: True
Source Interface: VLAN2
Source Address: Any
Destination Interface: VLAN1
Destination Address: Single IP 192.168.1.10
Schedule Name: Anytime
Click Apply.
Note: In this example, we denied access of any devices from VLAN2 to the server, and then permitting access to the other devices on in VLAN1. Your needs may vary.
Step 12. The Access Rules list will show as follows:

The access rule is defined defined explicitly to restrict the server, 192.168.1.10, access from the VLAN2 users.
Verification
To verify the service, open the command prompt. On Windows platforms this can be achieved by clicking the Windows button and then typing cmd in the lower left-hand search box on the computer and select Command Prompt from the menu.
Enter the following commands:
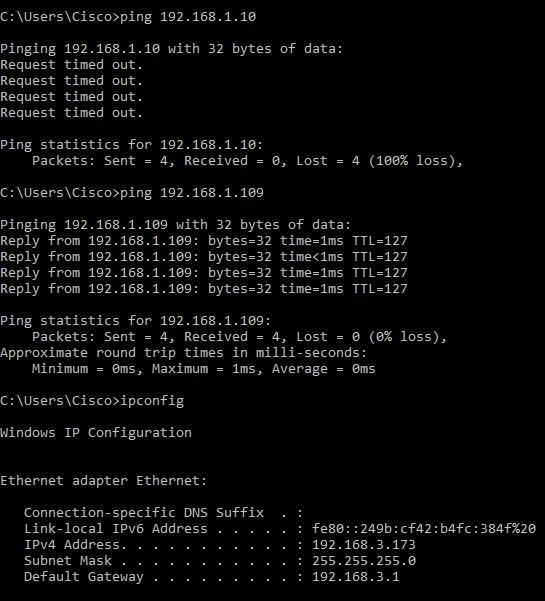
- On PC (192.168.3.173) in VLAN2, ping the server (IP: 192.168.1.10). You will get a Request timed out notification which means communication is not allowed.
- On PC (192.168.3.173) in VLAN2, ping the other PC (192.168.1.109) in VLAN1. You will get a successful reply.
Conclusion
You have seen the necessary steps to configure inter-VLAN routing on a RV34x series router and how to do a targeted ACL restriction. Now you can take all that knowledge and use it to create VLANs in your network that will fit your needs!