Implementing LTE WAN Backup with Cisco RV34x Series Routers Using a Mac OSX
Available Languages
Wireless Bridging:
3rd Party LTE Modem
Objective
This article explains how to use a Cisco Business RV router in tandem with a third-party router that has integrated Long Term Evolution (LTE) Wide Area Network (WAN) capability using a Mac computer. The LTE router is used as back up connectivity to the Internet for the RV34x series router. In this scenario, the NETGEAR Nighthawk LTE Mobile Hotspot Router, Model MR1100 will be used.
If you use a Windows computer, you should follow the steps in Implementing LTE WAN Backup with Cisco RV34x Series Routers Using a Windows PC.
Table of Contents
- NETGEAR Resources
- Backup Internet Topology
- Overview for Set Up
- Initial Configuration on the LTE Mobile Router
- Configure IP Passthrough on the LTE Mobile Router
- Configure RV34x Router for Backup Internet on WAN 2
- Verify Internet Access on the Cisco RV34x Router
- Verify the WAN 2 Backup Internet
Applicable Devices | Firmware Version
- RV340 | Firmware 1.0.03.16
- RV340W | Firmware 1.0.03.16
- RV345 | Firmware 1.0.03.16
- RV345P | Firmware 1.0.03.16
Introduction
It is essential for a business to have consistent Internet. You want to do everything you can to ensure connectivity in your network, but you have no control over the reliability of your Internet Service Provider (ISP). At some point their service might go down, which means your network would too. That’s why it is important to plan ahead. What can you do?
It’s simple, with the Cisco Business RV34x series routers there are two options available to set up a backup Internet:
- You can add a second traditional ISP using a 3G/4G LTE Universal Serial Bus (USB) compatible dongle with a subscription. The challenge of this setup is when a third-party does an update to the dongle software, it can sometimes cause compatibility issues. If you would like to see the most up to date ISP USB dongle compatibility with Cisco RV Series Routers, click here.
- Utilize the 2nd WAN port and add a second ISP router with integrated LTE capability. The focus of this article is on this option, so if that interests you, please continue!
In this scenario we will focus on adding an ISP router with LTE capability, specifically, the NETGEAR Nighthawk LTE Mobile Hotspot Router, Model MR1100. The router uses mobile data, just like a mobile phone, when it is used to access the Internet so make sure you have the appropriate plan to support your environment.
Fourth generation (4G) LTE is an improvement over 3G. It provides a more reliable connection, faster upload and download speeds, and better voice and video clarity. Although 4G LTE is not a full 4G connection, it is considered far superior to 3G.
In addition, the secondary ISP can be configured to load balance and expand bandwidth on your network. If you would like to view a video on this, check out Cisco Tech Talk: Configuring Dual WAN for Load Balancing on RV340 Series Routers.
Cisco Business does not sell or support NETGEAR products. It was simply used as an LTE router that was compatible with the Cisco RV series routers.
NETGEAR Resources
- Product Page
- Quick Start Guide
- User Manual
- What Cellular Bands are Supported by MR1100 Nighthawk M1 Mobile Router?
- List of Carriers Supported by AirCard Hotspot
- Purchase the MR1100 Nighthawk M1 Mobile Router (Check your ISP for availability)
Backup Internet Topology
The image below illustrates the Primary ISP connected to WAN1 on the RV Series Router (represented as a blue box) and WAN 2 connected to the shown port on the NETGEAR router (the black piece of equipment) for the secondary ISP.

Before connecting the LTE router into the RV340 router, follow the instructions below to set up the LTE router as a backup Internet.
Overview for Set Up
Here are the high-level steps needed to enable backup Internet.
- Initial Configuration on the LTE Mobile Router
- Configure IP Passthrough on the LTE Mobile Router
- Configure the RV34x Router for Backup Internet on WAN 2
Initial Configuration on the LTE Mobile Router
Use a workstation to connect to the Nighthawk LTE router and follow the instructions to set up standard administration and hotspot networks. Steps can be found in the NETGEAR User Manual. This sets the LTE router as a Wi-Fi hotspot.
Initial configuration for the LTE mobile router allows an Ethernet tethered connection. Using the same workstation, connect to the Ethernet port and verify a valid IP address is issued from the LTE mobile router. Verify this by opening your browser to check a valid Internet site.

The hotspot will be disabled automatically in the next section. This will allow access to the external public-facing IP address required for our needs.
Configure IP Passthrough on the LTE Mobile Router
After following the steps in the section above, you may access the dashboard to configure the LTE mobile router as a standalone device for straight access into the public Internet.
Complete the IP Passthrough configuration options to provide a direct, public-facing IP address.
Step 1
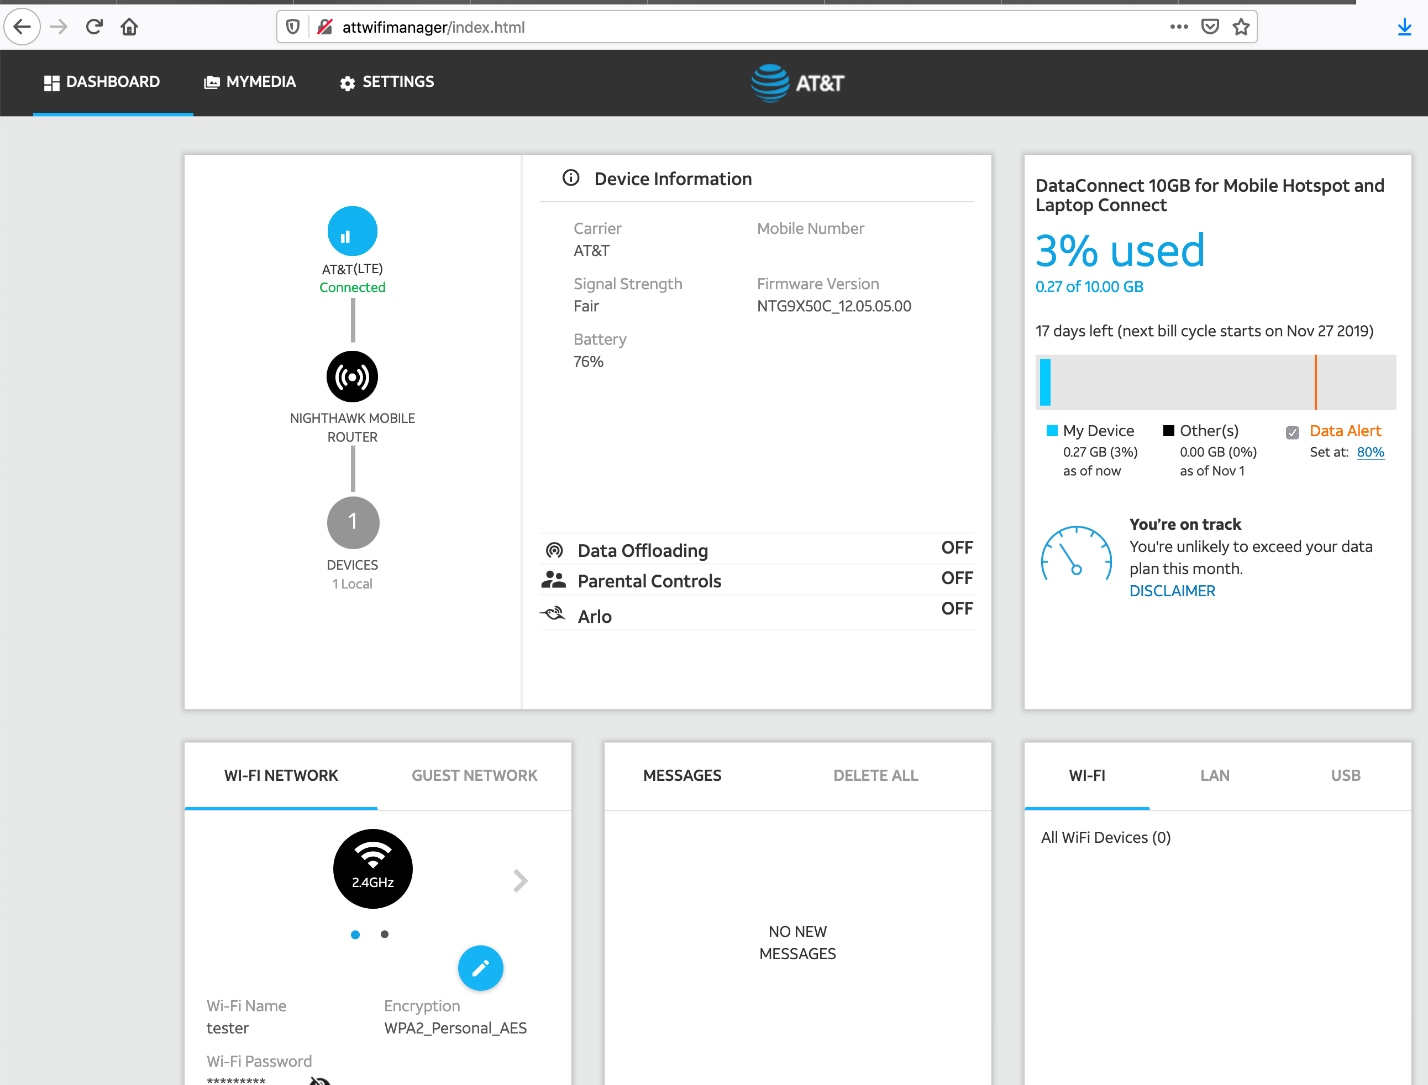
In a web browser, enter attwifimanager/index.html.

You should see a dashboard screen similar to the one shown below.
Step 2
Click Settings to access the advanced configuration parameters.

Step 3
Navigate to Mobile Router Setup.

Step 4
Under IP PASSTHROUGH, select ON Disables Wi-Fi on the mobile router. This will disable Wi-Fi hotspot support.

Step 5
Under TETHERING, select Charge only from the drop-down menu.

Step 6
Click Apply.

Step 7
A pop-up window will open to Confirm Restart, click Continue.

Step 8
A notice will appear in the upper right corner, Mobile Broadband Disconnected.

Step 9
A notice will appear, SCANNING FOR MOBILE ROUTER.

Step 10
The Wi-Fi interface needs to be disabled to test the configuration of the LTE router on the LAN network. To disable the Wi-Fi connection, click on the Wi-Fi icon and select Turn Wi-Fi Off.

Step 11
You will then see that the network is not connected to the RV340.

Step 12
In Step 7, you had the NETGEAR router perform a reboot. Once that is complete, take an Ethernet cable and connect the LTE router directly to your PC.
Step 13
Note the ISP Internet-facing IP address of your Ethernet LAN. This is the IP address of the LTE router.
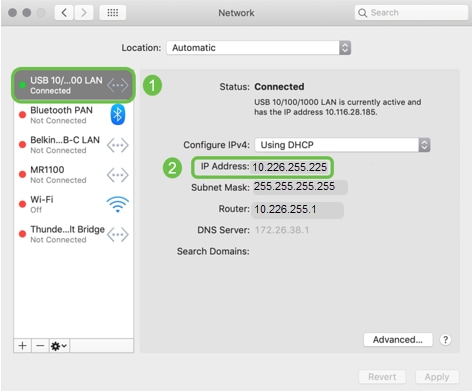
Step 14
Check connectivity to the Internet by opening your browser and entering a valid Internet site.

Step 15
Disconnect the Ethernet cable from the LTE router and PC.
Configure RV34x Router for Backup Internet on WAN 2
Now that the LTE router has been configured and the workstation is receiving an ISP-generated IP address, connect the LTE mobile router directly to WAN 2 port of the RV340 series router as shown in the Backup Internet Topology section of this article. This address was provided to the Cisco router directly by the LTE router (from the ISP).
Currently the Internet connection is provided by WAN 1 of the RV340.
Step 1
Connect the LTE router into the WAN 2 port of the RV340 router.
Step 2
Connect your PC to the RV router in order to access the administration menus.
Step 3
Navigate to Status and Statistics > ARP Table. Take note of the IPv4 address for your PC on the LAN. This IP address will be needed for step 5.

Step 4
Select System Summary and see the WAN 1 and WAN 2 are shown as up.

Step 5
Scroll down the page and take note of the IP addresses for each WAN.

Step 6
On the Mac Computer, select the following:
- Applications Folder
- Utilities Folder
- Terminal


Step 7
Enter the command to ping the local LAN gateway of the router.
c:\Users\ping [IP address of local gateway of the router]In this scenario, the IP address is 172.168.1.1.
c:\Users\ping 172.168.1.1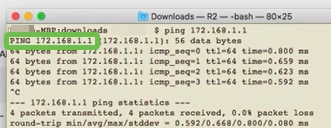
Step 8
Enter the command to ping the WAN 2 gateway. On a Mac computer, the ping continues until you hit control + C.
c:\Users\ping [IP address of the WAN 2 gateway]In this scenario, the IP address is 10.226.255.1.
c:\Users\ping 10.226.255.1
Step 9
Enter the command to ping the WAN 1 gateway. Let the ping continue through the verification process.
c:\Users\ping [IP address of the WAN 1 gateway]In this scenario, the IP address is 192.168.100.1.
c:\Users\ping 192.168.100.1
Step 10
Navigate to WAN > Multi-WAN. Ensure WAN 1 is given a Precedence of 1 and WAN 2 is given a Precedence of 2.
This will configure WAN 2 as the backup ISP in case of failure on WAN 1.

Step 11
Click the Save icon.

Verify Internet Access on the Cisco RV34x Router
Step 1
Navigate to Status and Statistics > System Summary. Make sure the Multi-WAN Status is online.

Step 2
Check by opening your browser to check a valid Internet site.

Verify the WAN 2 Backup Internet
Step 1
Ensure the ping is still running.

Step 2
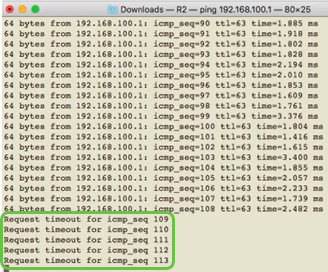
Pull the cable to WAN 1. You will see the pings start to fail. Click control + c to make the pings stop.
Step 3
Navigate to Status and Statistics > System Summary. Take note that WAN 1 is offline.
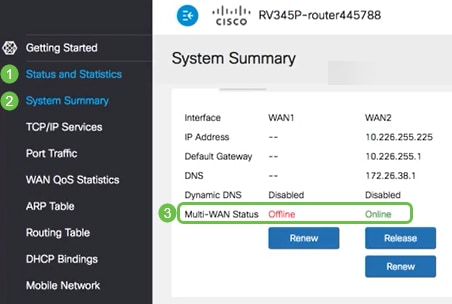
Step 4
Ping the WAN 2 IP address. The replies indicate that you have connectivity to the LTE backup WAN (LTE router).
c:\Users\ping [WAN 2 IP address]In this scenario, the IP address is 10.226.255.1.
c:\Users\ping 10.226.255.1
Step 5
Open a web browser and check a valid Internet site. This also verifies that you have proper backup WAN functionality on the WAN (LTE router).

Conclusion
Great job, you have now configured your network with backup connectivity. Your network is now more reliable, which works out well for everyone!