Configuring Shrew Soft VPN client to connect to RV34X Series Router
Available Languages
Objective
The objective of this document is to show how to use the Shrew Soft VPN client to connect to an RV340 Series router.
You can download the latest version of the Shrew Soft VPN client software here:
Applicable Devices | Software Version
-
RV340 | 1.0.3.17 (Download Latest)
-
RV340W | 1.0.3.17 (Download Latest)
-
RV345 | 1.0.3.17 (Download Latest)
-
RV345P | 1.0.3.17 (Download Latest)
Introduction / Use Case
IPSec VPN (Virtual Private Network) allows you to securely obtain remote resources by establishing an encrypted tunnel across the Internet. The RV34X series routers work as IPSEC VPN servers and support the Shrew Soft VPN Client. This guide will show you hoe to configure your router and the Shrew Soft Client to secure a connection to a VPN.
This document has two parts:
-
Configure the RV340 Series Router
-
Configure the Shrew Soft VPN client
Configure the RV34X Series Router:
We will start by configuring the Client-to-Site VPN on the RV34x
Step 1
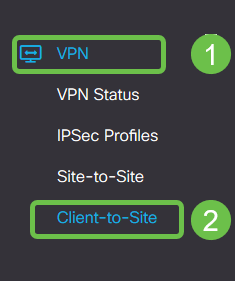
In VPN > Client-to-Site,
Step 2
Add a Client-to-Site VPN profile

Step 3
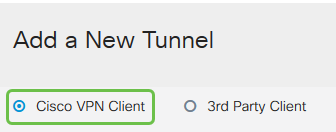
Select the Cisco VPN Client option.
Step 4
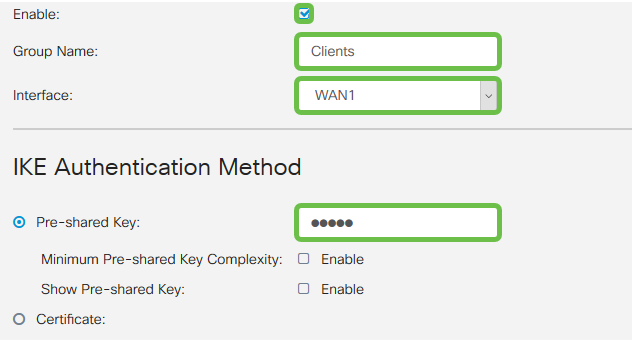
Check the Enable box to make the VPN Client Profile active. We will also configure the Group Name, select the WAN interface, and enter a Pre-shared Key.
Note: Please note the Group Name and Pre-shared Key as they will be used later when configuring the client.
Step 5
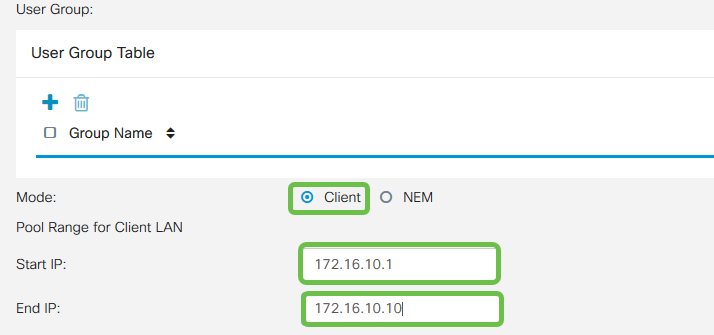
Leave the User Group Table blank for now. This is for the User Group on the router, but we have not configured it yet. Make sure the Mode is set to Client. Enter the Pool Range for Client LAN. We will use 172.16.10.1 through 172.16.10.10.
Note: The Pool Range should use a unique subnet that isn’t used elsewhere on the network.
Step 6
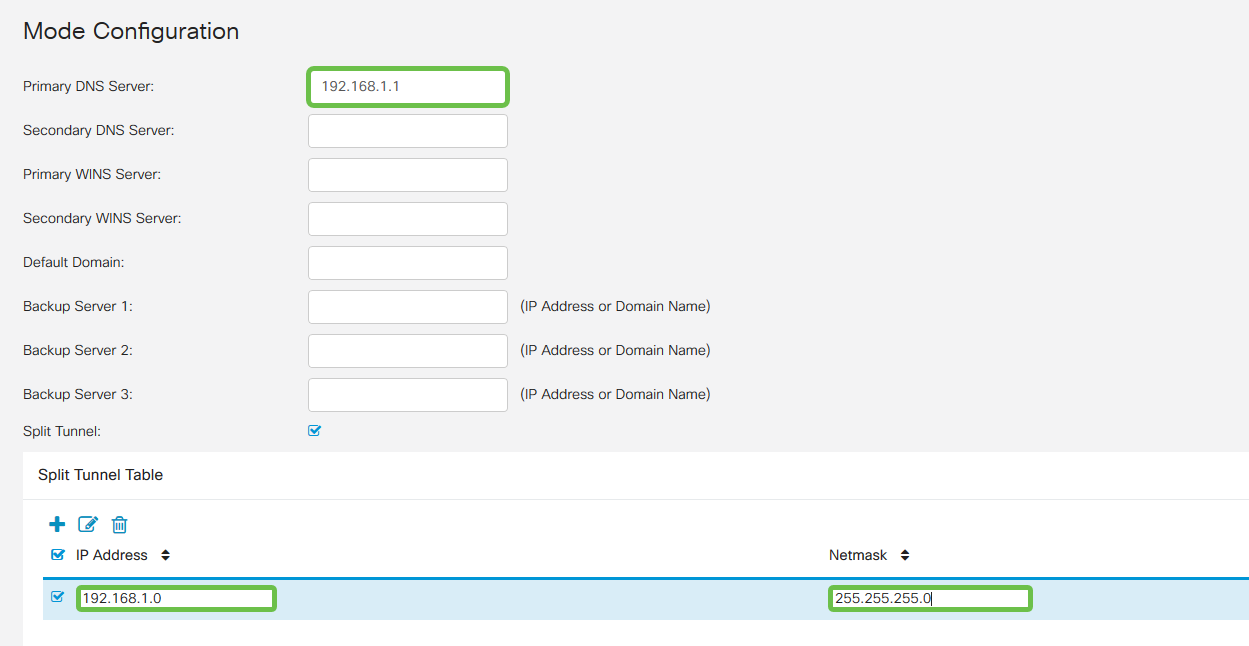
Here is where we configure the Mode Configuration settings. Here are the settings we will use:
-
Primary DNS Server: If you have an internal DNS Server or want to use an external DNS Server, you can enter it here. Otherwise, the default is set to the RV340 LAN IP address. We will use the default in our example.
-
Split Tunnel: Check to enable Split Tunneling. This is used to specify which traffic will go over the VPN tunnel. We will use Split Tunnel in our example.
-
Split Tunnel Table: Enter the networks the VPN client should have access to over the VPN. This example uses the RV340 LAN network.
Step 7
After clicking Save, we can see the Profile in the IPSec Client-to-Site Groups list.

Step 8
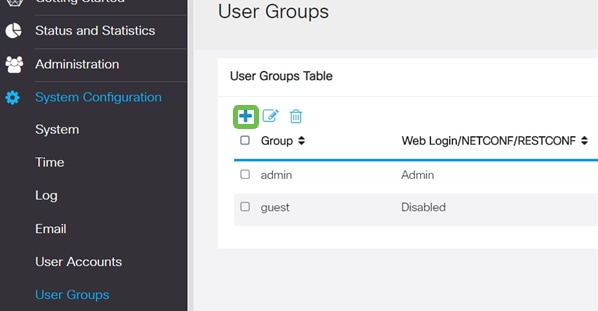
We will now configure a User Group to use for Authenticating VPN client users. In System Configuration > User Groups, click on ‘+’ to add a User Group.
Step 9
Enter a Group Name.

Step 10
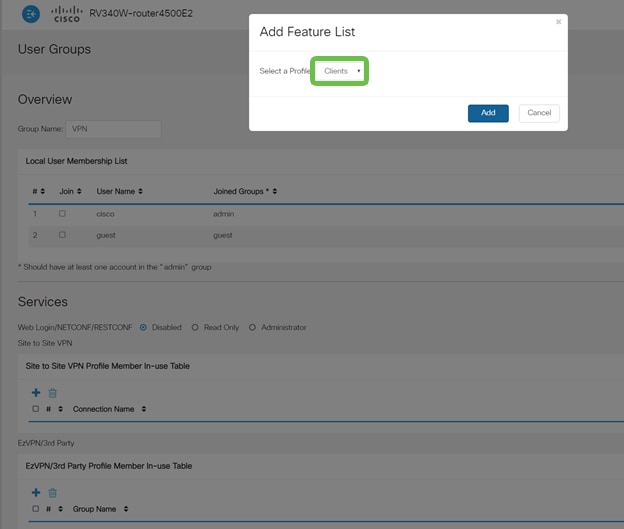
In the Services section > EzVPN/3rd Party, click Add to link this User Group to the Client-to-Site Profile we configured earlier.
Step 11
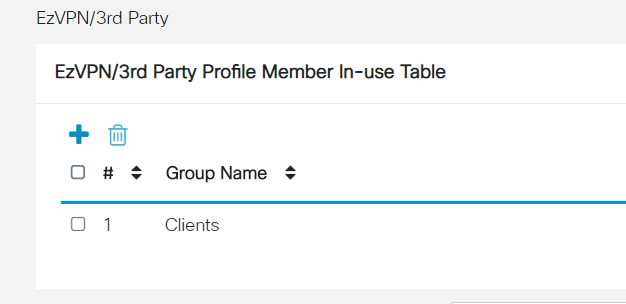
You should now see the Client-to-Site Group Name in the list for EzVPN/3rd Party
Step 12
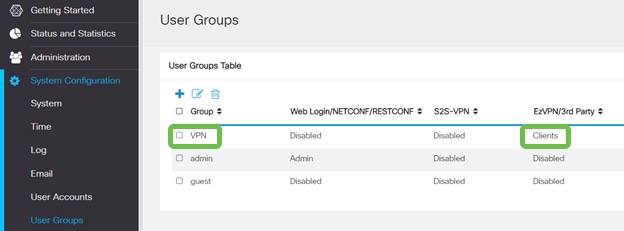
After you Apply the User Group configuration, you will see it in the User Groups list and it will show the new User Group will be used with the Client-to-Site Profile we created earlier.
Step 13
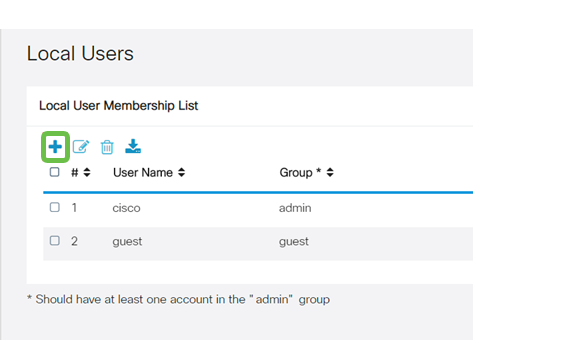
We will now configure a new User in System Configuration > User Accounts. Click on ‘+’ to create a new User.
Step 14
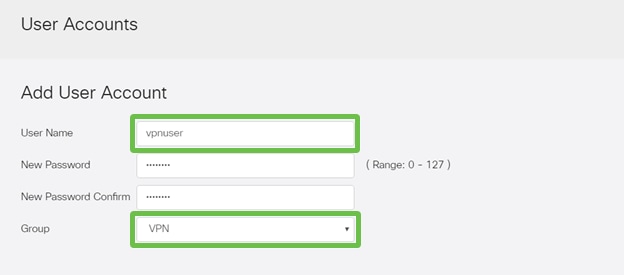
Enter the new User Name along with the New Password. Verify that the Group is set to the new User Group we just configured. Click Apply when finished.
Step 15
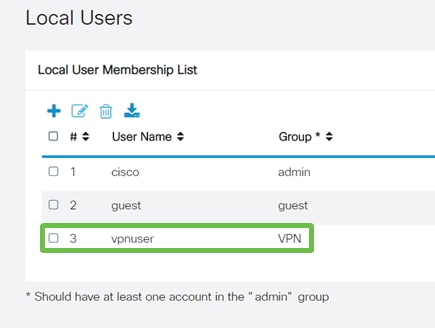
The new User will show up in the list of Local Users.
This completes the configuration on the RV340 Series Router. We will now configure the Shrew Soft VPN client.
Configure the ShrewSoft VPN client
We will now configure the Shrew Soft VPN client.
Step 1
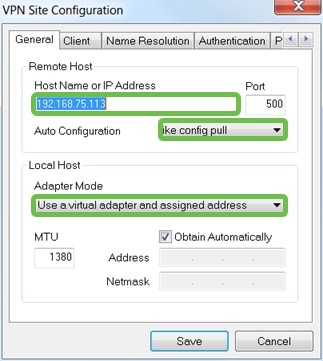
Open the ShrewSoft VPN Access Manager and click Add to add a Profile. In the VPN Site Configuration window that appears, configure the General tab:
-
Hostname or IP Address: Use the WAN ip address (or hostname of the RV340)
-
Auto Configuration: Select ike config pull
-
Adapter Mode: Select Use a Virtual adapter and assigned address
Step 2
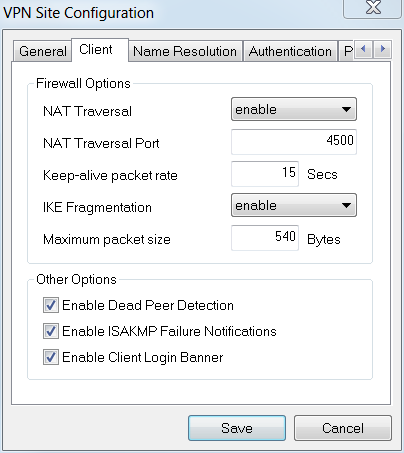
Configure the Client tab. We will just use the default settings.
Step 3
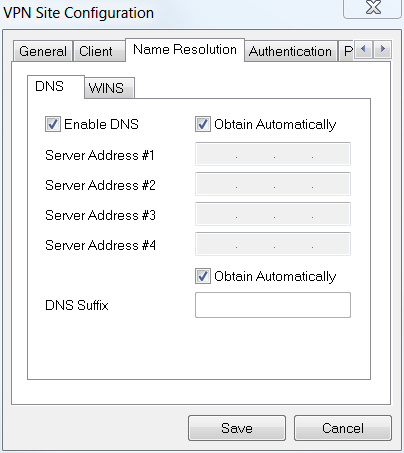
In the Name Resolution tab > DNS tab, check the Enable DNS box and leave the Obtain Automatically boxes checked.
Step 4
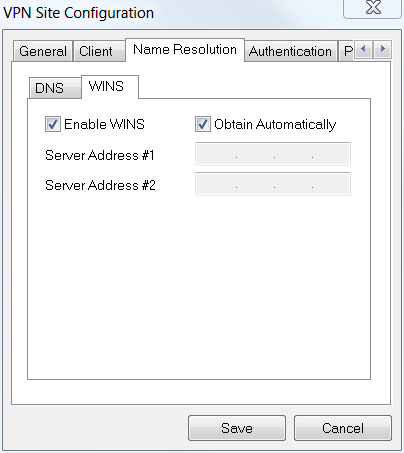
In the Name Resolution tab > WINS tab, check the Enable WINS box and leave the Obtain Automatically box checked.
Step 5
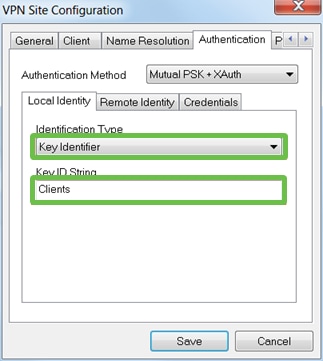
Configure the Authentication tab > Local Identity tab:
-
Identification Type: Select Key Identifier
-
Key ID String: Enter the Group Name that was configured on the RV34x
Step 6
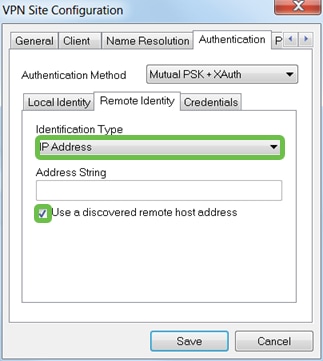
In the Authentication tab > Remote Identity tab, we will leave the default settings.
-
Identification Type: IP Address
-
Address String: <blank>
-
Use a discovered remote host address box: Checked
Step 7
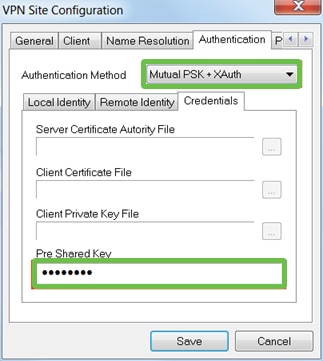
In the Authentication tab > Credentials tab, configure the following:
-
Authentication Method: Select Mutual PSK + XAuth
-
Pre-Shared Key: Enter the Preshared Key configured in the RV340 Client Profile
Step 8
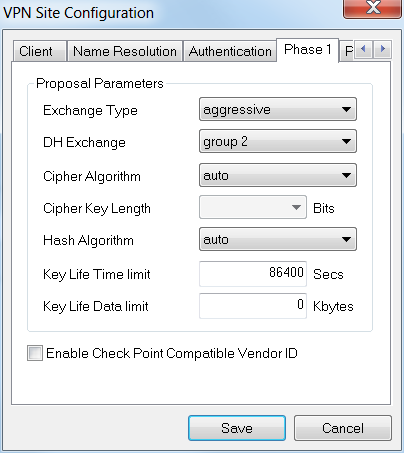
For the Phase 1 tab, we will leave the default settings in place:
-
Exchange Type: Aggressive
-
DH Exchange: group 2
-
Cipher Algorithm: Auto
-
Hash Algorithm: Auto
Step 9
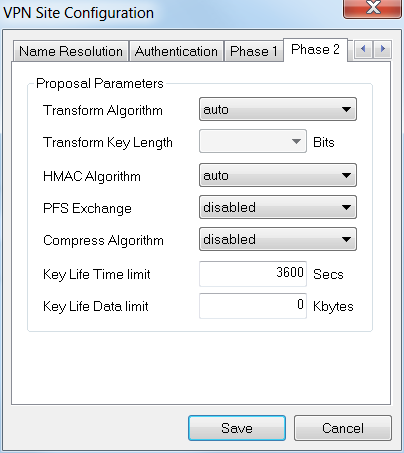
We will also use the defaults for the Phase 2 tab:
-
Transform Algorithm: Auto
-
HMAC Algorithm: Auto
-
PFS Exchange: Disabled
-
Compress Algorithm: Disabled
Step 10
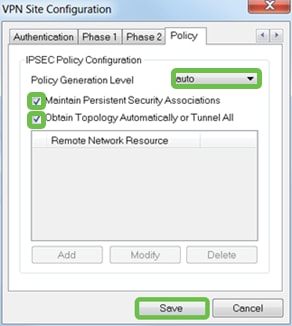
For the Policy tab, we will use the following settings:
-
Policy Generation Level: Auto
-
Maintain Persistent Security Associations: Checked
-
Obtain Topology Automatically or Tunnel All: Checked
Since we configured Split-Tunneling on the RV340, we don’t need to configure it here.
When finished, click Save.
Step 11
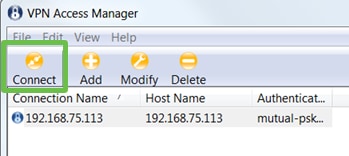
We’re now ready to test the connection. In VPN Access Manager, highlight the connection profile and click on the Connect button.
Step 12
In the VPN Connect window that comes up, enter the Username and Password using the credentials for the User Account we created on the RV340 (step 13 & 14).
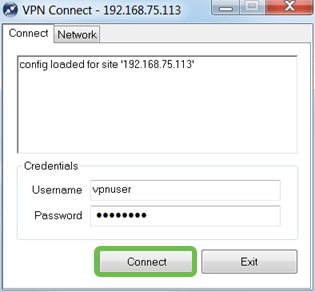
When finished, click Connect.
Step 13
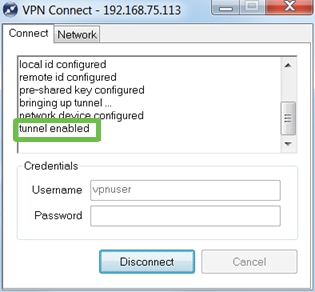
Verify the tunnel is connected. You should see tunnel enabled.
Conclusion
There it is, you are now setup to connect to your network via VPN.