Configuring Plug and Play in RV160 and RV260 routers
Available Languages
Objective
The objective of this document is to show you how to configure Plug and Play (PnP) and PnP support on RV160 and RV260 routers.
Introduction
Cisco Open Plug-n-Play (PnP) agent is a software application for Cisco Small Business devices. When a device is powered on, the Open PnP agent discovery process, which is embedded in the device, attempts to discover the address of the Open PnP server. The Open PnP agent uses methods like Dynamic Host Configuration Protocol (DHCP), Domain Name System (DNS), and Cisco cloud service discovery to acquire the desired IP address of the Open PnP server. Simplified deployment process of Cisco Small Business device automates the following deployment related operational tasks:
- Establishing initial network connectivity for the device.
- Delivering device configuration.
- Delivering firmware images.
PnP support was introduced in the Small Business environment with FindIT 1.1, which acts as the PnP server.
Some terms to be familiar with regarding PnP and FindIT:
- An Image is a firmware update for a PnP enabled device.
- A Configuration is a configuration file to be downloaded to the device. Configuration files contain all the information a device needs to participate in a network, such as gateway, IP addresses of known devices, security settings etc.
- An Unclaimed device is a device that has checked into the PnP server but does not have an Image or Configuration assigned to it.
- Provisioning is the act of supplying devices with images or configurations.
Applicable Devices
- RV160
- RV260
Software Version
- 1.0.00.15
PnP Router configuration
Devices must first be configured to “check in” with the PnP server in order to receive provisioning. To configure the router to check into the FindIT Manager to support PnP, perform the following steps.
Step 1. Log in to the web configuration page of your router.

Step 2. Navigate to System Configuration > PnP.

Step 3. By default, PnP is enabled in the router and PnP Transport is set to Auto to discover the PnP server automatically. In this example, Static had been selected as the PnP Transport option.

Note: Unlike switches, the RV160/RV260 series routers only support Hyper Text Transfer Protocol Secure (HTTPS) encrypted PnP communications.
Step 4. Enter the IP address or the Fully Qualified Domain Name (FQDN) of the FindIT manager and the port number if it is using something other than Port 443. By default the router will trust any already trusted Certificate Authority (CA) certificate. If desired you can choose to only trust certificates from a particular certification authority by selecting only one Root CA certificate.
In this example,
IP/FQDN is FindIT.xxxx.net.
Port is 443.
CA Certificate is All.
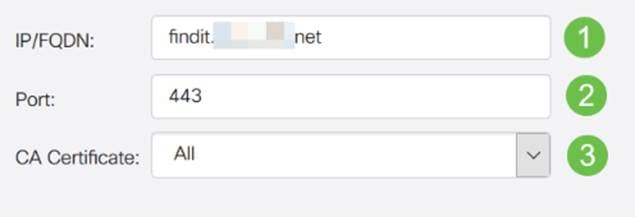
Step 5. Click Apply.

Image or Configuration Upload
Getting to low, or no touch deployments requires the configuration or image files to be available to the device prior to powering on the first time. To upload an image or a configuration to the FindIT Manager to deploy to PnP devices, perform the following steps.
Step 1. Connect to the FindIT Network Manager and go to Network Plug and Play and choose Images or Configurations.
In this example, Images has been selected.

Step 2. Click on the Add icon to add an image file.

Step 3. Drag and drop the firmware file from a folder to the browser window and choose Upload.

Claiming Devices
Once the firmware or configuration has been uploaded, you can claim a device that has checked in. Claiming a device allows a FindIT server to deploy a configuration or image to that device.
Step 1. Log in to the FindIT Manager and navigate to Network Plug and Play > Unclaimed Devices.

Step 2. Locate the device under Unclaimed devices and select it.

Step 3. Choose the configuration or image you want to apply and click Claim. In this example, a configuration file has been selected. This will move the device from the Unclaimed tab into the Claimed tab and the next time the device checks into the server it will deploy the configuration.

Configuring PnP Redirect
By default, PnP is enabled on the RV160/RV260 routers and is set to Auto discover the PnP server. This can occur from a DHCP server, DNS query, or Cisco’s device help website.
PnP auto redirect allows you to use Cisco’s device help website (https://software.cisco.com) to allow PnP enabled devices from multiple networks to connect automatically to the desired PnP server. You will be able to handle the configurations and images of a large number of devices remotely.
To configure the PnP auto redirect, perform the following steps.
Step 1. Log in to the web utility of the router. Navigate to System Summary.

Step 2. Obtain the Serial number and model number (PID VID) of the router from the System Information.

Step 3. Go to Cisco Software Central website (https://software.cisco.com)
Step 4. Log in using your Cisco Smart Account and navigate to Plug and Play Connect .

Step 5. Navigate to Controller Profiles to add details regarding the server.
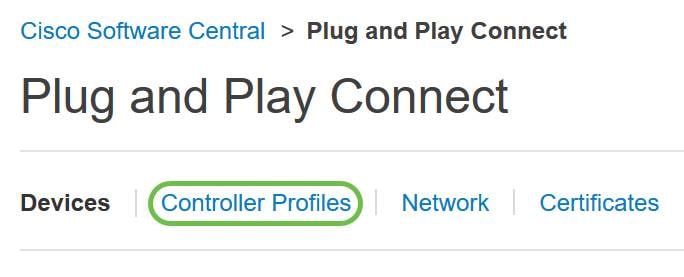
Step 6. Click on Add Profile….
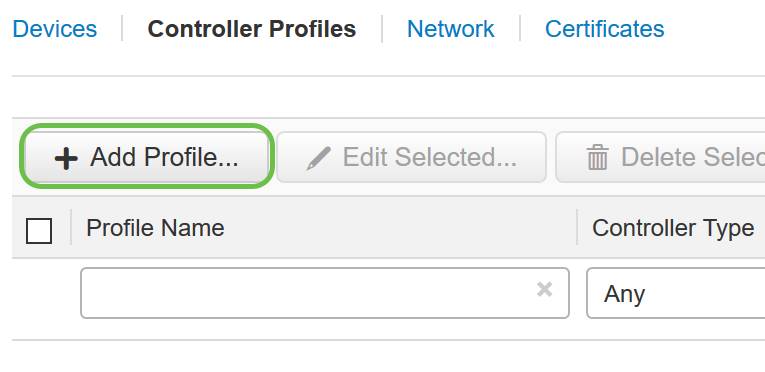
Step 7. Select Controller Type as PNP SERVER and click Next.

Step 8. Enter the mandatory fields that includes Profile Name, Primary Controller (to include the URL) and upload the Secure Sockets Layer (SSL) Certificate.
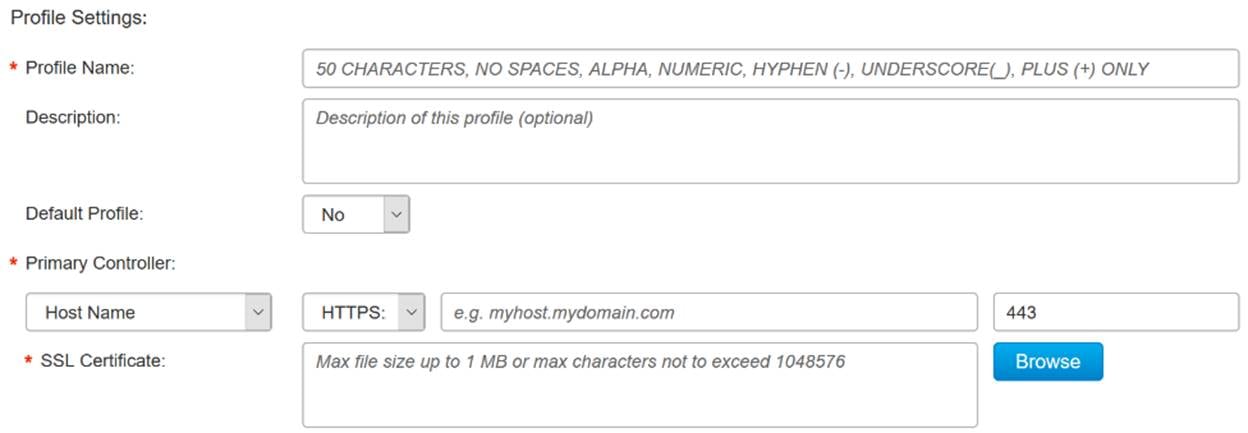
An example of a Controller Profile should appear as follows:

Step 9. Once the Profile is built, you can add the device. To do this navigate to Devices and click on Add Devices…

Step 10. Add devices using either Import using a CSV file or Enter Device info manually.
Note: If you have a large number of devices to add, use Import using a CSV file option.
In this example, Enter Device info manually is chosen.
Click Next.

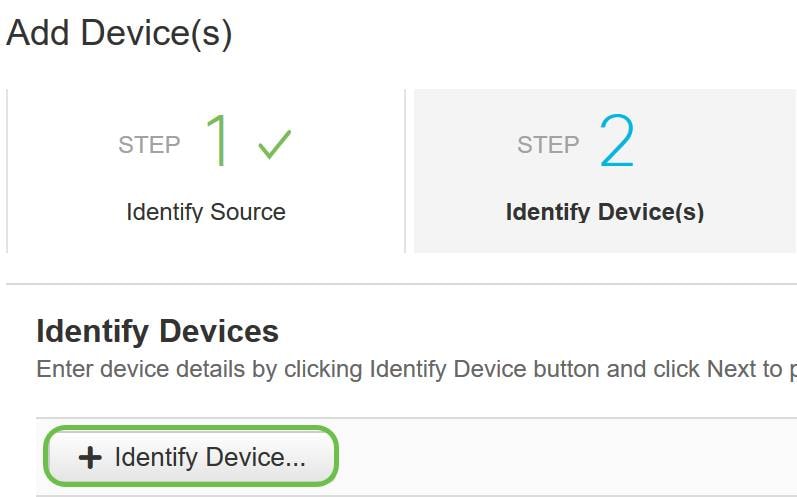
Step 11. Click on Identify Device…
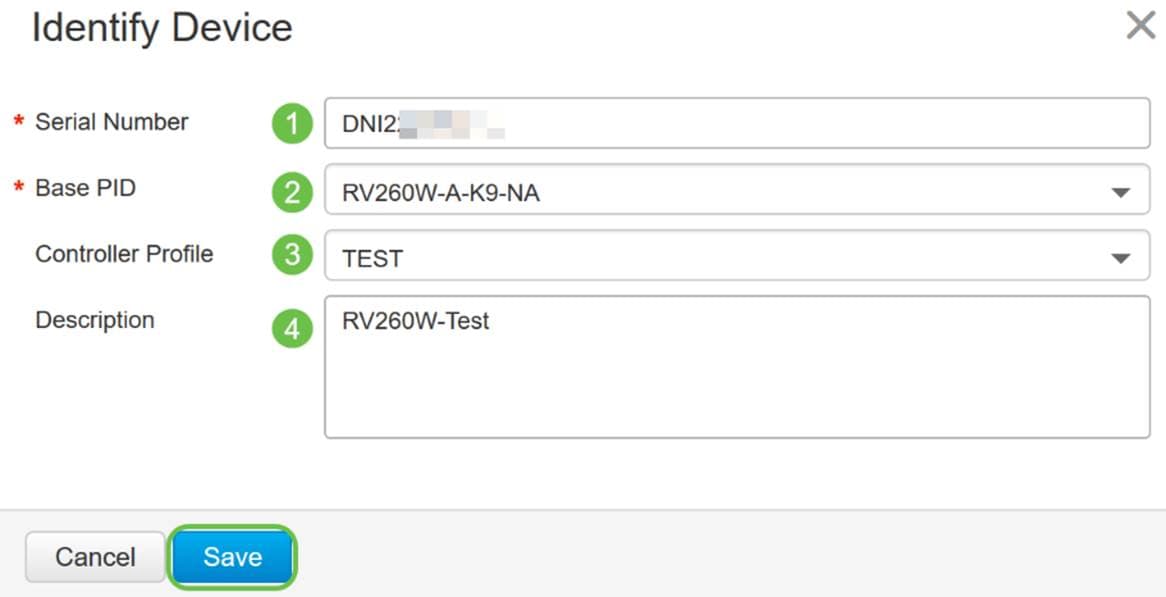
Step 12. Enter the Serial Number, Base PID, Controller Profile information and Description.
Click Save.
Step 13. Review the settings and click Submit.

Step 14. A result screen will appear about the successful addition of the device. Click Done.

Step 15. Shortly after the router will check in to the server. Periodically the router will connect in to the server after reboot. So redirection is not required. This will take a few minutes.

When the router contacts the server, you will see the following screen.

You will get the following screen once the redirect is successful.

Step 16. To see if the device has checked in to the FindIT Manager, go to FindIT Manager. Navigate to Network Plug and Play > Unclaimed Devices.

Step 17. See that the device had checked in to the FindIT manager. You can then manage the configurations or images for the RV160 or RV260.

Conclusion
You should now have successfully configured PnP on the RV160/RV260 routers.
For configuring PnP in RV34x series routers, click here.
For more information on FindIT Network Management, click here.
If you want to learn more about FindIT and Network PnP, click here.
For further information on how to request a smart account, click here.
To learn more about registering FindIT Network Manager to Cisco Smart Account, click here.
 Feedback