Configuring SNMP on RV160 and RV260 routers
Available Languages
Objective
The objective of this article is to show you how to configure the Simple Network Management Protocol (SNMP) settings on the RV160 and RV260 Routers.
Introduction
SNMP is an Internet-standard protocol for collecting and organizing data on managed devices on the IP networks. It allows network administrators to manage, monitor, receive notifications of critical events as they occur on the network, and troubleshoot.
The SNMP framework consists of three elements; an SNMP manager, an SNMP agent, and a Management Information Base (MIB). The function of the SNMP manager is to control and monitor the activities of the network hosts that utilize SNMP. The SNMP agent is within the software of the device and it aids in the maintenance of data in order to manage the system. Lastly, MIB is a virtual storage area for network management information. These three combine to monitor and manage the devices in a network.
RV160/260 devices support SNMP version v1, v2c, and v3. They act as SNMP agents that reply to SNMP commands from SNMP Network Management Systems. The supported commands are the standard SNMP commands get/next/set. The devices also generate trap messages to notify the SNMP manager when alarm conditions occur. Examples include reboots, power cycles and WAN link events.
Applicable Devices
- RV160
- RV260
Software Version
- 1.0.00.13
Configure SNMP
To configure the SNMP of the router, perform the following steps.
Step 1. Log in to the web configuration page of your router.

Note: In this article, we will be using the RV260W to configure SNMP. The configuration may vary depending on the model you are using.
Step 2. Navigate to System Configuration > SNMP.

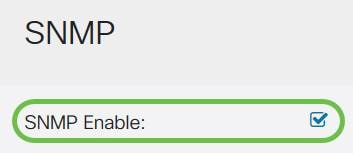
Step 3. Check the SNMP Enable check box to enable SNMP.

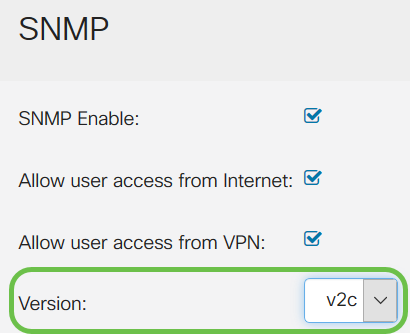
Step 4. (Optional) Check the Allow user access from Internet check box to allow authorized user access outside the network through management applications such as the Cisco FindIT Network Management.

Step 5. (Optional) Check the Allow user access from VPN check box to allow authorized access from a Virtual Private Network (VPN).

Step 6. From the Version drop-down menu, choose an SNMP version to use on the network. The options are:
- v1 - Least secure option. Uses plaintext for community strings.
- v2c - The improved error handling support provided by SNMPv2c includes expanded error codes that distinguish different types of errors; all types of errors are reported through a single error code in SNMPv1.
- v3 - SNMPv3 provides secure access to devices by authenticating and encrypting data packets over the network. Authentication algorithms include message digest algorithm (MD5) and secure hash algorithm (SHA). Encryption methods include Data Encryption Standard (DES) and Advanced Encryption Standard (AES).
For more information on SNMPv3, click here.

In this example, v2c has been selected as the Version.
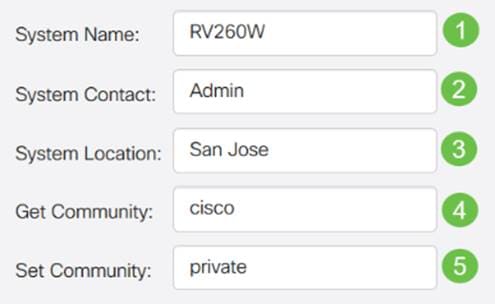
Step 7. Enter the following fields
- System Name - Enter a name for the router for easier identification in network management applications.
- System Contact - Enter a name of an individual or administrator to identify with the router in case of emergency.
- System Location - Enter a location of the router. This makes locating a problem much easier for an administrator.
- Get Community - Enter the SNMP community name in the Get Community field. It creates read-only community which is used to access and retrieve the information for SNMP agent.
- Set Community - In the Set Community field, enter an SNMP community name. It creates read-write community which is used to access and modify the information for SNMP agent. Only requests from the devices that identify themselves with this community name are accepted. This is a user-created name. The default is private.

Trap Configuration
Using Trap configurations, you can set the source address of every SNMP trap packet sent by the router to a single address regardless of the outgoing interface.
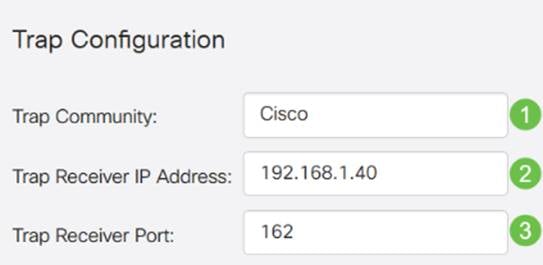
Step 8. To configure the SNMP trap, enter the following information.
|
Trap Community |
Enter the name of the trap community |
|
Trap Receiver IP Address |
Enter the IP address |
|
Trap Receiver port |
Enter the port number |

Note: Typically, SNMP uses User Datagram Protocol (UDP) as the transport protocol and the default UDP ports for SNMP traffic are 161 (SNMP) and 162 (SNMP Trap).
Step 9. Click Apply.

You should now have successfully enabled and configured SNMP on your RV160/RV260 Router.
 Feedback