Configuring RIP on the RV160 and RV260
Available Languages
Objective
This objective of this document is to configure RIP on the RV160 and RV260 series routers.
Introduction
Routing Information Protocol (RIP) documented as Request for Comments (RFC) 1058 is a distance-vector routing protocol and commonly used Interior Gateway Protocol (IGP). RIP uses broadcast User Datagram Protocol (UDP) data packets to exchange routing information. These RIP packets contain information about the network that the devices can reach and the number of routers or gateways that the packet must travel through in order to reach the destination address. It would send routing update messages every 30 seconds, which is termed as advertising. If a router doesn’t receive an update from another router for 180 seconds or more then the receiving device would mark that route as unusable. The router will remove all routing table entries for devices that doesn’t update after 240 seconds.
RIP uses a single routing metric called hop count to measure the distance between the source and destination. In a path from source to destination, each hop is assigned a hop count value, which is usually 1. When a router receives a new or changed destination network entry from a routing update, it would add a 1 to the metric value and add it in the routing table. It uses the IP address of the sender as the next hop.
RIP limits the number of hops allowed in a path from the source to a destination. This prevents routing loops from continuing indefinitely. The maximum number of hops in a path is 15. When the metric is 15 and a router receives a routing update that contains a new or changed entry, then the metric value would increase by 1 causing the metric to be 16 (infinity), this means that the network destination is considered unreachable. The downside of this feature is that it limits the maximum diameter of a RIP network to less than 16 hops. RIP implements the split horizon and hold down mechanisms to prevent incorrect routing information from being propagated.
RIP ensures a higher degree of network stability by quickly rerouting network packets if one of the network connections goes off-line. When RIP is active, users experience little to no service interrupts due to single router, switch, or server outages if there are sufficient network resources available. RIP also has advantages over static routes because the initial configuration is simple and doesn’t require you to update the configuration when the topology changes. The disadvantage of RIP is that it requires more network and processing overhead than static routing.
The differences between RIP version 1 (RIPv1) and RIP version 2 (RIPv2) is that RIPv1 does not support Variable Length Subnet Masking (VLSM) and does not support authentication. It uses classful routing protocol and sends routing updates as broadcasts. RIPv2 supports plain text and Message Digest Algorithm 5 (MD5) authentication, route summarization, Classless Inter-domain Routing (CIDR), VLSMs, and send routing updates as multicast traffic.
RIP Next Generation (RIPng) is documented as RFC 2080 which functions the same and offers the same benefits as IPv4 RIP. RIPng supports IPv6 addresses and prefixes and the use of the all-RIP-devices multicast group address, FF02::9, as the destination address for RIP update messages.
Applicable Devices
· RV160
· RV260
Software Version
· 1.0.00.13
Configuring RIP
Step 1. Log into the web configuration page of your router.
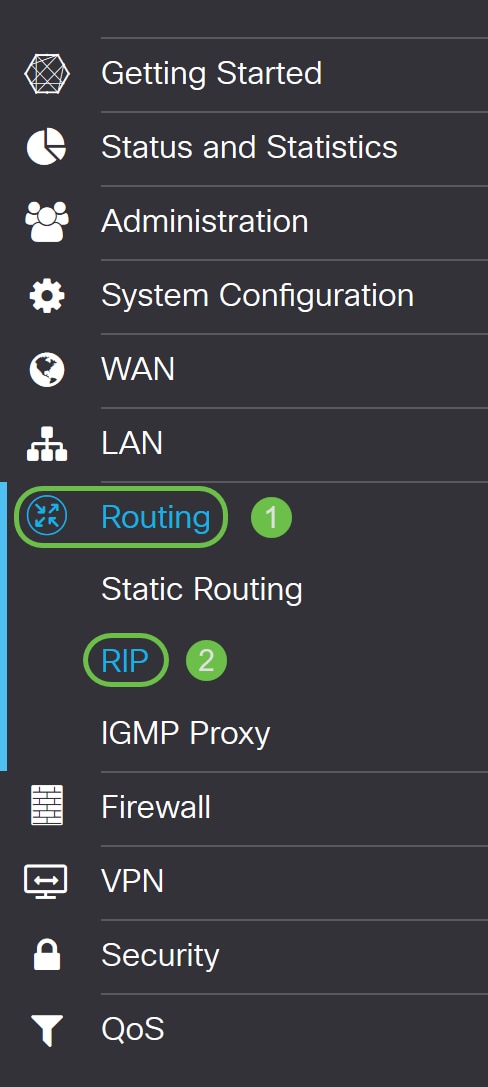
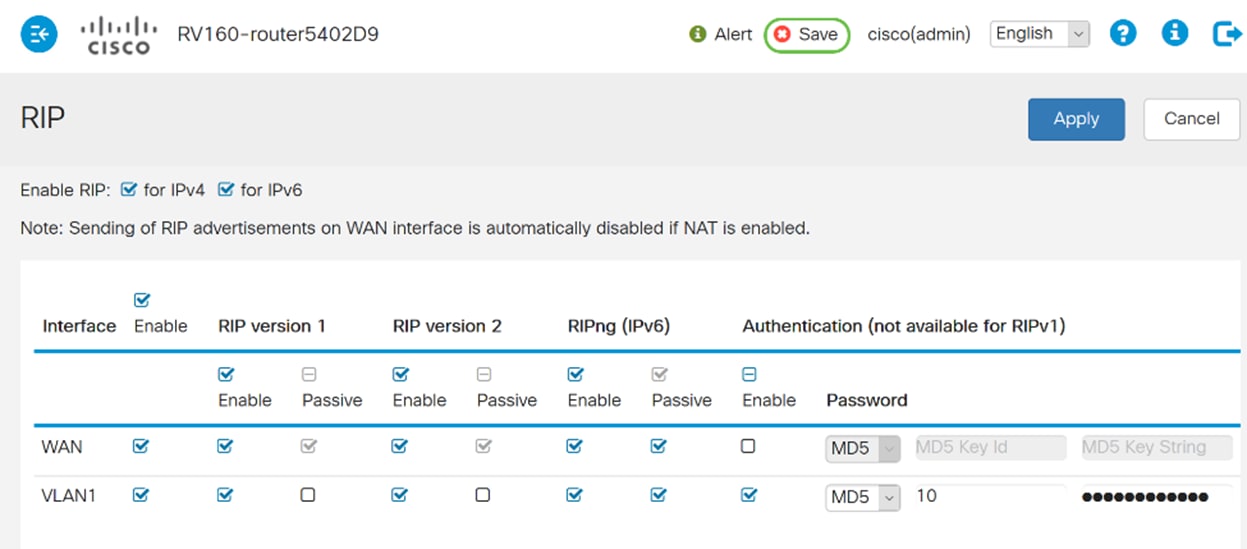
Step 2. Navigate to Routing > RIP.
Step 3. To enable RIP, check for IPv4 or for IPv6 or both.
We have checked both for this demonstration.
Note: Transmission of RIP advertisement on the WAN interface is automatically disabled if NAT is enabled.
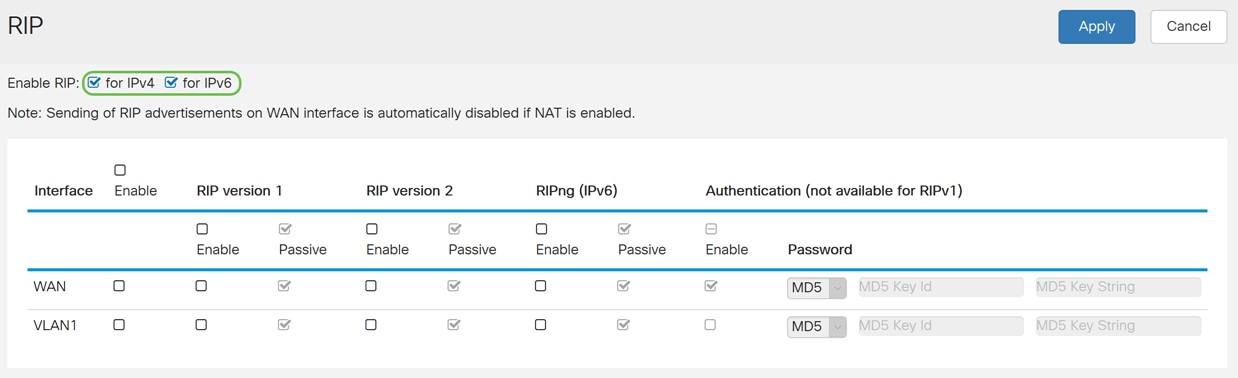
Step 4. Check Enable in the corresponding Interface to allow routes from upstream to be received.
For this example, we enabled the WAN interface.

Note: Checking the checkbox above the Enable field will automatically check RIP version 1, RIP version 2, RIPng (IPv6), and authentication for all the interfaces. Similarly, unchecking Enable unchecks all.

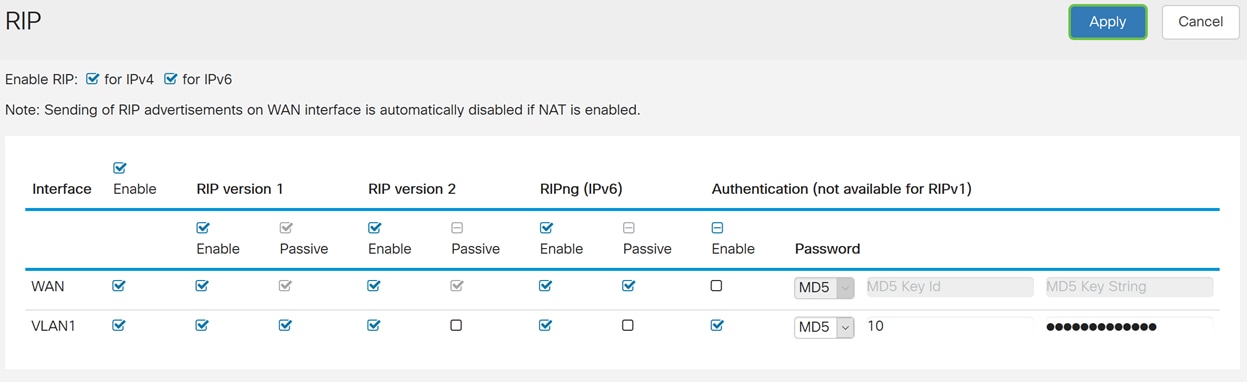
Step 5. RIPv1 uses classful routing and does not include subnet information or authentication. Check Enable to enable sending and receiving routing information on RIP version 1. Check Passive to disable routing information from being sent on RIP version 1.
We checked the Enable checkbox for RIPv1 and left Passive as checked.
Note: Passive configuration is activated only when enable is checked.

Step 6. RIPv2 is a classless protocol that uses multicast and has a password authentication. Check Enable to enable sending and receiving routing information on RIP version 2. Check Passive to disable routing information from being sent on RIP version 2.
For this demonstration, we checked Enable for RIPv2 and unchecked Passive.
Note: Passive configuration is activated only when enable is checked.

Step 7. RIPng uses (UDP) to send routing information. This is based on RIP version 2 but used for IPv6 routing. Check Enable to enable RIP IPv6 routing. Check Passive to disable sending RIPng version.
Here, we checked Enable and unchecked Passive for RIPng (IPv6).
Note: Passive configuration is activated only when enable is checked.

Step 8. Authentication is a security feature that forces authentication of RIP packets before routes are exchanged with other routers. Check Enable to enable authentication so that routes are exchanged only with trusted routers on the network. Then select either Plain (Common method of authentication) or MD5 (Challenge-response authentication mechanism) for the authentication type and enter the password.
In this example, we enabled authentication and selected MD5 as our authentication type. We entered 10 as our MD5 Key Id and CiscoTest123! as our Md5 Key String.
Note: This is not available for RIPv1.

Step 9. Click Apply.
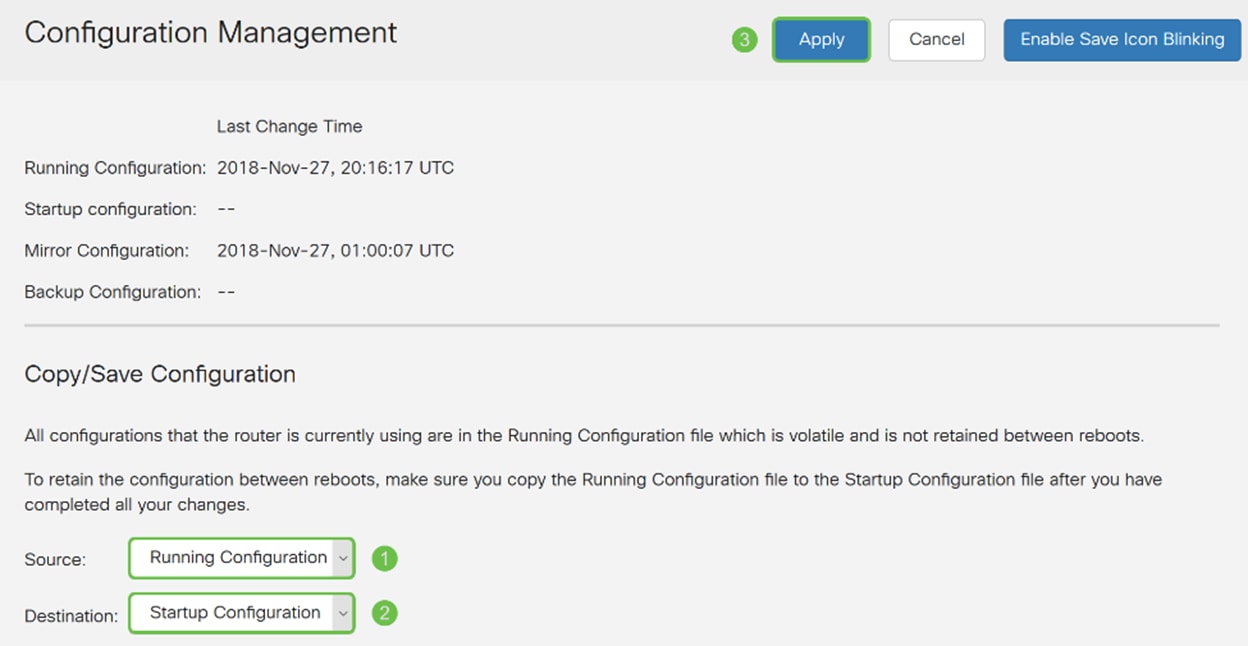
Step 10. At the top of the page, click the Save button to navigate to the Configuration Management to save your running configuration to the startup configuration. This is to retain the configuration between reboots.
Step 11. In the Configuration Management, make sure the Source is Running Configuration and the Destination is Startup Configuration. Then press Apply to save your running configuration to the startup configuration. All configurations that the router is currently using are in the Running Configuration file which is volatile and is not retained between reboots. Copying the Running Configuration file to the Startup Configuration file will retain all the configuration between reboots.
Conclusion
You should now have successfully configured RIP on your device. You can follow the steps below to check your routing table for RIP.
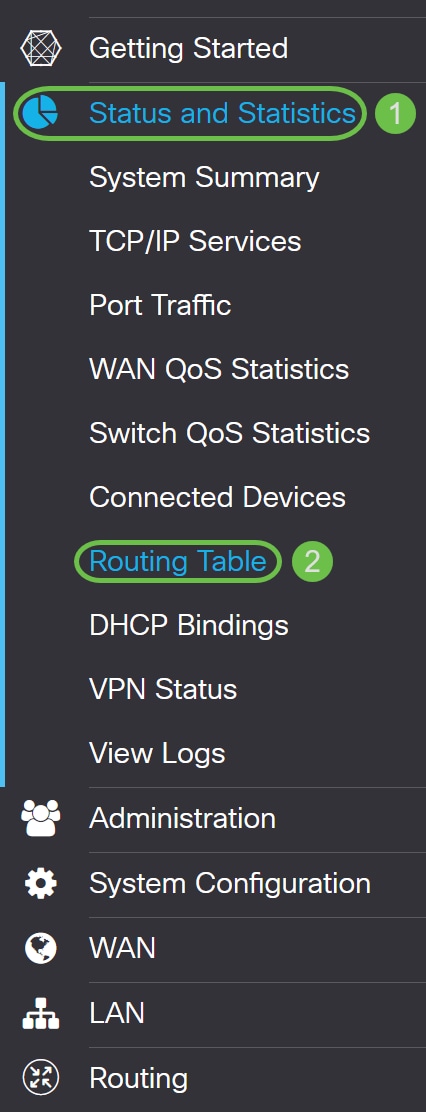
Step 1. Navigate to Status and Statistics > Routing Table.
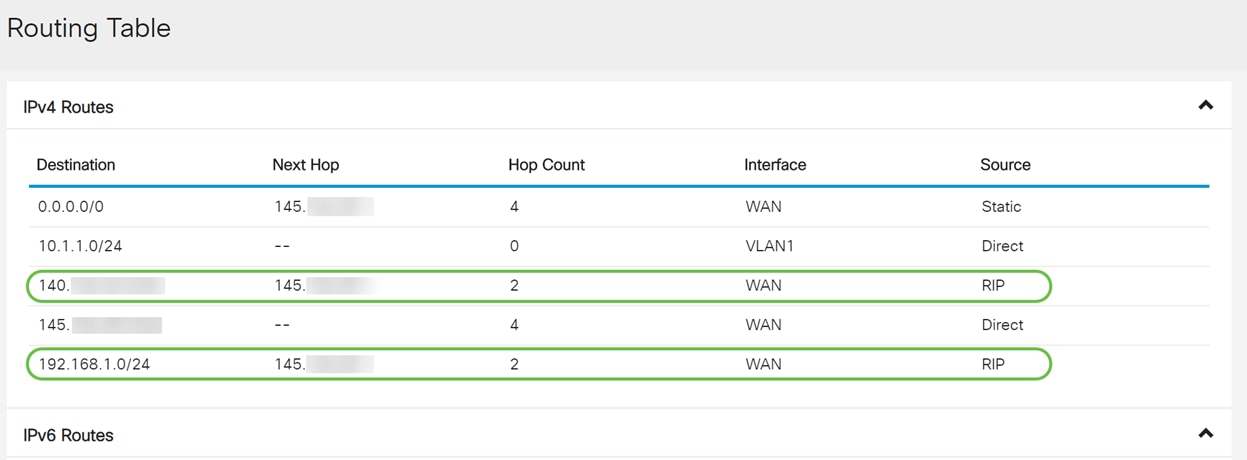
Step 2. In the Routing Table under IPv4 Routes, you should see routes that were discovered by RIP under the Source field.
 Feedback