Configure Access Rules on RV160 and RV260 Series Routers
Available Languages
Objective
Your router is responsible for receiving data from the outside network and is the first line of defense when it comes to your local network security. By enabling access rules on your router, you can filter packets based on specific parameters such as IP address or port number. With the steps provided below, this document aims to guide you on how to configure access rules to better control the packets which enter your network. This document will also highlight some best practices for using access rules to their full potential for the best security.
Applicable Devices
- RV160x
- RV260x
Software Version
- 1.0.00.13
Configure Access Rules
Step 1. From the navigation pane on the left side of the configuration utility, select Firewall > Access Rules.

The Access Rules page appears. On this page there are tables containing lists of access rules and their attributes for IPv4 and IPv6 respectively. From here you may add a new access rule, edit an existing rule, or remove an existing rule.
Add/Edit an Access Rule
Step 2. To add a new access rule, click the blue icon to add in the IPv4 Access Rules or IPv6 Access Rules table depending on which protocol you'd like the rule to apply to. In this instance, IPv4 is used.

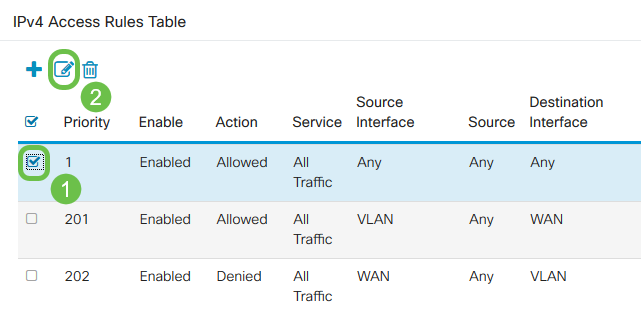
To edit an existing entry, select the checkbox next to the access rule that you would like to modify. Then select the blue edit icon at the top of the corresponding table. Only one rule can be selected at a time for editing.

The Add/Edit Access Rules page appears.
Step 3. Check/Uncheck the checkbox for Rule Status to enable or disable the access rule during operation. This is useful when you have an access rule that you would like to save to apply at a later date.

Step 4. From the Action field, select whether the rule should allow or deny access to the incoming network traffic to be specified.

Note: It is recommended for the best security to set access rules that allow only the traffic that you expect to receive, rather than trying to only deny undesirable traffic. This will better protect your network against unknown threats.
Step 5. In the Services field, select from the drop-down menu the type of network service you would like the access rule to apply to.

Note: The IPv4 or IPv6 radio button is automatically selected based on the table you chose to apply the access rule to from the Access Rules page.
Step 6. Select from the Log field whether you would like the router to generate a log message once packets entering your network are matching the applied rules.

Step 7. From the Source Interface drop-down list, select the network interface for incoming packets that the access rule will apply towards.

Step 8. Select from the Source Address drop-down list the type of incoming address the access rule will apply to. The options are as follows:
- Any - The rule will apply to any incoming IP addresses
- Single - The rule will apply to a single defined IP address
- Subnet - The rule will apply to a defined subnet of a network
- IP Range - The rule will apply to a defined range of IP addresses
Note: If you select Single, Subnet, or IP Range, corresponding fields will appear to the right of the drop-down menu where you can enter address details. In this example an IP Range is entered to demonstrate.

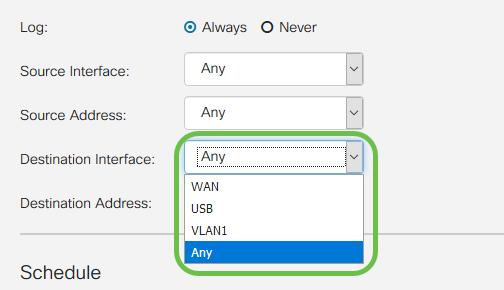
Step 9. From the Destination Interface drop-down list, select the network interface for outgoing packets that the access rule will apply towards.

Step 10. Select from the Destination Address drop-down list the type of outgoing address the access rule will apply to. The options are as follows:
- Any - The rule will apply to any outgoing IP addresses
- Single - The rule will apply to a single defined IP address
- Subnet - The rule will apply to a defined subnet of a network
- IP Range - The rule will apply to a defined range of IP addresses
Note: If you select Single, Subnet, or IP Range, corresponding fields will appear to the right of the drop-down menu where you can enter address details. In this example a subnet is entered to demonstrate.

Step 11. From the Schedule Name drop-down list, select the time schedule you would like the access rule to apply to.

Note: For increased security, it is a best practice to restrict non-critical network access to business hours to ensure unwanted connections are denied when your business is not in operation.
Note: Click the link to the right of the Schedule Name drop-down if you would like to configure the schedule times for access rules. More information can be found on how to configure these schedules here.
Step 12. When you are satisfied with the access rule configuration, click Apply to confirm.

You will now be returned to the main Access Rules page.
Note: When a new access rule is created, its priority is placed at the bottom of the list. This means that if an access rule conflicts with another on a specific parameter, the restrictions of the higher priority rule will take precedence. To move a rule up or down in priority, you may use the blue arrows located in the Configure column.

Step 13 (Optional). If you would like to return the access rules list to default, click Restore Defaults in the upper right corner of the page.

Remove an Access Rule
Step 14. To remove an access rule from the list, simply select the checkbox for the corresponding rule you would like to remove. Then select the blue trash can icon at the top of the list. Multiple access rule entries may be removed at once.

Service Management
Service management allows you to add or edit existing network services by their port number, protocol, and other details. These network servicescwill be available in the Services drop-down when configuring the access rules. Through the configuration menu of the service management list, you can create custom services that can then be applied to the access rules for finer control over the traffic entering your network. To learn more about how to configure Service Management, click here.
Conclusion
Access Rules when appropriately applied are a valuable tool for securing your WAN connection. With the above guide and discussed practices, you should have everything you need to properly configure secure access rules for your RV160x or RV260x router.
 Feedback