ACL Best Practices on an RV34x Series Router
Available Languages
Objective
The objective of this article is to describe best practices for creating Access Control Lists (ACLs) with your RV34x series router.
Applicable Devices | Firmware Version
- RV340 | 1.0.03.20 (download latest)
- RV340W | 1.0.03.20 (download latest)
- RV345 | 1.0.03.20 (download latest)
- RV345P | 1.0.03.20 (download latest)
Introduction
Do you want more control over your network? Do you want to take extra steps to keep your network secure? If so, an Access Control List (ACL) might be just what you need.
An ACL consists of one or more Access Control Entries (ACEs) that collectively define the network traffic profile. This profile can then be referenced by Cisco software features such as traffic filtering, priority, or custom queueing. Each ACL includes an action element (permit or deny) and a filter element based on criteria such as source address, destination address, protocol, and protocol-specific parameters.
Based on the criteria that you entered, you can control certain traffic from entering and/or exiting a network. When a router receives a packet, it would examine the packet to determine whether to forward or drop the packet based on your access list.
Implementing this security level is based on different use cases considering particular network scenarios and security needs.
It is important to note that the router may automatically make an access list based on configurations on your router. In this case, you may see access lists that you cannot erase unless you change the router configurations.
Why use Access Lists
- In most cases, we use ACLs to provide a basic level of security for accessing our network. For example, if you don’t configure ACLs, by default all packets passing through the router could be allowed to all parts of our network.
- ACLs can allow one host, range of IP addresses or networks and prevent another host, range of IP addresses or networks from accessing the same area (host or network).
- By using ACLs, you can decide which types of traffic you forwarded or blocked at the router interfaces. For instance, you can permit Secure Shell (SSH) File Transfer Protocol (SFTP) traffic and at the same time block all Session Initiation Protocol (SIP) traffic.
When to use Access Lists
- You should configure ACLs in routers that are positioned between our internal network and an external network like the Internet.
- You can use ACLs to control traffic entering or going out of a specific part of our internal network.
- When you need to filter inbound traffic or outbound traffic, or both on an interface.
- You should define ACLs on a per-protocol basis to control traffic.
Best practices for configuring basic security with Access Lists
- Implement ACLs that allow only those protocols, ports, and IP addresses that deny everything else.
- Block incoming packets that claim to have the same destination and source address (land attack on the router itself).
- Turn on logging capability on ACLs to an internal (trusted) Syslog host.
- If you use Simple Network Management Protocol (SNMP) on the router, then you have to configure SNMP ACL and complex SNMP community string.
- Allow only internal addresses to enter the router from the internal interfaces and allow only traffic destined for internal addresses to enter the router from the outside (external interfaces).
- Block multicast if not used.
- Block some Internet Control Message Protocol (ICMP) message types (redirect, echo).
- Always consider the order in which you enter the ACLs. For example, when the router is deciding whether to forward or block a packet, it tests the packet against each ACL statement in the order in which the ACLs were created.
Access List implementation in Cisco RV34x series routers
Example Network Topology
Example Scenario
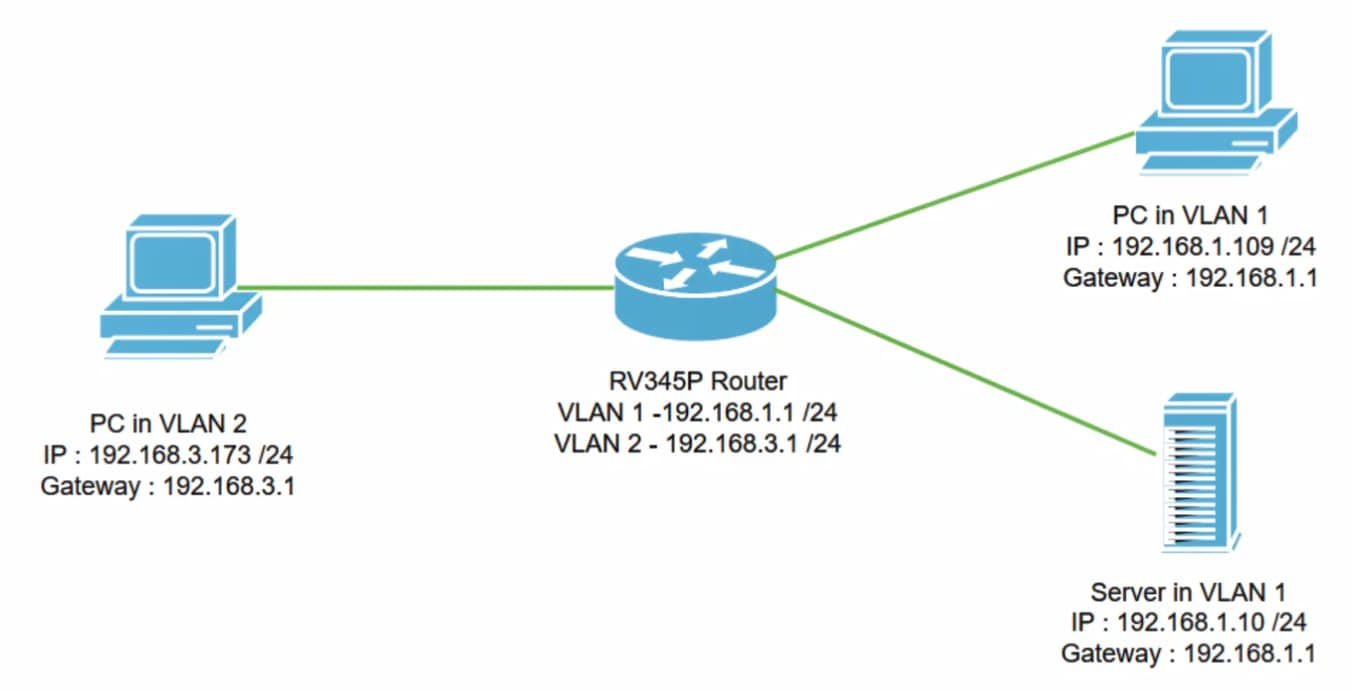
In this scenario, we’ll replicate this network diagram, where we have an RV345P router and two different VLAN interfaces. We have a PC in VLAN 1 and in VLAN2, and we also have a server in VLAN 1. Inter-VLAN routing is enabled, so VLAN 1 and VLAN 2 users are able to communicate with each other. Now we are going to apply the access rule to restrict the communication between the VLAN 2 user toward this server in VLAN 1.
Example Configuration
Step 1
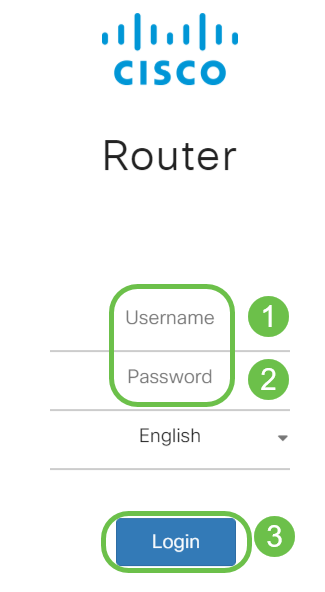
Log in to the Web User Interface (UI) of the router using the credentials you have configured.

Step 2
To configure the ACL, navigate to Firewall > Access Rules and click on the plus icon to add a new rule.

Step 3
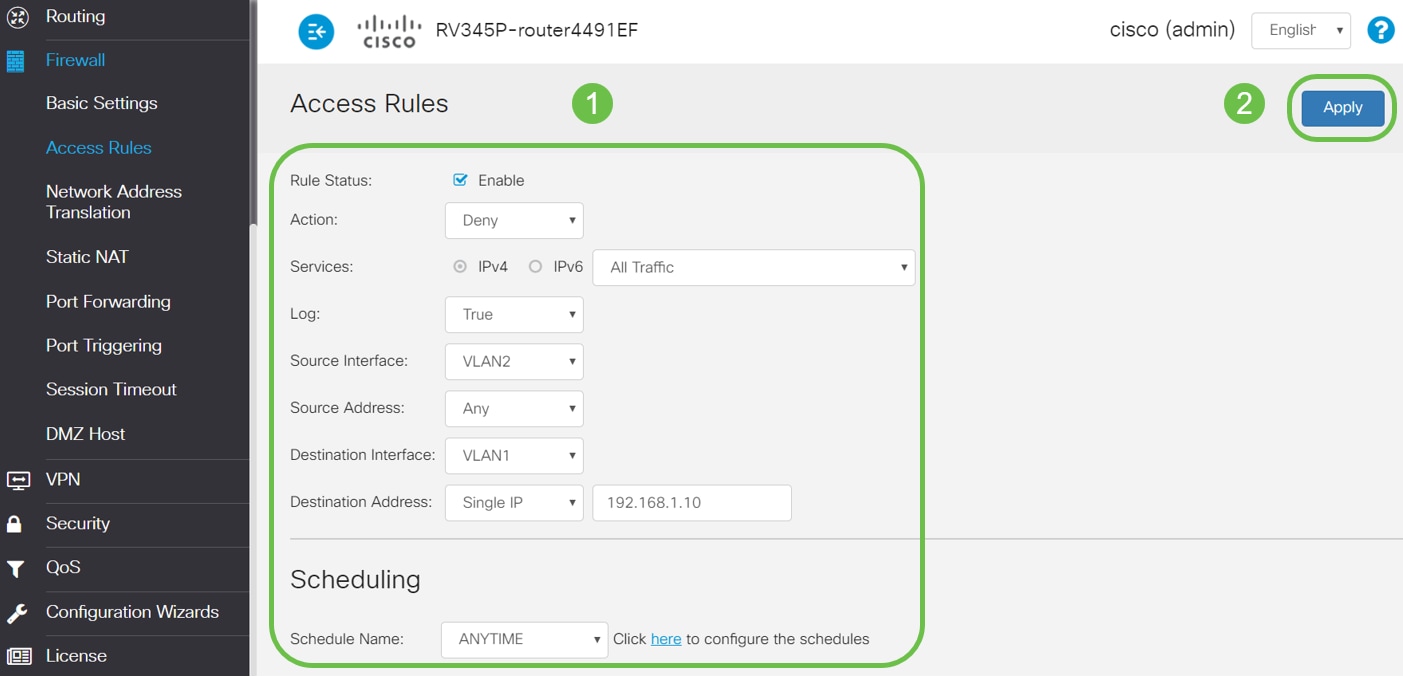
Configure the Access Rules parameters. Apply ACL to restrict the server (IPv4: 192.168.1.10/24) access from VLAN2 users. For this scenario, the parameters will be as follows:
- Rule Status: Enable
- Action: Deny
- Services: All Traffic
- Log: True
- Source Interface: VLAN2
- Source Address: Any
- Destination Interface: VLAN1
- Destination Address: Single IP 192.168.1.10
- Schedule Name: Anytime
Click Apply.
In this example, we denied access from any devices from VLAN2 to the server and then permitting access to the other devices on in VLAN1. Your needs may vary.

Step 4
The Access Rules list will show as follows:

Verification
To verify the service, open the command prompt. On Windows platforms, this can be achieved by clicking the Windows button and then typing cmd in the lower left-hand search box on the computer and select Command Prompt from the menu.
Enter the following commands:
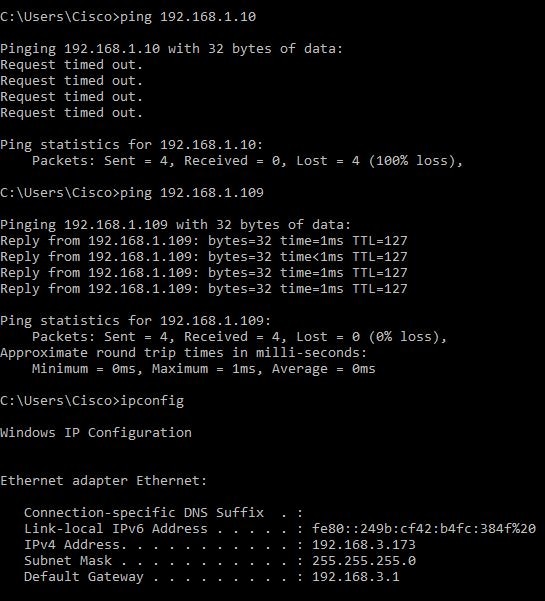
- On PC (192.168.3.173) in VLAN2, ping the server (IP: 192.168.1.10). You will get a Request timed out notification which means communication is not allowed.
- On PC (192.168.3.173) in VLAN2, ping the other PC (192.168.1.109) in VLAN1. You will get a successful reply.

Conclusion
You have seen the necessary steps to configure the Access rule on a Cisco RV34x series router. Now you can apply that to create an Access Rule in your network that will fit your needs!
 Feedback