Configure Firewall Basic Settings on RV110W
Available Languages
Objective
A firewall is a security system which monitors and controls the flow of incoming and outgoing traffic to the network using configured security rules. The firewall serves as a barrier between a trusted, secure internal network and external untrusted networks.
The objective of this document is to show you how to configure firewall basic settings on the RV110W.
Note: For advanced configuration settings (such as enabling or disabling specific services in the firewall), refer to Firewall Service Management on RV110W.
Applicable Devices
• RV110W
Basic Firewall Configuration
Step 1. Use the web configuration utility to choose Firewall > Basic Settings. The Basic Settings page appears:

Step 2. In the Firewall field, check the Enable check box to enable firewall settings.

Step 3. In the DoS Protection field, check the Enable check box to protect your network from Denial of Service (DoS) attacks.

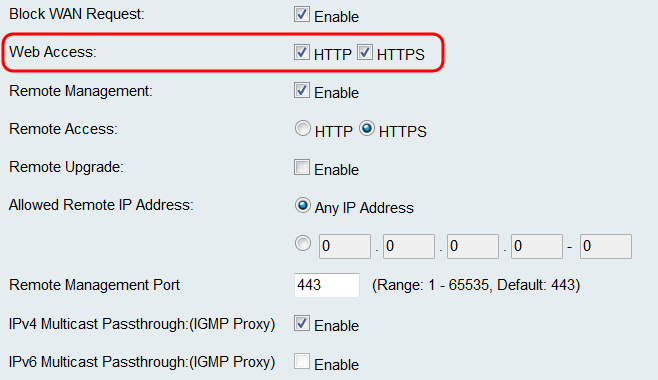
Step 4. In the Block WAN Request field, check the Enable check box to deny ping requests to the RV110W from external networks.

Step 5. In the Web Access field, check the HTTP check box and/or the HTTPS check box to enable traffic from these protocols. HTTPS is a version of HTTP which encrypts packets for increased security.

Step 6. In the Remote Management field, check the Enable check box to enable remote management settings.

Note: If you choose not to enable remote management, skip to Step 11.
Step 7. In the Remote Access field, choose the type of web access used to connect to the firewall by clicking either the HTTP radio button or the HTTPS radio button. HTTPS encrypts packets for greater security.

Step 8. In the Remote Upgrade field, check the Enable check box to allow the RV110W firmware to be upgraded remotely.

Step 9. In the Allowed Remote IP Address field, click the Any IP Address radio button to allow remote upgrades to the router from any IP, or click the radio button beneath to enter a range of IP addresses that are allowed to remotely upgrade the router in the fields to the right.

Step 10. In the Remote Management Port field, enter the port or range of ports on which remote management is allowed.

Step 11. In the IPv4 Multicast Passthrough:(IGMP Proxy) field, check the Enable check box to enable multicast passthrough for IPv4.

Step 12. In the IPv6 Multicast Passthrough:(IGMP Proxy) field, check the Enable check box to enable multicast passthrough for IPv6.

Note: You may only enable this option if the device is configured to operate in an IPv6 mode on the Networking > IP Mode page.
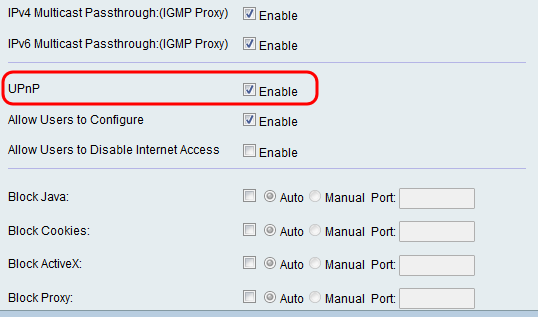
Step 13. In the UPnP field, check the Enable check box to enable Universal Plug and Play (UPnP) which allows automatic discovery of devices that can connect to the router.

Note: If you choose not to enable UPnP, skip to Step 16.
Step 14. In the Allow User to Configure field, check the Enable check box to allow users to set port-mapping rules o.

Step 15. In the Allow Users to Disable Internet Access field, check the Enable check box to allow users to disable Internet access.

Step 16. In the Block Java field, check the Enable check box if you would like to block Java applets. Next click the Auto radio button to block Java on all ports, or click the Manual radio button to enter the port number in the Port field on which to block Java.

Step 17. In the Block Cookies field, check the Enable check box if you would like to block cookies. Next click the Auto radio button to block cookies on all ports, or click the Manual radio button to enter the port number in the Port field on which to block cookies.

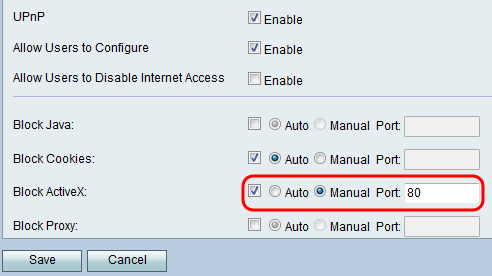
Step 18. In the Block ActiveX field, check the Enable check box if you would like to block ActiveX content. Next click the Auto radio button to block ActiveX content on all ports, or click the Manual radio button to enter the port number in the Port field on which to block ActiveX content.

Step 19. In the Block Proxy field, check the Enable check box to block proxy servers. Next click the Auto radio button to block proxy servers on all ports, or click the Manual radio button to enter the port number in the Port field on which to block proxy servers.

Step 20. Click Save to save changes or Cancel to discard them.
Revision History
| Revision | Publish Date | Comments |
|---|---|---|
1.0 |
11-Dec-2018 |
Initial Release |
 Feedback