Configure Log Settings on RV110W
Available Languages
Objective
Log settings define the logging rules and output destinations for error messages, authorization violation messages, and trace data as various events are recorded on the network. Log settings can also specify which system messages are logged based on the facility that generated the message and its severity level.
The objective of this document is to explain how to configure log settings on the RV110W.
Applicable Devices
- RV110W
Software Version
- v1.2.0.10
Configuring Log Settings on the RV110W
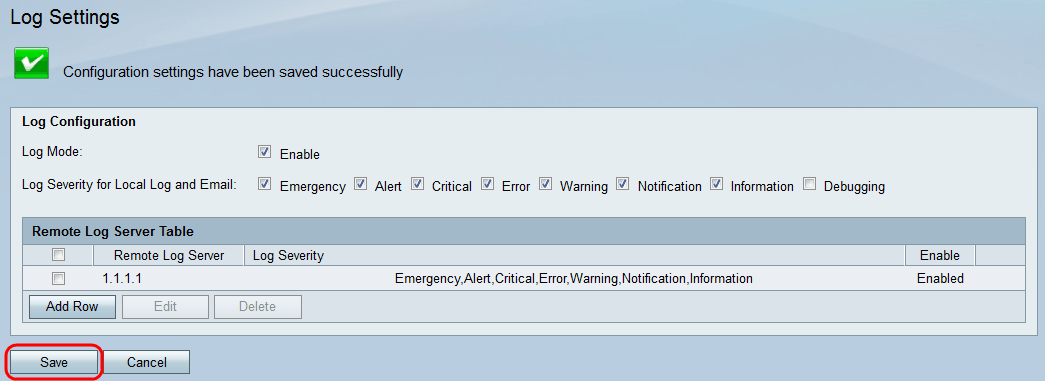
Step 1. In the firewall configuration utility, choose Administration > Logging > Log Settings. The Log Settings window opens.
Step 2. In the Log Mode field, check the Enable check box in order to begin making further changes.

Step 3. Check the appropriate check boxes in the Log Severity for Local Log and Email field below. The options are defined as follows and listed in order of highest to lowest priority.
- Emergency — An emergency log message is logged if a device is down or unusable. The message is normally broadcasted to all processes.
- Alert — An alert log message is logged if there is a serious device malfunction, such as a case in which all device features stop working.
- Critical — A critical log message is logged if there is critical device malfunction, such as two ports not functioning properly while the remaining ports work fine.
- Error — A device error log message is logged if there is an error within a device, such as a single port being offline.
- Warning — A warning log message is logged if a device is functioning properly, but an operational problem occurs.
- Notification — A notification log message is logged if a device is functioning properly, but a system notice occurs.
- Information — An informational message on a device is logged if a condition that is not an error condition exists, but may require attention or special handling.
- Debugging — Provides all detailed debugging messages.
Note: Selecting log severity options placed at lower priority levels will automatically include and check any log severity options with higher priority levels. For example, choosing “Error” logs automatically includes Emergency, Alert, and Critical logs in addition to Error logs.
Step 4. In the Remote Log Server table, click Add Row.

A new row appears with new fields and options available.

Step 5. Under the Remote Log Server column, enter the IP address of the log server that will collect the logs in the field of the row.
Step 6. Under the Log Severity column, check the desired severity of the logs for the corresponding remote log server.
Step 7. Under the Enable column, check the check box to enable the logging settings for the corresponding remote log server.
Step 8. To edit the information for particular remote log server, select the entry by checking its corresponding check box and click the Edit button.
Step 9. Click Save in order to save your settings.

 Feedback