VPN Tunnel Setup on the RV016, RV042, RV042G and RV082 VPN Routers
Available Languages
Objective
A Virtual Private Network (VPN) is a secure connection between two endpoints. A private network, that sends data securely between these two locations or networks, is established by a VPN tunnel. A VPN tunnel connects two PCs or networks and allows data to be transmitted over the Internet as if the endpoints were within a network. VPN is a good solution for companies that have employees that have to travel or be outside of the LAN often. With VPN, these employees can have access to the LAN and use the resources available to do their job. Also, VPN can connect two or more sites, so companies with different branches can communicate with each other.
Note: The RV Wired Routers Series offers two types of VPN, Gateway to Gateway and Client to Gateway. In order for the VPN connection to work properly, the IPSec values on both sides of the connection must be the same. Furthermore, both sides of the connection must belong to different LANs. The next steps explain how to configure VPN on The RV Wired Routers Series.
For the purpose of this article, the VPN configuration will be Gateway to Gateway.
This article explains how to set up a VPN Tunnel on RV016 RV042, RV042G and RV082 VPN Routers.
Applicable Devices
• RV016
• RV042
• RV042G
• RV082
Software Version
• v4.2.1.02
VPN Setup
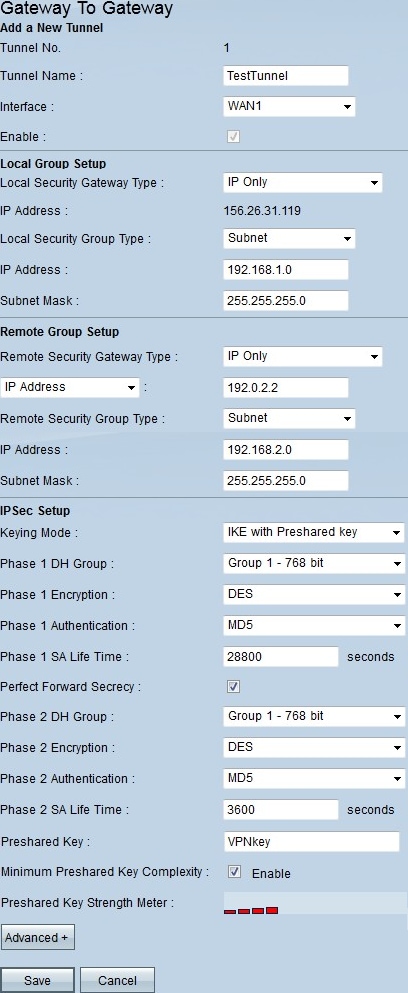
Step 1. Log in to the Web Configuration Utility page and choose VPN > Gateway to Gateway. The Gateway to Gateway page opens:
Note: To configure a client to gateway VPN tunnel, choose VPN > Client to Gateway.

Step 2. In the Tunnel Name field, enter the name of the VPN tunnel.
Step 3. In the Interface drop-down list, choose one of the available WAN interfaces. This is the interface that will establish the VPN tunnel with the other side.
Step 4. Under Local Group Setup, in the Local Security Gateway Type drop-down list, choose one of the Listed options:
• IP Only — Choose this option if your router is configured with an static IP address for Internet connectivity.
• IP + Domain Name (FQDN) Authentication — Choose this option if your router is configured with a static IP address and a registered domain name for Internet connectivity.
• IP + Email Address (User FQDN) Authentication — Choose this option if your router is configured with a static IP address for Internet connectivity and an email address will be use for authentication.
• Dynamic IP + Domain Name (FQDN) Authentication — Choose this option if your router is configured with a dynamic IP address and a dynamic domain name will be used for authentication.
• Dynamic IP + Email Address (User FQDN) Authentication — Choose this option if your router has a dynamic IP address for Internet connectivity, but does not have a dynamic domain name for authentication and instead an email address will be used for authentication.
Step 5. Under Local Group Setup, in the Local Security Group Type drop-down list, choose one of the options:
• IP Address — This option lets you specify one device that can use this VPN tunnel. You only need to enter the IP address of the device.
• Subnet — Choose this option to allow all devices that belong to the same subnet to use the VPN tunnel. You need to enter the network IP address and its respective subnet mask.
• IP Range — Choose this option to specify a range of devices that can use the VPN tunnel. You need to enter the first IP address and the last IP address of the range of devices.
Step 6. Under Remote Group Setup, in the Remote Local Security Gateway Type drop-down list, choose one of the following:
• IP Only — Choose this option if your router is configured with an static IP address for Internet connectivity.
• IP + Domain Name (FQDN) Authentication — Choose this option if your router is configured with a static IP address and a registered domain name for Internet connectivity.
• IP + Email Address (User FQDN) Authentication — Choose this option if your router is configured with a static IP address for Internet connectivity and an email address will be use for authentication.
• Dynamic IP + Domain Name (FQDN) Authentication — Choose this option if your router is configured with a dynamic IP address and a dynamic domain name will be used for authentication.
• Dynamic IP + Email Address (User FQDN) Authentication — Choose this option if your router has a dynamic IP address for Internet connectivity, but does not have a dynamic domain name for authentication and instead an email address will be used for authentication.
Step 7. If you choose IP Only as the remote local security gateway type, choose one of these options from the drop-down list below:
• IP — Choose this option to enter the IP address in the adjacent field.
• IP by DNS Resolved— Choose this option if you do not know the IP address of the remote gateway, then enter the name of the other router in the adjacent field.
Step 8. Under Remote Group Setup, in the Remote Security Group Type drop-down list, choose one of the following:
• IP Address — This option lets you specify one device that can use this VPN tunnel. You only need to enter the IP address of the device.
• Subnet — Choose this option to allow all devices that belong to the same subnet to use the VPN tunnel. You need to enter the network IP address and its respective subnet mask.
• IP Range — Choose this option to specify a range of devices that can use the VPN tunnel. You need to enter the first IP address and the last IP address of the range of devices.
Step 9. Under IPSec Setup, in the Keying Mode drop-down list, choose one of the options:
• Manual — This option lets you configure manually the key instead of negotiating the key with the other router in the VPN connection.
• IKE with Preshared Key — Choose this option to enable the Internet Key Exchange Protocol (IKE) which sets up a security association in the VPN tunnel. IKE uses a preshared key to authenticate a remote peer.
Step 10 . DH (Diffie - Hellman) is a key exchange protocol that allows both ends of the VPN tunnel to share an encrypted key. In the Phase 1 DH Group and Phase 2 DH Group drop-down lists, choose one of the following:
• Group 1 - 768 bit — Offers faster exchange speed, but lower security. If you need the VPN session to be fast and security is not an issue, then choose this option.
• Group 2 - 1024 bit — Provides more security than Group 1, but it has more processing time. This is a more balanced option in terms of security and speed.
• Group 3 - 1536 bit — Offers less speed but more security. If you need the VPN session to be secure, and speed is not an issue, then choose this option.
Step 11. In the Phase 1 Encryption and Phase 2 Encryption drop-down lists, choose one of the following for encryption and decryption of the key:
• DES — Data Encryption Standard, this is a basic algorithm for encryption of data which encrypts the key in a 56 bit packet.
• 3DES — Triple Data Encryption Standard, this algorithm encrypts the key in three 64 bit packets. It is more secure than DES.
• AES-128 — Advanced Encryption Standard, this algorithm uses the same key for encryption and decryption. It offers more security than DES. Its key size is 128 bits
• AES-192 — Similar to AES-128, but its key size is 192 bits.
• AES-256 — Similar to AES-128, but its key size is 256 bits. This is the most secure encryption algorithm available.
Step 12. In the Phase 1 Authentication and Phase 2 Authentication drop-down lists, choose one of these options:
• SHA1 — This algorithm produces a hash value of 160 bits. With this value, the algorithm checks for integrity in the data exchanged, and it makes sure the data has not changed.
• MD5 — This is an algorithm design for authentication purposes. This algorithm checks the integrity of the shared information between the two ends of the VPN tunnel. It produces a hash value which is shared to authenticate the key on both ends of the VPN tunnel.
Step 13. In the Phase 1 SA Lifetime and Phase 2 SA Lifetime fields, enter the time (in seconds) the VPN tunnel is active in a phase. The default value for Phase 1 is 28800 seconds. The default value for Phase 2 is 3600 seconds.
Note: Phase 1 and Phase 2 configuration must be the same on both routers.
Step 14. (Optional) Check the Perfect Forward Secrecy check box to enable perfect forward secrecy (PFS). With PFS, IKE Phase 2 negotiation will generate new data for encryption and authentication, which enforces more security.
Step 15. In the Preshared Key, enter the key both routers will share for authentication.
Step 16. (Optional) Check the Minimum Preshared Key Complexity check box to enable the Preshared Key Strength Meter which tells you the strength of the key you create.
Step 17. (Optional) To configure more advanced encryption options, click Advanced+.
Step 18. Click Save to save your configurations.
Advanced VPN Options
If you want to add more features to your VPN setup, the RV Wired Routers Series offers advanced options. These options enhance the security features of your VPN tunnel. These options are optional, but if you set advanced options on one router, make sure to set the same options on the other router. The next section explains these options.
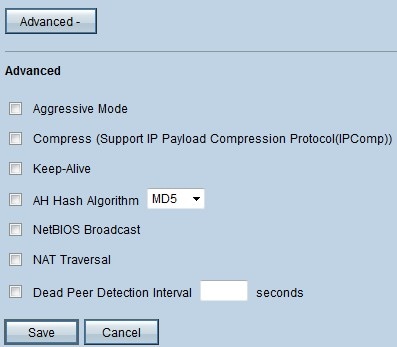
Step 1. In the IPSec field click on the Advanced+ button. The Advanced page opens:
Note: To configure the advanced options of a client to gateway VPN tunnel, choose VPN > Client to Gateway. Then click Advanced+.


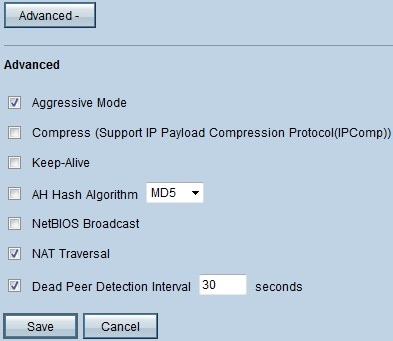
The picture above shows an example of a configuration of the advanced options.
Step 2. Under Advanced, check the options you would like to add to your VPN setup:
• Aggressive Mode — With this option, negotiation of the key is faster, which decreases security. Check the Aggressive Mode check box if you want to improve the speed of the VPN tunnel.
• Compress (Support IP Payload Compression Protocol (IP Comp)) — With this option, the IP Comp protocol will reduce the size of the IP datagrams. Check the Compress (Support IP Payload Compression Protocol (IP Comp)) check box to enable this option
• Keep Alive — This option attempts to re-establish the VPN session if it gets dropped. Check the Keep Alive checkbox to enable this option.
• AH Hash Algorithm — This option extends protection to the IP header to verify the integrity of the entire packet. Either MD5 or SHA1 can be used for this purpose. Check the AH Hash Algorithm check box and from the drop-down list, choose either MD5 or SHA1, to enable authentication of the entire packet.
• NetBIOS Broadcast — This is a Windows protocol that gives information about the different devices plugged in a LAN, such as printers, computers, and file servers. Normally, VPN doesn't transmit this information. Check the NetBIOS Broadcast check box to send these information across the VPN tunnel.
• NAT Traversal — Network Address Translation enables users in a private LAN to access Internet resources with the use of a public IP address as the source address. If your router is behind a NAT gateway, check the NAT Traversal check box.
• Dead Peer Detection Interval — Check the Dead Peer Detection Interval check box and enter (in seconds) the interval before the router sends another packets to check the connectivity of the VPN tunnel.
Step 3. Click Save to save your configurations.
Revision History
| Revision | Publish Date | Comments |
|---|---|---|
1.0 |
10-Dec-2018 |
Initial Release |
 Feedback