Deploy a Quick VPN Alternative for Mac OS on RV016, RV042, RV042G and RV082 VPN Routers
Available Languages
Objective
There is no Quick VPN version suitable for Mac OS. However, there is an increasing number of users who would like to deploy a Quick VPN alternative for Mac OS. In this article, IP Securitas is used as an alternative for a Quick VPN.
Note: You need to download and install the IP Securitas on your MAC OS before you start configuration. You can download it from the following link:
http://www.lobotomo.com/products/IPSecuritas/
This article explains how to deploy a Quick VPN alternative for Mac OS on Rv016, RV042, RV042G and RV082 VPN Routers.
Applicable Devices
• RV016
• RV042
• RV042G
• RV082
Software Version
• v4.2.2.08
Deploy a Quick VPN Alternative for Mac OS
Note: The VPN Client to Gateway configuration of the device needs to be done first. To know more how to configure VPN Client to Gateway refer to Set Up a Remote Access Tunnel (Client to Gateway) for VPN Clients on RV016, RV042, RV042G and RV082 VPN Routers.
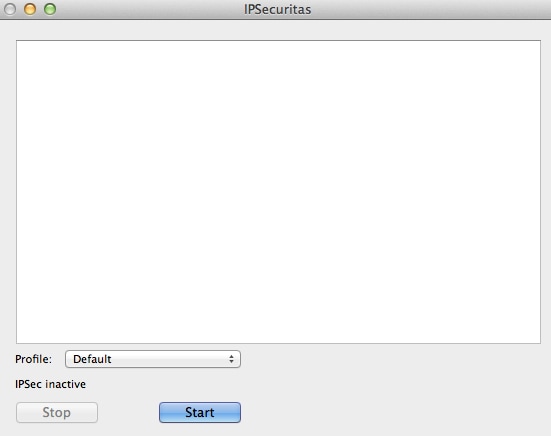
Step 1. Run the IP Securitas on the Mac OS. The IPSecuritas window appears:

Step 2. Click Start.

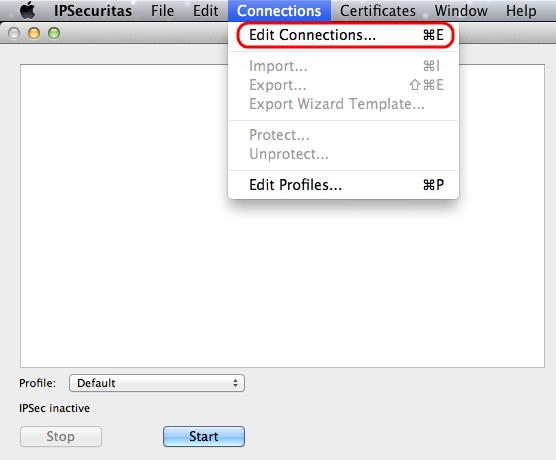
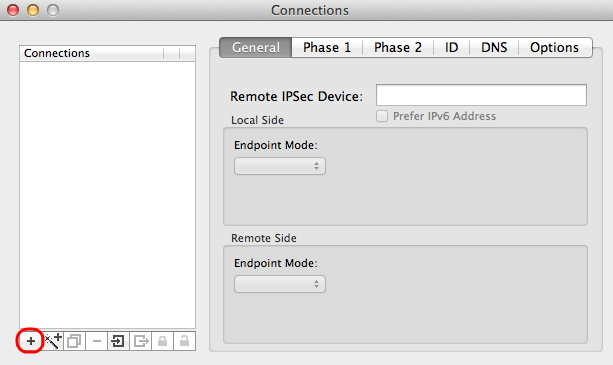
Step 3. From the menu bar, choose Connections > Edit Connections. The Connections window appears.

Step 4. Click the + icon to add a new connection.

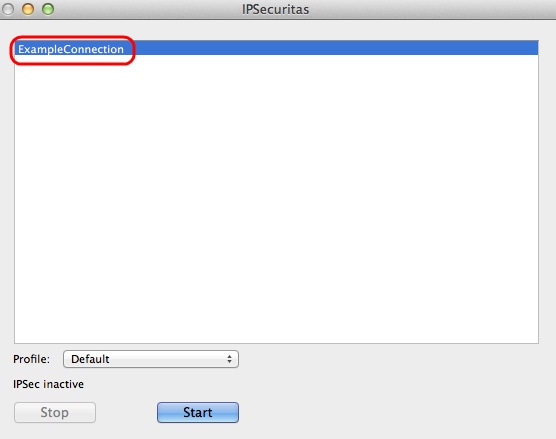
Step 5. Enter a name for the new connection under connections.
General

Step 1. Click the General tab.
Step 2. Enter the IP address of the remote router in the Remote IPSec Device field.
Note: You do not need to configure Local Side as this configuration is for remote client. You just need to configure Remote Mode.
Step 3. In the Remote Side area, choose Network from the Endpoint Mode drop-down list.
Step 4. Enter the subnet mask in the Network Mask (CIDR) field.
Step 5. Enter the remote network address in the Network Address field.
Phase 1
Phase 1 is the simplex, logical security association (SA) between the two ends of the tunnel to support secure authenticated communication.

Step 1. Click the Phase 1 tab.
Step 2. Enter the lifetime you entered during the configuration of the tunnel in the Lifetime field. If time expires, a new key is renegotiated automatically. The key lifetime can range from 1081 to 86400 seconds. The default value for Phase 1 is 28800 seconds.
Step 3. Choose the appropriate time unit for the Lifetime from the Lifetime drop-down list. The default is seconds.
Step 4. Choose the same DH Group which you entered for the configuration of the tunnel from the DH Group drop-down list. The Diffie-Hellman (DH) group is used for key exchange.
Step 5. Choose the encryption type from the Encryption drop-down list which you entered for the configuration of the tunnel. The Encryption method determines the length of the key used to encrypt/decrypt Encapsulating Security Payload (ESP) packets.
Step 6. Choose the authentication method which you entered for the configuration of the tunnel from the Authentication drop-down list. The type of authentication determines the method to authenticate ESP packets.
Step 7. Choose the appropriate exchange mode from the Exchange Mode drop-down list.
• Main — Represents exchange mode for all type of gateway except Full Qualified Domain Name (FQDN).
• Aggressive — Represents the exchange mode for Full Qualified Domain Name (FQDN) gateway.
Phase 2
Phase 2 is the security association to determine the security of the data packet during the data packets pass through the two end points.

Step 1. Click the Phase 2 tab.
Step 2. Enter the same lifetime in the Lifetime field which you entered for the the configuration of the tunnel and also Phase 1.
Step 3. Choose the same time unit of the lifetime from the Lifetime drop-down list which you entered for the configuration of the tunnel and Phase 1.
Step 4. Choose the same DH group from the Perfect Forwarding Secrecy (PFS) Group drop-down list which you entered for the the configuration of the tunnel.
Step 5. Uncheck all the unused Encryption and Authentication methods. Only check the ones defined under the Phase 1 tab.
ID

Step 1. Click ID tab.
Step 2. Choose the same method of local identifier as the tunnel from the Local Identifier drop-down list. Enter the appropriate value according to the type of local identifier if needed.
Step 3. Choose the same method of remote identifier as the tunnel from the Remote Identifier drop-down list. Enter the appropriate value according to the type of remote identifier if needed.
Step 4. Choose the same authentication method as the tunnel from the Authentication Method drop-down list. Enter the appropriate authentication value according to the type of authentication method if needed.
Step 5. Click the x icon (red circle) to close the connection window. This automatically saves the settings. The IPSecuritas window appears.
Connection

Step 1. In the IPSecuritas window, click Start. The user is then connected to access the VPN.
Revision History
| Revision | Publish Date | Comments |
|---|---|---|
1.0 |
12-Dec-2018 |
Initial Release |
 Feedback