Separate Two LAN Networks with Few Public IPs on RV042, RV042G and RV082 VPN Routers
Available Languages
Objective
Hosts which are in one VLAN (VLAN1 - 192.168.0.x from ports 1-7) should not communicate with the device in another VLAN (VLAN8- 192.168.0.26 to port 8) of the RV082 at the same time hosts from VLAN1 should have more priority over Internet traffic than clients from VLAN8. Here VLANs are used for security reasons and also to divide LAN on RV042, RV042G and RV082 VPN Routers. Various sections which are in this procedure are listed below:
• Basic LAN and WAN Settings
• How to add one-to-one NAT (Private to Public address)
• Setup priority for ports on VLAN's
• Managing bandwidth for particular VLAN
• How to choose port status for VLAN's
• How to check connectivity between the VLAN's
Applicable Devices
• RV042
• RV042G
• RV082
• Any consumer Linksys Router
Software Version
• v4.2.1.02
Topology
The VPN router uses one public IP for WAN1 interface, a few public IPs to use One-to-One NAT and explains how to map them to hosts inside a LAN.

One to One NAT:
Public address 1 ->192.168.0.1(RV082)
Public address 2 -> 192.168.0.26 (consumer router)
Public address 3 -> 192.168.0.100
Public address 4 -> 192.168.0.101
Public address 5-> 192.168.0.102
In consumer linksys router:
Ports 1 to 7 - VLAN 1
Port 8 - VLAN 8
Separate Two LAN Networks with Few Public IPs on RV082
Basic LAN and WAN Settings
This article is written with respect to the above topology.
Step 1. Use the web configuration utility to choose Setup > Network. The Setup page opens:

Step 2. In the LAN Settings field, enter the Device IP Address as 192.168.0.1 and the subnet mask as 255.255.255.0. By default, the IP address will be 192.168.1.1.

Step 3. In WAN Connection Type, for WAN1 drop-down list choose Static IP.

Step 4. In Specify WAN IP Address field, enter Public Address 1.
Step 5. Enter the related subnet mask for Public Address 1 in the subnet mask field.
Step 6. In the Default Gateway Address fields, enter the default gateway of public address 1.
Step 7. In DNS Server (Required) enter the first DNS IP address.
Step 8. In the 2 field, enter the second DNS IP address.
Step 9. Click Save Settings to save the changes.

Step 10. To see the changes made, click System Summary in the main tab and see the changes that is made in Network Setting Status.
Add one-to-one NAT from Private to Public IPs

Step 11. In the web configuration utility, choose Setup > One-to-One NAT. The One-to-One NAT page opens.
Step 12. In the One-to-One NAT field, check Enable.
Step 13. In the Private Address Begin field, enter 192.168.0.100.
Step 14. In Public Begin Range, enter Public Address 1.
Step 15. Enter the range length as 1.
Step 16. Click Update this Range.
Step 17. In the Private Address Begin, enter 192.168.0.101.
Step 18. In Public Begin Range, enter Public Address 2.
Step 19. Enter the range length as 1.
Step 20. Click Update this Range.
Step 21. In the Private Address Begin, enter 192.168.0.102.
Step 22. In Public Begin Range, enter Public Address 3.
Step 23. Enter the range length as 1.
Step 24. Click Update this Range.
Step 25. In the Private Address Begin, enter 192.168.0.26.
Step 26. In Public Begin Range, enter Public Address 4.
Step 27. Enter the range length as 1.
Step 28. Click Update this Range.
Step 29. Click Save Settings to save the changes.
Set Priority for Ports on VLANs
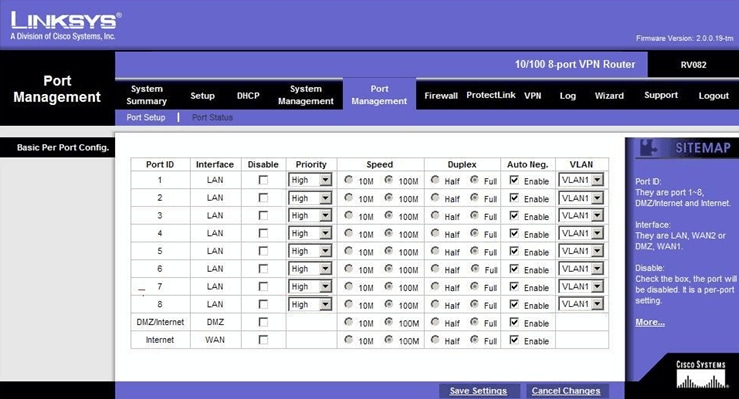
Step 30. In the web configuration utility, choose Port Management > Port Setup. The Basic Per Port Config. page opens:

• Port ID (1-7) — From the drop-down list choose the Priority as High.

• Port ID 8 — Choose the Priority as Normal and in the VLAN field, choose VLAN8.
Step 31. Click Save Settings to save the changes.
Bandwidth Management for VLAN8
Upstream Setup

Step 32. In the web configuration utility, choose System Management > Bandwidth Management. The Bandwidth Management page opens:

Step 33. In the Bandwidth Management field, click Rate Control.

Step 34. In the Interface field, check WAN1 in the interface field.
Step 35. In the Service drop-down list, choose All Traffic[TCP&UDP/1~65535].
Step 36. In the IP field, enter 26 in the first field and 26 in the next field.
Step 37. In the Direction drop-down list, choose Upstream.
Step 38. Enter the Max. Rate to be 200 kbit/sec.
Step 39. In the Enable field, check Enable.
Step 40. Click Update this application.
Downstream Setup

Step 41. In the Interface field, check WAN1 in the interface field.
Step 42. In the Service drop-down list, choose All Traffic[TCP&UDP/1~65535].
Step 43. In the IP field, enter 26 in the first box and 26 on the next box.
Step 44. In the Direction drop-down list, choose Downstream.
Step 45. Enter the Max. Rate to be 4096 Kbit/sec.
Step 46. In the Enable field, check Enable.
Step 47. Click Update this application.
Step 48. Click Save Settings to save the changes.
How to Check Port status of 2 VLANs and Ports
Port Status of VLAN 1-7
Step 49. From the drop-down list choose any Port ID from 1-7. Here, Port ID 2 is chosen.

Note : Under summary and statistics verify the following.
• Verify that the Priority is High.
• Verify that the VLAN is VLAN1.
• In the statistics field, verify that the received packet and byte count, transmitted packet and byte count and error count.
Status of VLAN 8

Step 50. From the drop-down list choose Port ID: 8.
Note: Especially port 8 is chosen to see whether it has been setup right.
Under summary and statistics verify the following. These verifications are done to see whether the port has been setup properly:
• Verify that the Priority is Normal.
• Verify that the VLAN is VLAN8.
• In the statistics field, verify the received packet and byte count, transmitted packet and byte count and error count.
How to Check Connectivity between VLANs
Step 51. In the web configuration utility, choose System Management > Diagnostic. The Diagnostic page opens:

Step 52. Click Ping.
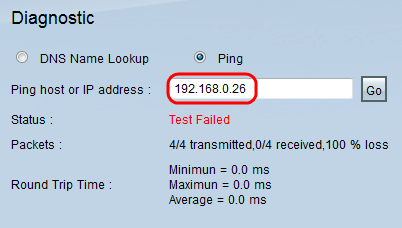
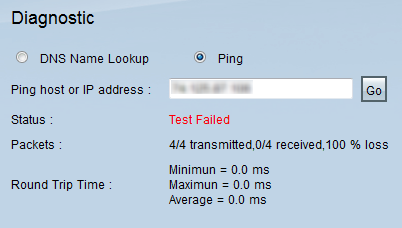
Step 53. In Ping host or IP address field, enter 192.168.0.26 and click Go.
Note: The status says Test Failed and the packet loss will be 100%. It means that any hosts which are connected to ports in VLAN1 (port1-7) cannot ping IP 192.168.0.26 which is in VLAN 8 on port 8 of RV082.
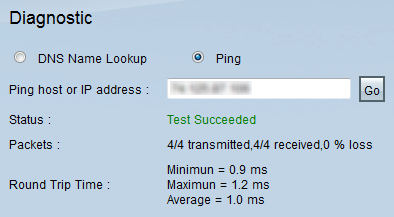
Step 54. Again in Ping host or IP address field, enter ISP address and click Go.
Note: The status says Test Succeeded and the packet loss will be 0%. It means that 192.168.0.1(RV082) can reach the ISP.
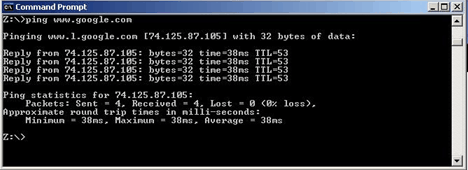
The above image shows that the clients on RV082 can reach www.google.com. Hosts connected to LAN of consumer router which get IP from DHCP of that router can ping and access Internet.
Hosts from LAN of consumer router cannot ping private IPs of RV082 which are inside of VLAN1.
Revision History
| Revision | Publish Date | Comments |
|---|---|---|
1.0 |
12-Dec-2018 |
Initial Release |
 Feedback