Configuration on Gateway-to-Gateway VPN tunnel using DynDNS on one side of the tunnel on RV016, RV042, RV042G and RV082 VPN Routers
Available Languages
Objectives
A Dynamic Domain Name System (DDNS) allows Internet access to the server using a domain name rather than an IP address. DDNS also maintains IP address information even when the client receives a dynamic IP assignment subject to constant change by the ISP. With this configuration, the server is always available regardless of the IP address. This service is only usable after you establish an account with a DDNS service provider.
The objective of this document is to explain how to configure a Gateway to Gateway VPN using DynDNS on local group side, and Static IP with registered domain name on the Remote group side for RV016, RV042, RV042G and RV082 VPN Routers.
Applicable Devices
• RV016
• RV042
• RV042G
• RV082
Software Version
• 4.2.2.08
VPN Tunnel Configuration
Configure DDNS
Step 1. Visit www.dyndns.org and register a domain name.
Step 2. Log in to the Router Configuration Utility and choose Setup > Dynamic DNS. The Dynamic DNS page opens.
Step 3. Click the Edit icon for WAN1.

The Edit Dynamic DNS Setup page opens:
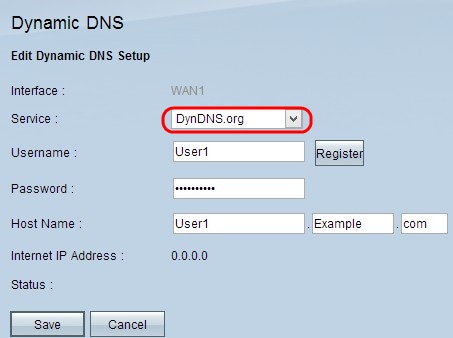
Step 4. Choose DynDNS.org from the Service drop-down list.
Step 5. In the Username field, enter your DynDNS.org account Username information.
Step 6. In the Password field, enter the password corresponding to the Username registered at DynDNS.org
Step 7. Enter your host name in the Host Name field.
Note: The two remaining fields on the Edit Dynamic DNS Setup page display information and are non-configurable:
• Internet IP Address— Displays the router's IP address. This address will change because it is dynamic.
• Status— Displays the status of the DDNS. If there is an error, make sure you have entered the DDNS information correctly.
Step 8. Click Save.
Configure VPN Tunnel From Site 1 to Site 2
Step 9. Log in to the Router Configuration Utility and choose VPN > Gateway to Gateway. The Gateway to Gateway page opens:

Note: Before navigating away from this page, click Save to save the settings, or click Cancel to undo them.
Step 10. In the Tunnel Name field, enter a name for the VPN tunnel between site 1 and site 2.

Note: The Tunnel Name is just for reference and does not have to match the name used at the other end of the VPN tunnel.
Step 11. Choose the WAN port to use for this tunnel from the Interface drop-down list.
Step 12. Check Enable to enable the VPN tunnel. The check box will be disabled once the VPN tunnel is created.
Step 13. In the Local Group Setup area, choose Dynamic IP + Domain Name (FQDN) Authentication from the Local Security Gateway Type drop-down list.
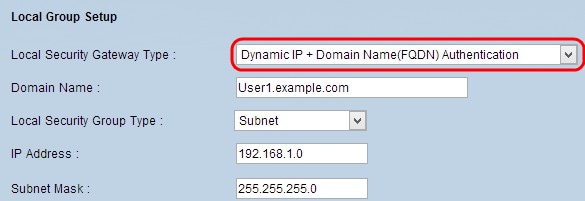
Step 14. In the Domain Name field, enter the Registered DynDNS domain name.
Step 15. Choose Subnet from the Local Security Group Type drop-down list. The Local Security Group Type defines which LAN resources can use the VPN tunnel.

Step 16. Enter the IP address in the IP Address field.
Step 17. Enter the subnet mask in the Subnet Mask field.
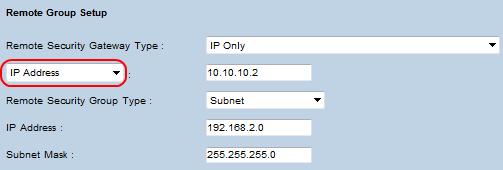
Step 18. In the Remote Group Setup area, choose IP Only from the Remote Security Gateway Type drop-down list.

Step 19. Choose IP by DNS Resolved from the next drop-down list to specify one device.
Step 20. After selecting IP by DNS Resolved from the drop-down list, enter the registered domain name of the router in the field beside it.
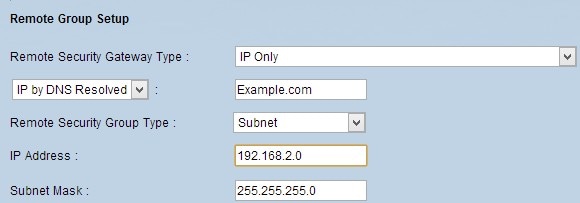
Step 21. Choose Subnet from the Remote Security Group Type drop-down list. The Remote Security Group Type specifies which resources on the remote LAN can access the VPN tunnel.
Step 22. Enter the subnetwork IP address in the IP Address field.
Step 23. Enter the subnet mask in the Subnet Mask field.
Step 24. Under the IP Sec Setup area, find the Preshared Key field, and enter a preshared key to use to authenticate the remote IKE peer. Up to 30 keyboard characters and hexadecimal values can be entered. Both ends of the VPN tunnel must use the same preshared key. The rest of the fields in the IPSec Setup area may use default values.
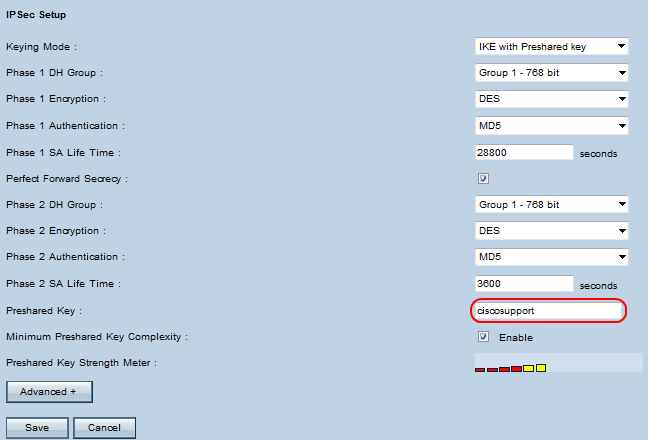
Step 25. Click Save to save the changes.
Note: Configure the other router by following Steps 9 through 25 with the configuration for Local Group Setup and Remote Group Setup switched. The configuration done in the Local Group Setup area for the first router will be the configuration in the Remote Group Setup area on the second router.
Revision History
| Revision | Publish Date | Comments |
|---|---|---|
1.0 |
11-Dec-2018 |
Initial Release |
 Feedback